Konica Minolta 7115F Instruction Manual Download Page 162

7

Fax Transmission/Reception Methods

7-22

Konica 7115F/7118F

Mailbox Reception

If mailbox numbers and F codes (mailbox IDs and passwords) have 
already been programmed on this machine, this function can be used to 
receive only those faxes  with an identical mailbox ID and password 
specified by the caller.

Since the received fax can only be retrieved after entering the 
corresponding mailbox ID, confidential faxes can safely be sent and 
received.

For details on programming the mailboxes, refer to “Setting Up Mailboxes 
(“MAILBOX” function)” on page 10-29.

To retrieve a document from a mailbox
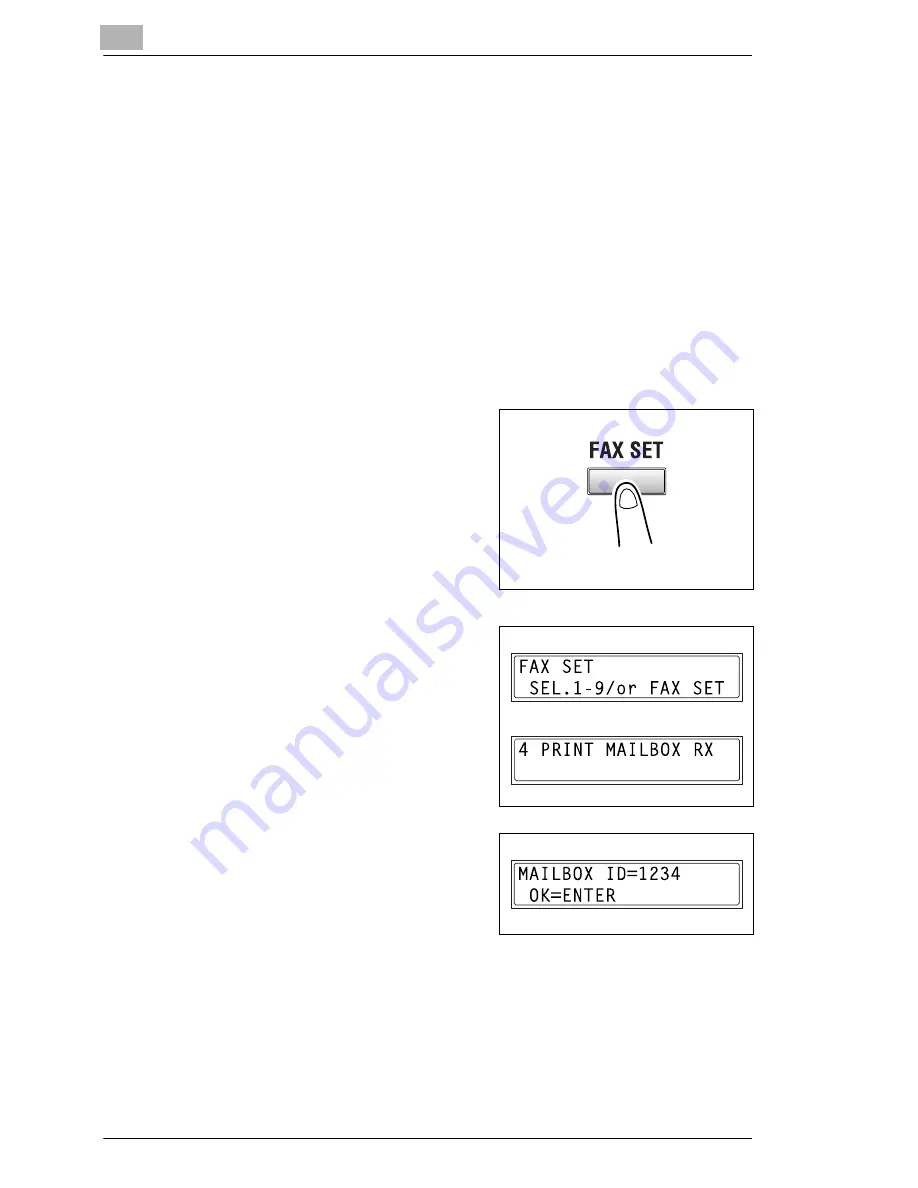
1

Press the [FAX SET] key.

2

Press the [4] key from the KEYPAD.

or

Press the [FAX SET] key 4 times to 
select “PRINT MAILBOX RX”, and 
then press the [ENTER] key.

A screen appears, allowing you to 
enter the mailbox ID.

3

Using the KEYPAD, enter the 4-digit 
mailbox ID, and then press the 
[ENTER] key.

Summary of Contents for 7115F

Page 1: ...7115F 7118F FK 117...

Page 2: ...s for energy efficiency What is an ENERGY STAR Product An ENERGY STAR product has a special feature that allows it to automatically switch to a low power mode after a period of inactivity An ENERGY ST...

Page 3: ...EL 1 9 Ozone Release 1 9 Notice for Ni MH Batteries 1 9 1 3 About the Instruction Manual 1 10 Explanation of Manual Conventions 1 10 key 1 10 1 4 Explanation of Basic Concepts and Symbols 1 11 Paper F...

Page 4: ...Settings 3 24 Auto Reset 3 24 Power Save Mode Preheat Mode 3 25 Auto Shut Off 3 25 Queued Copy Jobs 3 25 Interrupting Copy Jobs 3 26 Auto Paper Source Change Feature 3 26 ID Numbers 3 26 To enter an I...

Page 5: ...position translucent or transparent documents 4 6 To position a book 4 7 4 2 Making Copies 4 9 To make a simple copy 4 9 4 3 Selecting the Paper Source 4 11 To make copies using the APS function 4 11...

Page 6: ...ge function 5 12 5 5 Making Copies for Filing Image Shift function 5 13 Precautions on the Binding Margin Location 5 13 To make copies using the Image Shift function 5 13 5 6 Programmed Copy Jobs 5 14...

Page 7: ...n 7 4 Timer Transmission 7 7 To fax using timer transmission 7 7 Mailbox Transmission 7 9 To fax using mailbox transmission 7 9 Relay Initiation Transmission 7 11 To fax using relay initiation transmi...

Page 8: ...printing density PRINT DENSITY function 9 8 To set the LCD CONTRAST function 9 8 To set the BUZZER VOLUME function 9 9 To set the LANGUAGE function 9 9 To set the INITIAL MODE function 9 10 9 2 Settin...

Page 9: ...IORITY function 9 39 To set the 4 IN 1 COPY ORDER function 9 39 To set the CRISSCROSS MODE function 9 40 10 Initial Set Mode Fax Functions 10 1 Programming Fax Settings FAX REGISTRATION Menu 10 1 To s...

Page 10: ...ansmission Copy mode is allowed OT DIAL IN COPY function 10 38 10 3 Specifying Reception Settings RX OPERATION Menu 10 39 To select the RX OPERATION menu 10 41 To select the memory reception mode MEMO...

Page 11: ...age LOAD PAPER Appears 12 1 To load paper into the 1st Tray 12 1 To load paper into the 2nd Tray 12 3 To load paper into the Multiple Bypass Tray 12 4 12 2 When the Message TONER EMPTY Appears 12 5 To...

Page 12: ...ray MT 102 14 4 14 2 List of Initial Set Function Confirm Menu Commands 14 5 Initial Set Menu Commands 14 5 14 3 Care of the Machine 14 9 Cleaning 14 9 Housing 14 9 Platen Glass 14 9 Document Pad 14 9...

Page 13: ...7118F Before using this machine be sure to read the Instruction Manual thoroughly in order to ensure that you use the machine efficiently After you have gone through the manual store it in the holder...

Page 14: ...Please read the next section before using this device It contains important information related to user safety and preventing equipment problems Make sure you observe all of the precautions listed in...

Page 15: ...utlet and then call your authorized Konica Service Representative In principle do not use an extension cord Use of an extension cord could cause fire or electrical shock Contact your authorized Konica...

Page 16: ...are susceptible to magnetism They could cause these products to mal function The inside of this product has areas subject to high temperature which may cause burns When checking the inside of the unit...

Page 17: ...uct in an environment with a temperature outside the range specified in the Instruction Manual as breakdown or malfunction could result Do not attempt to feed stapled paper carbon paper or aluminum fo...

Page 18: ...one port is not specifically designed for 3 wire connected equipment 3 wire connected equipment might not respond to incoming ringing when attached to this port For compliance with Telecom s Specifica...

Page 19: ...beam cannot escape from the machine during any phase of user operation This machine is certified as a Class 1 laser product This means the machine does not produce hazardous laser radiation Internal L...

Page 20: ...laser The maximum power of the laser diode is 5 mW and the wavelength is 770 795 nm Laser Safety Label A laser safety label is attached to the outside of the machine as shown be low Laser Aperture of...

Page 21: ...unpleasant odor may however be created in poorly ventilated rooms during extensive machine operations For a comfort able healthy and safe operating environment it is recommended that the room well ven...

Page 22: ...the machine Note May also appear as Important or Tip Text highlighted in this manner contains useful information and tips to ensure safe use of the machine and serve as supplementary information It is...

Page 23: ...of words and symbols in this manual are explained below Paper Feeding During printing paper is supplied from the right side of the machine and fed into the Exit Tray on top with the printed surface o...

Page 24: ...n the illustration and the second to the length shown as B A Width B Length Paper Orientation Lengthwise If the width A of the paper is shorter than the length B the paper has a vertical or portrait o...

Page 25: ...rect sunlight A location out of the direct airflow of an air conditioner or heater and not exposed to extremely high or low temperatures A well ventilated location A location that is not exposed to hi...

Page 26: ...and mainte nance adhere to the recommended space requirements detailed below Note Be sure to allow a clearance of 100 mm or more at the back of the machine and 150 mm or more at the right of the machi...

Page 27: ...aper misfeed could result Never bring any magnetized object near the machine Never use flammable sprays or liquids near the machine Always make sure that the power plug is completely plugged into the...

Page 28: ...g the machine supplies toner paper etc Store the supplies in a location that meets the following requirements Free from direct sunlight Away from any heating apparatus Not subjected to high humidity N...

Page 29: ...ertificates Legal Documents G Food stamps G Postage stamps canceled or uncanceled G Checks or drafts drawn by government agencies G Internal revenue stamps canceled or uncanceled G Passports G Immigra...

Page 30: ...2 Precautions 2 6 Konica 7115F 7118F...

Page 31: ...pies or Faxing 3 1 Available Copy Features The main copy functions available with this machine are listed below For details on their operation refer to the pages indicated Copying p 5 1 G Single sided...

Page 32: ...3 Before Making Copies or Faxing 3 2 Konica 7115F 7118F Zoom function p 4 21 G Reduced full sized enlarged G X Y Zoom function p 4 23...

Page 33: ...opies or Faxing 3 Konica 7115F 7118F 3 3 Output p 5 5 G Sort function G Group function G Crisscross output sorting G Crisscross output grouping Note The required options differ depending on the desire...

Page 34: ...3 Before Making Copies or Faxing 3 4 Konica 7115F 7118F Special features G Erase function p 5 9 G Reverse Image function p 5 12 G Image Shift function p 5 13...

Page 35: ...efore Making Copies or Faxing 3 Konica 7115F 7118F 3 5 Mixed Original function p 4 2 G Mixed originals Note The Mixed Original function is only available when an Automatic Document Feeder is installed...

Page 36: ...or Faxing 3 6 Konica 7115F 7118F 3 2 Available Fax Features Sending G Broadcast transmission p 7 4 G Timer transmission p 7 7 G Relay initiation transmission p 7 11 G Polling transmission p 7 16 Tran...

Page 37: ...Faxing 3 Konica 7115F 7118F 3 7 Receiving G Memory reception p 7 21 G Polling reception p 7 23 G Mailbox reception p 7 22 G Forwarding p 10 46 Receive Transmission request A B Mailbox Mailbox ID Fax P...

Page 38: ...Document Feeder DF 217 optional Automatically feeds one document page at a time for scanning G Paper Feed Cabinet PF 121 optional Includes a paper tray that can be loaded with up to 250 sheets of cop...

Page 39: ...nal Internal printer controller that allows this machine to be connected to a computer and used as a printer G Network Interface Card KN 305 optional Allows this machine to be used as a printer over a...

Page 40: ...fore Making Copies or Faxing 3 10 Konica 7115F 7118F 3 4 Part Names and Their Functions Main Unit The illustration above shows the optional Original Cover Kit installed 1 2 3 6 4 5 13 14 15 12 11 10 8...

Page 41: ...Serial Interface Connector Used for connecting the RS232C interface cable when this machine is used for PC faxing and PC scanning 9 Network Interface Connector Used for connecting the network cable wh...

Page 42: ...Name Description 1 Imaging Unit Creates the copy image Replacement of the Imaging Unit must be performed by your authorized Konica Service Representative 2 Toner Bottle Holder Opened when replacing th...

Page 43: ...Description 1 Document Exit Tray Collects documents that have been scanned 2 Document Guide Plate Adjusted to the size of the document p 4 1 3 Document Feeder Cover Doc Feed Cover Opened when clearing...

Page 44: ...Konica 7115F 7118F Multiple Bypass Tray Optional 5 6 No Part Name Description 5 Bypass Tray Holds up to 50 sheets plain paper or 20 sheets special paper of paper p 4 17 6 Bypass Tray Extender Pulled...

Page 45: ...Name Description 7 2nd Tray Holds up to 250 sheets of paper plain paper With the Konica 7118 7118F up to four Paper Feed Cabinets can be installed With the Konica 7115 7115F one Paper Feed Cabinet can...

Page 46: ...3 Before Making Copies or Faxing 3 16 Konica 7115F 7118F Shifting Unit Optional 12 No Part Name Description 12 Copy Tray Collects fed out copies that have been sorted...

Page 47: ...17 Job Tray Optional With the Job Tray installed 13 14 15 No Part Name Description 13 Copy Tray Lamp Lights up when paper is fed into the Upper Copy Tray 14 Upper Copy Tray Collects computer printouts...

Page 48: ...two copy programs can be stored 4 JOB RECALL key Used to recall a stored copy program 5 X Y ZOOM key Used to specify different scaling proportions for the vertical and horizontal directions 6 IMAGE SH...

Page 49: ...sion PRINT MAILBOX RX retrieve mailbox faxes POLLING TX polling transmission POLLING RX polling reception RELAY INITIATE relay initiation transmission CANCEL RESERV cancel queued job TX MODE transmiss...

Page 50: ...on 29 AUTO RESET key Cancels all copy functions and returns them to their default settings Deletes all queued jobs p 3 24 Cancels all fax functions and returns them to their default settings Queued ti...

Page 51: ...ter Scan mode The indicator lights up in green to indicate that the machine is in Scan mode Available only when the Internet Fax Network scan kit is installed 37 KEYPAD Used to specify the number of c...

Page 52: ...ted the paper type is displayed AUTO or a paper tray and paper size paper type 4 Fax status Sub messages Indicates the current faxing status Messages describing the current status such as when warming...

Page 53: ...yed during standby 2 Messages Displays messages such as operating instructions Symbol Description Manual bypass Paper is loaded in the Manual Bypass Tray Custom paper size The paper setting for the Ma...

Page 54: ...s press the AUTO RESET key to return all functions to their defaults and then select the desired settings Auto Reset The machine automatically resets all modes and functions to their defaults one minu...

Page 55: ...tivates while the machine is in Power Save mode the machine is automatically turned off Tip The length of time until the machine automatically enters Power Save mode can be set between 1 min and 240 m...

Page 56: ...Table on page 14 11 Auto Paper Source Change Feature If the paper tray runs out of paper while copying the machine will automatically switch to a different paper source and continue copying provided t...

Page 57: ...pying can be started Select the desired settings 4 When you are finished making copies press the ID key Printing From the Computer If the optional Printer Controller is installed the machine can be us...

Page 58: ...ansmissions receptions are finished before turning the machine OFF Note When the machine is turned off all settings except the stored copy programs and Initial Set mode settings are reset to their def...

Page 59: ...3 C 73 4 F Default Settings The settings that are automatically selected when the machine is turned off or the AUTO RESET key is pressed are called the default settings These settings serve as a refer...

Page 60: ...characters available with each one touch dial key Repeatedly press the one touch dial key to scroll through the corresponding characters and symbols listed until the desired character appears in the d...

Page 61: ...t location NAME _ Press the MNO key twice NAME N Press the JKL key once NAME NJ Press the Space key once NAME NJ Press the MNO key 3 times NAME NJ O Press the def key 3 times NAME NJ Of Press the key...

Page 62: ...ress the Delete key one touch dial key 27 G To change an entered character use the and keys to move the cursor _ to the character that you wish to change and then enter the new character The character...

Page 63: ...his machine check these settings Required Settings Before using the machine the following must be specified G Current date time G User fax number G Phone dialing system G Communication external intern...

Page 64: ...e is set on a 24 hour system 5 Using the KEYPAD enter the date year month and day For the year enter the last two digits In the screen that allows you to set the time and date press the and keys to mo...

Page 65: ...he fax number are the number keys 0 through 9 Space and 1 Press the INITIAL SET key The first screen of the Initial Set mode appears 2 Press the key 11 times to select INITIAL USER DATA 3 From the KEY...

Page 66: ...er name can be a maximum of 32 characters long 1 Press the INITIAL SET key The first screen of the Initial Set mode appears 2 Press the key 11 times to select INITIAL USER DATA 3 From the KEYPAD press...

Page 67: ...e correct setting after checking which type of dialing system is used To specify the telephone dialing system 1 Press the INITIAL SET key The first screen of the Initial Set mode appears 2 Press the k...

Page 68: ...sion number is programmed in the key To specify the telephone wiring system 1 Press the INITIAL SET key The first screen of the Initial Set mode appears 2 Press the key 9 times to select COMM SETTING...

Page 69: ...pecifications Paper types Plain paper 60 g m2 to 90 g m2 and recycled paper Paper sizes A3L to A5C F4 210 mm 330 mm In inches 11 17 L to 5 1 2 8 1 2 C Paper capacity 250 sheets Manual Bypass Tray Spec...

Page 70: ...he corresponding paper size p 4 19 G If cards OHP transparencies or postcards are loaded into the 1st Tray select the appropriate setting using the TRAY1 PAPER function in the Initial Set mode p 9 14...

Page 71: ...an inkjet printer Paper that is either extremely thick or extremely thin Folded curled rolled wrinkled or torn paper Perforated paper or paper with punched holes Extremely smooth or extremely rough p...

Page 72: ...chine is being used to print from a host computer the image cannot be printed within the area 4 mm from all edges of the paper Paper Storage Observe the following precautions when storing copy paper G...

Page 73: ...ay occur Document feed method Document type Document size Automatic Document Feeder Sheet documents Single sided documents Capacity 50 g m2 to 110 g m2 Documents of mixed sizes Capacity 60 g m2 to 90...

Page 74: ...bon backed paper Precautions for Positioning Documents on the Platen Glass The following precautions should be observed when positioning the above listed types of documents on the Platen Glass G For d...

Page 75: ...up into the Automatic Document Feeder Have the necessary precautions been observed when loading the document A maximum of 50 document pages can be loaded Do not load so many pages that the top of the...

Page 76: ...nced Copy Operations on page 5 1 4 Press the START key to begin feeding and copying the loaded document pages starting from the top page To load documents of mixed sizes Documents containing pages of...

Page 77: ...e the necessary precautions been observed when loading the document A maximum of 50 document pages can be loaded Do not load so many pages that the top of the stack is higher than the mark Be sure to...

Page 78: ...a 7115F 7118F 5 Press the APS AMS key until the APS function is selected Check that AUTO appears in the bottom line of the screen 6 Press the START key to begin feeding and copying the loaded document...

Page 79: ...or the Automatic Document Feeder if it is installed 2 Position the document to be copied face down on the Platen Glass 3 Align the document on the scales above and to the left of the Platen Glass 4 Ca...

Page 80: ...c Document Feeder if it is installed 2 Position the document to be copied face down on the Platen Glass 3 Align the document on the scales above and to the left of the Platen Glass 4 Place a blank she...

Page 81: ...the book on the Platen Glass Do not place objects weighing more than 3 kg on the Platen Glass In addition do not press down extremely hard on the document otherwise the machine may be damaged 3 Caref...

Page 82: ...7115F 7118F 4 Press the ORIGINAL key to light the DUAL PAGE indicator 5 Select the desired copy settings For details refer to Making Copies on page 4 9 and Advanced Copy Operations on page 5 1 6 Press...

Page 83: ...edure describes how to load documents and make a simple copy of it To make a simple copy 1 Press the COPY key to enter Copy mode 2 Load the document to be copied Refer to Loading the Document on page...

Page 84: ...sing the KEYPAD enter the desired number of copies The number of copies can be set to any number between 1 and 99 5 Press the START key The set number of copies are made To stop copying before the set...

Page 85: ...size of the document and the specified G Manual paper selection The paper tray containing the paper that you wish to use can be selected Note The Automatic Document Feeder optional is needed for copyi...

Page 86: ...esired paper size and then press the START key again To copy with a manually selected paper size 1 Load the document to be copied Refer to Loading the Document on page 4 1 2 Press the PAPER SIZE key a...

Page 87: ...rds are loaded into the 1st Tray first set the TRAY1 PAPER function in the PAPER SOURCE SETUP menu of the Initial Set mode To specify the size of paper loaded into the 1st Tray TRAY1 PAPER function on...

Page 88: ...types G Plain or recycled paper thickness 60 g m2 to 90 g m2 G Special paper Cards thickness 91 g m2 to 157 g m2 OHP transparencies Postcards Label sheets Paper sizes G Maximum 297 mm to 432 mm G Mini...

Page 89: ...heet of paper with the front side facing down lightly sliding the paper as much as possible into the feed slot The manual bypass mark appears in the bottom line of the screen Is a card or a postcard l...

Page 90: ...6 Press the ENTER key 7 If necessary specify any other copy settings Zoom p 4 21 Copy density p 4 25 8 Press the START key Tip To copy onto more pages using the same settings feed paper into the Manua...

Page 91: ...of the paper and then load the paper with the front side facing down lightly sliding the paper as much as possible into the feed slot The manual bypass mark appears in the bottom line of the screen Ar...

Page 92: ...d press the key CUSTOM and then use the KEYPAD to enter the paper size For details refer to page 4 19 If OHP was selected in step 3 set the paper size to A4 C or A4 L 6 Press the ENTER key 7 If necess...

Page 93: ...e entered in millimeters 1 Load the document to be copied 2 Load the paper into the Manual Bypass Tray 3 Press the NO key and then use the and keys to select the type of paper loaded 4 Press the YES k...

Page 94: ...aded paper The paper width can be set between 90 mm and 297 mm If you wish to correct the entered setting press the NO key and then use the KEYPAD to enter the new number 9 Press the ENTER key 10 If n...

Page 95: ...ratio is automatically selected based on the size of the document loaded and the specified paper size Preset zoom ratios The following common zoom ratios for copying from various standard document siz...

Page 96: ...pies using a specific zoom setting 1 Load the document to be copied Refer to Loading the Document on page 4 1 2 Press the LENS key and then select the desired zoom ratio To select a specific zoom rati...

Page 97: ...ements Press the NO key to return to the zoom ratio before it was changed The zoom ratio can be changed by using the LENS key Each press of the LENS key changes the zoom ratio as shown below 0 50 0 70...

Page 98: ...ic Copy Operations 4 24 Konica 7115F 7118F 5 If necessary specify any other copy settings Paper p 4 11 Copy density p 4 25 6 Enter the number of copies to be made on the KEYPAD and then press the STAR...

Page 99: ...der to prevent the image on the back of newspaper or magazine articles from appearing in the copy press the key to select a level toward LIGHT In order to copy pale colors in bright areas of an image...

Page 100: ...the DENSITY SET key to select between the A AUTO PHOTO and TEXT settings The current setting appears on the left side of the screen 3 If the PHOTO or TEXT setting was selected use the and keys to adj...

Page 101: ...lable while a copy job is interrupted For details refer to Function Combination Table on page 14 11 To interrupt a copy job 1 Press the INTERRUPT key The Interrupt indicator lights up and the current...

Page 102: ...en press the START key to copy the other document 5 After the other document is copied press the INTERRUPT key The INTERRUPT indicator goes off and all copy functions return to their previous settings...

Page 103: ...ded copies A single sided copy is produced from a single sided document G 2 in 1 copy function A single sided copy is produced from two single sided document pages Important This function is only avai...

Page 104: ...2 in 1 or 4 in 1 indicator Do you know the copy order for the 4 in 1 copy function The copy order can be set to one of the two shown at the right For details on changing the copy order refer to To se...

Page 105: ...ng the BINDING POS function in the Initial Set mode p 9 35 3 To erase the area around the text and or the binding of the book press the ERASE key to select the desired erase setting There are three er...

Page 106: ...in 1 mm increments The default setting is 10 mm The width of the erased area for the Center setting is fixed at 10 mm The width of the erased area for the Frame setting can be changed using the ERASE...

Page 107: ...a copy of each page sorted or by pages grouped Output methods G Non sort The copies are stacked on top of each other as they are fed out G Sort function The copies are automatically divided into sets...

Page 108: ...fted sorting Sets containing one copy of each page are fed out in an alternating shifted pattern The Automatic Document Feeder and Shifting Unit must be installed G Crisscross sorting Sets containing...

Page 109: ...ies of a single page are fed out in an alternating shifted pattern The Automatic Document Feeder and Shifting Unit must be installed G Crisscross grouping Sets containing all copies of a single page a...

Page 110: ...atic Document Feeder Refer to Loading the Document on page 4 1 2 Press the OUTPUT key to light the indicator for the desired Output function Are neither the Sort nor the Group indicators lit The Non s...

Page 111: ...e copy G Top erase setting The top of the document is erased from the copy G Frame erase setting A frame around the document is erased from the copy G Fold erase setting A section along the center of...

Page 112: ...ons 5 10 Konica 7115F 7118F Precautions on the Erased Margin Location The location of the erased area in the copy depends on how the document is positioned Erase setting Platen Glass Automatic Documen...

Page 113: ...is erased The width of the erased area for the Left Top and Frame settings can be set between 5 mm and 20 mm in 1 mm increments The default setting is 10 mm The width of the erased area for the Fold s...

Page 114: ...eas of the document text inverted To make copies using the Reverse Image function 1 Load the document to be copied Refer to Loading the Document on page 4 1 2 Press the REVERSE IMAGE key to light the...

Page 115: ...e Shift function 1 Load the document to be copied Refer to Loading the Document on page 4 1 2 Press the IMAGE SHIFT key to light the IMAGE SHIFT indicator Do you know how large of a binding margin is...

Page 116: ...s warming up or while a copy job is paused Interrupt mode To store a copy program 1 Select the copy settings to be stored as the copy program 2 Press the JOB STORE key 3 Using the and keys select the...

Page 117: ...l a copy program 1 Load the document to be copied Refer to Loading the Document on page 4 1 2 Press the JOB RECALL key 3 Using the and keys select the program number of the copy program that you wish...

Page 118: ...5 Advanced Copy Operations 5 16 Konica 7115F 7118F...

Page 119: ...ze no larger than that shown below can be fed G If the length of the document exceeds 1000 mm the machine assumes that a paper misfeed has occurred and stops scanning G When using the Super Fine setti...

Page 120: ...ocuments on the Platen Glass G The fax document sizes that can be set using the Control Panel are A4 L A4 C B4 L and A3 L p 6 5 This machine scans the scanning area for the document size that is set C...

Page 121: ...f the document Load the document face up 3 If necessary change the Resolution setting p 6 8 4 Using the KEYPAD enter the fax number of the recipient The fax number of a previously programmed recipient...

Page 122: ...d If the image is not rotated it is sent as a document with the width of an A3 size page To cancel the transmission If you wish to cancel a scanned document queued for transmission or a fax waiting to...

Page 123: ...document on the scales above and to the left of the Platen Glass If the Automatic Document Feeder is not installed skip to step 4 3 Press the BOOK TX key Even when faxing sheet documents positioned on...

Page 124: ...on the Platen Glass when the screen shown at the right appears and then press the YES key Repeat step 8 until all pages of the document have been scanned To change the document size before pressing t...

Page 125: ...nt correctly the machine automatically redials the fax number and tries sending the fax again If the fax could not be sent correctly after redialing the transmission result report is printed If the Me...

Page 126: ...axed 2 Press the RESOLUTION key until the resolution that matches the document is selected Repeatedly pressing the RESOLUTION key changes the setting as shown below Document type Resolution setting Do...

Page 127: ...ng may not be sent as specified and instead are sent with the Fine or Photo setting If the Photo or Super Fine Photo setting is specified the fax may be sent with a decreased resolution depending on t...

Page 128: ...axes If the country code and recipient s fax number are entered immediately after the prefix for making an international call not enough time may be allowed for making the connection making the fax nu...

Page 129: ...The fax number can contain a maximum of 30 digits The keys that can be used to enter the fax number are the number keys 0 through 9 Space and Pause If the REDIAL PAUSE key is pressed while entering t...

Page 130: ...ch Dialing ONE TOUCH DIAL function on page 10 3 1 Press the FAX key to enter Fax mode 2 Load the document into the Automatic Document Feeder 3 If necessary change the Resolution setting p 6 8 4 Press...

Page 131: ...s refer to Setting Up Speed Dialing SPEED DIAL function on page 10 8 1 Press the FAX key to enter Fax mode 2 Load the document into the Automatic Document Feeder 3 If necessary change the Resolution s...

Page 132: ...Setting Up One Touch Dialing ONE TOUCH DIAL function on page 10 3 1 Press the FAX key to enter Fax mode 2 Load the document into the Automatic Document Feeder 3 If necessary change the Resolution set...

Page 133: ...on page 10 16 1 Press the FAX key to enter Fax mode 2 Load the document into the Automatic Document Feeder This step is not necessary with polling reception 3 If necessary change the Resolution settin...

Page 134: ...e two numbers A maximum of 30 digits excluding can be dialed For details on programming combination dialing numbers refer to page 10 3 and page 10 8 1 Press the FAX key to enter Fax mode 2 Load the do...

Page 135: ...8 4 Press the TEL BOOK key 5 Using the and keys select either LIST or SEARCH and then press the YES key If LIST was selected The list of programmed one touch dialing and speed dialing numbers is disp...

Page 136: ...ed dial number For details on entering text refer to Entering Text on page 3 30 From 1 to 10 characters can be entered 4 Press the ENTER key The number of names beginning with the text entered in step...

Page 137: ...ext and then try searching for different text 8 Press the START key to begin scanning and sending the fax To redial the last recipient called 1 Press the FAX key to enter Fax mode 2 Load the document...

Page 138: ...e reception is finished a beep is sounded For details on checking the transmission result refer to page 6 22 G If there is no more paper If the AUTO SELECT paper supply setting is selected the paper t...

Page 139: ...le sheet of paper The length is reduced to a maximum of 70 and then printed If the document does not fit within a single sheet of paper even after reducing it to 70 the document is divided and printed...

Page 140: ...Press the ENTER key 3 Using the and keys display the desired transmission results to check them In the transmission result screen TX indicates sent faxes and RX indicates received ones If the NO key...

Page 141: ...o fax documents positioned on the Platen Glass on page 6 5 of 6 Basic Faxing Manual Transmission If the machine is connected to a telephone and the same line is used for phoning and faxing the documen...

Page 142: ...to dial the fax number The fax number of the recipient can also specified using the keys in the Control Panel of this machine p 6 10 5 After finishing talking on the phone the recipient should press...

Page 143: ...l key with the batch transmission settings transmission time p 10 25 To fax using batch transmission 1 Load the document into the Automatic Document Feeder 2 If necessary change the Resolution setting...

Page 144: ...the tel book or by entering the fax number using the KEYPAD Note A maximum of 16 recipients can be specified by entering the fax number using the KEYPAD Tip With the result report printed after the t...

Page 145: ...ng group dialing Press the one touch dial key programmed with the desired group of fax numbers Press the YES key and then specify the next recipient When selecting from the tel book Press the TEL BOOK...

Page 146: ...ients skip to step 9 8 The recipients specified in step 5 are displayed in the order that they were selected Check the recipient and then press the YES key To delete the displayed recipient press the...

Page 147: ...cannot be sent at the specified time A timer transmission cannot be performed at the same time as a direct transmission Tip Timer transmission can be combined with broadcast transmission mailbox tran...

Page 148: ...ed transmission time and then press the ENTER key If you wish to correct the time press the NO key and then enter the correct time 6 Specify the fax number of the recipient Refer to Dialing on page 6...

Page 149: ...tible with F codes can be specified as recipients for mailbox transmission To fax using mailbox transmission 1 Position the document to be faxed 2 If necessary change the Resolution setting p 6 8 3 Pr...

Page 150: ...ed with a sub address the sub address is displayed as the mailbox ID If necessary change the mailbox ID If you wish to correct the mailbox ID press the NO key and then enter the new number 7 Press the...

Page 151: ...y station Note Relay initiation transmission is compatible with F code transmission Only machines that are compatible with relay broadcast transmission should be specified as relay stations This machi...

Page 152: ...20 digits or less programmed at the relay station If you wish to correct the ID press the NO key and then enter the new number 7 Press the ENTER key A screen appears allowing you to specify the passw...

Page 153: ...must first be programmed A maximum of 5 relay boxes can be programmed For details on programming a relay box refer to Setting Up Relay Boxes RELAY BOX function on page 10 31 Note Relay broadcast tran...

Page 154: ...ossible by positioning the document on the Platen Glass If direct transmission is specified while a fax is being sent or received the transmission will be queued With direct transmission multiple reci...

Page 155: ...ent Refer to Dialing on page 6 10 7 Press the START key to begin scanning and sending the fax Note When transmission is finished the transmission mode returns to the default setting Memory transmissio...

Page 156: ...up polling transmission 1 Position the document to be faxed 2 If necessary change the Resolution setting p 6 8 3 Press the FAX SET key 4 Press the 5 key from the KEYPAD or Press the FAX SET key 5 time...

Page 157: ...g ID can be set to any number between 0000 and 9999 If there is only one polling transmission document it is not necessary to specify a polling ID and password 7 Using the KEYPAD enter the 4 digit pas...

Page 158: ...and keys select either SINGLE or MULTI and then press the YES key To allow only one polling transmission request then delete the document from the memory select SINGLE To allow multiple polling transm...

Page 159: ...ct CANCEL RESERV and then press the ENTER key The details specified transmission time type of transmission of the jobs queued in the memory are displayed Have no jobs been queued in the memory The mes...

Page 160: ...ob press the key After checking press the YES key to return to the previous screen 4 Press the YES key to delete the displayed job CANCEL RESERV appears in the display 5 To delete another queued job p...

Page 161: ...the caller 2 After talking and the caller s fax machine sounds long beeps press the START key The machine starts receiving the fax Were the long beeps not sounded by the caller s fax machine If the c...

Page 162: ...nly be retrieved after entering the corresponding mailbox ID confidential faxes can safely be sent and received For details on programming the mailboxes refer to Setting Up Mailboxes MAILBOX function...

Page 163: ...sion To receive a fax using polling reception 1 Press the FAX SET key 2 Press the 6 key from the KEYPAD or Press the FAX SET key 6 times to select POLLING RX and then press the ENTER key 3 Specify the...

Page 164: ...ue with step 8 8 Press the START key A message appears allowing you to select whether or not to check the fax numbers to be called 9 To check the numbers to be called press the ENTER key If you do not...

Page 165: ...YPAD the following F codes can be set depending on the use F codes G SUB Specify when transmitting while using F codes G PASSWORD SID Specify when limiting the recipient caller with a password G POLL...

Page 166: ...A maximum of 10 mailboxes can be set up Since a mailbox ID is required in order to retrieve documents received in the different mailboxes confidential faxes can safely be sent and received Refer to Se...

Page 167: ...enter the fax number of the recipient 2 Press the key and then use the KEYPAD to enter the sub address A number up to 20 digits long can be entered for the sub address To enter an SID continue with s...

Page 168: ...e recipient 2 Press the key and then use the KEYPAD to enter the sub address A number up to 20 digits long can be entered for the sub address To enter an SID continue with step 3 If an SID will not be...

Page 169: ...14400 bps between this machine and the computer is possible Connect the computer using a 9 pin RS232C interface cable purchased separately Modem Specifications The protocol specifications for this ma...

Page 170: ...For PC scanning an environment that includes the following software and equipment is required G Operating system Windows 95 Windows 98 Windows Me Windows NT 4 0 or Windows 2000 G TWAIN compatible ima...

Page 171: ...Mode Copy Functions This chapter describes the various Initial Set mode functions that can be used to set copy related functions Note Depending on the options installed some functions may not be avai...

Page 172: ...nufacturer s default setting is OFF no auto power off 4 DENSITY ADF This function can be used to set the image quality when scanning using the Automatic Document Feeder ADF Select MODE1 when scanning...

Page 173: ...9 for the MACHINE SETTING function that you wish to set The MACHINE SETTING functions are as follows 1 AUTO RESET 2 POWER SAVE MODE 3 AUTO SHUT OFF 4 DENSITY ADF 5 PRINT DENSITY 6 LCD CONTRAST 7 BUZZE...

Page 174: ...ect the MACHINE SETTING menu on page 9 3 2 Press the 1 key from the KEYPAD to select AUTO RESET 3 Using the and keys select either ON or OFF and then press the YES key If OFF was selected the MACHINE...

Page 175: ...NG menu on page 9 3 2 Press the 2 key from the KEYPAD to select POWER SAVE MODE 3 Using the KEYPAD specify the length of time the machine is idle before it enters Power Save mode and then press the EN...

Page 176: ...continue with step 3 If the AUTO SHUT OFF function in the ADMIN MANAGEMENT menu is set to DISABLE skip to step 4 3 Using the and keys select either ON or OFF and then press the YES key If ON was sele...

Page 177: ...ive faxes or perform printing from the computer To specify the ADF Automatic Document Feeder scanning image quality DENSITY ADF function 1 Select the MACHINE SETTING menu Refer to To select the MACHIN...

Page 178: ...Using the and keys select one of the five settings between LIGHT and DARK and then press the YES key The MACHINE SETTING menu appears again To set the LCD CONTRAST function 1 Select the MACHINE SETTIN...

Page 179: ...elect BUZZER VOLUME 3 Using the and keys select HIGH LOW or OFF and then press the YES key The MACHINE SETTING menu appears again To set the LANGUAGE function 1 Select the MACHINE SETTING menu Refer t...

Page 180: ...L MODE function 1 Select the MACHINE SETTING menu Refer to To select the MACHINE SETTING menu on page 9 3 2 Press the 9 key from the KEYPAD to select INITIAL MODE 3 Using the and keys select either CO...

Page 181: ...be used to set the type of paper plain paper OHP transparencies or postcards loaded into the 1st Tray and whether the size is automatically detected AUTO or specified SIZE INPUT The manufacturer s def...

Page 182: ...SOURCE SETUP 3 From the KEYPAD press the key 1 through 3 for the PAPER SOURCE SETUP function that you wish to set The PAPER SOURCE SETUP functions are as follows 1 INCH METRIC 2 TRAY1 PAPER 3 AUTO SEL...

Page 183: ...ect the PAPER SOURCE SETUP menu Refer to To select the PAPER SOURCE SETUP menu on page 9 12 2 Press the 1 key from the KEYPAD to select INCH METRIC 3 Using the and keys select a paper tray and then pr...

Page 184: ...he YES key 4 Using the and keys select either AUTO or SIZE INPUT and then press the YES key If AUTO was selected the PAPER SOURCE SETUP menu appears again If SIZE INPUT was selected a screen appears a...

Page 185: ...h and length measurements correctly 6 Using the KEYPAD enter the paper width mm and then press the ENTER key The paper width can be set between 90 mm and 297 mm However when the width is set between 2...

Page 186: ...Using the and keys select either DISABLE does not allow automatic paper selection or ENABLE allows automatic paper selection and then press the YES key If DISABLE was selected a screen appears allowi...

Page 187: ...he main screen appears No USER MANAGEMENT Description 1 DRUM DEHUMIDIFY When the room temperature changes drastically such as when a heater is used in the winter or when the machine is used in an extr...

Page 188: ...ss the key twice to select USER MANAGEMENT and then press the ENTER key 3 Using the and keys select TONER REPLENISHER and then press the ENTER key Toner replenishing begins and the main screen appears...

Page 189: ...to lose the administrator access number No ADMIN MANAGEMENT Description 1 AUTO SHUT OFF This function can be used to set whether or not the auto power off function is performed The manufacturer s defa...

Page 190: ...through 3 for the ADMIN MANAGEMENT function that you wish to set The ADMIN MANAGEMENT functions are as follows 1 AUTO SHUT OFF 2 COPY TRACK 3 REMOTE MONITOR 4 Using the KEYPAD enter the 6 digit admin...

Page 191: ...UTO SHUT OFF Using the KEYPAD enter the 6 digit administrator access number and then press the ENTER key 3 Using the and keys select either DISABLE or ENABLE and then press the YES key The ADMIN MANAG...

Page 192: ...MANAGEMENT menu on page 9 20 2 Press the 2 key from the KEYPAD to select COPY TRACK Using the KEYPAD enter the 6 digit administrator access number and then press the ENTER key 3 Using the and keys sel...

Page 193: ...NO REG and then press the ENTER key 4 Using the KEYPAD enter the desired ID number for the account section and then press the ENTER key Enter a 3 digit ID number If you wish to correct the ID number p...

Page 194: ...ber and then press the ENTER key 3 Using the and keys select ID NO REG and then press the ENTER key 4 Using the KEYPAD enter the ID number that you wish to change delete and then press the ENTER key E...

Page 195: ...XX DELETED appears To change or delete other ID numbers return to step 3 7 Use the KEYPAD to enter the new number 8 Press the YES key If the new ID number has already been registered the message ID NO...

Page 196: ...er and then press the ENTER key 3 Using the and keys select COPY TRACK DATA and then press the ENTER key 4 Using the and keys select DISPLAY and then press the YES key 5 Using the and keys select the...

Page 197: ...ith step 7 To finish without clearing the counter press the YES key The COPY TRACK DATA function appears again 7 After the counter is cleared press the YES key After clearing the counter if you wish t...

Page 198: ...rom the KEYPAD to select COPY TRACK Using the KEYPAD enter the 6 digit administrator access number and then press the ENTER key 3 Using the and keys select COPY TRACK DATA and then press the ENTER key...

Page 199: ...elect COPY TRACK Using the KEYPAD enter the 6 digit administrator access number and then press the ENTER key 3 Using the and keys select COPY TRACK DATA and then press the ENTER key 4 Using the and ke...

Page 200: ...MONITOR Using the KEYPAD enter the 6 digit administrator access number and then press the ENTER key 3 Using the and keys select LIMITED FULL or OFF and then press the YES key If LIMITED or OFF was se...

Page 201: ...et the density level of the AUTO density setting to one of the three settings between LIGHT and DARK The manufacturer s default setting is the middle level 4 DENSITY LEVEL M This function can be used...

Page 202: ...ne starts up or after the Control Panel is reset The manufacturer s default setting is APS auto paper selection 3 OUTPUT PRIORITY This function can be used to specify if the selected output mode is NO...

Page 203: ...TOP SETTING appears press the YES key to quit To set the PAPER PRIORITY function 1 Select the COPY SETTING 1 menu Refer to To select the COPY SETTING 1 menu on page 9 32 2 Press the 1 key from the KEY...

Page 204: ...the and keys select AUTO MANUAL or PHOTO and then press the YES key The COPY SETTING 1 menu appears again To set the AUTO density level DENSITY LEVEL A function 1 Select the COPY SETTING 1 menu Refer...

Page 205: ...DENSITY LEVEL M 3 Using the and keys select one of the five settings between LIGHT and DARK and then press the YES key The COPY SETTING 1 menu appears again To set the BINDING POS function 1 Select th...

Page 206: ...nding width margin and then press the ENTER key The binding width can be set between 0 mm and 20 mm If you wish to correct the setting press the NO key and then enter the new number The COPY SETTING 1...

Page 207: ...1 menu appears again To select the COPY SETTING 2 menu 1 Press the INITIAL SET key 2 Press the key 5 times to select COPY SETTING 2 3 From the KEYPAD press the key 1 through 5 for the COPY SETTING 2...

Page 208: ...lect MIXED ORIGINAL 3 Using the and keys select either ON or OFF and then press the YES key The COPY SETTING 2 menu appears again To set the COPY PRIORITY function 1 Select the COPY SETTING 2 menu Ref...

Page 209: ...o select OUTPUT PRIORITY 3 Using the and keys select NON SORT or GROUP and then press the YES key The COPY SETTING 2 menu appears again To set the 4 IN 1 COPY ORDER function 1 Select the COPY SETTING...

Page 210: ...OSS MODE function 1 Select the COPY SETTING 2 menu Refer to To select the COPY SETTING 2 menu on page 9 37 2 Press the 5 key from the KEYPAD to select CRISSCROSS MODE 3 Using the and keys select eithe...

Page 211: ...asily and accurately without the need to manually enter the number using the KEYPAD A maximum of 100 fax numbers can be programmed 3 GROUP DIAL This function can be used to program a single one touch...

Page 212: ...E TOUCH DIAL 2 SPEED DIAL 3 GROUP DIAL 4 PROGRAM DIAL 5 BATCH TX 6 MAILBOX 7 RELAY BOX Tip If at any time you wish to quit programming changing or deleting a FAX REGISTRATION function press the NO key...

Page 213: ...are programmed with fax numbers the recipient can be specified easily and accurately without the need to manually enter the number using the KEYPAD A maximum of 27 numbers can be programmed A list of...

Page 214: ...fax number can contain a maximum of 30 digits For details on the characters that can be entered refer to p 6 11 To enter a sub address continue with step 5 If a sub address will not be entered press...

Page 215: ...he SID A number up to 20 digits long can be entered for the SID 7 Press the ENTER key 8 Enter the name of the programmed number For details on entering text refer to Entering Text on page 3 30 Text up...

Page 216: ...select ONE TOUCH DIAL 3 Press the one touch dial key that you wish to change or delete 4 Press the NO key If a one touch dial key programmed with a group of fax numbers or a transmission reception fun...

Page 217: ...s pressed the corresponding settings programmed in group dialing or program dialing are changed If the NO key is pressed the corresponding settings programmed in group dialing or program dialing are d...

Page 218: ...A maximum of 100 fax numbers 001 to 100 can be programmed A list of the information programmed in the speed dial numbers can be printed out Refer to Outputting a report list PRINT REPORT menu on page...

Page 219: ...16 If you wish to change the fax number press the NO key and then enter the correct number For details on F codes sub address and SID refer to Using F codes on page 7 25 5 Press the key and then use...

Page 220: ...7118F 10 Using the and keys select the desired modem speed 11 Press the YES key The settings are registered To program another speed dial number repeat steps 3 through 11 12 Press the NO key to finish...

Page 221: ...lected the fax number is displayed Continue with step 6 If DELETE was selected the settings programmed for the speed dial number are deleted and the Speed dial input screen appears again If you try to...

Page 222: ...e the fax number F codes sub address and SID and modem speed as desired For details on making changes refer to Entering Text on page 3 30 For details on changing the F codes sub address and SID or mod...

Page 223: ...a report list PRINT REPORT menu on page 11 3 To program a group of fax numbers 1 Select the FAX REGISTRATION menu Refer to To select the FAX REGISTRATION menu on page 10 2 2 Press the 3 key from the...

Page 224: ...s programmed in the specified one touch dial key group dial key is added 7 When you are finished specifying recipients press the START key The settings are registered To program another group repeat s...

Page 225: ...o change the name of the group enter the new name and then press the YES key For details on making changes refer to Entering Text on page 3 30 The fax numbers are displayed in the order that they were...

Page 226: ...rresponding one touch dial key Transmission reception functions that can be programmed G Broadcast transmission G Timer transmission G Mailbox transmission G Polling reception G Relay initiation trans...

Page 227: ...mission on page 7 7 To fax using mailbox transmission on page 7 9 To fax using relay initiation transmission on page 7 11 To receive a fax using polling reception on page 7 23 The settings are registe...

Page 228: ...ed the specified recipients are displayed in order Continue with step 6 If DELETE was selected the program dialing settings are deleted and the FAX REGISTRATION menu appears again 6 To delete the disp...

Page 229: ...ission that you wish to change or delete 4 Press the NO key 5 Using the and keys select either EDIT or DELETE and then press the YES key If EDIT was selected the programmed transmission time is displa...

Page 230: ...nd SID as desired 8 Press the YES key Other program dialing settings can be changed 9 Press the NO key to return to the FAX REGISTRATION menu To change delete a programmed mailbox transmission 1 Selec...

Page 231: ...CLEAR key and then by using the one touch dial keys or the speed dial numbers or by entering the fax number using the KEYPAD specify a different recipient 7 Press the YES key The mailbox ID is display...

Page 232: ...5 Using the and keys select either EDIT or DELETE and then press the YES key If EDIT was selected the specified recipients are displayed in order Continue with step 6 If DELETE was selected the progr...

Page 233: ...rn to the FAX REGISTRATION menu To change delete a programmed relay initiation transmission 1 Select the FAX REGISTRATION menu Refer to To select the FAX REGISTRATION menu on page 10 2 2 Press the 4 k...

Page 234: ...EAR key and then by using the one touch dial keys or the speed dial numbers or by entering the fax number using the KEYPAD specify a different recipient 7 Press the YES key The relay box ID is display...

Page 235: ...together at the specified time Note A one touch dial key must first be programmed with the fax number of the recipient for the batch transmission To set batch transmitting 1 Select the FAX REGISTRATI...

Page 236: ...ey that was pressed one programmed for group dialing program dialing or combination dialing or not programmed at all An error message appears 4 Using the KEYPAD enter the desired transmission time and...

Page 237: ...ON menu on page 10 2 2 Press the 5 key from the KEYPAD to select BATCH TX 3 Press the one touch dial key programmed with the batch transmission setting that you wish to change 4 Press the CLEAR key an...

Page 238: ...EGISTRATION menu on page 10 2 2 Press the 5 key from the KEYPAD to select BATCH TX 3 Press the one touch dial key programmed with the batch transmission setting that you wish to delete 4 Press the CLE...

Page 239: ...relay box ID To register a mailbox 1 Select the FAX REGISTRATION menu Refer to To select the FAX REGISTRATION menu on page 10 2 2 Press the 6 key from the KEYPAD to select MAILBOX 3 Using the KEYPAD...

Page 240: ...enter the new password If no password is to be specified press the ENTER key without entering anything The FAX REGISTRATION menu appears again To delete a mailbox 1 Select the FAX REGISTRATION menu Re...

Page 241: ...ay station to receive a document from another fax machine transmitting station then transmit the document to multiple recipients receiving stations Note A relay box ID cannot be the same as a mailbox...

Page 242: ...and 5 4 Using the KEYPAD enter the 4 digit relay box ID and then press the ENTER key The relay box ID can be set to any number between 0000 and 9999 If you wish to change the relay box ID press the NO...

Page 243: ...receiving stations 7 Using the one touch dial keys or the speed dial numbers or by entering the fax number using the KEYPAD specify a receiving station and then press the YES key A maximum of 50 recip...

Page 244: ...ect the FAX REGISTRATION menu on page 10 2 2 Press the 7 key from the KEYPAD to select RELAY BOX 3 Using the KEYPAD enter the number of the relay box that you wish to delete 4 Press the NO key The spe...

Page 245: ...HT For faint or colored text select a setting toward DARK 2 RESOLUTION This function can be used to set the default scanning resolution image quality to one of the following Normal Fine Super Fine Pho...

Page 246: ...ime you wish to quit setting a TX OPERATION function press the NO key When the message STOP SETTING appears press the YES key to quit To specify the default scanning contrast SCAN CONTRAST function 1...

Page 247: ...tion setting and then press the YES key The resolution settings appear as follows NORM Normal FINE Fine S F Super Fine PHOTO Photo If PHOTO was selected a screen appears allowing you to make a detaile...

Page 248: ...key from the KEYPAD to select DEFAULT TX 3 Using the and keys select either MEM TX or ADF TX and then press the YES key The TX OPERATION menu appears again To specify if one touch dialing transmission...

Page 249: ...is ON 4 RX PRINT This function can be used to set whether the fax is only printed after all document pages have been received MEMORY RX or printing begins as soon as the first page of the document is...

Page 250: ...ch received document The manufacturer s default setting is OFF 8 SELECT TRAY This function can be used to select which paper tray can be used to supply paper when printing received documents or transm...

Page 251: ...through 8 for the RX OPERATION function that you wish to set The RX OPERATION functions are as follows 1 MEMORY RX MODE 2 NO of RINGS 3 REDUCTION RX 4 RX PRINT 5 RX MODE 6 FORWARD 7 FOOTER 8 SELECT T...

Page 252: ...e time for memory reception to begin and then press the ENTER key To specify that memory reception stays on from the time that it is set to ON until it is manually cancelled press the ENTER without en...

Page 253: ...he RX OPERATION menu Refer to To select the RX OPERATION menu on page 10 41 2 Press the 1 key from the KEYPAD to select MEMORY RX MODE 3 Using the and keys select OFF and then press the YES key If a p...

Page 254: ...mber of rings and then press the ENTER key The number of rings can be set between 1 and 16 The RX OPERATION menu appears again To set the REDUCTION RX function 1 Select the RX OPERATION menu Refer to...

Page 255: ...t RX PRINT 3 Using the and keys select either MEMORY RX or PRINT RX and then press the YES key The RX OPERATION menu appears again To set the RX MODE function 1 Select the RX OPERATION menu Refer to T...

Page 256: ...key If ON or ON PRINT was selected a screen appears allowing you to specify the forwarding location Continue with step 4 If OFF was selected the RX OPERATION menu appears again 4 Using the one touch d...

Page 257: ...elect either ON or OFF and then press the YES key The RX OPERATION menu appears again To set the SELECT TRAY function 1 Select the RX OPERATION menu Refer to To select the RX OPERATION menu on page 10...

Page 258: ...ialing system If this function is not correctly set to the type of dialing system used faxes cannot be sent Select the correct setting after checking which type of dialing system is used by your telep...

Page 259: ...AL SET key The first screen of the Initial Set mode appears 2 Press the key 9 times to select COMM SETTING 3 From the KEYPAD press the 2 key A screen appears allowing you to select the monitoring volu...

Page 260: ...d The manufacturer s default setting is ON 2 RESERV REPORT If multiple recipients are specified for transmission such as with broadcast transmission and polling reception a report can be printed to sh...

Page 261: ...to quit setting changing a REPORTING function press the NO key When the message STOP SETTING appears press the YES key to quit To exit the REPORTING menu press the AUTO RESET key The main screen appea...

Page 262: ...select RESERV REPORT 3 Using the and keys select either ON or OFF and then press the YES key The REPORTING menu appears again To set the TX RESULT REPORT function 1 Select the REPORTING menu Refer to...

Page 263: ...X RESULT REPORT function 1 Select the REPORTING menu Refer to To select the REPORTING menu on page 10 50 2 Press the 4 key from the KEYPAD to select RX RESULT REPORT 3 Using the and keys select either...

Page 264: ...10 Initial Set Mode Fax Functions 10 54 Konica 7115F 7118F...

Page 265: ...s available when the CONFIRM key is pressed Items that can be checked with MACHINE COUNTER MACHINE COUNTER Description TOTAL COUNT This count shows the total number of prints made since this machine w...

Page 266: ...rs 1 Press the CONFIRM key twice and then press the ENTER key The MACHINE COUNTER menu appears 2 Using the and keys select the counter that you wish to check 3 Press the YES key to return to the MACHI...

Page 267: ...ing whether or not to print a report 2 Press the ENTER key A menu appears showing the reports and lists that can be printed 3 Using the and keys select the report list that you wish to print and then...

Page 268: ...d transmission reception result are printed The machine can also be set to print this report automatically after every 60 transmissions receptions SESSION FAX SET No DESTINATION STATION DATE TIME PAGE...

Page 269: ...in the one touch dial keys are printed in numerical order of the keys List of Speed Dial Numbers The recipients programmed for the speed dial numbers are printed in numerical order List of Programmed...

Page 270: ...Machine Settings List The current machine settings are printed Configuration Page This function is only available when the Printer Controller optional is installed The list of the printer settings is...

Page 271: ...n the bottom line of the screen For the sample message shown above supply A4 C size paper into the 1st Tray Check the message for the empty paper tray and the paper size and then load paper according...

Page 272: ...the package was unwrapped faces up Have the necessary precautions been observed when loading the paper Do not load so many much paper that the top of the stack is higher than the mark 4 Slide the pape...

Page 273: ...the 2nd Tray 2 Press down on the Paper Lifting Plate until it locks into place 3 Load the paper into the tray so that the front side of the paper the side facing up when the package was unwrapped face...

Page 274: ...er tray To load paper into the Multiple Bypass Tray 1 Load the paper into the Bypass Tray Have the necessary precautions been observed when loading the paper Load the paper so that the front side of t...

Page 275: ...eloped specifically for this machine Use of any other type of toner may cause damage to the machine For details contact your authorized Konica Service Representative Do not throw away the used toner b...

Page 276: ...Shake the new Toner Bottle well 5 With the UP marking on top insert and push the bottle into position Do you know how much you need to insert the bottle Fit the protrusion on the Toner Bottle all the...

Page 277: ...se the Front Cover Toner will be automatically supplied as soon as the Front Cover is closed Do you know what to do if the copy image density is still low immediately after the Toner Bottle has been r...

Page 278: ...described below to clear the misfed paper To clear a paper misfeed in the main unit or 1st Tray CAUTION The area around the fusing unit is extremely hot Touching any part other than the specified leve...

Page 279: ...old the green part of the Pressure Levers when pulling them down 3 Slowly pull out the paper 4 While holding the guide plate pressed down slowly pull out the paper Have the necessary precautions been...

Page 280: ...e the necessary precautions been observed when turning the roller Only turn the green knob when turning the roller 6 Return the Pressure Levers to their original positions 7 Close the Side Cover of th...

Page 281: ...onica 7115F 7118F 12 11 9 Slide the paper guides against the edges of the paper Is the paper guide positioned correctly Make sure that the paper guides are pushed up against the edges of the paper 10...

Page 282: ...Messages 12 12 Konica 7115F 7118F To clear a paper misfeed in the Paper Feed Cabinet 1 Open the Side Cover of the Paper Feed Cabinet 2 Slowly pull out the paper 3 Close the Side Cover of the Paper Fee...

Page 283: ...Remove all paper from the tray 2 Open the Side Cover of the main unit 3 Slowly pull out the paper Have the necessary precautions been observed when pulling out the paper Do not touch the Transfer Rol...

Page 284: ...12 Error Messages 12 14 Konica 7115F 7118F 5 Load the paper into the Bypass Tray again...

Page 285: ...d occurs while the document is being fed the message shown below appears and copying and printing stops Remove the misfed document according to the following procedure To clear a misfeed in the Automa...

Page 286: ...onica 7115F 7118F 3 Lift open the Automatic Document Feeder 4 While turning the Document Feed Knob in the direction of the arrow slowly pull out the document 5 Close the Automatic Document Feeder and...

Page 287: ...ca 7115F 7118F 12 17 6 Load the documents removed in step 2 back into the tray Note If RETURN 1 2 ORIG to ADF and PRESS START KEY appears on the display also load the one or two document pages that ca...

Page 288: ...alternately OPEN DOC FEED COVER REMOVE PAPER IN BYPASS TRAY Paper is loaded in the Manual Bypass Tray Remove the paper from the Manual Bypass Tray FRONT COVER OPEN The Front Cover of the main unit is...

Page 289: ...of the paper in the selected paper tray has changed While copying documents with mixed sizes using the APS function paper of a suitable size could not be found indicates the paper tray and XXX indicat...

Page 290: ...the paper from the Upper Copy Tray or the Lower Copy Tray of the Job Tray and then press the AUTO RESET key Flashing alternately PRESS ANY KEY LINE PROBLEM The telephone dialing system or telephone wi...

Page 291: ...tive CALL SERVICE M2 The Imaging Unit should be replaced Contact your authorized Konica Service Representative MACHINE TROUBLE Some problem occurred in the machine Turn the machine off then on again I...

Page 292: ...12 Error Messages 12 22 Konica 7115F 7118F...

Page 293: ...p 12 1 The copy is too dark The copy density is set too dark Use the DENSITY SET key to select a lighter copy density p 4 25 The document was not pressed close enough against the Platen Glass Position...

Page 294: ...y The document pad is dirty Clean the document pad with a soft cloth dampened with a mild detergent p 14 9 The selected paper size is larger than the document with a zoom setting of 1 00 Select a copy...

Page 295: ...Plates for the size of the document p 4 1 The document is not positioned correctly in the Automatic Document Feeder Lift open the Automatic Document Feeder and correctly position the document against...

Page 296: ...n page 3 27 Even though the START key is pressed no copies are made If the ERROR indicator on the Control Panel is lit an error has occurred Follow the instructions in any messages that appear on the...

Page 297: ...orrectly p 6 3 and p 6 5 The Platen Glass is dirty Wipe the glass with a soft dry cloth p 14 9 The text in the document is too faint Adjust the scanning contrast p 10 36 There is a problem with the te...

Page 298: ...he fax again The received fax is blank The toner is empty Replace the toner bottle with a new one p 12 5 The caller sent the back of the fax pages Contact the caller Faxes cannot be received automatic...

Page 299: ...telephone cord from the wall jack to the main unit Transmitting Check again after the transmission is finished After dialing the ringing cannot be heard The telephone dialing system is not set correc...

Page 300: ...13 Troubleshooting 13 8 Konica 7115F 7118F...

Page 301: ...91g m2 to 157 g m2 OHP transparencies postcards and label sheets Special paper can only be fed through the 1st Tray and the Manual Bypass Tray Paper sizes 1st Tray A3 L to A5 C F4 210 mm 330 mm Width...

Page 302: ...FAX Kit for Konica 7115 7118 Standard Memory Fax 4 MB Can be increased to a maximum of 12 MB Copier 32 MB Can be increased to a maximum of 48 MB Memory backup battery Nickel hydrogen battery 6 V 280 m...

Page 303: ...5 kg Specification Shifting amount 28 mm Paper capacity 250 sheets Power consumption Less than 63 W Specification Paper types Plain paper 60 g m2 to 90 g m2 recycled paper Special paper Cards 91g m2 t...

Page 304: ...recycled paper Special paper Cards 91g m2 to 157 g m2 OHP transparencies postcards and label sheets Paper sizes Width 90 mm to 297 mm Length 140 mm to 432 mm Paper capacity Plain or recycled paper 50...

Page 305: ...MODE1 MODE2 PRINT DENSITY LIGHT to DARK 5 levels LCD CONTRAST LIGHT to DARK 4 levels BUZZER VOLUME HIGH LOW OFF LANGUAGE Default ENGLISH INITIAL MODE COPY FAX 2 PAPER SOURCE INCH METRIC For each pape...

Page 306: ...OFF COPY PRIORITY APS AMS MANUAL OUTPUT PRIORITY NON SORT GROUP 4 IN 1 COPY ORDER PATTERN1 PATTERN2 CRISSCROSS MODE ON OFF 7 FAX REGISTRATION ONE TOUCH DIAL For details refer to page 10 3 SPEED DIAL...

Page 307: ...FF PSTN PBX PSTN PBX 11 REPORTING ACTIVITY REPORT ON OFF RESERV REPORT ON OFF TX RESULT REPORT ON OFF RX RESULT REPORT ON OFF 12 INITIAL USER DATA DATE For details refer to page 3 34 USER FAX NO For d...

Page 308: ...RESULT TOTAL PAGE TOTAL COUNT SIZE COUNT TOTAL SCAN TX PAGES RX PAGES PRINT REPORT TX RESULT REPORT RX RESULT REPORT ACTIVITY REPORT MEMORY DATA LIST MEMORY IMAGE LIST ONE TOUCH LIST SPEED DIAL LIST K...

Page 309: ...leaning it Housing Clean the surface of the housing by wiping it with a soft cloth dampened with a mild household detergent Platen Glass Clean the Platen Glass by wiping it with a soft dry cloth Docum...

Page 310: ...5F 7118F Control Panel Clean the Control Panel by wiping it with a soft dry cloth CAUTION Incorrectly cleaning the Control Panel keys may damage them Never use mild household detergent or glass cleane...

Page 311: ...s cannot be combined The function set first takes precedence The functions cannot be combined The function set last takes precedence A If paper is loaded into the manual bypass tray the function set f...

Page 312: ...100 mm 148 mm 4 5 3 4 Paper format Size inches Size millimeters Ledger 11 17 279 mm 432 mm 11 14 11 14 279 mm 356 mm Computer 10 1 8 14 257 mm 356 mm 10 14 10 14 254 mm 356 mm 9 1 4 14 9 1 4 14 236 mm...

Page 313: ...1 A4 210 mm 297 mm 8 1 4 11 3 4 A5 0 70 A6 0 50 B5 0 86 B6 0 61 A3 1 41 B4 1 22 A5 148 mm 210 mm 5 3 4 8 1 4 A6 0 70 B6 0 86 A4 1 41 A3 2 00 B4 1 73 B5 1 22 A6 105 mm 148 mm 4 1 4 5 3 4 A4 2 00 A5 1 4...

Page 314: ...4 0 75 Letter 0 64 Invoice 0 50 11 15 279 4 mm 381 mm 11 14 0 93 Legal 0 75 F4 0 77 Letter 0 73 Invoice 0 50 11 14 279 4 mm 355 6 mm Legal 0 77 F4 0 77 Letter 0 77 Invoice 0 50 Legal 8 1 2 14 215 9 mm...

Page 315: ...Appendix 14 Konica 7115F 7118F 14 15 Zoom ratio Paper size Document size 1 inch 25 4 mm 1 mm 0 0394 inch Invoice 5 1 2 8 1 2 139 7 mm 215 9 mm 11 17 2 00 11 14 1 64 Legal 1 54 F4 1 50 Letter 1 29...

Page 316: ...is turned on With this report the document number and recipient information for the lost fax can be retrieved Information programmed in one touch dial keys are not lost during a power outage There is...

Page 317: ...pecified and the scanned image TIFF format can be sent as an e mail message to a computer or Internet fax In addition e mail messages from computers can be received as images General subscriber line A...

Page 318: ...iple station lines in order to enable unrestricted communications between the telephone sets Protocols The necessary rules for communication Touch tone signals A signal used on the telephone line used...

Page 319: ...function 9 16 Auto shut off 3 25 9 6 Administrative setting 9 21 Automatic Document Feeder 9 7 14 2 Automatic paper size detection units 9 13 Automatic reception 6 20 B Batch transmission 7 3 Setup 10...

Page 320: ...sity level Manual 9 35 Default finishing mode 9 39 Default mixed originals setting 9 38 Density priority 9 34 Erased width 9 36 Priority paper size or tray 9 33 Copy program Recalling 5 15 Storing 5 1...

Page 321: ...14 11 G Group dialing 6 14 Setup 10 13 I ID numbers 3 26 Image shift 5 13 Incorrect copies 13 1 Initial mode 9 10 Initial set mode 9 1 10 1 Copy Setting 1 9 32 Copy Setting 2 9 37 Installation site 2...

Page 322: ...feeding 4 14 Custom paper size 4 19 Manual paper selection 4 12 Manual reception 6 20 7 21 Manual transmission 7 1 Memory full 6 7 Memory reception 7 21 Menu commands 14 5 Multiple Bypass Tray 14 4 O...

Page 323: ...em 3 37 Phone wiring system 3 38 Polling reception 7 23 Polling transmission 7 16 Power outage 14 16 Power save mode 9 5 Power source 2 1 Power Switch 3 28 Preheat mode 3 25 Printing 3 27 Program dial...

Page 324: ...Space requirements 2 2 Specifications 14 1 Speed dialing 6 13 Setup 10 8 T Tel book 6 17 Timer transmission 7 7 Toner replenishing 9 18 12 5 Total count 11 1 Transmission result report 10 52 Transmiss...

Page 325: ...Index 15 Konica 7115F 7118F 15 7 Z Zoom setting 4 21 AMS 4 21 X Y zoom function 4 23...

Page 326: ...15 Index 15 8 Konica 7115F 7118F...

Page 327: ...MANUFACTURER TOKYO JAPAN ONICA CORPORATION K INSTRUCTION MANUAL 7115F 7118F FK 117 2002 3 4506 7772 01 Printed in China...

Reviews: