


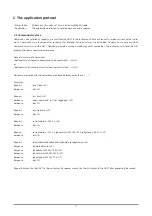


C.2 Overview
C.2.1 Overview commands
The following commands are used to manipulate configuration parameters and reset (a function of) the instrument.
COMMANDS CHAPTER
DESCRIPTION
.set
C.2.2
Set parameter
.show
C.2.3
Show parameter
.clear
C.2.4
Clear parameter
.reset
C.2.5
Reset (a function of) the instrument
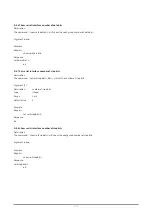
C.2.2 Overview command: ‘set’ parameter
The following commands are used to set configuration parameters. Configuration parameters will keep their value after a power
cycle.
COMMAND : SET
CHAPTER
DESCRIPTION
.set opermode
D.1.1
Set the instrument operational mode
.set ip0method
D.3.1
Set the IP address method
.set ip0address
D.3.3
Set the IP address
.set ip0netmask
D.3.5
Set the IP netmask
.set ip0gateway
D.3.7
Set the IP gateway
.set ser0baudrate
D.4.1
Set the serial interface baudrate
.set ser0parity
D.4.3
Set the serial interface parity
.set ser0databits
D.4.5
Set the serial interface number of databits
.set ser0stopbits
D.4.7
Set the serial interface number of stopbits
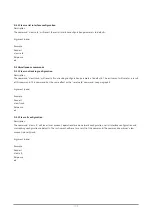
C.2.3 Overview command: ‘show’ parameter
The following commands are used to show configuration parameters.
COMMAND : SHOW
CHAPTER
DESCRIPTION
.show opermode
D.1.2
Show the instrument operational mode
.show hostname
D.2.1
Show the instrument hostname
.show ip0method
D.3.2
Show the IP address method
.show ip0address
D.3.4
Show the IP address
.show ip0netmask
D.3.6
Show the IP netmask
.show ip0gateway
D.3.8
Show the IP gateway
.show ser0baudrate
D.4.2
Show the serial interface baudrate
.show ser0parity
D.4.4
Show the serial interface parity
.show ser0databits
D.4.6
Show the serial interface number of databits
.show ser0stopbits
D.4.8
Show the serial interface number of stopbits
96
Summary of Contents for SOLYS Gear Drive
Page 1: ...SOLYS2 Sun Tracker SOLYS Gear Drive Sun Tracker Instruction Manual...
Page 2: ...2...
Page 4: ...4...
Page 6: ...6...
Page 10: ...10...
Page 39: ...Figure 3 13 Adjustment of the sun sensor 21 0 5 mm 3x 39...
Page 61: ...6 Insert the Ethernet cable Contacts on this side 61...
Page 78: ...78...
Page 80: ...80...
Page 86: ...86...
Page 88: ...88...
Page 112: ......


