


This chapter provides all the information on the accessory installation of all possible SOLYS accessories and instruments.
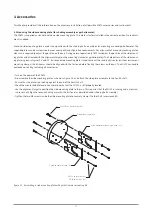
3.1 Mounting the side mounting plate (for shading assembly or pyrheliometer)
The SOLYS is supplied as standard with one side mounting plate. This plate is factory installed in the correct position. No readjust-
ment is needed.
A second side mounting plate is used in conjunction with the shading ball assembly or for mounting a second pyrheliometer. The
supplied plates can be customized to meet your specific configuration requirements. For alignment of a second mounting plate a
clear sun is required to adjust the position on the axis. During normal operation (SOLYS turned on) the position of the side mount-
ing plate can be fixated with the alignment target on the mounting clamps (or pyrheliometer). The hole pattern of the side mount-
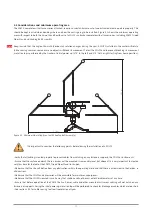
ing plate is given in figures 3.1 and 3.3. If a second side mounting plate is used to mount the shading drive arm (without instrument
mounting clamps) this drive arm should be aligned with the first one before fixating the screws on the axis. The SOLYS can handle
payloads up to 80 kg including all accessories.
• Turn on the power of the SOLYS
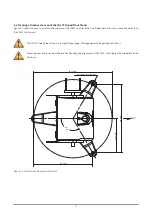
• Pre-assemble the side mounting plate as shown in figure 3.1 and attach the side plate assembly to the Zenith shaft.
Ensure that the plate is pushed up against the end of the Zenith shaft.
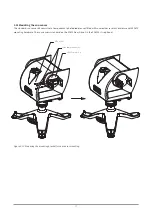
• Check the circular bubble level once more to verify that the SOLYS is still properly leveled
• Use the alignment target to position the side mounting plate to the sun. This requires that the SOLYS is running and a clear sun
is present, or allign the second shading arm with the first one (as described under shading ball assembly)
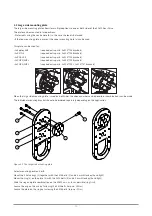
• Tighten the two M6 screws inside the side mounting plate to securely clamp it to the shaft (use wrench #3)
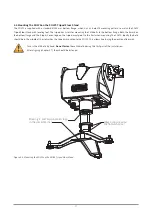
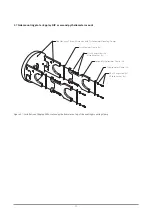
figure 3.1. Assembling a side mounting plate with pyrheliometer mounting kit
3. Accessories
Side mounting plate
M4x20 flat head screw (4x)
Pyrheliometer mounting clamp (2x)
Pyrheliometer clamp (2x)
M3x10 cap screw (4x)
M3 lock washer (4x)
27
Summary of Contents for SOLYS Gear Drive
Page 1: ...SOLYS2 Sun Tracker SOLYS Gear Drive Sun Tracker Instruction Manual...
Page 2: ...2...
Page 4: ...4...
Page 6: ...6...
Page 10: ...10...
Page 39: ...Figure 3 13 Adjustment of the sun sensor 21 0 5 mm 3x 39...
Page 61: ...6 Insert the Ethernet cable Contacts on this side 61...
Page 78: ...78...
Page 80: ...80...
Page 86: ...86...
Page 88: ...88...
Page 112: ......


