


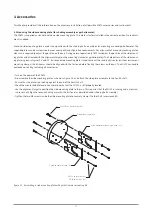


3.9 Large side mounting plate
The large side mounting plate allows for multiple options to one or both sides of the SOLYS Gear Drive.
The plate can be mounted in two positions:
• Preferred is using the centre hole (b), in this case the load is balanced
• If the top mounting plate is present the upper mounting hole (a) can be used
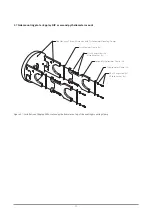
This plate can be used for:
• 2x Eppley AHF
(required extra parts: 2x 0367706 brackets)
• 2x PMO-6
(required extra parts: 2x 0367704 brackets)
• 2x PGS-100
(required extra parts: 2x 0367714 brackets)
• 3x CHP1/SHP1
(required extra parts: 3x 0367710 brackets)
• 6x CHP1/SHP1
(required extra parts: 3x 0 3x 0367717 brackets)
When the large side mounting plate is used on both sides the above number can be double, or combinations can be made.
The individual mounting brackets have to be ordered separately depending on the application.
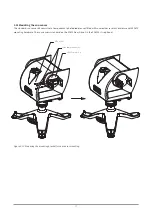
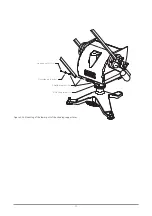
Figure 3.9. The large side mounting plate
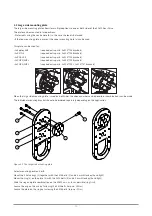
Select mounting position A or B.
Mount the 2 halve rings (2) together with the 2 M8 bolts (3) and a 6 mm Allen key (hand tight)
Mount the ring (2) on the plate (1) with the 4 M6 bolts (4) and a 5 mm Allen key (hand tight)
Slide the ring and plate combination on the SOLYS axis, as far as possible (ring first)
Secure the ring on the axis by fastening the 2 M8 bolts (torque ~16 Nm)
Secure the plate on the ring by fastening the 4 M6 bolts (torque ~5 Nm)
35
3
2
4
1
A
B
Summary of Contents for SOLYS Gear Drive
Page 1: ...SOLYS2 Sun Tracker SOLYS Gear Drive Sun Tracker Instruction Manual...
Page 2: ...2...
Page 4: ...4...
Page 6: ...6...
Page 10: ...10...
Page 39: ...Figure 3 13 Adjustment of the sun sensor 21 0 5 mm 3x 39...
Page 61: ...6 Insert the Ethernet cable Contacts on this side 61...
Page 78: ...78...
Page 80: ...80...
Page 86: ...86...
Page 88: ...88...
Page 112: ......


