background image

Console Inputs 

••••

 89

Console Inputs

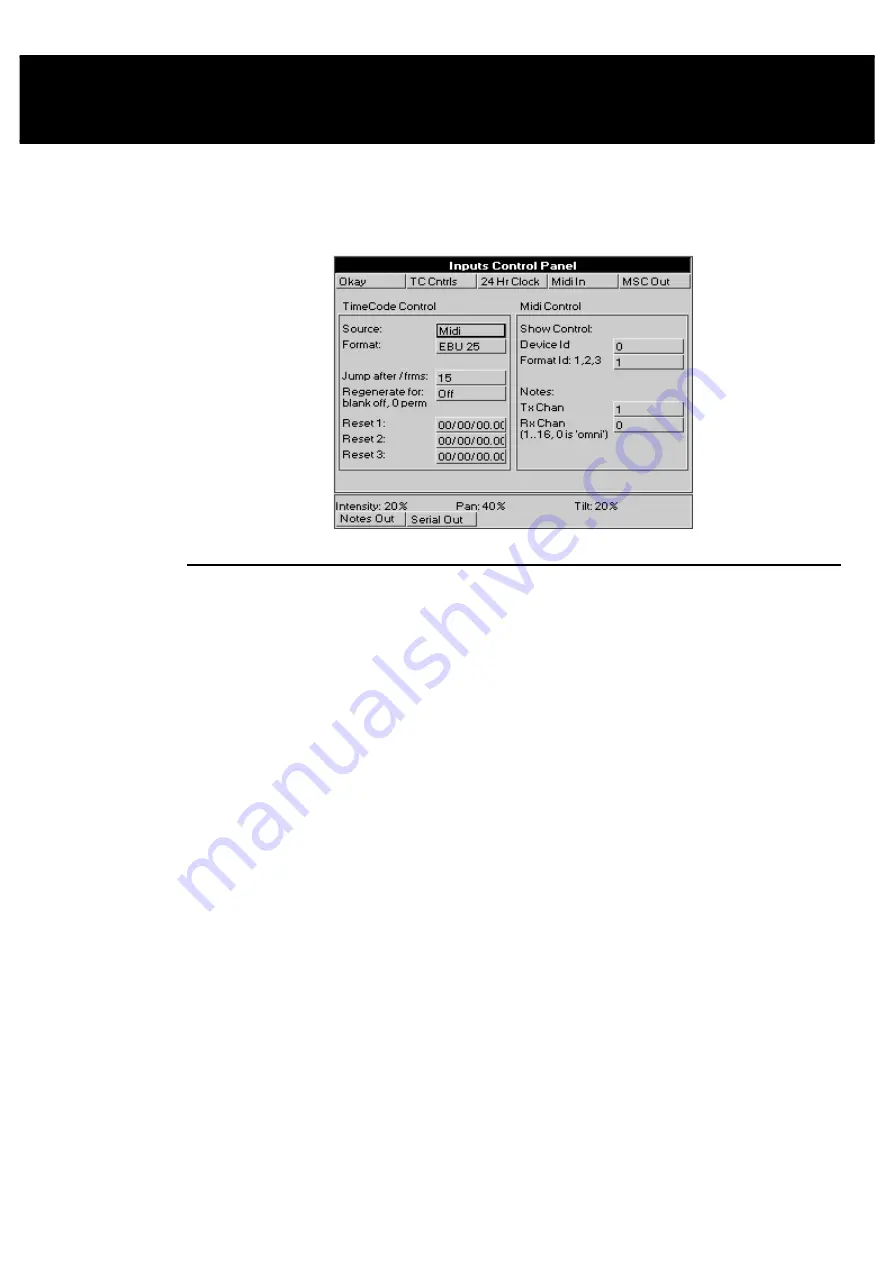
This chapter covers the use of MIDI, and Timecode inputs. These features are accessed through the Inputs
Control Panel window

To open the Inputs Control Panel window, press 

setup

 and 

Inputs

.

MIDI Timecode

The HOG can only receive MIDI Timecode. It has programmable error correcting features. The console
can also simulate Timecode to help with programming when the Timecode source is not ready.

Setting up the console to read Timecode

Before using Timecode, the console must be configured to accept Timecode:

1


Press 

Setup

.

2


Press 

Inputs

 to bring up the options window for Timecode

input.

3


Connect the MIDI signal to the MIDI Input.

4


Move the selection box to 

Source:

 and press 

Set

. Now use the

cursor keys and 

Enter

 to choose either 

Midi

 or 

Simulate

 from

within the drop down menu..

5


Move the selection box to 

Format:

 and press 

Set

. Now use the

cursor keys and 

Enter

 to choose the type of input: 

Film 24

,

EBU 25

NTSC 30

 and 

SMPTE 30

, from within the drop down

menu.

6


Press 

TC Cntrls

 on the top toolbar to open up the timecode

control panel at the bottom of the screen (this panel will remain
open until you close it by pressing the 

Okay

 button on the bottom

toolbar).

7


Press 

Tcode On

 to allow the console to simulate or read

timecode from the MIDI in port. Pressing 

Tcode On

 a second

time will turn this off again.

Timecode Error Correction

Entering a time in the 

Regenerate for:

 box turns on automatic generation of Timecode should the

signal drop out. This will continue for the amount of time selected in the 

Regenerate For:

 box. If you

enter 0, regeneration will be continuous. To turn automatic timecode regeneration off, set the value in the

Regenerate for:

 box to a blank with the backspace button.

Summary of Contents for HOG 1000

Page 1: ...Software Version 3 20...

Page 2: ...ideo Printer Amtron FR2651 Flat round cable woven shield FCC STATEMENT NOTE This equipment has been tested and found to comply with the limits for a Class B digital device pursuant to Part 15 of the F...

Page 3: ...oboScan is a trademark of Martin Professional a s Microsoft is a registered trademark and Windows is a trademark of Microsoft Corporation Software License Notice Your license agreement with Flying Pig...

Page 4: ...Saving and Loading Shows 14 QUICK START 17 Program a Cue 18 Record the Cue 19 Playback the Cue 19 Setting up the Stage for XYZ Mode 19 PROGRAMMING 21 Programming Styles 21 Programmer Overview 21 Sele...

Page 5: ...Cuelist Contents Window 66 Other Cuelist Window Functions 66 PLAYBACK 69 Masters 69 Other Playback Controls 70 Master Precedence 71 Customising Playback with Cuelist Options 71 Chases 73 SAVING AND M...

Page 6: ...ming 100 Playback 101 EXTENDED KEY CHART 103 Pig functions 103 Setup functions 103 External Keyboard 103 Key Mapping 104 Choose 104 FIXTURE LIBRARY 105 The files and what they do 105 Making a new fixt...

Page 7: ...levision or touring events Operational Overview For WHOLEHOG II Users The HOG is a quick jump from the WHOLEHOG II with almost all of the syntax and programming the same as on the WHOLEHOG II There ar...

Page 8: ...There are no preset faders for direct access Instead use the keypad to select a fixture and the Palettes or parameter wheels to grab the position beam or colour parameter you want You set fade times...

Page 9: ...fade time for fixtures which are fading intensity down In time out time unless otherwise specified Delay The time that the console waits before starting a cue s crossfade Wait The time a cue will wait...

Page 10: ...on t happen at all Please help us eliminate any problems by reporting them back to us There are two types of crashes fatal errors and program faults When a fatal error occurs the LCD will say I m sorr...

Page 11: ...generate personalities for new fixtures To ensure that you can take advantage of updates please complete and return to Jands Electronics the registration card that was shipped with your HOG If you inc...

Page 12: ...6 HOG Version 3 20 This Page intentionally Left Blank...

Page 13: ...o be chosen quickly from the keypad and are an easy way to create a cue Below the display screen are three Parameter Wheels which offer another choice when programming All parameters can alternatively...

Page 14: ...nd directly on the console and windows to view cue lists or palette lists Near the bottom of the main LCD is the Command Line This will tell you what fixtures are currently selected for programming an...

Page 15: ...ed and shares the same earth as the fixtures As with any DMX system the console and the fixtures must share the same ground ie be run off the same power otherwise signal corruption can occur If this i...

Page 16: ...ENTER 6 Repeat steps 2 to 5 for each fixture type to be used 7 Press Okay to return to the Patch window The fixtures listed in the schedule are all contained in the ROM Fixture Library which has perso...

Page 17: ...t 1 at DMX address 40 for the intensity and address 320 for the remaining parameters VL5s differ from most other fixtures in that they must be patched twice once for intensity and once for the other p...

Page 18: ...tion Press Okay to finish Note Parameters from unpatched fixtures will not be executed by masters Thus a cue with entirely unpatched fixtures will have no affect on the state of a master s LEDs ie the...

Page 19: ...by type is chosen the first palette of each set is an empty marker palette labelled with the name of the type in question Note that automenus incorporate any changes made to the fixture spreadsheet i...

Page 20: ...n formatted yet the console will do so automatically 3 Press Save Show 4 Press Okay 5 When save process is finished press Okay Loading Shows at Startup When you start up the console the last show in u...

Page 21: ...ish to load 2 Press Setup on the desk 3 Press Shows 4 Press New Show 5 Press Okay to lose current show in memory and load new show You do not require a library disk to start a new show The console now...

Page 22: ...16 HOG Version 3 20 This Page intentionally Left Blank...

Page 23: ...search by using the lower RHS cursor keys to move around the window 4 Press Set to change to the Fixture Type window 5 Again use the cursor keys to select the fixture to use such as Trackspot 6 Press...

Page 24: ...e keys are operating on the information on the main LCD panel Program a Cue Open the Programmer Window To open the Programmer window on the external monitor press and hold the Monitor button and then...

Page 25: ...he Halt button stops playback To clear a cue list on fader 1 first press fader 1 s Choose button to select it and then press Release Setting up the Stage for XYZ Mode Calibration The XYZ system must f...

Page 26: ...each one of the four points and record them into the respective palettes 9 Select each of the four focus points in turn press Set twice and then choose the appropriate identifier eg Cal USR 10 Press...

Page 27: ...and grouped positions are setup especially when using 3 D programming methods We recommend that you spend time learning to use the console and its options and then decide on the best way to program y...

Page 28: ...and also have VL5s currently selected and have 9 of them start with the programmer clear and you will finish up with Desk Channels 1 2 4 5 and VL5 9 selected Selecting different types at the same tim...

Page 29: ...skip the last digit for levels ending in zero For example 6 ENTER sets the fixtures to 60 For 6 type 06 ENTER Further selections can then be made and intensities set for other fixtures Intensities can...

Page 30: ...rammed Black text Parameters still active in the programmer but part of a previously recorded palette or cue Selecting the menu buttons at the top of the window shows more information Values Shows the...

Page 31: ...around just like cues But more on these items later Cue Names Cues can also be given text names by pressing Set immediately after recording the cue Enter a name in the Quick Name box and press ENTER...

Page 32: ...ng All Cybm2 litho in the group palette alternatively you can press Select on the toolbar followed by All Press Colour to make the parameter wheels swap to controlling colour If at any point you want...

Page 33: ...tures these symbols and refer to colour wheels and point in the direction of the wheel s rotation This symbol indicates split colours Type and Wheel Selection Apart from selecting palette numbers the...

Page 34: ...pan chase to be programmed independently of a tilt chase Now try saving your show to disk 1 Press the Setup key 2 Insert a 3 5 1 44MB floppy disk into the drive at the front of the console 3 Press Sa...

Page 35: ...ecord this as the second cue Note if you want to leave the timing window open you can do so by holding PIG and pressing Time In this case you need to press Set to insert new times Checking your cue be...

Page 36: ...efault cue times You can change the default times for fade and delay in the Control Panel window Setup Panel The console will automatically use these for your cues unless you make a change while progr...

Page 37: ...t into the right menu banks 3 Press ENTER Changing an existing Group To remove fixtures from a group or combine fixtures into a group 1 Select the desired fixtures to add or remove 2 Press Record The...

Page 38: ...the new palette in the palette button you have chosen and push all palette buttons from this button onwards one place to the right Replace will delete the current contents of the palette button and re...

Page 39: ...tion or 2 use the Load and Update buttons The first method works just like modifying groups 1 Select the fixtures you want to change and set the new parameters 2 Press Record 3 Choose an option Merge...

Page 40: ...t focus position needs updating You need only select the fixtures to modify and adjust their pan and tilt settings Once Update is pressed the update window shows the fixtures preset focus and lets you...

Page 41: ...ssible to Merge multiple items at a time by holding Copy or using the keypad syntax It is not possible to merge a Group into a Palette Where there is conflict between what s in the programmer and what...

Page 42: ...Merge or Remove 2 use Load Update or 3 using Update without Load Auto Update The first method uses the Record button in a similar manner to the way cues are created in the first place 1 Select fixture...

Page 43: ...ENTER 12 Cues can also be copied to other cuelists For example Copy 2 1 Thru 4 ENTER to 5 12 will copy cues 1 through 4 in Master number two s cuelist to cues 12 through 15 in Master number five s cu...

Page 44: ...elist When copying cues pressing State copies the entire state of the cuelist up to the point of the selected cue not just the cue This corresponds to the sum of all the cues up to and including the s...

Page 45: ...ters that have not been modified in the programmer will be not be recorded even if the Use button for that parameter has been pushed Cuelists Every cuelist is stored in the cuelist directory window Op...

Page 46: ...kly onto the Masters with one button press For concert design shows are often organised with one song per page When the set list arrives before each show it s a simple matter of moving the pages aroun...

Page 47: ...o add an existing cuelist to the current page 1 Open the cuelist directory by holding PIG and pressing List 2 Press Move or Copy 3 Press List 4 Select the cuelist by entering its number on the keypad...

Page 48: ...ill be replaced with cuelists from the incoming page A cuelist that is being held over from a previous page will display a in front of the cue name for example the normal name of a cue might be Drum S...

Page 49: ...it when you have one master cuelist for playback then change page to access different special effects Or use it to store useful manual control cuelists items such as smoke machines or lectern lights T...

Page 50: ...44 HOG Version 3 20 This Page intentionally Left Blank...

Page 51: ...wever this system can occasionally be confusing and sometimes recorded cues don t appear the same during playback as they did while in the programmer This problem usually one of two causes 1 Active cu...

Page 52: ...se the order in which it occurs 1 Select Cyber 1 Thru 10 2 Press Pig and Copy 3 Press Use I Use F Use C and Use B to select time parameters only 4 Cyber 10 Thru 1 Clone also works with XYZ programming...

Page 53: ...to 100 intensity and an open beam without this information being stored in the cue It s useful for updating preset focuses or for focusing a specific fixture in the middle of a cue Highlight will not...

Page 54: ...grammer Active 50 grabs all fixtures with intensity of at least 50 Substitute any other number for 50 Grabbing all parameters of a fixture Sometimes it is handy to grab all the parameters of an active...

Page 55: ...the fixtures selected in the programmer Grouping Pressing Grouping on the Programmer toolbar will group together fixtures in the designated parts during fanning For example pressing 3 Part means Fixtu...

Page 56: ...t works just like selecting an extra fixture type To enter DMX Test Mode press the Group button to display a list of the available fixture types and select the last item in the menu DMX Test The norma...

Page 57: ...r wheels and the lights will go there instantly Likewise if you need to nudge the lights up a bit maybe so they hit the top of a mike stand you only need to adjust the Z parameter wheel and all the li...

Page 58: ...ttes and then build your cues from the palettes Recording Cues with XYZ XYZ information can only be recorded into palettes and not into cues Therefore it is advisable to record all XYZ information fir...

Page 59: ...ng them try paging through the Effects palette Running Effects Across Different Fixtures and One Shot Effects To run effects across multiple fixture types or have an effect that runs once and stops se...

Page 60: ...ts by combining existing effects and recording the combined effect in a blank palette position Effects are usually transferable from one fixture type to another provided they have similar parameters s...

Page 61: ...unwanted parameters eg intensity in a movement effect 3 Choose an Effects button The new effect button will store the effects you set up An IFCB indicator in the palette button will show what paramet...

Page 62: ...56 HOG Version 3 20 This Page intentionally Left Blank...

Page 63: ...mined To open a cuelist s window hold down the Pig and press Choose for the desired Master Or hold Monitor and press QList on the toolbar to view the window on the external monitor and use the Choose...

Page 64: ...o the cue or to enter Comment Macros that can be used to control other cuelists See Macros later in this chapter Use the Set key and type in your comment followed by ENTER key Timing There are three t...

Page 65: ...applied to all the wait boxes you selected Setting the Fade and Delay times Fade and delay times can be adjusted by selecting the appropriate boxes pressing Set and typing in a new time Again several...

Page 66: ...n This time you will notice that when you execute cue 3 the fixtures are already in the correct colour and position and so all that cue 3 now executes is the fixtures intensity If the original cue cha...

Page 67: ...get If too many cuelists are all running at once then the desk might not be able to respond quickly enough to more important functions such as sending DMX streams To replay a cuelist on a virtual mast...

Page 68: ...press will also be recorded Only one macro can be recorded at a time the console will not allow you to record another macro if a macro is already being recorded Stop Recording To stop recording Press...

Page 69: ...ntry and while holding down the Pig key press ENTER 3 Select the cue prior to the point where you wish to insert the Macro cue using the cursor keys 4 Press Macro Q 5 You will see a point cue appear a...

Page 70: ...ressed at any time then the cuelist proceeds as normal and is removed from the waiting list Message pops up a warning box The text used in the warning box is taken from the comment field of the cue Be...

Page 71: ...to a Virtual Master It is possible to insert Mark Link and Macro cues without the cuelist being connected to a master If the cuelist is connected to a master then the cue is inserted at the current cu...

Page 72: ...Black Programmed in the displayed cue but unchanged from previous cues Red Parameters changed from the previous cue Intensity levels going up Green Intensity levels going down from the previous cue Wh...

Page 73: ...Pressing Renumber in the bottom cuelist toolbar renumbers the subsequently selected cues This is useful if you have mixed up the fixture numbering and you wish to bring some semblance of order to the...

Page 74: ...68 HOG Version 3 20 This Page intentionally Left Blank...

Page 75: ...he default destination for programming operations eg Record Copy etc Go Press Go to start a cue fading and start the cuelist executing cues running If the cuelist is already running press it to skip c...

Page 76: ...is at 0 Hold down the Choose button of the incoming master 2 Pull down the faders of the outgoing masters At this point NO fades will occur 3 Move up the incoming master s fader This will now perform...

Page 77: ...ole will output for a particular intensity channel the highest programmed value of all the HTP masters and the highest priority LTP master Cuelist options exist for fully customising the priority sche...

Page 78: ...Running These options determine what happens when the Go button is pressed while a cuelist is already executing cues Start next skip loop Starts next cue immediately Or if the cuelist is in the middle...

Page 79: ...ion is not selected then only the information specifically programmed in each cue will be output when that cue is active but not in jumps If Goto or a link cue is used to jump to a new cue the state w...

Page 80: ...not have to have simple default fade and delay times You can adjust them parameter by parameter as though they were a normal cue Chase settings In the options window you can select the chase directio...

Page 81: ...e finished okay appears when everything has been copied to the disk If your show is larger than can be stored on one floppy disk you may have to delete unused cues lists in order to save it 5 Press Ok...

Page 82: ...ng Shows Using the Change Show window you can select items from a different show and merge them into your current show To merge items into your new show 1 Insert into the disk drive the floppy contain...

Page 83: ...g up and making palettes on one console then saving to disk and loading onto the other console From then on parallel programming of cues and cuelists can occur When you come to merge back into one con...

Page 84: ...p window when the console is turned on You can press New Show in the Change Show window Or you can load a blank show from a floppy disk by pressing Load Show in either the start up window or the Chang...

Page 85: ...the on screen mouse with this option Use this mode to simplify control of X and Y parameters when programming fixtures External keyboard If you ve plugged in a keyboard use this button to prevent the...

Page 86: ...e hasn t been used If you use 0 they will never turn off To specify minutes enter the time then press Pig and Menu Lvl Sets the backlight level for the menu palette LCDs Levels range from 0 off to 3 f...

Page 87: ...dit again and enter your PIN With Lock All a warning window will appear indicating that the console is locked There is an entry box for entering your PIN to unlock The default PIN is 0 To change this...

Page 88: ...fader or button is not working on the console you can use the event monitor to accurately determine what works and what doesn t by looking at the information shown on the main LCD Debug Information Th...

Page 89: ...ical cue so the full cue number will always understate the number of cues left Custom Options An options text file called setup moreopts txt is now saved as part of the show Edit it to change the more...

Page 90: ...84 HOG Version 3 20 This Page intentionally Left Blank...

Page 91: ...atched to address 400 on output 1 This information is useful when a fixture is patched to multiple locations The channels view shows the patch location for every parameter of every fixture Fixture Edi...

Page 92: ...one type of fixture select the box on the ALL line 4 Press Set and enter the fixture number or the starting number if changing all of the fixtures Note You cannot give the same number to multiple fix...

Page 93: ...Press the Set key to toggle the selection between Normal and Invert Swap 5 Press Okay when you re done Invert Pan and Invert Tilt make the pan and tilt parameters respond in a reverse manner to normal...

Page 94: ...88 HOG Version 3 20 This Page intentionally Left Blank...

Page 95: ...Midi or Simulate from within the drop down menu 5 Move the selection box to Format and press Set Now use the cursor keys and Enter to choose the type of input Film 24 EBU 25 NTSC 30 and SMPTE 30 from...

Page 96: ...of entering numbers by hand it s possible to use the Learn Timing function found in the current cuelist window to enter them automatically editing manually later for fine tuning Simply turn on the fun...

Page 97: ...it in omni mode so that it responds to all channels To trigger other MIDI equipment using the console Select Notes Out from the Input Panel and set the MIDI channel to the correct channel for the rece...

Page 98: ...te 18 func_keys note 19 Example go note 8 This means that all go keys are transmitted as MIDI note 8 The note velocity is used to indicate which of the go buttons are being transmitted eg if fader 3 s...

Page 99: ...lcd lh_tool Touchpanels pressed touchpanel preceded by X and Y coords sent by coord_x coord_y Fourth Menu Palette Group menu buttons group_menu for all menus index 21 22 are the scrollup down keys Th...

Page 100: ...show disk is loaded Others Set others 1 Time others 35 Setup others 2 Blind others 36 Slash others 3 Try cue others 37 Dec others 4 Pig others 44 Minus others 5 Next page others 45 Plus others 6 DBO...

Page 101: ...epresents the channel number which can be between 0 and F hex Message Status in Hex Data 1 Data 2 Note off 8n Note number Velocity Note on 9n Note number Velocity Polyphonic aftertouch An Note number...

Page 102: ...n Standbye_ 12 Q_list Page Change Open Cue Path 1D Q_path Grand Master DBO Set 06 FE 01 value Rate Thruster Set 06 FF 01 value Console actions which MSC commands can not reproduce exactly Move Fader C...

Page 103: ...tered as a 4 digit or 2 digit year the console will interpret the century if omitted Daily Triggers Daily triggers allows you to leave the console running unattended and at a set time or times each da...

Page 104: ...timezone should be entered as the offset between GMT and your local time without their daylight saving time adjustments The longitude and latitude are entered in degrees and minutes west and east of t...

Page 105: ...is properly grounded and that it s on the same power source as the fixtures Test the cabling Use a DMX tester and work your way down the data line from the console to the fixtures Make sure the fixtu...

Page 106: ...x channels the colour wheel gets programmed as well even though I didn t touch it All the colour parameters are linked recording one records the others You can unlink them by using the control panel K...

Page 107: ...00 I created a chase on my fader but want to adjust the rate on the fly Hold down choose on the chase s Master and dial the parameter wheels I have an Intensity Only cue on a fader but nothing happens...

Page 108: ...fact that Halt back will not fade on the backup it will snap Plus it will not track any over rides using the programmer MIDI notes will do full tracking correctly Regarding crashes it depends what th...

Page 109: ...buttons left to right located on the external monitor Setup functions Setup also has special functions when used with other items Left Parameter Wheel Adjusts desk lamp brightness Centre Parameter Wh...

Page 110: ...eld down Adding the line no_keyboard_guard 1 to the file moreopts txt will disable this protection This protection is not present on the HogEdit offline editor available from the Flying Pig website ht...

Page 111: ...you were to look at the directory of a show disk using a PC this is what you would see _zcat dat System catalogue file binary library Subdirectory containing library files _lib lib Library file text...

Page 112: ...t your new fixture file Using a text editor on a PC create a new fixture file The next section describes the format of these files but to save time you can copy an existing one and edit it Save your f...

Page 113: ...l_5 lib will show vl 5 The following is a dissection of a typical library file version 1 Internal file format id Some optional syntax lines will require version number greater than 1 The notes will in...

Page 114: ...ange 42 58 congo centre range 59 74 bluehole centre range 75 89 yellhole centre range 90 107 warm centre range 108 123 cold centre range 128 255 spin The full available syntax is range min max label n...

Page 115: ...palette will be the minimum of the range unless centre is specified Since AutoMenus combines ranges across different fixture types into one palette it is important that you use consistent label names...

Page 116: ...y Finally there s no point in giving a range of values when the result is the same across the range range 0 26 white noauto range 244 255 shutter closed noauto should be range 0 open Since a gobo para...

Page 117: ...4_1 lib Vl6 Hi 4 1 Vlm 3 13 vari_4_1 lib Vl mirror 4 1 Vl5 m1 3 20 vari_4_2 lib Vl5 m1 Vl5 m2 3 21 vari_4_2 lib Vl5 m2 Vl5 m3 3 22 vari_4_2 lib Vl5 m3 Vl5 m4 3 23 _lib lib Vl5 m4 Vl5 m4 3 23 vari_4_2...

Page 118: ...et Xenotech 16 0 misc lib Xenotech Colormag 17 2 lsd lib Colormag Molemag 17 3 lsd lib Molemag Star 2G 19 0 misc lib Starlite 2G Starlite mk5 19 1 _lib lib Star5 RamPsu 21 0 wybron lib ColoRam PSU Aut...

Page 119: ...Fixture Library 113...

Page 120: ...nel sockets and are wired as follows Pin 1 Digital Ground Pin 2 Data ve Pin 3 Data ve Pin 4 Not Used Pin 5 Not Used RS 485 Standard USITT DMX 512 Protocol Desklight 2 ports are provided for desklights...

Page 121: ...n 13 SELECT Pin 14 AUTOFEED Pin 15 ERROR Pin 16 INIT Pin 17 SELECT IN Pin 18 Ground Pin 19 Ground Pin 20 Ground Pin 21 Ground Pin 22 Ground Pin 23 Ground Pin 24 Ground Pin 25 Ground VGA Port The VGA p...

Page 122: ...l Synchronisation Pin 15 Not Used Keyboard Port The Keyboard port allows an IBM AT style computer keyboard to be connected to the HOG The port is a 180 o 5 Pin female DIN connector and is wired as fol...

Page 123: ...Hardware Notes 117 This Page intentionally Left Blank...

Page 124: ...ables 9 Console Rate 70 Contents 66 Contrast 9 80 Control Panel 79 Copy 37 Groups and Palettes 34 Crashes 4 Croak 4 Crossfading 42 Cue 2 Cue Numbers 25 Cue Only 38 Cue Storage 25 Cuelist 2 39 merging...

Page 125: ...0 Maintain state 73 Manual Crossfades 70 Manual Fade 72 Manual Override 70 Mark 60 Mask 32 39 Masters Playback 69 Memory 83 Menus 81 Merge 32 33 36 Merging Cuelists 39 Groups and Palettes 35 Merging S...

Page 126: ...tion 4 Save As 77 Saving 14 75 Screen Setup 9 Select 46 Serial Output 94 Simulating Timecode 90 Single Q Rate 70 SMPTE 89 Software Updates 5 Split Fade Times 59 Split Timing 29 State 37 Stomped 71 Sup...

Reviews: