45
_____________________________________________________________________________________________
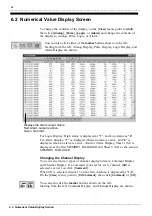
6.2 Numerical Value Display Screen
______________________________________________________________________________________________
Changing the Display Interval
You can make cropping settings, then change the display interval for the
time elapsed.
On the [
View
] menu, point to [
Thin Out
], then click [
1/1
], [
1/2
], [
1/5
], [
1/10
],
[
1/100
], or [
1/1000
].
You can also click the
toolbar
buttons shown on the left.
Changing Waveform Formats for Time Elapsed
For details on display formats, refer to 5.2.2 "Changing the Format of the
Time Axis."
On the [
View
] menu, point to [
Time Notation
], then click [
Absolute Time
],
[
Relative Time
], [
Sec
], or [
Sampling No.
].
You can also click the
toolbar
buttons shown on the left. Starting from
the left: Absolute Time, Relative Time, Seconds, and Sampling Number
are shown.
Tracing Settings (during measurement)
When the tracing function is active, you can update the display so that the
time elapsed follows the values. If this function is inactive, the display is not
updated until the data is completely loaded, even if values are displayed all
the way to the bottom of the display screen.
To activate or deactivate the tracing function, on the [
View
] menu, click
[
Trace
].
You can also click the
toolbar
button shown on the left.
Copying
On the [
Edit
] menu, click [
Copy
] to copy the display values of the selected
lines (text format) to the clipboard, then paste them into another program.
You can also click the
toolbar
button shown on the left.
Click lines to select them.
To select more than one line, hold the
Ctrl
key while you click other lines
that you want to select.
You can select a block of lines by selecting the first line, then holding the
Shift
key while you select the last line of the block.

