B. Accessories
B−9
Festo P.BE−MPA−EN en 0502b
Fitting
Proceed as follows:
1. Make sure the seals are not damaged. Replace the seals if
they are damaged.
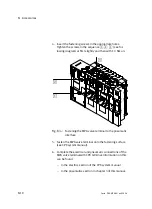
2. Place the sheet metal seal onto the guide pin of the pneu
matic interface.
1
Guide pins
2
Pneumatic
sub−base
3
Sheet metal seal
4
Pneumatic
interface
1
2
3
4
1
Fig.B/3:
Fitting the MPA valve terminal to the pneumatic interface
3. Push the pneumatic interface together with the pneumatic
sub−bases. Make sure that the seal and the components
are correctly positioned.
Summary of Contents for MPA-FB Series
Page 2: ......
Page 4: ...Contents and general instructions II Festo P BE MPA EN en 0502b...
Page 8: ...Contents and general instructions VI Festo P BE MPA EN en 0502b...
Page 17: ...Summary of components 1 1 Festo P BE MPA EN en 0502b Chapter 1...
Page 30: ...1 Summary of components 1 14 Festo P BE MPA EN en 0502b...
Page 31: ...Fitting 2 1 Festo P BE MPA EN en 0502b Chapter 2...
Page 47: ...Installation 3 1 Festo P BE MPA EN en 0502b Chapter 3...
Page 55: ...3 Installation 3 9 Festo P BE MPA EN en 0502b 1 2 3 Fig 3 2 Disconnecting the tubing...
Page 79: ...Commissioning 4 1 Festo P BE MPA EN en 0502b Chapter 4...
Page 96: ...4 Commissioning 4 18 Festo P BE MPA EN en 0502b...
Page 97: ...Diagnosis and error treatment 5 1 Festo P BE MPA EN en 0502b Chapter 5...
Page 139: ...Technical appendix A 1 Festo P BE MPA EN en 0502b Appendix A...
Page 151: ...Accessories B 1 Festo P BE MPA EN en 0502b Appendix B...
Page 161: ...Index C 1 Festo P BE MPA EN en 0502b Appendix C...
Page 162: ...C Index C 2 Festo P BE MPA EN en 0502b Contents C Index C 1...


