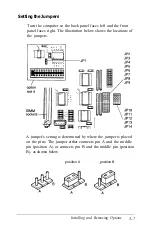
To move a jumper from one position to the other, use needle-
nose pliers
or
tweezers to pull it off its pins and gently move it to
the desired position. Be careful not to lose the jumper.
Caution
Be careful not to bend the jumper pins or damage any
surrounding components on the main system board.
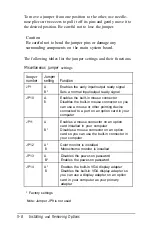
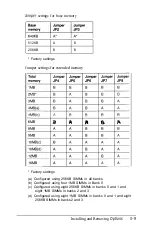
The following tables list the jumper settings and their functions.
Miscellaneous jumper
settings
Jumper
Jumper
number
setting
Function
JP1
A
Enables the early input/output ready signal
B*
Sets a normal input/output ready signal
JP10
A
Enables the built-in mouse connector
B
Disables the built-in mouse connector so you
can use a mouse or other pointing device
connected to a port on an option card in your
computer
JP11
A
B*
Enables a mouse connector on an option
card installed in your computer
Disables a mouse connector on an option
card so you can use the built-in connector in
your computer
JP12
JP13
JP14
A*
B
A
B*
A*
B
Color monitor is installed
Monochrome monitor is installed
Disables the power-on password
Enables the power-on password
Enables the built-in VGA display adapter
Disables the built-in VGA display adapter so
you can use a display adapter on an option
card in your computer as your primary
adapter
* Factory settings
Note: Jumper JP9 is not used
5-8
Installing
and
Removing Options
Summary of Contents for Equity 386/25
Page 1: ......
Page 3: ......
Page 14: ...xii ...
Page 20: ...6 lntroduction ...
Page 63: ...Hard disk drive types continued Running the Setup Program 2 25 ...
Page 142: ...5 34 lnstalling and Removing Options ...
Page 248: ...C 14 Physically Formatting a Hard Disk ...
Page 298: ...F 6 Specifications ...
Page 326: ......

