EPSON Stylus COLOR 900/900N
Chapter 5 Adjustments
120
Removing and then
reinstalling the
same printhead
1
Make sure the ink cartridges are not installed, and then
turn the printer on to cause the Ink Out error.
2
Press the Cleaning button for three seconds. The printer
enters the ink cartridge replacement sequence and the
carriage moves to the black ink cartridge replacement
position.
3
Insert a new black ink cartridge, close the ink cartridge
clamp, and then press the Cleaning button to move the
carriage to the color ink cartridge replacement position.
4
Insert a new color ink cartridge, close the ink cartridge
clamp, and then press the Cleaning button. The printer
performs the ink charge operation.
5
Perform the Head Angular Adjustment. See
6
Perform the Bi-directional Adjustment. See.
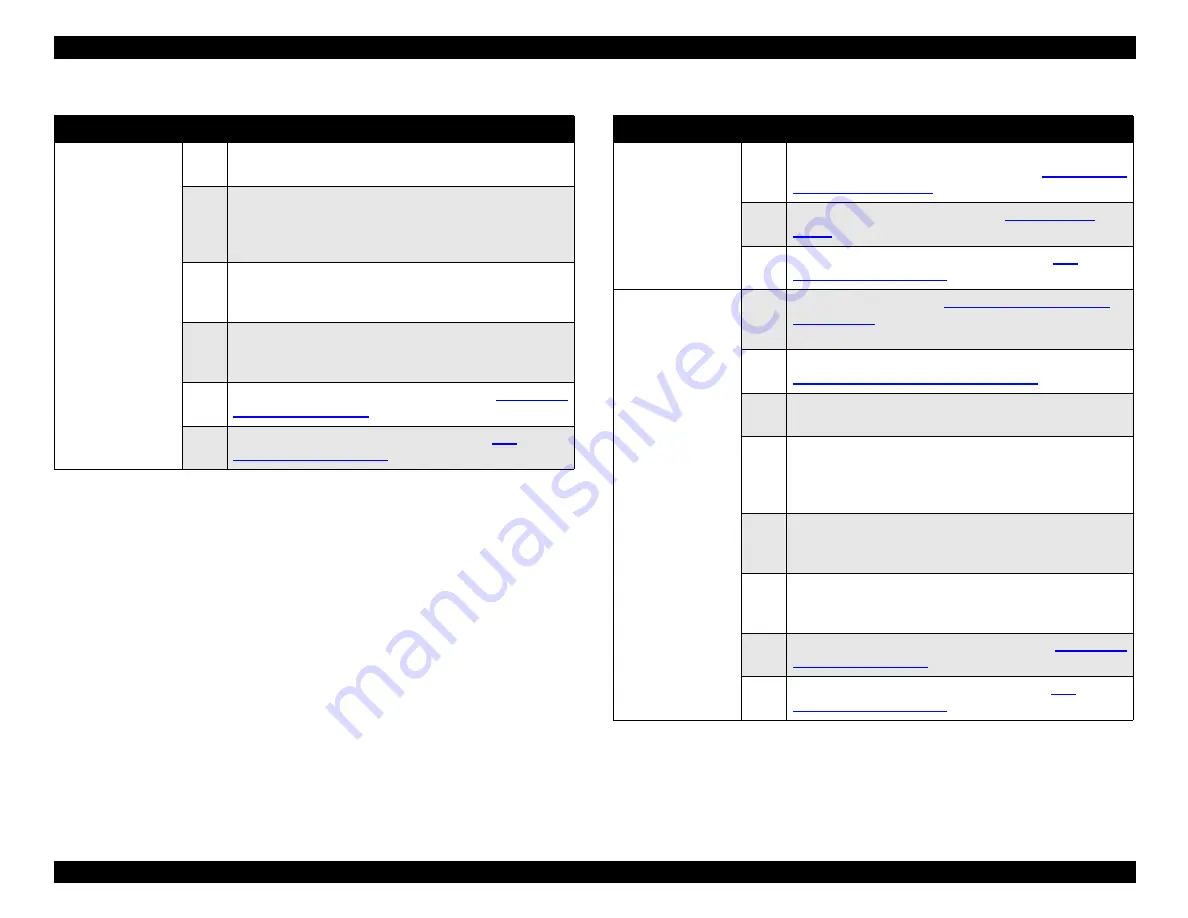
Table 5-1. Required Adjustments (continued)
Type of repair
Step
Required adjustments
C265 Main board
replacement
1
Start the adjustment program and select the printer’s
model name and market destination. See
3
Input the 22-digit printhead ID. See
4
Perform the Bi-Directional Adjustment. See
CR shaft removal
or replacement
1
Follow the instructions in
on page 162 to clean and lubricate the
carriage guide shaft.
2
Perform the Platen Gap (Parallelism) Adjustment. See
“Platen Gap (Parallelism) Adjustment”
3
Make sure the ink cartridges are not installed, and then
turn the printer on to cause the Ink Out error.
4
Press the Cleaning button for three seconds. The printer
enters the ink cartridge replacement sequence and the
carriage moves to the black ink cartridge replacement
position.
5
Insert a new black ink cartridge, close the ink cartridge
clamp, and then press the Cleaning button to move the
carriage to the color ink cartridge replacement position.
6
Insert a new color ink cartridge, close the ink cartridge
clamp, and then press the Cleaning button. The printer
performs the ink charge operation.
7
Perform the Head Angular Adjustment. See
8
Perform the Bi-directional Adjustment. See.
Table 5-1. Required Adjustments (continued)
Type of repair
Step
Required adjustments
Summary of Contents for 900N
Page 1: ...EPSONStylusCOLOR900 900N Color ink jet printer TM SC900 N 6 59 0 18 ...
Page 8: ... 37 5 PRODUCTDESCRIPTION ...
Page 37: ... 37 5 OPERATINGPRINCIPLES ...
Page 67: ... 37 5 TROUBLESHOOTING ...
Page 89: ... 37 5 DISASSEMBLYANDASSEMBLY ...
Page 121: ... 37 5 ADJUSTMENTS ...
Page 156: ... 37 5 MAINTENANCE ...
Page 169: ... 37 5 APPENDIX ...
Page 179: ...EPSON Stylus COLOR 900 900N Chapter 7 Appendix 176 Figure 7 3 C265 Main Board Soldering side ...
Page 181: ...EPSON Stylus COLOR 900 900N Chapter 7 Appendix 178 Figure 7 6 C265 PNL Board ...
Page 195: ...06 03 01 02 for S E ASIA 03 03 05 03 04 EPSON STYLUS COLOR 900 No 7 10056 Rev 01 ...
Page 197: ......
Page 198: ......
Page 199: ......
Page 200: ......
Page 201: ......

