EPSON Stylus COLOR 900/900N
Chapter 5 Adjustments
139
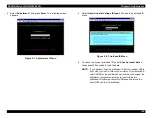
3. Select Bi-Directional Adjustment. You see the Bi-D adjustment
menu:
Figure 5-29. Bi-D Adjustment Menu
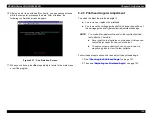
4. Select Print the Bi-D adjustment pattern. You see a description of
the pattern to be printed:
Figure 5-30. Description of Pattern to Be Printed
5. Press Enter to print the Bi-D adjustment pattern.
NOTE:
Never print the adjustment pattern on plain paper. Always
use coated ink jet paper for clear, sharp output.
To ensure proper adjustment, use an eye-loupe or a
magnifying glass to view the adjustment pattern.
Summary of Contents for 900N
Page 1: ...EPSONStylusCOLOR900 900N Color ink jet printer TM SC900 N 6 59 0 18 ...
Page 8: ... 37 5 PRODUCTDESCRIPTION ...
Page 37: ... 37 5 OPERATINGPRINCIPLES ...
Page 67: ... 37 5 TROUBLESHOOTING ...
Page 89: ... 37 5 DISASSEMBLYANDASSEMBLY ...
Page 121: ... 37 5 ADJUSTMENTS ...
Page 156: ... 37 5 MAINTENANCE ...
Page 169: ... 37 5 APPENDIX ...
Page 179: ...EPSON Stylus COLOR 900 900N Chapter 7 Appendix 176 Figure 7 3 C265 Main Board Soldering side ...
Page 181: ...EPSON Stylus COLOR 900 900N Chapter 7 Appendix 178 Figure 7 6 C265 PNL Board ...
Page 195: ...06 03 01 02 for S E ASIA 03 03 05 03 04 EPSON STYLUS COLOR 900 No 7 10056 Rev 01 ...
Page 197: ......
Page 198: ......
Page 199: ......
Page 200: ......
Page 201: ......


