background image

Getting Help

229

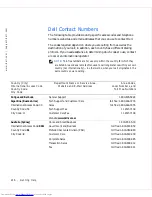
U.S.A. (Austin, Texas)

International Access Code: 

011

Country Code: 

1

Automated Order-Status System

toll free: 1-800-433-9014

AutoTech (For portable and desktop computers)

toll free: 1-800-247-9362

Dell Home and Small Business Group 

(For portable and desktop computers): 

Customer Technical Support (Return material 

authorization numbers)

toll free: 1-800-624-9896

Customer Technical Support (Home sales 

purchased via 

www.dell.com

)

toll free: 1-877-576-3355

Customer Service (Credit return authorization 

numbers)

toll free: 1-800-624-9897

National Accounts

 (Computers purchased by established Dell national accounts 

[have your account number handy], medical institutions, or value-added resellers 

[VARs]):
Customer Service and Technical Support (Return 

material authorization numbers)

toll free: 1-800-822-8965

Public Americas International

 (Computers purchased by governmental agencies 

[local, state, or federal] or educational institutions):
Customer Service and Technical Support (Return 

material authorization numbers)

toll free: 1-800-234-1490

Dell Sales

toll free: 1-800-289-3355

 or toll free: 1-800-879-3355

Spare Parts Sales

toll free: 1-800-357-3355

Desktop and Portable Fee-Based Technical Support

toll free: 1-800-433-9005

Sales (Catalogs)

toll free: 1-800-426-5150

Fax

toll free: 1-800-727-8320

TechFax

toll free: 1-800-950-1329

Dell Services for the Deaf, Hard-of-Hearing, or 

Speech-Impaired

toll free: 1-877-DELLTTY

(1-877-335-5889)

Switchboard

512 338-4400

DellNet™ Technical Support

toll free: 1-877-Dellnet

(1-877-335-5638)

US Virgin Islands

General Support

1-877-673-3355

Venezuela

General Support

8001-3605

Country (City)
International Access Code 
Country Code

City Code

Department Name or Service Area,

Website and E-Mail Address

Area Codes,

Local Numbers, and

Toll Free Numbers

Summary of Contents for OptiPlex GX50

Page 1: ...w w w d e l l c o m s u p p o r t d e l l c o m Dell OptiPlex GX50 Systems User s Guide ...

Page 2: ...n DellNet and OptiPlex are trademarks of Dell Computer Corporation Intel is a registered trademark and Celeron is a trademark of Intel Corporation Microsoft Windows NT MS DOS and Windows are registered trademarks of Microsoft Corporation 3Com is a registered trademark of 3Com Corporation IBM is a registered trademark of International Business Machines Corporation NetWare and Novell are registered ...

Page 3: ...Button 20 Power Light 22 Floppy Drive Access Light 23 Hard Drive Access Light 23 Back View 23 Connecting Devices 26 Parallel Connector 27 Mouse Connector 27 USB Connectors 27 Integrated Network Adapter Connector 27 Network Cable Requirements 27 Line In Jack 28 Line Out Jack 28 Microphone Jack 28 Serial Port Connectors 28 Keyboard Connector 28 Video Connector 28 Inside Your Computer Inside Your Com...

Page 4: ...y Cable Slot and Padlock Ring 42 Password Protection 42 System Password 42 Setup Password 45 Disabling a Forgotten Password 46 Computer Settings 47 Entering System Setup 48 System Setup Screens 48 Changing the Boot Sequence 50 Additional System Setup Options 52 If You Have a Problem 58 Jumper Settings 58 Software Installation and Configuration 60 3 Installing Upgrades Opening the Computer Cover 62...

Page 5: ...mall Mini Tower Computer 88 Replacing Front Panel Inserts 89 Internal Drives 89 IDE Drive Addressing 92 Connecting Drives 93 Hard Drives 95 Detaching Hard Drive Cables 96 Removing a Hard Drive 99 Installing a Hard Drive 102 Reattaching Hard Drive Cables 103 Adding a Second Hard Drive Small Mini Tower Computer 107 Floppy Drives 109 Detaching Floppy Drive Cables 109 Removing a Floppy Drive 113 Insta...

Page 6: ... Application and Device Compatibility 141 Program Compatibility Wizard 141 System Restore 142 Using System Restore 143 Restore Process 144 Driver Rollback 145 User Accounts and Fast User Switching 146 How to Use Fast User Switching 146 What Happens When a Fast User Switch Occurs 147 Special Considerations With Fast User Switching 147 How to Turn Off Fast User Switching 148 How to Add Users 148 Hom...

Page 7: ...Problems 177 Recover From a Program That Is Not Responding 178 Restart a Computer That Is Not Responding 179 Repairing a Wet Computer 179 Repairing a Dropped or Damaged Computer 180 Hardware Conflicts 180 Computer Memory Problems 181 System Board Problems 182 Resetting a Damaged System Board 183 Dell Diagnostics 184 When to Use the Dell Diagnostics 184 Features 184 Before You Start Testing 184 Run...

Page 8: ...205 Program Conflicts 205 Memory Address Conflicts 206 Interrupt Assignment Conflicts 206 BIOS Recovery Utility 207 7 Getting Help Help Overview 210 Technical Assistance 210 Help Tools 210 Problems With Your Order 213 Product Information 213 Returning Items for Warranty Repair or Credit 213 Before You Call 214 Dell Contact Numbers 216 8 Additional Information Regulatory Notices 232 FCC Notices U S...

Page 9: ...of Korea Only 239 Polish Center for Testing and Certification Notice 241 Wymagania Polskiego Centrum BadaÒ i Certyfikacji 241 PozostaŠe instrukcje bezpieczeÒstwa 242 BSMI Notice Taiwan Only 244 NOM Information Mexico Only 245 Información para NOM únicamente para México 246 ENERGY STAR Compliance 247 Limited Warranty and Return Policy 248 Glossary 249 ...

Page 10: ...x Contents ...

Page 11: ...e card slot openings at the back of the computer before touching anything inside your computer While you work periodically touch an unpainted metal surface on the computer chassis to dissipate any static electricity that might harm internal components 4 Disconnect your computer and devices from their power sources Also disconnect any telephone or telecommunication lines from the computer Doing so ...

Page 12: ... touching an unpainted metal surface on the computer chassis As you continue to work inside the computer periodically touch an unpainted metal surface to remove any static charge your body may have accumulated You can also take the following steps to prevent damage from electrostatic discharge ESD When unpacking a static sensitive component from its shipping carton do not remove the component from...

Page 13: ... of the monitor its contrast and brightness settings and the lighting around you such as overhead lights desk lamps and the curtains or blinds on nearby windows to minimize reflections and glare on the monitor screen Use a chair that provides good lower back support Keep your forearms horizontal with your wrists in a neutral comfortable position while using the keyboard or mouse Always leave space...

Page 14: ...c o m s u p p o r t d e l l c o m 1 Monitor screen at or below eye level 4 Arms at desk level 2 Monitor and keyboard positioned directly in front of the user 5 Wrists relaxed and flat 3 Feet flat on the floor 2 1 3 4 5 ...

Page 15: ...w w w d e l l c o m s u p p o r t d e l l c o m SE CT ION 1 About Your Computer Finding Information and Assistance Front View Back View Inside Your Computer Removing and Attaching the Computer Stand ...

Page 16: ...en shipped from Dell You can use this CD to access documentation reinstall drivers or run diagnostics tools You must boot your computer from this CD to run the diagnostics which may require changing your computer s boot sequence see Changing the Boot Sequence Setup and Quick Reference Guide Getting started setup Support tools Solving Problems Warranty information Read the Setup and Quick Reference...

Page 17: ...installing and configuring your operating system Click the Start button and select Help or Help and Support depending on your operating system to obtain more information on your operating system User s guides for your computer and devices Depending on your operating system double click the User s Guides icon on your desktop or click the Start button and then select Help and Support to access the e...

Page 18: ...stions Obtain answers to technical service and support questions Get the latest versions of the drivers for your computer Access documentation about your computer and devices Join online discussions with other Dell customers and Dell technical professionals Explore a list of online links to Dell s primary vendors Dell Premier Support website Service call status Top technical issues by product Freq...

Page 19: ...D es k t op C om p u te r 1 USB connectors 2 2 Headphone connector 3 Hard drive access lights 4 Power button 5 Power light 1 Front panel door 2 Power button 3 Power light 4 Hard drive access light 5 Floppy drive access light 1 2 3 4 5 ...

Page 20: ...l c o m s u p p o r t d e l l c o m Small Mini Tow er Comput er 1 Removable CD drive panel 2 Floppy drive access light 3 Removable floppy drive panel 4 Hard drive access light 5 Power button 6 Power light 7 Front panel door 2 1 3 4 5 6 7 ...

Page 21: ...s two Universal Serial Bus USB connectors and the headphone connector This door is removable if you remove it or accidentally knock it off its hinges it snaps back in place S ma l l D es k t op C om p u te r 1 USB connectors 2 2 Headphone connector 3 Breakaway hinges 2 2 1 3 ...

Page 22: ...ut er Speaker Headphone Connector Used to connect computer speakers headphones or other audio output devices This connector is amplified to support headphones Power Button The power button controls the computer s AC input power 1 Breakaway hinges 2 2 USB connectors 2 3 Headphone connector 2 1 3 ...

Page 23: ...ss power button Computer goes into standby mode or turns off depending on the operating system setup Computer turns on Boots and computer turns on Hold power button for 6 seconds Computer turns off Computer turns off Boots and computer turns on Pressing or holding the power button to shut down the computer may result in data loss Use the power button to shut down the computer only if the operating...

Page 24: ...r does not restart press the power button to restart the computer Power Light The power light illuminates in two colors and blinks or remains solid to indicate different states normal and nonnormal The following are normal lights No light computer is in the off state S4 S5 or mechanical OFF Steady green normal operating state Blinking green low power state S1 or S3 Action Results Computer Turned O...

Page 25: ...indows 2000 or Windows XP if enabled in the operating system OS PS 2 keyboards will always wake the computer from S3 in Windows 98 SE and will wake from S3 in Windows 2000 or Windows XP if enabled in the operating system See Diagnostic Lights for a description of nonnormal indications Floppy Drive Access Light The floppy drive access light lights when the drive is reading data from or writing data...

Page 26: ...24 About Your Computer w w w d e l l c o m s u p p o r t d e l l c o m S ma l l D es k t op C om p u te r 1 PCI slots 2 2 AC adapter 2 1 ...

Page 27: ...About Your Computer 25 Small Mini Tow er Comput er 1 AC adapter 2 AC voltage switch 3 AGP slot 4 PCI slots 4 2 1 3 4 ...

Page 28: ...printer usually require you to load device drivers into computer memory before they will work Always attach external devices while your computer is turned off Then turn on the computer before turning on any external devices unless the documentation for the device specifies otherwise If the computer does not seem to recognize the device try turning on the device before turning on the computer 1 Par...

Page 29: ...ork Adapter Connector The network adapter which includes a Remote Wake Up feature has the following lights A yellow activity light flashes when the computer is transmitting or receiving network data A high volume of network traffic may make this light appear to be in a steady on state A dual colored link integrity light which is green when there is a good connection between a 10 megabit per second...

Page 30: ...n reassign the serial port s designation if you add an expansion card containing a serial port using this designation If you set the computer s serial ports to Auto in system setup and add an expansion card containing a serial port configured to a specific designation the computer automatically maps assigns the integrated ports to the appropriate COM setting as necessary Before you add a card with...

Page 31: ... ma l l Fo rm Fa c to r C om p u te r 1 Hard drive 7 System board 2 3 5 inch floppy drive 8 Power supply 3 CD drive 9 AC power connector 4 Cover release buttons 2 10 I O ports and connectors 5 Internal speaker 11 Padlock ring 6 Chassis intrusion switch 12 Heat sink assembly 2 1 3 5 6 7 9 8 10 11 12 4 ...

Page 32: ...ver release buttons 2 8 AC power connector 2 Hard drive 9 Padlock ring 3 Internal speaker 10 I O ports and connectors 4 Chassis intrusion switch 11 Heat sink assembly 5 Expansion card cage 12 System board 6 Power supply 13 3 5 inch floppy drive 7 Expansion card slots 14 CD drive 2 1 3 5 6 4 7 8 9 10 11 12 13 14 ...

Page 33: ...8 AC power connector 2 Hard drive 9 Padlock ring 3 Internal speaker 10 Microprocessor and airflow shroud 4 Chassis intrusion switch 11 Power supply 5 System board 12 3 5 inch floppy drive 6 Expansion card slots 13 CD drive 7 I O ports and connectors 2 1 3 5 6 4 7 8 9 10 11 12 13 ...

Page 34: ...a ble C olo rs System Board Components The following figure shows the principal connectors and components on the system board Hard drive Blue pull tab Floppy drive Black pull tab CD drive Orange pull tab ATA or IDE Gray Control panel Gray CD audio Blue Computer audio Black ...

Page 35: ...About Your Computer 33 10 4 3 2 1 5 11 12 13 14 15 16 17 18 19 20 22 23 24 7 21 6 9 8 Back of Computer Front of Computer ...

Page 36: ... lower connectors 8 PCI3 connector 20 Fan connector 9 PCI4 connector 21 Microprocessor and heat sink 10 PCI2 connector 22 Memory module DIMM connectors 11 PCI1 connector 23 DC power connector 12 CD audio connector 24 System board speaker Connector or Socket Description AUDIO Line in line out and microphone jacks AUX_PWR Standby power light BATTERY Battery socket CD_IN CD drive audio cable connecto...

Page 37: ... Keyboard and mouse connectors MICROPROCESSOR Microprocessor connector MODEM Telephony connector MONITOR Video connector NIC_USB Integrated network adapter connector and USB connectors PAR_SER1_SER2 Parallel and serial connectors PCI1 PCI2 PCI3 and PCI4 PCI expansion card connectors POWER Main power input connector PSWD Password jumper H_RISER Horizontal riser board connector vertical PCI cards V_...

Page 38: ...36 About Your Computer w w w d e l l c o m s u p p o r t d e l l c o m Sma ll Fo rm Fac to r Des kt o p Com p u te r St a nd ...

Page 39: ...t the stand onto what was the left side of the computer c Position the stand as shown in the figure by aligning the large round hole in the stand with the securing button on the side of the cover and aligning the captive screw in the stand with the screw hole in the cover d When the stand is in place tighten the thumbscrew e Rotate the computer so that the stand is at the bottom and the drives are...

Page 40: ...38 Abo u t You r C o mp u t er w w w d e l l c o m s u p p o r t d e l l c o m ...

Page 41: ...o r t d e l l c o m SE CT ION 2 Advanced Features LegacySelect Technology Control Manageability Security Password Protection Computer Settings Additional System Setup Options Jumper Settings Software Installation and Configuration ...

Page 42: ... place after you reboot the computer Manageability Dell OpenManage IT Assistant Dell OpenManage IT Assistant is the premier Dell systems management application for configuring managing and monitoring computers and other devices on a corporate network IT Assistant employs the latest remote management technology to provide asset management configuration management event alert management and security...

Page 43: ...rs which when set up on a network with IT Assistant are called managed systems For more information about Dell OpenManage Client Instrumentation see the Dell OpenManage Client Instrumentation User s Guide available on the Dell website Security The computer provides the following methods of physically securing the chassis Chassis Intrusion Detection Security Cable Slot and Padlock Ring Chassis Intr...

Page 44: ...ext computer start up Disabled No intrusion monitoring occurs and no messages appear NOTE When the setup password is enabled you must know the setup password before you can reset the Chassis Intrusion option Security Cable Slot and Padlock Ring This ring is used to attach commercially available antitheft devices To prevent unauthorized removal of your computer loop the galvanized security cable ar...

Page 45: ...d the password jumper on the system board is in the enabled position its default setting NOTE You can only assign a system password when System Password is set to Not Enabled Assigning a System Password 1 Verify that Password Status is set to Unlocked 2 Highlight System Password and then press the left or right arrow key The option heading changes to Enter Password followed by an empty 32 characte...

Page 46: ...tem Password When you turn on your computer or press the reset button or when you reboot the computer by pressing the Ctrl Alt Del combination the following prompt appears on the screen when Password Status is set to Unlocked Type in the password and press ENTER to leave password security enabled press CTRL ENTER to disable password security Enter password If Password Status is set to Locked the f...

Page 47: ...e with the normal operation of your computer 5 Confirm that Not Enabled is displayed for the System Password option If Not Enabled appears in the System Password option the system password has been deleted If you want to assign a new password continue to step 6 If Not Enabled is not displayed for the System Password option press Alt B to reboot the computer and then repeat steps 3 through 5 6 To a...

Page 48: ... change to Setup Password becomes effective immediately rebooting the computer is not required Operating Your Computer With a Setup Password Enabled When you start system setup the Setup Password option is highlighted prompting you to type the password If you do not enter the correct password the computer lets you view but not modify system setup options NOTE You can use Password Status in conjunc...

Page 49: ...ssword feature CAUTION Before you open the computer cover see Safety Instructions 1 Open the computer cover 2 Replace the PSWD jumper plug 3 Close the computer cover and reconnect the computer and devices to an electrical outlet and turn them on Booting your computer with the PSWD jumper installed reenables the password feature When you enter system setup both password options appear as Not Enable...

Page 50: ...ready on shut it down and then turn it on again 3 When Press F2 to Enter Setup appears in the upper right corner of the screen press F2 If you wait too long and your operating system begins to load into memory let the computer complete the load operation then shut down the computer and try again NOTE To ensure an orderly computer shutdown consult the documentation that accompanied your operating s...

Page 51: ... change because they are set by the computer appear less bright When Enter appears to the right of an option title press Enter to access a popup menu of additional options Key functions a line of boxes across the bottom of all screens that lists keys and their functions within system setup Help press F1 for information in the currently highlighted option ...

Page 52: ... field Cycles through the options in a field In many fields you can also type the appropriate value Scrolls through help information Enters the selected field s pop up options menu spacebar or In the selected field s pop up options menu cycles through the options in a field Exits system setup without rebooting the system and returns the system to the boot routine Exits system setup and reboots the...

Page 53: ...attempt to boot from the next device in the list CD ROM Device The computer will attempt to boot from the CD drive If the computer does not find a CD in the drive or if there is not an operating system on the CD the computer will attempt to boot from the next device in the list MBA Onboard NIC Selecting MBA UNDI allows the computer to boot from the network server The MBA UNDI option appears under ...

Page 54: ...cess memory NVRAM Auto Power On allows you to set the time and days of the week to turn on the computer automatically You can set Auto Power On to turn on the computer either every day or every Monday through Friday NOTE This feature does not work if you turn off your computer using a power strip or surge protector Time is kept in a 24 hour format hours minutes To change the start up time press th...

Page 55: ...rive is the 3 5 inch floppy drive installed in the top externally accessible drive bay The Diskette Drive A option has the following possible settings 3 5 Inch 1 44 MB Not Installed NOTE Tape drives are not reflected in the Diskette Drive A option For example if you have a single floppy drive and a tape drive attached to the floppy tape drive interface cable set Diskette Drive A to match the chara...

Page 56: ...select PXE RPL BootP or NetWare as the active boot mode Mouse Port enables or disables the computer s integrated Personal System 2 PS 2 compatible mouse port Disabling the mouse allows an expansion card to use interrupt request IRQ 12 This setting is used to control the use of this legacy device Serial Port 1 and Serial Port 2 configure the computer s integrated serial ports You can set these opti...

Page 57: ...OTE You cannot set the parallel port to 3BCh if Mode is set to EPP DMA Channel This option determines the direct memory access DMA channel used by the parallel port and appears only when Mode is set to ECP The available options are DMA 1 DMA 3 and Off IDE Drive Interface enables or disables the computer s integrated enhanced integrated drive electronics EIDE hard drive interface With Auto the defa...

Page 58: ... Off if you are using a PS 2 compatible keyboard and mouse NOTE For Windows NT Off is the default setting Primary Video Controller determines which video controller to use when the computer boots When Auto is selected the computer uses a video expansion card if one is installed or the onboard video controller if a video expansion card is not installed When Onboard is selected the computer uses the...

Page 59: ...ic IRQ line already in use by a PCI device Primary Drive n and Secondary Drive n Primary Drive n identifies drives attached to the primary EIDE interface connector labeled IDE1 on the system board Secondary Drive n identifies drives connected to the secondary EIDE interface connector labeled IDE2 Use the secondary EIDE interface connector for EIDE CD drives and EIDE tape drives NOTE For all device...

Page 60: ...ates the following message Performing automatic IDE configuration Primary Master IDE Disk Drive Secondary Master CD ROM Reader If it detects a device during the scan it sets the device to Auto in system setup If no device is listed it sets the device setting to Off in system setup If your computer does not reset after you perform these steps enter system setup and reset the computer to its origina...

Page 61: ... damage to your computer or unpredictable results may occur To change the jumper setting to disabled pull the plug off its pins To reenable the setting carefully fit the plug onto the pins indicated S ys te m Boa r d J u m p er S et ti n g s Jumper Setting Description PSWD default Password features are enabled Password features are disabled jumpered unjumpered ...

Page 62: ...at hardware it requires and what its defaults are A program usually includes installation instructions in its accompanying documentation and a software installation routine on its program floppy disks or CD s The software installation routine assists you in transferring the appropriate program files to your computer s hard drive Installation instructions may provide details about how to configure ...

Page 63: ... r t d e l l c o m SE CT ION 3 Installing Upgrades Computer Cover Expansion Cards Expansion Card Cage Small Desktop Computer Only Memory Microprocessor Front Panel Inserts Internal Drives Hard Drives Floppy Drives CD Drives Battery ...

Page 64: ...If you have installed a padlock through the padlock ring on the back panel remove the padlock NOTICE Do not open the cover if the computer is on the edge of a desk or table Doing so may cause the computer to tip over and fall Make sure that the computer is situated so that there is at least 12 inches of desk or table top for the cover to rest on 3 Press the two release buttons until the cover is f...

Page 65: ...talling Upgrades 63 S ma l l D es k t op C om p u te r 1 Security cable slot 2 Padlock ring 3 Release buttons one on each side 1 Security cable slot 2 Padlock ring 3 Release buttons one on each side 3 1 2 ...

Page 66: ...ey do not catch on the computer cover Make sure cables are not routed over the drive cage they will prevent the cover from closing properly 2 Check to see that no tools or extra parts are left inside the computer s chassis 3 Close the computer cover by pivoting the cover down toward the back of the chassis and into position Make sure that the release buttons click into place 1 Security cable slot ...

Page 67: ...s for the following cards In the small form factor computer one low profile 32 bit 33 megahertz MHz Peripheral Component Interconnect PCI card In the small desktop computer up to two 32 bit 33 MHz PCI cards In the small mini tower computer up to four 32 bit 33 MHz PCI cards E xpa n sio n Card Ty pe s 1 Low profile 32 bit PCI card 2 32 bit PCI card 1 2 ...

Page 68: ...rocedure see Safety Instructions NOTICE Before disconnecting a device from the computer wait 10 to 20 seconds after disconnecting the computer from its electrical outlet Before removing a component from the system board verify that the standby power light on the system board has turned off To locate this light see System Board Components 1 If you are replacing an expansion card remove the current ...

Page 69: ... Press the lever on the expansion card retention arm and raise the retention arm S ma l l Fo rm Fa c to r C om p u te r 1 card edge connector 2 expansion card 3 hinged lever 4 retention arm 5 expansion card connector 1 2 3 4 5 ...

Page 70: ...e l l c o m s u p p o r t d e l l c o m S ma l l D es k t op C om p u te r 1 lever 5 card edge connector 2 retention arm 6 expansion card connector 3 filler bracket 7 riser board 4 expansion card 8 expansion card cage 5 4 8 6 1 2 3 7 ...

Page 71: ... 7 If you are replacing an expansion card that is already installed in the computer remove the expansion card If necessary disconnect any cables connected to the card Grasp the card by its top corners and ease it out of its connector 8 Prepare the expansion card for installation 1 expansion card 2 card edge connector 3 expansion card connector 4 retention arm 5 lever 1 2 3 4 5 ...

Page 72: ...r computer from its electrical outlet before installing any expansion cards Verify that the standby power light on the system board is off To locate this light see System Board Components 9 Place the expansion card on the connector and press down firmly Make sure that the card is fully seated in the slot If the expansion card is full length insert the end of the card into the expansion card guide ...

Page 73: ... brackets are flush with the alignment bar Notch in the top of the card or filler bracket fits around the alignment guide Press the arm into place securing the expansion card s in the computer Re te ntion Ar m Cl osur e 1 Bracket within slot 2 Bracket caught outside of slot 3 Fully seated card 4 Not fully seated card 1 2 3 4 ...

Page 74: ...age to appear on the screen at the next computer start up ALERT Cover was previously removed 14 Reset the chassis intrusion detector by changing Chassis Intrusion to Enabled or Enabled Silent NOTE If a setup password has been assigned by someone else contact your network administrator for information on resetting the chassis intrusion detector 15 If you installed a sound card enter system setup pe...

Page 75: ...devices disconnect them from their electrical outlets and wait 10 to 20 seconds 2 Open the computer cover 3 In the small desktop computer remove the expansion card cage 4 Press the lever on the expansion card retention arm and raise the retention arm see the illustration for your computer in Installing an Expansion Card 5 If necessary disconnect any cables connected to the card 6 Grasp the card by...

Page 76: ...trusion detector 12 If you removed a sound card enter system setup perform the following steps a Enter system setup select Integrated Devices and change the setting for Sound to On b Connect external audio devices to the audio connectors on the I O panel see I O Panel Small Form Factor Desktop and Mini Tower Computers 13 If you removed an add in network adapter perform the following steps a Enter ...

Page 77: ...once it is removed from the computer 3 Gently pull on the handle and lift the expansion card cage up and away from the computer Ex pa nsio n Car d Ca ge Rem o v al Replacing the Expansion Card Cage 1 Align the slots in the side of the expansion card cage with the tabs on the side of the computer and slide the expansion card cage down into place 1 Expansion card cage 1 ...

Page 78: ...can increase memory up to 512 MB by using synchronous dynamic random access memory SDRAM dual in line memory modules DIMMs The system board illustration shows the location of the DIMM sockets on the system board DIMMs must be non error checking and correction non ECC When you add memory you may install DIMMs in either socket For optimum operation Dell recommends that you install a DIMM in socket A...

Page 79: ...e computer cover 2 If necessary remove any DIMMs that occupy sockets in which you plan to install the upgrade DIMMs 3 Install the upgrade DIMMs a Locate the plastic securing clips at each end of the socket b Press the clips outward until they snap open c Align the slots on the bottom of the memory module with the ridges inside the socket NOTICE To avoid damage to the memory module press the module...

Page 80: ...TE After you open and close the cover the chassis intrusion detector causes the following message to appear on the screen at the next computer start up ALERT Cover was previously removed You will need to reset the chassis intrusion detector The computer detects that the new memory does not match the existing configuration information and generates the following message 1 Socket 2 Securing clip 3 S...

Page 81: ...at they are seated properly in their sockets Then repeat steps 3 4 and 5 7 Reset the chassis intrusion detector by changing Chassis Intrusion to Enabled or Enabled Silent NOTE If a setup password has been assigned by someone else contact your network administrator for information on resetting the chassis intrusion detector 8 When the System Memory total is correct press Esc to exit system setup 9 ...

Page 82: ...u open the computer cover Also before you upgrade the microprocessor see the other precautions in Safety Instructions 1 Turn off the computer and devices disconnect them from their electrical outlets wait 10 to 20 seconds and then open the computer cover CAUTION The microprocessor and heat sink assembly can get extremely hot Be sure the assembly has had sufficient time to cool before you touch it ...

Page 83: ...n heat sink assembly a Remove the memory module closest to the heat sink assembly b Pull down on the toggle clip lever until you can unhook the ends of the clip from the tabs on each side of the ZIF socket c Remove the clip from the socket and then lift the heat sink from the microprocessor 1 Anchor tabs 1 ...

Page 84: ... the microprocessor chip from its socket Bending the pins can permanently damage the microprocessor chip Your microprocessor socket is a zero insertion force ZIF socket with a lever type handle that secures the chip in or releases it from the socket To remove the chip pull the microprocessor socket release lever straight up until the chip is released and then remove the chip from the socket 1 ZIF ...

Page 85: ...hen you unpack the microprocessor Bending the pins can permanently damage the microprocessor 6 Unpack the new microprocessor If any of the pins on the chip appear to be bent see Getting Help for instructions on obtaining technical assistance 7 Align the pin 1 corner of the microprocessor chip with the pin 1 corner of the microprocessor socket NOTE You must identify the pin 1 corner to correctly po...

Page 86: ...he microprocessor chip in the socket a If the release lever on the microprocessor socket is not fully extended move it to that position now b With the pin 1 corners of the chip and socket aligned align the pins on the chip with the holes in the socket NOTICE When you place the microprocessor chip in the socket be sure that all of the pins go into the corresponding holes on all sides of the socket ...

Page 87: ... Sink Removal and hook the unhinged end of the clip over the tab on the top edge of the socket c Rotate the lever upward until it snaps into place 10 Plug the fan cable into its connector on the system board 11 Close the computer cover reconnect your computer and devices to their electrical outlets and turn them on As the computer boots it detects the presence of the new microprocessor and automat...

Page 88: ...ling Upgrades w w w d e l l c o m s u p p o r t d e l l c o m Fro n t Pa n e l Co ve r Re mo v al S ma l l Fo rm Fa c to r C om p u te r Fro n t Pa n e l In se rt Re m ov a l Sm all Fo r m Fac to r Co mp u te r ...

Page 89: ...Installing Upgrades 87 Front Pa nel Cove r Re mo val Small Deskt op Computer Fro n t Pa n e l In se rt Re m ov a l Sm all D es kt o p Com p u te r ...

Page 90: ... pops free of the front panel cover Removing Front Panel Inserts Small Mini Tower Computer 1 Open the computer cover to a 45 degree angle and disconnect the CD drive data cable 2 Open the cover to a 90 degree angle and press on the insert tabs to release them Small Mini Tow er Comput er 1 Insert tabs 1 ...

Page 91: ...rnal Drives This computer may support the following internal drives Small form factor one enhanced integrated drive electronics IDE hard drive one floppy or optional Zip drive and one optional CD drive Small desktop one enhanced IDE hard drive one floppy or optional Zip drive and one optional CD drive Small mini tower two enhanced IDE hard drives two floppy or optional Zip drives and two optional ...

Page 92: ...90 Installing Upgrades w w w d e l l c o m s u p p o r t d e l l c o m Sma ll Fo rm Fac to r Com p u te r 1 CD drive 2 Floppy drive 3 Hard drive 2 3 1 ...

Page 93: ...Installing Upgrades 91 S ma l l D es k t op C om p u te r 1 CD drive 2 Floppy drive 3 Hard drive 3 1 2 ...

Page 94: ...y setting a jumper or switch depending on the drive Refer to the drive documentation in your upgrade kit for information on configuring devices for the cable select setting When you connect two IDE devices to a single IDE interface cable and configure them for the cable select setting the device attached to the last connector on the interface cable is the master or boot device drive 0 and the devi...

Page 95: ...ace connector labeled IDE2 Connecting Drives When you install a drive you connect two cables a DC power cable and an interface cable to the back of the drive Your drive s power input connector to which you connect the DC power cable resembles the following connector Po w er Ca bl e Co nne ct or The drive s interface connector is a card edge connector or a header connector as shown in the following...

Page 96: ...the cable When you attach an interface cable to the system board be sure that the locking tabs snap into place so that the cable is firmly attached to the connector on the system board Most interface connectors are keyed for correct insertion that is a notch or a missing pin on one connector matches a tab or a filled in hole on the other connector Keyed connectors ensure that the pin 1 wire in the...

Page 97: ...to keep be sure to make a backup of your files before you begin this procedure 2 If you have a small mini tower computer and you are adding an additional hard drive see Adding a Second Hard Drive Small Mini Tower Computer NOTICE Ground yourself by touching an unpainted metal surface on the back of the computer NOTICE When you unpack the drive do not set it on a hard surface which may damage the dr...

Page 98: ...96 Installing Upgrades w w w d e l l c o m s u p p o r t d e l l c o m Ha rd D riv e Sh r ou d Re mo v al Detaching Hard Drive Cables 1 Disconnect the power cable and hard drive cable from the drive ...

Page 99: ...Installing Upgrades 97 S ma l l Fo rm Fa c to r C om p u te r 1 Power cable 2 Hard drive cable 1 2 ...

Page 100: ...98 Installing Upgrades w w w d e l l c o m s u p p o r t d e l l c o m S ma l l D es k t op C om p u te r 1 Hard drive cable 2 Power cable 1 2 ...

Page 101: ... from the floppy drive and interface IDE2 connectors on the system board see the small form factor computer illustration in Detaching Floppy Drive Cables Removing a Hard Drive 1 For the small form factor computer press in on the tabs on each side of the drive slide the drive toward the I O panel and remove the drive from the computer 1 Power cable 2 Hard drive cable 1 2 ...

Page 102: ...l c o m s u p p o r t d e l l c o m Sma ll Fo rm Fac to r Com p u te r 2 For the small desktop and small mini tower computers press in on the tabs on each side of the drive and slide the drive up and out 1 Notch in drive rail 2 Tabs 2 2 1 ...

Page 103: ...Installing Upgrades 101 S ma l l D es k t op C om p u te r Small Mini Tow er Comput er 1 Tabs 2 2 Hard drive 1 2 1 2 ...

Page 104: ...u unpack the drive do not set it on a hard surface which may damage the drive Instead set the drive on a surface such as a foam pad that will sufficiently cushion it 1 Unpack the drive and prepare it for installation 2 Check the documentation for the drive to verify that it is configured for your computer 3 If your replacement hard drive does not have the bracket rails attached remove the rails fr...

Page 105: ... 4 Install the hard drive into the computer by gently sliding the drive into place until you hear it securely click Reattaching Hard Drive Cables 1 Connect the power cable and hard drive data cable to the drive 1 Drive 2 Bracket rails 2 3 Screws 4 1 3 2 ...

Page 106: ...104 Installing Upgrades w w w d e l l c o m s u p p o r t d e l l c o m Sma ll Fo rm Fac to r Com p u te r 1 Power cable 2 IDE cable 3 IDE1 connector 3 1 2 ...

Page 107: ...Installing Upgrades 105 S ma l l D es k t op C om p u te r 1 Power cable 2 IDE cable 3 IDE1 connector 3 1 2 ...

Page 108: ...ith pin 1 on the hard drive IDE1 connector and with the system board interface connector IDE1 To locate the IDE connector 1 IDE1 on the system board see System Board Components 3 On the small desktop computer replace the hard drive shroud by inserting the two tabs on the bottom into the holes in the computer and snapping the top into place 4 Close the computer cover reconnect your computer and dev...

Page 109: ...und yourself by touching an unpainted metal surface on the back of the chassis NOTICE When you unpack the drive do not set it on a hard surface which may damage the drive Instead set the drive on a surface such as a foam pad that will sufficiently cushion it 1 Unpack the drive and prepare it for installation 2 Check the documentation for the drive to verify that it is configured for your computer ...

Page 110: ...in the two green rail tabs and pull the first hard drive out of the upper bay c Gently slide the first hard drive into the lower bay until you hear a click d Reconnect the power cable and the data cable to the back of the hard drive 7 Gently slide the new hard drive into the upper bay until you hear a click Seco nd Hard Dr ive I n stallation 1 Rail tabs 2 2 Second hard drive in upper bay 3 First h...

Page 111: ... documentation that accompanied the drive to verify that the drive is configured for your computer Change any settings necessary for your configuration 2 If you are installing an IDE drive configure the drive for the cable select setting You usually configure a drive for cable select by setting a jumper or switch depending on the drive For instructions on configuring the cable select setting see t...

Page 112: ...d e l l c o m Sma ll Fo rm Fac to r Com p u te r b To release the cable from the connector slide the lever until it is fully extended and then lift the cable away 1 Floppy drive cable 2 Tab 3 Interposer board 4 System board floppy drive connector DSKT 1 3 4 2 ...

Page 113: ...Installing Upgrades 111 1 Floppy drive cable 2 Lever 1 2 ...

Page 114: ...112 Installing Upgrades w w w d e l l c o m s u p p o r t d e l l c o m S ma l l D es k t op C om p u te r 1 Power cable 2 Floppy drive cable 3 Floppy drive connector 1 2 3 ...

Page 115: ...ving a Floppy Drive 1 On the small form factor computer remove the floppy drive from its sled by pulling the sled tab out while pushing the drive up and then sliding the drive out of the sled 1 Power cable 2 Floppy drive cable 3 Floppy drive connector 1 2 3 ...

Page 116: ... m Sma ll Fo rm Fac to r Com p u te r 2 On the small desktop and small mini tower computers press inward on the two tabs on the sides of the drive bay to disengage the drive from the computer 3 Slide the drive upward and remove it from the computer 1 Sled tab 2 Sled 1 2 ...

Page 117: ...Installing Upgrades 115 S ma l l D es k t op C om p u te r Small Mini Tow er Comput er ...

Page 118: ... computer until the tabs securely click into position 3 Connect the interposer board to the floppy drive a Slide the drive cable into the connector b Close the lever so that the cable is secure in the connector c Line up the hole on the bottom of the interposer board with the notch on the connector and snap the interposer board onto the drive 4 Attach the power cable to the interposer board on the...

Page 119: ...e fan and cooling vents 7 Close the computer cover reconnect your computer and devices to their electrical outlets and turn them on 8 Enter system setup and update the appropriate Diskette Drive A option to reflect the size and capacity of your new floppy drive 1 Connector notch 2 Interposer board alignment hole 3 Floppy drive cable 4 Lever 3 4 2 1 ...

Page 120: ...ews that secure each rail to the drive Attach the bracket to the new drive by aligning the screw holes on the drive with the screw holes on the bracket rails and tightening all four screws two screws on each rail Flo p p y Dri v e Bra c ke t Ra i l s 2 Gently slide the drive into place until the tabs securely click into position 3 Attach the power and data cables to the floppy drive and connect th...

Page 121: ...Installing Upgrades 119 S ma l l D es k t op C om p u te r 1 Power cable 2 Floppy drive cable 3 Floppy drive connector 1 2 3 ...

Page 122: ...d cooling vents 5 Close the computer cover reconnect your computer and devices to their electrical outlets and turn them on 6 Enter system setup and update the appropriate Diskette Drive A option to reflect the size and capacity of your new floppy drive 7 Verify that your computer works correctly by running the Dell Diagnostics 1 Power cable 2 Floppy drive cable 3 Floppy drive connector 1 2 3 ...

Page 123: ...llation Check the documentation that accompanied the drive to verify that the drive is configured for your computer Change any settings necessary for your configuration 2 If you are installing an IDE drive configure the drive for the cable select setting You usually configure a drive for cable select by setting a jumper or switch depending on the drive For instructions on configuring the cable sel...

Page 124: ...122 Installing Upgrades w w w d e l l c o m s u p p o r t d e l l c o m In te r po se r Boa rd Re mo v al 1 Interposer board 1 ...

Page 125: ... 123 2 On the small desktop and small mini tower computers remove the data power and audio cables from the drive S ma l l D es k t op C om p u te r 1 Power cable 2 Audio cable 3 CD drive cable 4 CD drive connector 1 2 3 4 ...

Page 126: ...124 Installing Upgrades w w w d e l l c o m s u p p o r t d e l l c o m Small Mini Tow er Comput er 1 Power cable 2 Audio cable 3 CD drive cable 4 CD drive connector 2 1 3 4 ...

Page 127: ...s 125 Removing a CD Drive 1 Press inward on the two tabs on the sides of the drive to disengage the drive from the computer 2 Slide the drive upward and remove it from the computer S ma l l Fo rm Fa c to r C om p u te r ...

Page 128: ...126 Installing Upgrades w w w d e l l c o m s u p p o r t d e l l c o m S ma l l D es k t op C om p u te r Small Mini Tow er Comput er ...

Page 129: ... screws for each rail 2 If you are installing a new drive connect it to the set of rails that are attached to the inside of the cover If a set of rails is not attached to the inside of the cover contact Dell CD Dr iv e Br a cke t Rai ls 3 Gently slide the drive into place until the tabs securely click into position 4 On the small form factor computer connect the interposer board to the CD drive If...

Page 130: ...ing Upgrades w w w d e l l c o m s u p p o r t d e l l c o m In te r po se r Bo ar d Co nn e c tio n Sm all For m Fac t or Co mp u t er 5 Connect the drive power and audio cables to the drive 1 Interposer board 1 ...

Page 131: ...Installing Upgrades 129 S ma l l D es k t op C om p u te r 1 Power cable 2 Audio cable 3 CD drive cable 4 CD drive connector 1 2 3 4 ...

Page 132: ... u p p o r t d e l l c o m Small Mini Tow er Comput er 6 If you are installing a drive that has its own controller card install the controller card in an expansion card slot 1 Power cable 2 Audio cable 3 CD drive cable 4 CD drive connector 2 1 3 4 ...

Page 133: ...t your computer works correctly by running the Dell Diagnostics Battery A 3 0 V CR2032 lithium coin cell battery installed on the system board maintains system configuration date and time information in a special section of memory The operating life of the battery can extend up to ten years The battery may need replacing if an incorrect time or date is displayed during the boot routine along with ...

Page 134: ... the settings are lost while you are replacing the battery refer to your written or printed copy of the configuration information to restore the correct settings CAUTION Before you open the computer cover see Safety Instructions 2 Open the computer cover NOTICE If you pry the battery out of its socket with a blunt object be careful not to touch the system board with the object Make certain that th...

Page 135: ...tem setup s System Time and System Date options b Use the copy of the configuration information that you made in step 1 to restore the correct settings for other system setup options c Exit system setup 7 Turn off and unplug your computer and leave it unplugged for at least 10 minutes 8 After 10 minutes plug in the computer turn it on and enter system setup If the time and date are still incorrect...

Page 136: ...134 Ins ta l l i n g Up g r a d es w w w d e l l c o m s u p p o r t d e l l c o m ...
Page 137: ...CT ION 4 Microsoft Windows XP Features Overview New User Interface Files and Settings Transfer Wizard Application and Device Compatibility System Restore User Accounts and Fast User Switching Home and Small Office Networking Internet Connection Firewall ...

Page 138: ...roved desktop and user interface Files and Settings Transfer Wizard Application program compatibility enhancements System Restore Fast User Switching Expanded home and small office networking functions A personal firewall for always on Internet connections Home and small office features Help and Support Center The Help and Support Center introduced with Microsoft Windows Millennium Edition Me repl...

Page 139: ...n right click the icon and click Pin to Start menu To access all the programs installed on the computer click All Programs at the bottom of the Start menu The right half of the new Start menu contains useful icons for accessing your files configuring the computer and finding information and assistance The Dell Solution Center icon opens a portal to services and application programs installed on yo...

Page 140: ...anup Wizard The wizard runs 7 days after you first start your computer and every 60 days after that The Desktop Cleanup Wizard first opens a dialog box informing you that there are unused icons on the desktop and asking whether you want to run the wizard If you elect to run the wizard it places unused desktop icons in the folder C Desktop Icons The default for the Desktop Cleanup Wizard is on To t...

Page 141: ... the taskbar If space becomes an issue on the taskbar Windows XP consolidates all the Internet Explorer buttons into a single button When clicked that button expands to a menu of the six Internet Explorer active sessions Notification Area Cleanup Over time software icons tend to proliferate in the notification area the area in the bottom right corner of the Windows desktop Windows XP detects when ...

Page 142: ... system the wizard can be launched either from the Windows XP CD or from a diskette created on the new Windows XP computer You transfer the data to the new computer over a network or direct serial connection or store it on a removable medium such as a floppy disk Zip disk or writable CD To use the Files and Settings Transfer Wizard 1 On the new Windows XP computer click the Start button point to A...

Page 143: ...us operating systems with Windows application programs that when installed replace current versions of certain Windows files with older versions This situation can cause problems with the newer application programs which rely on the replaced files To eliminate this problem and improve operating system stability Windows XP manages multiple versions of files and invokes the correct version required ...

Page 144: ...on about the settings you used and whether they fixed the problem or select No and then click Next 10 Click Finish to close the wizard System Restore The System Restore feature of Windows XP provides the capability to restore the operating system in the event of a problem to a previous state without losing personal data files such as Word documents drawings or e mail System Restore actively monito...

Page 145: ...ints are created to allow you to choose previous system states Each restore point gathers the necessary information needed to restore to a precisely chosen system state There are three types of restore points System automatically created restore points scheduled by your computer Installation event triggered restore points when a program is installed Manual restore points created by you as needed S...

Page 146: ...n on demand restore point For information on types of user accounts see How to Add Users This is useful to create a checkpoint to return to before making a particularly risky change before leaving a shared system to other users or at a particular state you believe is optimal To create a restore point perform the following steps 1 Click the Start button point to All Programs Accessories System Tool...

Page 147: ...oration you can repeat the preceding steps using a different restore point or you can undo the restoration To undo a restoration perform the following steps 1 Click the Start button point to All Programs Accessories System Tools and then click System Restore 2 Select Undo my last restoration and click Next 3 Click Next to confirm the restoration undo After System Restore finishes collecting data t...

Page 148: ...ut requiring the previous user to log off New users log on and switch from the original user s session to their own New users can run their desktop and applications without interfering with the original user When the original user returns that user can switch back to the desktop and applications with the original settings All of this is accomplished without the delay of each individual user loggin...

Page 149: ...cause multimedia applications use resources that cannot easily be shared between different users on a single computer those applications terminate during the user switch allowing the new user to take full advantage of the multimedia capabilities Special Considerations With Fast User Switching Considerations when using Fast User Switching include Some older Windows games may not operate with a fast...

Page 150: ...log off check box to disable Fast User Switching 4 Click Apply Options How to Add Users Only a computer administrator or a user with administrator rights can create multiple user accounts The individual who performs the initial operating system setup creates a computer administrator account and can add any number of users during the initial setup All user accounts created during setup have adminis...

Page 151: ...In Windows XP Microsoft has improved the online documentation and usability of operating system tools for setting up a home or small office network New features in the operating system include support for the Point to Point Protocol over Ethernet PPPoE and a built in firewall Network Setup Wizard The Home Network Wizard first appeared in Windows Me To make setting up a home or small office network...

Page 152: ...r can browse the hard drive and add or delete files discover passwords and credit card numbers and set the system up to launch attacks on other systems or websites As a result firewall protection from these attacks is increasingly required on computers Recognizing this need Microsoft provides an integrated firewall in Windows XP to provide immediate protection from outside access attempts When ena...

Page 153: ...vanced users These advanced options include the ability to open or close specific Transmission Control Protocol TCP or User Datagram Protocol UDP ports or to enable port redirection Port redirection allows access requests to a specific port on the firewall such as port 80 the Web server port to be automatically redirected to another computer on the local network This capability allows a Web server...

Page 154: ...152 Microsoft Windows XP Features w w w d e l l c o m s u p p o r t d e l l c o m ...
Page 155: ...p p o r t d e l l c o m SE CT ION 5 Technical Specifications Processor Memory Computer Information Graphics Optional and Video Audio Expansion Bus Drives Ports Key Combinations Controls and Lights Power Physical Environmental ...

Page 156: ...mic random access memory SDRAM Dual in line memory module DIMM sockets two non error checking and correction non ECC DIMM capacities 64 128 and 256 megabyte MB SDRAM Computer random access memory RAM 64 to 512 MB Basic input output system BIOS address F0000h Computer Information Computer chip set Intel 810E Data bus width 64 bits Address bus width 32 bits Direct memory access DMA channels 7 Interr...

Page 157: ...pixels 75 Hz max refresh rate with 256 colors Audio Audio type Sound Blaster emulation Audio controller Analog Devices AD1885 AC97 Codec Stereo conversion 16 bit analog to digital and digital to analog Interfaces Internal PCI bus AC97 External stereo line in minijack microphone in minijack line out minijack on the rear input output I O panel headphones minijack on the front panel Expansion Bus Bus...

Page 158: ...h high IDE hard drives Externally accessible bays Small form factor chassis one 3 5 inch bay for a slimline 3 5 inch floppy drive one removable media bay for a slimline CD drive Small desktop chassis one 3 5 inch bay for a 3 5 inch floppy drive one removable media bay for a CD drive Small mini tower computer two 3 5 inch bays for two 3 5 inch floppy drives two 5 25 inch bays for two CD drives Port...

Page 159: ... DOS real mode only Ctrl Alt toggles microprocessor speeds on 102 key keyboard in MS DOS real mode only F2 or Ctrl Alt Enter starts embedded system setup during power on system test POST only F3 automatically starts boots the computer from the network environment specified by the managed boot agent MBA rather than from one of the devices in the system setup Boot Sequence option F12 launches the bo...

Page 160: ...e system board standby power light Power DC power supply Wattage small form factor computer 100 W small desktop computer 110 W small mini tower computer 200 W Heat dissipation small form factor computer 455 BTU hr average small desktop computer 500 BTU hr average small mini tower computer 910 BTU hr average Voltage 90 to 135 volts V at 60 Hz 180 to 265 V at 50 Hz Backup battery 3 V CR2032 lithium ...

Page 161: ...to 65 C 40 to 149 F Relative humidity 20 to 80 noncondensing Maximum vibration Operating 0 25 gravities G at 3 to 200 Hz at 1 octave min Storage 0 5 G at 3 to 200 Hz at 1 octave min Maximum shock Operating bottom half sine pulse with a change in velocity of 20 inches sec 50 8 cm sec Storage 27 G faired square wave with a velocity change of 200 inches sec 508 cm sec Altitude Operating 16 to 3048 me...

Page 162: ...160 Te c h n ic a l Sp e c if ic a tio n s w w w d e l l c o m s u p p o r t d e l l c o m ...

Page 163: ...w w w d e l l c o m s u p p o r t d e l l c o m SE CT ION 6 Solving Problems Finding Solutions Dell Diagnostics Messages and Codes Software Problems BIOS Recovery Utility ...

Page 164: ...ter not working See Printer Problems Serial or other parallel devices not working See Serial or Parallel Device Problems Mouse not working See Mouse Problems Keyboard not working See Keyboard Problems Floppy drive or hard drive lights not lit scraping or unusual noises no noise See Floppy Drive Problems or Hard Drive Problems Computer battery not working See Battery Problems Expansion card errors ...

Page 165: ... devices and disconnect them from their electrical outlets 2 If you are using a surge protector remove it 3 Make sure the power cable is firmly connected to the computer and then verify that the power cable is directly connected to the electrical outlet 4 Turn on the computer Does the power light on the front of the computer light up Yes The problem is resolved No The computer may be defective Con...

Page 166: ...sts after you complete the basic checks fill out the Diagnostics Checklist as you perform the following steps 1 Turn off the computer wait at least 30 seconds and then turn the computer back on 2 Allow 1 minute for the computer to initialize its components and then adjust the monitor s brightness and contrast controls Is the monitor readable Yes The problem is resolved No Go to step 3 3 Turn off n...

Page 167: ... technical assistance Sound and Speaker Problems Basic Checks If using external speakers Make sure that the speaker cables are firmly connected to the computer Test the electrical outlet verify that the speakers are connected to a working electrical outlet Ensure that the speakers are turned on If using a sound card make sure external audio devices are connected to the sound card s connectors and ...

Page 168: ...unctioning properly If the problem persists contact Dell for technical assistance No Contact Dell for technical assistance Printer Problems Basic Checks Disconnect the cable from the computer and check the cable connector for bent or broken pins Check for damaged or frayed cables If the cable is not damaged make sure that it is firmly connected to the computer Test the electrical outlet verify tha...

Page 169: ... see Printer Problems If a computer error message indicates a port problem or if equipment connected to a port seems to perform incorrectly or not at all the source of the problem can be any of the following A faulty connection between the I O port and the device Incorrect settings for system setup options Incorrect settings in the operating system s configuration files A faulty cable between the ...

Page 170: ... for additional information on port settings and configuration requirements Is the device working properly Yes The problem is resolved No Go to step 2 2 Run the Serial Ports device group and or the Parallel Ports device group in the Dell Diagnostics These device groups check the basic functions of the system board s I O port logic If a printer is connected to the parallel port the Parallel Ports d...

Page 171: ...rayed cables If the cable is not damaged make sure that it is firmly connected to the computer Reinstall the mouse driver for your operating system Restart the computer If the problem still exists after you complete the basic checks fill out the Diagnostics Checklist as you perform the following steps 1 If you are using a PS 2 mouse enter system setup and make sure that Mouse Port under the Integr...

Page 172: ...hat it is firmly connected to the computer Check for interference Keyboard extension cables can cause problems Restart the computer If the problem still exists after you complete the basic checks fill out the Diagnostic Checklist as you perform the following steps 1 Turn off the computer and then disconnect the keyboard cable and check it for bent or broken pins Do you see bent pins Yes If they ca...

Page 173: ... Run the PC AT Compatible Keyboards tests in the Dell Diagnostics Did any of the diagnostics tests fail Yes The original keyboard may be defective Go to step 8 No Go to step 8 8 Turn off the computer connect another keyboard to the computer and then turn the computer on If you do not have another keyboard contact Dell for technical assistance Is the keyboard functioning properly Yes The original k...

Page 174: ...ompt and press Enter Using Microsoft Windows or Windows NT insert a floppy into the drive open My Computer from the desktop and double click the floppy drive icon Check the settings in system setup Clean the drive using a commercially available cleaning kit NOTICE Do not attempt to clean drive heads with a swab You may accidentally misalign the heads rendering the drive inoperable If the problem s...

Page 175: ...ce trouble contact Dell for technical assistance No Contact Dell for technical assistance Hard Drive Problems Basic Checks If you hear an unfamiliar scraping or grinding sound when a drive is accessed there could be a hardware malfunction Contact Dell for technical assistance When you turn on the computer you can hear drive activity during the boot routine If your computer does not boot contact De...

Page 176: ...ctly Make any necessary changes and reboot the computer Is the drive operating properly Yes The problem is resolved No Proceed to step 2 2 Test the hard drive by using one of the following methods For Windows XP run the chkdsk utility by following these steps Click the Start button select Shutdown and then click Restart the Computer At the C prompt type CD Windows Command and press Enter Type chkd...

Page 177: ...r and devices disconnect them from their electrical outlets wait at least 5 seconds and then open the computer cover 5 Make sure the DC power cables from the power supply are firmly connected to the connectors on each drive Also verify that the interface cable for each drive is firmly connected to the drive and to the system board 6 Make sure the control panel cable is firmly connected to the syst...

Page 178: ...ttery Problems If an error message indicates a problem with the battery or if configuration information is lost from system setup when the computer is turned off the battery may be defective CAUTION There is a danger of a new battery exploding if it is incorrectly installed Replace the battery only with the same or equivalent type recommended by the manufacturer Discard used batteries according to...

Page 179: ...rd seems to perform incorrectly or not at all the problem could be a faulty connection a conflict with software or other hardware or a faulty expansion card Fill out the Diagnostics Checklist as you perform the following steps CAUTION Before you perform this procedure see Safety Instructions 1 Turn off the computer and devices disconnect them from their electrical outlets wait at least 5 seconds a...

Page 180: ...7 Close the computer cover reconnect the computer and devices to their electrical outlets and turn them on 8 Run the RAM test group in the Dell Diagnostics Did any of the diagnostics tests fail Yes Contact Dell for technical assistance No Proceed to step 9 9 Turn off the computer and devices disconnect them from their electrical outlets wait at least 5 seconds and then open the computer cover 10 R...

Page 181: ...ts wait at least 5 seconds and then open the computer cover 2 Let the computer dry for at least 24 hours Make sure that it is thoroughly dry before you proceed 3 Remove all expansion cards installed in the computer except a video expansion card NOTE If your primary hard drive is connected to a drive controller card and not one of the system board EIDE connectors leave the drive controller card ins...

Page 182: ...rds 3 Make sure that all cables are properly connected and that all components are properly seated in their connectors and sockets 4 Close the computer cover reconnect the computer and devices to their electrical outlets and turn them on 5 Run the System Board Devices test group in the Dell Diagnostics Did any of the diagnostics tests fail Yes Contact Dell for technical assistance No The problem i...

Page 183: ...le bytes to ensure proper operation Basic Checks If an insufficient memory message appears save and close any open files and exit any open application programs not in use Consider installing additional computer memory Run the System Memory test in the Dell Diagnostics Reseat the memory modules Restart the computer If the problem still exists after you complete the basic checks fill out the Diagnos...

Page 184: ...blem is resolved No Contact Dell for technical assistance System Board Problems A system board problem can result from a defective system board component a faulty power supply or a defective component connected to the system board If an error message indicates a system board problem fill out the Diagnostic Checklist as you perform the following steps CAUTION Before you perform this procedure see S...

Page 185: ...the computer working properly Yes The problem is resolved No Contact Dell for technical assistance Resetting a Damaged System Board If the computer cannot boot and you have exhausted all other troubleshooting options perform the following steps CAUTION Before you perform this procedure see Safety Instructions 1 Turn off the computer and devices disconnect them from their electrical outlets wait at...

Page 186: ...y use the Dell Diagnostics to test your Dell computer Using this program with other computers may cause incorrect computer responses or result in error messages Features The diagnostic test groups features allow you to take the following actions Perform quick checks or extensive tests on one or all devices Choose the number of times a test group or subtest is repeated Display or print test results...

Page 187: ...etup and save your changes The computer reboots and the Dell logo screen appears followed by a list of the available languages NOTE If you are using the ResourceCD for the first time on this computer the ResourceCD Installation window opens to inform you that the ResourceCD is about to begin installation Click OK to continue To complete the installation respond to the prompts offered by the instal...

Page 188: ...on numbers of subtests and additional information on the Dell Diagnostics Program Options Allows you to change the settings of the Dell Diagnostics Exit to MS DOS Exits to the MS DOS prompt 9 Select the type of tests to perform To perform a quick check of your computer or a specific device select Quick Tests from the Test All Devices or Test One Device option Quick Tests runs only the tests that r...

Page 189: ...you have finished running the Dell Diagnostics 11 Enter system setup and change the Boot Sequence to your original configuration Advanced Testing When you select Advanced Testing from the Diagnostics Menu the following screen appears A d va n c ed Te s ti n g S c re e n ...

Page 190: ...ardware Device groups menu bar contains the options Run tests Devices Select Config and Help To select a menu option press the left or right arrow key to highlight the option and press Enter or press the key that corresponds to the highlighted letter in the category title NOTE The options displayed on your screen should reflect the hardware configuration of your computer Advanced Testing Help Menu...

Page 191: ...operating system documentation for an explanation of the message and a recommended action C o mp u te r Me s s a g e s Versions Lists the version numbers of the subtests Message Cause Action Address mark not found The basic input output system BIOS found a faulty disk sector or could not find a particular disk sector See Floppy Drive Problems Hard Drive Problems Alert Previous attempts at booting ...

Page 192: ...d the data Run the chkdsk utility in the Microsoft Windows operating system to check the file structure of the floppy or hard drive See your operating system documentation for more information If you are using another operating system run the appropriate utility to check the file structure of the floppy or hard drive See your operating system documentation Decreasing available memory One or more d...

Page 193: ...mory Problems General failure The operating system is unable to carry out the command This message is usually followed by specific information for example PRINTER OUT OF PAPER Respond by taking the appropriate action Hard disk configuration error The hard drive failed initialization See Floppy Drive Problems or Hard Drive Problems Hard disk controller failure Hard disk failure Hard disk drive read...

Page 194: ...faulty See Keyboard Problems Memory address line failure at address read value expecting value One or more DIMMs may be faulty or improperly seated See Computer Memory Problems Memory allocation error The software you are attempting to run is conflicting with the operating system or another application program or utility Turn off the computer wait 30 seconds and then turn it on Try to run the prog...

Page 195: ...e in CMOS invalid The amount of memory recorded in the computer configuration information does not match the memory installed in the computer Reboot the computer If the error appears again see Getting Help for instructions on obtaining technical assistance Memory tests terminated by keystroke The memory test was not completed Rerun the memory test No boot device available The computer cannot find ...

Page 196: ... A or your hard drive does not have a bootable operating system installed on it A nonbootable floppy is in drive A Either replace the floppy with one that has a bootable operating system or remove the floppy from drive A and restart the computer Not a boot diskette There is no operating system on the floppy Boot the computer with a floppy that contains an operating system Plug and Play Configurati...

Page 197: ...ppy drive try another floppy in the drive Shutdown failure A chip on the system board might be malfunctioning Run the System Board Devices tests in the Dell Diagnostics Time of day clock stopped The battery may be dead Enter system setup and correct the date or time If the problem persists see Battery Problems Time of day not set The time or date displayed in the computer configuration information...

Page 198: ...tions on obtaining technical assistance WARNING Dell s Disk Monitoring System has detected that drive 0 1 on the primary secondary EIDE controller is operating outside of normal specifications It is advisable to immediately back up your data and replace your hard drive by calling your support desk or Dell Power on self test POST has queried the enhanced integrated drive electronics EIDE drive for ...

Page 199: ... read write failure Run the System Board Devices tests in the Dell Diagnostics if possible 1 3 Video Memory Test failure Run the VESA VGA Interface tests in the Dell Diagnostics 1 3 1 through 2 4 4 DIMMs not being properly identified or used See Computer Memory Problems 3 1 1 Slave DMA register failure Run the System Board Devices tests in the Dell Diagnostics if possible 3 1 2 Master DMA register...

Page 200: ...Search for video ROM failure Run the VESA VGA Interface tests in the Dell Diagnostics 4 2 1 No time tick See Getting Help for instructions on obtaining technical assistance 4 2 2 Shutdown failure See Getting Help for instructions on obtaining technical assistance 4 2 3 Gate A20 failure See Getting Help for instructions on obtaining technical assistance 4 2 4 Unexpected interrupt in protected mode ...

Page 201: ...ror message may result These particular error messages are not covered in this section Record the message on a copy of the Diagnostics Checklist found in Getting Help Also see Getting Help for instructions on obtaining technical assistance Diagnostic Lights Should your computer fail to operate lights on the front panel and back panel of the computer provide diagnostic codes that can help you troub...

Page 202: ...en reboot If the computer does not boot see Getting Help for instructions on obtaining technical assistance Solid green and a beep code during POST A problem was detected while the BIOS was executing See the previous table for instructions on diagnosing the beep code Solid green power light with no beep code and no video during POST The monitor or the graphics card may be faulty See Video and Moni...

Page 203: ... problem resolution requires you to open the computer chassis see Finding Solutions for procedures you need to complete prior to performing the suggested resolution If the problem persists after you perform the suggested problem resolution s contact Dell for further help The following table lists the codes for the back panel diagnostic lights gives their probable causes and offers suggested correc...

Page 204: ...r to retest Reinstall the expansion card s one at a time and restart the computer to retest Move each expansion card one at a time to another PCI slot and restart the computer to retest green yellow green yellow Possible video card failure or bad on board video If you have a video card reseat it and restart the computer to retest If you have video integrated you must replace the system board yello...

Page 205: ...mpatible with the operating system installed in your computer and that your computer meets the minimum hardware requirements needed to run the software Ensure that you properly installed and configured the application program Reinstall the program if necessary Consult the software documentation or contact the software manufacturer for detailed troubleshooting information on a particular applicatio...

Page 206: ...programs you use Whenever you change the operating environment parameters you may also affect the successful operation of the application programs Sometimes after modifying the operating environment you may need to reinstall a program that no longer runs properly Input Errors If a specific key or set of keys is pressed at the wrong time a program may give you unexpected results See the documentati...

Page 207: ... be available for use Because they remain in the computer s memory memory conflicts and errors can result when other programs require use of all or part of the memory already occupied by these TSR programs Typically your operating system s start up files such as config sys and autoexec bat contain commands to start TSR programs when you boot your computer If you suspect that one of these TSR progr...

Page 208: ... can arise if two devices attempt to use the same interrupt request IRQ line To avoid this type of conflict check the documentation for the default IRQ line setting for each installed expansion card Then consult the following table to configure the card for one of the available IRQ lines NOTE The following table lists default IRQ settings In computers with Plug and Play capabilities you can modify...

Page 209: ...xx writehdrfile where xxxxx is the name of the BIOS flash executable utility you downloaded Running this utility generates a file with a hdr extension 4 Copy the hdr file to a floppy 5 Insert the floppy into the floppy drive of the corrupted computer and turn it on The computer automatically flashes the BIOS from the floppy 6 When the computer begins to restart and the Dell logo screen appears rem...

Page 210: ...208 So lv ing Pr o ble m s w w w d e l l c o m s u p p o r t d e l l c o m ...

Page 211: ...w w w d e l l c o m s u p p o r t d e l l c o m SE CT ION 7 Getting Help Help Overview Dell Contact Numbers ...

Page 212: ...ation see World Wide Web 5 If the preceding steps have not resolved the problem call Dell for technical assistance When prompted by Dell s automated telephone system enter your Express Service Code to route the call directly to the proper support personnel If you do not have an Express Service Code open the Dell Accessories folder double click the Express Service Code icon and follow the direction...

Page 213: ...mputer information to access help tools and information Dell can be accessed electronically using the following addresses World Wide Web www dell com www dell com ap for Asian Pacific countries only www euro dell com for Europe only www dell com la for Latin American countries Anonymous file transfer protocol FTP ftp dell com Log in as user anonymous and use your e mail address as your password El...

Page 214: ...nds of technical information Using a touch tone phone you can select from a full directory of topics The technical information you request is sent within minutes to the fax number you designate For the TechFax telephone number to call see Dell Contact Numbers Automated Order Status System You can call this automated service to check on the status of any Dell products that you have ordered A record...

Page 215: ... and write it clearly and prominently on the outside of the box For the telephone number to call see Dell Contact Numbers 2 Include a copy of the invoice and a letter describing the reason for the return 3 Include a copy of the Diagnostics Checklist indicating the tests you have run and any error messages reported by the Dell Diagnostics 4 Include any accessories that belong with the item s being ...

Page 216: ...stics Checklist If possible turn on your system before you call Dell for technical assistance and call from a telephone at or near the computer You may be asked to type some commands at the keyboard relay detailed information during operations or try other troubleshooting steps possible only at the computer system itself Make sure that the system documentation is available CAUTION Before servicing...

Page 217: ..._________________________________ ________________________________________________________________________________________________ Are you connected to a network yes no Network version and network card _______________________________________________________________ Programs and versions ___________________________________________________________________________ ____________________________________...

Page 218: ...r call originates in the same country you are calling Country City International Access Code Country Code City Code Department Name or Service Area Website and E Mail Address Area Codes Local Numbers and Toll Free Numbers Antigua and Barbuda General Support 1 800 805 5924 Argentina Buenos Aires International Access Code 00 Country Code 54 City Code 11 Tech Support and Customer Care toll free 1 800...

Page 219: ... Home Small Business Sales toll free 0800 16884 Corporate Sales 02 481 91 00 Fax 02 481 92 99 Switchboard 02 481 91 00 Website support euro dell com E mail tech_be dell com E mail for French Speaking Customers support euro dell com be fr emaildell Bermuda General Support 1 800 342 0671 Brazil International Access Code 0021 Country Code 55 City Code 51 Customer Support Technical Support 0800 90 335...

Page 220: ... Code 2 Sales Customer Support and Technical Support toll free 1230 020 4823 China Xiamen Country Code 86 City Code 592 Home and Small Business Technical Support toll free 800 858 2437 Corporate Accounts Technical Support toll free 800 858 2333 Customer Experience toll free 800 858 2060 Home and Small Business toll free 800 858 2222 Preferred Accounts Division toll free 800 858 2062 Large Corporat...

Page 221: ...ax Switchboard 45170117 Website support euro dell com E mail den_support dell com E mail Support for Servers Nordic_server_support dell com Dominican Republic General Support 1 800 148 0530 El Salvador General Support 01 899 753 0777 Finland Helsinki International Access Code 990 Country Code 358 City Code 9 Technical Support 09 253 313 60 Technical Support Fax 09 253 313 81 Relational Customer Ca...

Page 222: ...4 71 00 Fax 01 55 94 71 01 Website support euro dell com E mail support euro dell com fr fr emaildell Germany Langen International Access Code 00 Country Code 49 City Code 6103 Technical Support 06103 766 7200 Home Small Business Customer Care 0180 5 224400 Global Segment Customer Care 06103 766 9570 Preferred Accounts Customer Care 06103 766 9420 Large Accounts Customer Care 06103 766 9560 Public...

Page 223: ... 01 204 0144 Fax 204 5960 Switchboard 01 204 4444 Website support euro dell com E mail dell_direct_support dell com Italy Milan International Access Code 00 Country Code 39 City Code 02 Home and Small Business Technical Support 02 577 826 90 Customer Care 02 696 821 14 Fax 02 696 821 13 Switchboard 02 696 821 12 Website support euro dell com E mail support euro dell com it it emaildell Corporate T...

Page 224: ...ess Sales Division Up to 400 employees 044 556 3494 Preferred Accounts Division Sales Over 400 employees 044 556 3433 Large Corporate Accounts Sales Over 3500 employees 044 556 3440 Public Sales Government agencies educational institutions and medical institutions 044 556 3440 Global Segment Japan 044 556 3469 Individual User 044 556 1657 Faxbox Service 044 556 3490 Switchboard 044 556 4300 Websit...

Page 225: ... 91 00 Customer Care Brussels Belgium 02 481 91 19 Fax Brussels Belgium 02 481 92 99 Switchboard Brussels Belgium 02 481 91 00 Website support euro dell com E mail tech_be dell com Macau Country Code 853 Technical Support toll free 0800 582 Customer Service Penang Malaysia 604 633 4949 Transaction Sales toll free 0800 581 Malaysia Penang International Access Code 00 Country Code 60 City Code 4 Tec...

Page 226: ...0 581 8838 Customer Care 020 581 8740 Home Small Business Sales toll free 0800 0663 Home Small Business Sales Fax 020 682 7171 Corporate Sales 020 581 8818 Corporate Sales Fax 020 686 8003 Fax 020 686 8003 Switchboard 020 581 8818 Website support euro dell com E mail tech_nl dell com New Zealand International Access Code 00 Country Code 64 Home and Small Business 0800 446 255 Government and Busine...

Page 227: ...48 City Code 22 Customer Service Phone 57 95 700 Customer Care 57 95 999 Sales 57 95 999 Customer Service Fax 57 95 806 Reception Desk Fax 57 95 998 Switchboard 57 95 999 Website support euro dell com E mail pl_support dell com Portugal International Access Code 00 Country Code 35 Technical Support 35 800 834 077 Customer Care 800 300 415 or 35 800 834 075 Sales 800 300 410 or 800 300 411 or 800 3...

Page 228: ...ll com Southeast Asian and Pacific Countries Customer Technical Support Customer Service and Sales Penang Malaysia 604 633 4810 Spain Madrid International Access Code 00 Country Code 34 City Code 91 Home and Small Business Technical Support 902 100 130 Customer Care 902 118 540 Sales 902 118 541 Switchboard 902 118 541 Fax 902 118 539 Website support euro dell com E mail support euro dell com es e...

Page 229: ...Customer Care Home and Small Business 0848 802 202 Customer Care Corporate 0848 821 721 Fax 022 799 01 90 Switchboard 022 799 01 01 Website support euro dell com E mail swisstech dell com E mail for French Speaking HSB and Corporate Customers support euro dell com ch fr emaildell Taiwan International Access Code 002 Country Code 886 Technical Support toll free 0080 60 1255 Technical Support Server...

Page 230: ...6 Home and Small Business Customer Care 0870 906 0010 Corporate Customer Care 01344 72 3185 Preferred Accounts 500 5000 employees Customer Care 01344 723196 Central Government Customer Care 01344 723193 Local Government Customer Care 01344 723194 Home Small Business Sales 0870 907 4000 Corporate Public Sector Sales 01344 860456 Website support euro dell com E mail dell_direct_support dell com Coun...

Page 231: ...free 1 800 822 8965 Public Americas International Computers purchased by governmental agencies local state or federal or educational institutions Customer Service and Technical Support Return material authorization numbers toll free 1 800 234 1490 Dell Sales toll free 1 800 289 3355 or toll free 1 800 879 3355 Spare Parts Sales toll free 1 800 357 3355 Desktop and Portable Fee Based Technical Supp...

Page 232: ...230 Ge tt ing Help w w w d e l l c o m s u p p o r t d e l l c o m ...

Page 233: ...w w w d e l l c o m s u p p o r t d e l l c o m SE CT ION 8 Additional Information Regulatory Notices ENERGY STAR Compliance Limited Warranty and Return Policy ...

Page 234: ...system has been designed and determined to be compliant with regulatory agency limits for EMI there is no guarantee that interference will not occur in a particular installation If this equipment does cause interference with radio communications services which can be determined by turning the equipment off and on you are encouraged to try to correct the interference by one or more of the following...

Page 235: ... your system or device refer to the following sections specific for each regulatory agency Each section provides country specific EMC EMI or product safety information FCC Notices U S Only Most Dell computer systems are classified by the Federal Communications Commission FCC as Class B digital devices To determine which classification applies to your computer system examine all FCC registration la...

Page 236: ... B digital device pursuant to Part 15 of the FCC Rules These limits are designed to provide reasonable protection against harmful interference in a residential installation This equipment generates uses and can radiate radio frequency energy and if not installed and used in accordance with the manufacturer s instruction manual may cause interference with radio communications However there is no gu...

Page 237: ...ifications not expressly approved by Dell could void your authority to operate this equipment CE Notice European Union Marking by the symbol indicates compliance of this Dell computer to the EMC Directive and the Low Voltage Directive of the European Union Such marking is indicative that this Dell system meets the following technical standards EN 55022 Limits and Methods of Measurement of Radio In...

Page 238: ...amine the FCC registration label located on the back panel of the computer If the label indicates a Class A rating the following warning applies to your computer RF INTERFERENCE WARNING This is a Class A product In a domestic environment this product may cause radio frequency RF interference in which case the user may be required to take adequate measures This Dell device is classified for use in ...

Page 239: ...e belongs to Class B devices as described in EN 55022 unless it is specifically stated that it is a Class A device on the specification label The following applies to devices in Class A of EN 55022 radius of protection up to 30 meters The user of the device is obliged to take all steps necessary to remove sources of interference to telecommunication or other devices Pokud není na typovém titku poè...

Page 240: ...assification Class A or B of the computer system To determine which classification applies to your computer system examine the regulatory labels markings see VCCI Class A ITE Regulatory Mark and VCCI Class B ITE Regulatory Mark located on the bottom or back panel of your computer Once you have determined your system sVCCI classification read the appropriate VCCI notice Class A ITE This is a Class ...

Page 241: ...orea Only To determine which classification Class A or B applies to your computer or other Dell digital device examine the Republic of Korean Ministry of Information and Communications MIC registration labels located on your computer or other Dell digital device The MIC label may be located separately from the other regulatory marking applied to your product Line three of the label identifies the ...

Page 242: ... purposes with regard to electromagnetic interference If you find that this device is not suitable for your use you may exchange it for a nonbusiness purpose device MIC Cla ss A Re gulat o r y L a bel Class B Device Please note that this device has been approved for nonbusiness purposes and may be used in any environment including residential areas ...

Page 243: ...nductor of the room s electrical installation should have a reserve short circuit protection device in the form of a fuse with a nominal value no larger than 16 amperes A To completely switch off the equipment the power supply cable must be removed from the power supply socket which should be located near the equipment and easily accessible A protection mark B confirms that the equipment is in com...

Page 244: ...i 16A amperów W celu ca kowitego wy czenia urz dzenia z sieci zasilania nale y wyj æ wtyczkê kabla zasilaj cego z gniazdka które powinno znajdowaæ siê w pobli u urz dzenia i byæ atwo dostêpne Znak bezpieczeñstwa B potwierdza zgodno æ urz dzenia z wymaganiami bezpieczeñstwa u ytkowania zawartymi w PN 93 T 42107 i PN EN 55022 1996 Je eli na tabliczce znamionowej umieszczono informacjê e urz dzenie j...

Page 245: ... nie le a o na kablach systemu komputerowego oraz aby kable nie by y umieszczone w miejscu gdzie mo na by oby na nie nadeptywaæ lub potykaæ siê o nie Nie nale y rozlewaæ napojów ani innych p ynów na system komputerowy Nie nale y wpychaæ adnych przedmiotów do otworów systemu komputerowego gdy mo e to spowodowaæ po ar lub pora enie pr dem poprzez zwarcie elementów wewnêtrznych System komputerowy pow...

Page 246: ...244 Additional Information w w w d e l l c o m s u p p o r t d e l l c o m BSMI Notice Taiwan Only ...

Page 247: ...tional Information 245 NOM Information Mexico Only The following information is provided on the device s described in this document in compliance with the requirements of the official Mexican standards NOM ...

Page 248: ... 11 Piso Col Lomas Altas 11950 México D F Ship to Dell Computer de México S A de C V al Cuidado de Kuehne Nagel de México S de R I Avenida Soles No 55 Col Peñon de los Baños 15520 México D F Supply voltage 115 230 VAC Frequency 60 50 Hz Input current rating DHS 2 0 1 0 A DHP 1 5 0 75 A DHM 3 0 1 5 A Exporter Dell Computer Corporation One Dell Way Round Rock TX 78682 Importador Dell Computer de Méx...

Page 249: ...d when shipped by Dell Any changes you make to this configuration such as installing additional expansion cards or drives may increase the computer s power consumption beyond the limits set by the EPA s ENERGY STAR Computers program ENERGY STAR Em ble m The EPA s ENERGY STAR Computers program is a joint effort between the EPA and computer manufacturers to reduce air pollution by promoting energy e...

Page 250: ...hey are not in use for extended periods of time particularly at night and on weekends Limited Warranty and Return Policy Dell Computer Corporation Dell manufactures its hardware products from parts and components that are new or equivalent to new in accordance with industry standard practices For information about the Dell warranty for your computer see the Setup and Quick Reference Guide ...

Page 251: ...or computer power management The key element of the standard is that the OS controls power management In previous standards most of the power management tasks were run by the BIOS withlimitedinterventionby theOS InACPI theBIOS communicates with hardware components in the computer but the OS controls power management operations AGP Accelerated graphics port A high speed graphics port that produces ...

Page 252: ...Intel 80286 microprocessor 16 bit bus and 1 2 MB floppy drive ATA Advanced Technology Attachment Aspecification fordrive interface SeeIDE ATAPI Advanced Technology Attachment Packet Interface An interface used to connect CD tape and other drives with a computer B Binary A system of numbers having 2 as its base and using 0 and 1 for its notation Binary code is used by computersbecause it workswellw...

Page 253: ...ectronic pathway that links computer components such as the microprocessor RAM expansion cards and so on The width of a bus indicates the amount of data that can move along the bus and is determined by the number of parallel conductors in the bus For example a 32 bit bus has 32 conductors and can move 32 bits of data at once Bus Speed The speed given in MHz that indicates how fast a bus can transf...

Page 254: ... written over CD RW CD rewritable A rewritable version of a CD Data can be written to a CD RW then erased and written over rewritten Chip See IC CIM Common Information Model CIM allows remote management application programs to access system management information on a client computer running any Microsoft Windows OS that includes the WBEM core components Clock Speed The speed given in MHz that ind...

Page 255: ...lcodescanalso be used to affect an output device such as causing a printer to start a new line of text Controller Part of a computer typically a separate circuit board or chip that allows the computer to use certain kinds of devices Types of controllers include hard drive network keyboard interrupt and graphics controllers COO Cost of ownership Business asset data that helps an organization collec...

Page 256: ...e second drive can locate the next segment dB Decibel s A measurement of relative loudness of a sound or in electronics for the relative difference between two power levels DC Direct current An electric current flowing in one direction only See AC DCE Data communication equipment In computer data transmission DCE is the RS 232 interface that a modem or other serial device uses to exchange data wit...

Page 257: ...e An industry organization leading the development adoption and unification of management standards and initiatives for desktop enterprise and Internet environments Working with keytechnologyvendorsandaffiliatedstandardsgroups theDMTFisenabling a more integrated and efficient approach to management DRAM Dynamic random access memory RAM Referred to as dynamic because it must be regularly refreshed ...

Page 258: ...he ECP standard EDO Extended data out A type of RAM that improves the time to read from memory on faster microprocessors such as the Intel Pentium For faster computers different types of DRAM are considered See also ECC EIDE Enhanced integrated device electronics An improved version of the IDE interface for hard drives and CD drives EIDE uses Logical Block Addressing which allows for hard drive st...

Page 259: ...ding the capabilities of the computer Examples of expansion cards include video modem and sound cards Expansion Slot A connector or slot on the computer s system board that allows for the insertion of an expansion card connecting it to the computer s bus Express Service Code A numeric code located on a sticker on your Dell computer This code is a mathematicalconversionofthecomputer s ServiceTagNum...

Page 260: ...that equals 1024 MB 1 073 741 824 bytes GHz Gigahertz A measurement of frequency that equals one thousand million Hz or one thousand MHz GUI Graphical user interface Software that interacts with the user by means of menus windows and icons Most applications that operate on the Microsoft Windows OS are GUIs H Hard Drive Controller A computer component that provides an interface with an individual h...

Page 261: ...in kilohertz kHz megahertz MHz gigahertz GHz or terahertz THz I I O Input output An operation or device that enters and or extracts data from the computer For example a keyboard is an input device and a printer is an output device I O Address An address in RAM that is associated with a specific device such as a serial port parallel port or expansion slot and allows the microprocessor to communicat...

Page 262: ...servers See also SPX and IPX SPX IPX SPX Internetwork Packet eXchange IPX Sequenced Packet eXchange SPX A Novell network communications protocol that functions similarly to TCP IP IRQ Interrupt request An electronic pathway assigned to a specific device so that the device can communicate with the microprocessor Each device connection must be assigned an IRQ For example the first serial port in you...

Page 263: ...2 A larger slower secondary cache used with the L1 cache In older microprocessors theL2cachewasusuallyexternaltotheprocessor contained on chip s or an expansion card On more recent processors the L2 cache is typically integrated into the processor lb Pound s A measurement of weight that equals 16 oz or 0 453592 kg LBA Logical block addressing A defining feature of EIDE that allows a computer to ad...

Page 264: ...ce that will be formalized in the SCSI 3 specification LVD uses less power than the present differential drive is less expensive and supports the higher speeds of Ultra 2 SCSI drives LVD requires 3 3 VDC instead of 5 VDC the previous standard M m Meter A measurement of length that equals 39 37 inches mA milliAmpere A measurement of current that equals one thousandth of an A Mb Megabit A measuremen...

Page 265: ... A computer chip that interprets and executes program instructions Also referred to as the CPU See also Bus Speed MIF Management Information Format A syntax for describing information for manageable hardware and software components that can be installed on a computer See also COO WBEM and WfM min Minute s A measurement of time that equals 60 sec Mini DIN A form of DIN connector that is round has 6...

Page 266: ...NIC Network Interface Controller Also referred to as a network adapter NiCad Nickel cadmium A chemical composition used in certain rechargeable batteries NiMH Nickel metal hydride A chemical composition used in certain rechargeable batteries Node In networking and communications a node is any computer or device attached to a network NVRAM Non volatile random access memory RAM Memory that does not ...

Page 267: ...ernal lines while allowing users to share a certain number of external phone lines The main purpose of a PBX is to save the cost of requiring a separate telephone line for each user PC Personal computer Commonly used to describe an IBM compatible computer as opposed to an Apple Macintosh computer PCI PeripheralComponentInterconnect Astandardforexpansioncardsdeveloped by Intel Corporation PCI is a ...

Page 268: ... Plug and Play Often referred to as Plug n Play or PnP A technology that can automatically configure devices at start up to use or share certain IRQs For this to work properly the computer s BIOS and OS must both support PnP and all devices being configured must also be PnP compliant PCI devices are PnP compliant PME Power management event An event that causes a computer to be remotely started suc...

Page 269: ... a number of different RAID levels The three most common are 0 3 and 5 Level 0 Provides data striping but no redundancy This improves performance but does not provide fault tolerance Level 3 Same as Level 0 but also reserves one dedicated drive for error correction data providing good performance and some level of fault tolerance Level 5 Provides data striping at the byte level and also stripe err...

Page 270: ...memory module A slim circuit board containing RDRAM chips RIMMs are plugged into sockets on the computer s system board to add memory to the computer They typically must be installed in matched pairs meaning two sockets forming a pair must contain RIMMs of identical capacity number of RDRAM chips and speed See also SIMM and DIMM RJ45 A form of connector resembling a standard telephone jack that is...

Page 271: ...iniature D connector typically to connect a device such as a modem or mouse Also referred to as a COM port See also DCE and DTE Service Tag Number A five to seven digit alpha numeric code located on a sticker on your Dell computer This code is programmed into your computer s system setup by Dell during the manufacturing process Dell customer support applications use the Service Tag to display all ...

Page 272: ...random access memory RAM Referred to as static because it retains a value as long as power is supplied unlike DRAM which must be refreshed regularly Stepping A term used to indicate a manufacturing version number or revision level of an Intel microprocessor The initial version of a new processor is the A0 step As revisions are made for functional fixes or manufacturing improvements the stepping is...

Page 273: ...ackets into the original message The lower layer IP addresses each packet so that it gets to the right destination See IP and IP Address Token Ring A network communications protocol See also Network Adapter TSR Terminate and stay resident A program application that is loaded stays in RAM after it is terminated and can be reactivated by pressing a designated hotkey or a combination of keys Examples...

Page 274: ...access scheme and can introduce an IP address indicateapathorfileon aserver orlocate aparticularpositionwithin a specified document USB Universal Serial Bus An interface for devices such as keyboards joysticks scanners speakers or printers that provides a maximum transfer speed of 12 Mb second Devices plug directly into a four pin connector on your computer or into a multiport hub that connects to...

Page 275: ...ware and other capabilities that enhance computer network operations and reduce support costs by allowing remote management application programs to access client computers over a network WfM technology is used in a client computer in such components as circuitry power supply network adapter and so on Remote management application programs can use WfM technology to access a client computer and gath...

Page 276: ... l l c o m s u p p o r t d e l l c o m Z ZIF Zero insertion force A type of socket or connector that allows a computer chip to be installed or removed with no stress applied to either the chip or its socket See LIF ...

Reviews: