background image

Monitoring Status and Statistics

D-Link

Unified Wired and Wireless Access System 

Oct. 2015

Page 488

D-Link UWS User Manual

Viewing Details About AP Authentication Failures

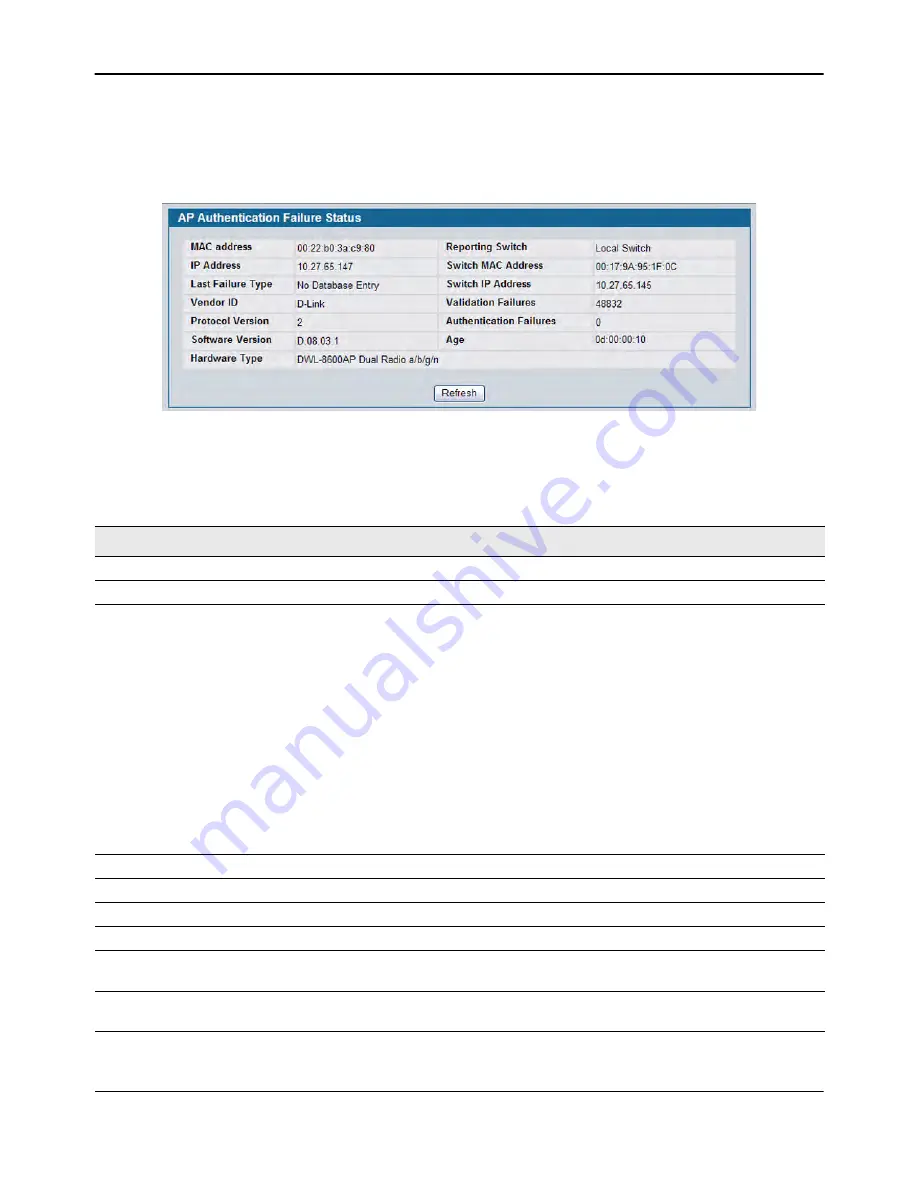
To view additional data (beacon information) for an AP in the authentication failure list, click the MAC address 
of the AP. 

Figure 317:  AP Authentication Failure Details

The following table describes the fields on the detailed 

Access Point Authentication Failure Status

 page.

Table 286:  Access Point Authentication Failure Details


Field

Description

MAC Address

The Ethernet address of the AP.

IP Address

The network IP address of the AP.

Last Failure Type

Indicates the last type of failure that occurred, which can be one of the 
following: 

• Local Authentication
• No Database Entry
• Not Managed
• RADIUS Authentication
• RADIUS Challenged
• RADIUS Unreachable
• Invalid RADIUS Response
• Invalid Profile ID
• Profile Mismatch-Hardware Type
• AP Relink

Vendor ID

Vendor of the AP software.

Protocol Version

Indicates the protocol version supported by the software on the AP.

Software Version

Indicates the version of software on the AP.

Hardware Type

Hardware platform for the AP.

Reporting Switch

Shows whether the switch that reported the AP authentication failure is 
the local switch or a peer switch. 

Switch MAC Address

Shows the IP address of the switch in the cluster that reported the AP 
authentication failure. 

Summary of Contents for DWL-8600AP

Page 1: ...ht 2015 All rights reserved User Manual Product Model DWS 4000 series DWL 8600AP DWL 8610AP DWL 6600AP DWL 6610AP DWL 2600AP DWL 3600AP DWL 6700AP Unified Wired Wireless Access System Release 2 01 October 2015 ...

Page 2: ... a commercial environment This equipment generates uses and can radiate radio frequency energy and if not installed and used in accordance with this manual may cause harmful interference to radio communications Operation of this equipment in a residential area is likely to cause harmful interference in which case the user will be required to correct the interference at his own expense CE Mark Warn...

Page 3: ...D Link Unified Wired and Wireless Access System July 2012 Page 3 D Link UWS User Manual MIC Warning CCC Warning ...

Page 4: ...MODEM 51 Load Configuration Using XMODEM 52 Display Operational Code Vital Product Data 52 Run Flash Diagnostics 53 Update Boot Code 54 Delete Operational Code 54 Reset the System 55 Restore Configuration To Factory Defaults Delete Configuration Files 55 Activate Backup Image 55 Understanding the User Interfaces 56 Using the Web Interface 56 Device View 57 Navigation Tree View 58 Configuration and...

Page 5: ...an Authentication List 83 Deleting an Authentication List 83 Authentication List Summary 84 Login Session 86 User Login 87 Assigning a User to an Authentication List 88 Denial of Service Protection 88 Multiple Port Mirroring 90 Adding a Port Mirroring Session 91 Removing or Modifying a Port Mirroring Session 92 Telnet Sessions 92 Outbound Telnet Client Configuration 94 Ping Test 95 TraceRoute 96 C...

Page 6: ...g Host 119 Deleting a Remote Logging Host 120 Persistent Log Configuration 120 Persistent Log 122 Syslog Configuration 123 Trap Log 124 Defining SNMP Parameters 125 SNMP v1 and v2 125 SNMP v3 125 SNMP Community Configuration 126 Trap Receiver Configuration 127 Trap Flags 128 Supported MIBs 130 Managing the DHCP Server 131 Global Configuration 131 Pool Configuration 133 Pool Options 136 Reset Confi...

Page 7: ...4 sFlow Poller Configuration 156 Counter Sampling 156 sFlow Sampler Configuration 157 Packet Flow Sampling 157 Viewing System Statistics 158 Switch Detailed 158 Switch Summary 160 Port Detailed 162 Port Summary Statistics 168 Section 3 Using System Tools 169 Reset Configuration to Defaults 169 Reset Passwords to Defaults 170 System Reset 170 Save All Applied Changes 171 Download File To Switch TFT...

Page 8: ... Subnet based VLAN Summary 194 MAC based VLAN Configuration 194 MAC based VLAN Summary 195 Double VLAN Tunneling 196 Double VLAN Tunneling Summary 197 Voice VLAN Configuration 198 Reset VLAN Configuration 199 Configuring Protected Ports 200 Protected Port Configuration 200 Assigning Ports to a Group 201 Protected Ports Summary 201 Creating MAC Filters 202 Adding MAC Filters 203 Modifying MAC Filte...

Page 9: ... MLD Snooping 226 Configuration and Status 226 Interface Configuration 227 VLAN Status 228 VLAN Configuration 229 Multicast Router Configuration 230 Multicast Router Status 231 Multicast Router VLAN Configuration 232 Multicast Router VLAN Status 233 Configuring MLD Snooping Queriers 234 MLD Snooping Querier Configuration 234 MLD Snooping Querier VLAN Configuration 235 MLD Snooping Querier VLAN Con...

Page 10: ...n 265 Remote Device Summary 266 LLDP MED 267 LLDP MED Global Configuration 267 LLDP MED Interface Configuration 268 LLDP MED Interface Summary 269 LLDP Local Device Information 270 LLDP MED Remote Device Information 272 Configuring Dynamic ARP Inspection 274 DAI Configuration 274 DAI VLAN Configuration 275 DAI Interface Configuration 276 DAI ARP ACL Configuration 277 DAI ARP ACL Rule Configuration...

Page 11: ...dary Address 302 Loopbacks Summary 303 Configuring RIP 304 RIP Configuration 304 RIP Interface Configuration 305 Configuring the RIP Interface 307 RIP Interface Summary 308 RIP Route Redistribution Configuration 309 RIP Route Redistribution Summary 310 Router Discovery 311 Router Discovery Configuration 311 Router Discovery Status 313 Router 314 Route Table 314 Best Routes Table 316 Configured Sta...

Page 12: ...ion 6 Configuring Quality of Service 334 Configuring Class of Service 334 Mapping 802 1p Priority 334 Trust Mode Configuration 335 IP DSCP Mapping Configuration 337 CoS Interface Configuration 338 CoS Interface Queue Configuration 339 CoS Interface Queue Status 340 Configuring Differentiated Services 341 Diffserv Configuration 341 Class Configuration 343 DiffServ Class Summary 345 Policy Configura...

Page 13: ...From a MAC based ACL 369 MAC ACL Summary 370 MAC ACL Rule Summary 370 ACL Interface Configuration 371 Assigning an ACL to an Interface 372 Removing an ACL from an Interface 372 Section 8 Managing Device Security 373 Configuring Port Security 373 Port Security Administration 374 Port Security Interface Configuration 374 Port Security Static 376 Port Security Dynamic 377 Port Security Violation Stat...

Page 14: ...he Client Statistics 408 Viewing the Client Interface Association Status 408 Viewing the Client CP Association Status 409 SNMP Trap Configuration 410 RADIUS Settings 411 RADIUS Configuration 411 RADIUS Server Configuration 413 Viewing Named Server Status Information 415 RADIUS Server Statistics 416 RADIUS Accounting Server Configuration 416 Viewing Named Accounting Server Status 418 RADIUS Server ...

Page 15: ...iewing Switch Status and Statistics Information 449 Viewing IP Discovery Status 453 Viewing the Peer Switch Configuration Received Status 455 Viewing the AP Hardware Capability List 456 AP Hardware Radio Capability 457 AP Image Capability 458 Peer Switch Status 459 Viewing Peer Switch Configuration Status 460 Viewing Peer Switch Managed AP Status 461 All AP Status 462 Managed AP Status 464 Monitor...

Page 16: ...tatus 499 Viewing Associated Client QoS Status 501 Viewing Associated Client Neighbor AP Status 502 Viewing Associated Client Distributed Tunneling Status 503 Viewing Associated Client TSPEC Status 505 Viewing Associated Client RRM Status 506 Viewing Associated Client SSID Status 507 Viewing Associated Client VAP Status 508 Switch Associated Client Status 509 Viewing Associated Client Statistics 5...

Page 17: ...iguration 539 Wireless Discovery Configuration 544 L3 IP Discovery 545 L2 VLAN Discovery 546 Profile 548 Radio Configuration 549 Wireless Default VAP Configuration 555 Managing the Virtual Access Point Configuration 555 Configuring the Default Network 557 Configuring AP Security 564 Using No Security 564 Using Static or Dynamic WEP 564 Static WEP Rules 566 Using WPA WPA2 Personal or Enterprise 566...

Page 18: ... 603 AP Profiles 603 Creating Copying and Deleting AP Profiles 604 Applying an AP Profile 606 Configuring the AP Profile Global Settings 608 Access Point Profile Radio Configuration 609 Access Point Profile VAP Configuration 619 Access Point Profile QoS Configuration 621 Access Point Profile TSPEC Configuration 624 Peer Switch 627 Peer Switch Configuration Enable Disable 628 Mutual Authentication ...

Page 19: ...us 660 Client Triangulation Location 662 Client Triangulation Summary 662 Detailed AP Triangulation Status 663 AP Scheduler 665 AP Scheduler Configuration 665 Visualizing the Wireless Network 667 WLAN Visualization Overview 667 Importing and Configuring a Background Image 668 Setting Up the Graph 669 Creating a New Graph 669 Manually Graphing the Components 671 Checking the Location of an AP or Cl...

Page 20: ...nel Plan 717 Monitoring the RF Transmission Power Level 719 Configuring the Automatic Power Adjustment 720 Load Balancing and WLAN Utilization 723 Detecting and Preventing Wireless Intrusion 726 Configuring a Radio in Sentry Mode 726 Configuring and Monitoring WIDS WIPS to Detect Rogue APs 727 Using WIDS WIPS to Detect Rogue Clients 732 Mitigating a Rogue Client Threat 734 Appendix B Limited Warra...

Page 21: ...ial Port 73 Figure 15 Network Connectivity 74 Figure 16 DHCP Client Options 76 Figure 17 HTTP Configuration 77 Figure 18 User Accounts 78 Figure 19 Authentication List Configuration 81 Figure 20 Login Session 84 Figure 21 Login Session 86 Figure 22 User Login 87 Figure 23 Denial of Service 88 Figure 24 Multiple Port Mirroring 90 Figure 25 Multiple Port Mirroring Add Source Ports 91 Figure 26 Telne...

Page 22: ...e 51 Trap Log 124 Figure 52 SNMP Community Configuration 126 Figure 53 Trap Receiver Configuration 127 Figure 54 Trap Flags Configuration 129 Figure 55 Supported MIBs 130 Figure 56 DHCP Server Global Configuration 131 Figure 57 Pool Configuration 133 Figure 58 Pool Options 136 Figure 59 Reset Configuration 137 Figure 60 Bindings Information 138 Figure 61 Server Statistics 139 Figure 62 Conflicts I...

Page 23: ...pload File from Switch 175 Figure 89 Multiple Image Service 177 Figure 90 Dual Image Status 178 Figure 91 Erase Startup config File 179 Figure 92 AutoInstall 179 Figure 93 Forwarding Database Age Out Interval 182 Figure 94 Forwarding Database Search 183 Figure 95 VLAN Configuration 185 Figure 96 VLAN Status 187 Figure 97 VLAN Port Configuration 188 Figure 98 VLAN Port Summary 189 Figure 99 Create ...

Page 24: ...r VLAN Status 221 Figure 127 IGMP Snooping Querier Configuration 222 Figure 128 IGMP Snooping Querier VLAN Configuration 223 Figure 129 IGMP Snooping Querier VLAN Configuration Summary 224 Figure 130 IGMP Snooping Querier VLAN Status 225 Figure 131 MLD Snooping Global Configuration and Status 226 Figure 132 MLD Snooping Interface Configuration 227 Figure 133 MLD Snooping VLAN Status 228 Figure 134...

Page 25: ...ce Information 263 Figure 163 LLDP Local Device Summary 264 Figure 164 LLDP Remote Device Information 265 Figure 165 LLDP Remote Device Summary 266 Figure 166 LLDP Global Configuration 267 Figure 167 LLDP MED Interface Configure 268 Figure 168 LLDP MED Interface Summary 269 Figure 169 LLDP MED Local Device Information 270 Figure 170 LLDP Remote Device Information 272 Figure 171 Dynamic ARP Inspect...

Page 26: ...edistribution Summary 310 Figure 200 Router Discovery Configuration 311 Figure 201 Router Discovery Status 313 Figure 202 Route Table 314 Figure 203 Best Routes Table 316 Figure 204 Configured Routes 317 Figure 205 Create Static Route 318 Figure 206 Route Preferences Configuration 319 Figure 207 VLAN Routing Configuration 320 Figure 208 VLAN Routing Configuration Interface Exists 321 Figure 209 VL...

Page 27: ...s 352 Figure 237 Auto VoIP Configuration 354 Figure 238 Auto VoIP Summary 355 Figure 239 IP ACL Configuration 357 Figure 240 IP ACL Rule Configuration Create Rule 358 Figure 241 IP ACL Rule Configuration Extended ACL Rule 359 Figure 242 IP ACL Summary 363 Figure 243 IP ACL Rule Summary 364 Figure 244 MAC ACL Configuration 365 Figure 245 MAC ACL Rule Configuration Create Rule 366 Figure 246 MAC ACL...

Page 28: ... Status 402 Figure 273 Interface Activation Status 404 Figure 274 Interface Capability Status 405 Figure 275 Client Summary 406 Figure 276 Client Detail 407 Figure 277 Client Statistics 408 Figure 278 Interface Client Status 408 Figure 279 CP Client Status 409 Figure 280 SNMP Trap Configuration 410 Figure 281 RADIUS Configuration 411 Figure 282 RADIUS Server Configuration Add Server 413 Figure 283...

Page 29: ...ure 310 Peer Switch Status 459 Figure 311 Peer Switch Configuration Status 460 Figure 312 Peer Switch Managed AP Status 461 Figure 313 All Access Points 462 Figure 314 Managed AP Status 465 Figure 315 Managed AP Statistics 479 Figure 316 AP Authentication Failure Status 486 Figure 317 AP Authentication Failure Details 488 Figure 318 RF Scan 490 Figure 319 RF Scan AP Details 491 Figure 320 AP Trian...

Page 30: ...Client Roam History 525 Figure 346 Detected Client Pre Authentication History Summary 526 Figure 347 Detected Client Roam History Summary 527 Figure 348 RRM Channel Load Configuration 528 Figure 349 RRM Channel Load History 530 Figure 350 RRM Neighbors 531 Figure 351 WDS Group Status Summary 532 Figure 352 WDS AP Group Status 533 Figure 353 WDS AP Group Status Summary 535 Figure 354 WDS AP Link St...

Page 31: ... a Profile 604 Figure 385 Configuring an AP Profile 605 Figure 386 Applying the AP Profile 607 Figure 387 AP Profile Global Configuration 608 Figure 388 AP Profile Radio Settings 610 Figure 389 AP Profile VAP Configuration 619 Figure 390 QoS Configuration 621 Figure 391 AP Profile TSPEC Configuration 625 Figure 392 Peer Switch Configuration Request Status 627 Figure 393 Peer Switch Configuration E...

Page 32: ...Control 669 Figure 422 Graphing a Switch 671 Figure 423 On Demand Location Search Window 671 Figure 424 Device Location Progress Timer 672 Figure 425 Device Location Status 672 Figure 426 Probable Device Location Point Solution 673 Figure 427 Probable Device Location Circle Solution 673 Figure 428 Probable Device Location Off Screen 674 Figure 429 Toolbar Icons 676 Figure 430 Legend 677 Figure 431...

Page 33: ...ue 729 Figure 445 Honeypot AP Rogue Status 729 Figure 446 WIDS Test Discovers Rogue 730 Figure 447 De Authentication Attack Enabled 730 Figure 448 Rogue AP Mitigation 731 Figure 449 De Authentication Attack Status 731 Figure 450 WIDS Client Configuration 732 Figure 451 Excessive Authentication Failures 733 Figure 452 Client Rogue Classification 733 ...

Page 34: ... 15 Login Fields 84 Table 16 Login Session Fields 86 Table 17 User Login Fields 87 Table 18 Denial of Service Configuration Fields 89 Table 19 Multiple Port Mirroring Fields 90 Table 20 Multiple Port Mirroring Add Source Fields 91 Table 21 Telnet Session Configuration Fields 93 Table 22 Outbound Telnet Fields 94 Table 23 Ping Fields 95 Table 24 TraceRoute Fields 96 Table 25 SNTP Global Configurati...

Page 35: ...6 Table 51 Reset Configuration Fields 137 Table 52 Bindings Information Fields 138 Table 53 Server Statistics Fields 139 Table 54 Conflicts Information Fields 140 Table 55 Time Range Configuration 141 Table 56 Time Range Summary 142 Table 57 Time Range Entry Configuration 143 Table 58 DNS Global Configuration Fields 145 Table 59 DNS Server Configuration Fields 146 Table 60 DNS Host Name Mapping Co...

Page 36: ...LAN Summary Fields 194 Table 90 MAC based VLAN Configuration Fields 195 Table 91 MAC based VLAN Summary Fields 195 Table 92 Double VLAN Tunneling Fields 196 Table 93 Double VLAN Tunneling Summary Fields 197 Table 94 Voice VLAN Configuration Fields 198 Table 95 Protected Port Configuration Fields 200 Table 96 Protected Ports Summary Fields 201 Table 97 MAC Filter Configuration Fields 202 Table 98 G...

Page 37: ...r VLAN Configuration Fields 235 Table 125 MLD Snooping Querier VLAN Configuration Summary Fields 236 Table 126 MLD Snooping Querier VLAN Status Fields 237 Table 127 MFDB Table Fields 238 Table 128 GMRP Table Fields 239 Table 129 MFDB IGMP Snooping Table Fields 240 Table 130 MLD Snooping Table Fields 241 Table 131 Multicast Forwarding Database Statistics Fields 242 Table 132 Spanning Tree Switch Co...

Page 38: ...OTP DHCP Relay Agent Status Fields 282 Table 162 IP Helper Global Configuration Fields 283 Table 163 IP Helper Global Configuration Add Fields 284 Table 164 IP Helper Interface Configuration Fields 285 Table 165 IP Helper Interface Configuration Add Fields 286 Table 166 IP Helper Helper Statistics Fields 287 Table 167 ARP Create Fields 289 Table 168 ARP Table Configuration Fields 290 Table 169 ARP...

Page 39: ...ping 335 Table 200 Trust Mode Configuration Fields 336 Table 201 IP DSCP Mapping Configuration Fields 337 Table 202 Interface Configuration Fields 338 Table 203 Interface Queue Configuration Fields 339 Table 204 DiffServ Configuration Fields 342 Table 205 DiffServ Class Configuration Fields 344 Table 206 Policy Configuration Fields 346 Table 207 Policy Class Definition Fields 348 Table 208 Service...

Page 40: ...Detail 407 Table 238 Client Interface Association Connection Statistics 408 Table 239 Interface Client Status 409 Table 240 CP Client Status 409 Table 241 SNMP Trap Configuration 410 Table 242 RADIUS Configuration Fields 411 Table 243 RADIUS Server Configuration Fields 414 Table 244 RADIUS Server Configuration Fields 415 Table 245 RADIUS Accounting Server Configuration Fields 417 Table 246 Named A...

Page 41: ...474 Table 275 Neighbor AP Clients 475 Table 276 Managed Access Point VAP Status 476 Table 277 Managed Access Point VAP TSPEC Status 477 Table 278 Distributed Tunneling Status 478 Table 279 Managed Access Point WLAN Summary Statistics 479 Table 280 Managed Access Point Ethernet Summary Statistics 480 Table 281 Detailed Managed Access Point Statistics 480 Table 282 Managed Access Point Radio Statist...

Page 42: ...ed Client Status 517 Table 309 Detailed Detected Client Status 518 Table 310 WIDS Client Rogue Classification 521 Table 311 Detected Client Pre Authentication History 523 Table 312 Detected Client Triangulation 524 Table 313 Detected Client Roam History 525 Table 314 Detected Client Pre Authentication History Summary 526 Table 315 Detected Client Roam History 527 Table 316 RRM Channel Load Configu...

Page 43: ...AP Provisioning Status 592 Table 348 General Global Configurations 595 Table 349 SNMP Traps 598 Table 350 Distributed Tunneling Configuration 600 Table 351 Device Location Configuration 601 Table 352 Wireless Network List 602 Table 353 Access Point Profile Summary 605 Table 354 Access Point Profile Global Configuration 608 Table 355 Radio Settings 611 Table 356 Default VAP Configuration 619 Table ...

Page 44: ...anaged AP Location Summary 654 Table 378 On Demand Location Trigger 655 Table 379 On Demand Location Trigger Global Status 657 Table 380 On Demand Location Trigger Floor Status 658 Table 381 AP Triangulation Summary 660 Table 382 Detailed AP Triangulation Status 661 Table 383 Client Triangulation Summary 663 Table 384 Detailed Client Triangulation Status 664 Table 385 AP Scheduler Configuration 66...

Page 45: ... on page 47contains information about performing the initial system configuration and accessing the user interfaces Section 2 System Administration on page 62 describes how to configure administrative features such as SNMP DHCP and port information Section 3 Using System Tools on page 169 describes how to perform the system maintenance tasks available from the Tools menu Section 4 Configuring L2 F...

Page 46: ...es product detail the platform specific functionality of the software packages including issues and workarounds Document Conventions This section describes the conventions this document uses This guide uses the typographical conventions described in Table 1 Note A note provides more information about a feature or technology Caution A caution provides information about critical aspects of the confi...

Page 47: ...s and subnet mask and the switch is physically and logically connected to the network you can manage and monitor the switch remotely through SSH telnet a Web browser or an SNMP based network management system You can also continue to manage the switch through the terminal interface via the EIA 232 port To connect to the switch and configure or view network information use the following steps 1 Usi...

Page 48: ...After the switch is connected to the network you can use the IP address for remote access to the switch by using a Web browser or through telnet or SSH Booting the Switch When the power is turned on with the local terminal already connected the switch goes through Power On Self Test POST POST runs every time the switch is initialized and checks hardware components to determine if the switch is ful...

Page 49: ...d after the first part of the POST is completed Use the following procedures to display the Boot menu 1 During the boot process press 2 within ten seconds after the following message displays Boot Menu Version 12 jun 2007 Select an option If no selection in 10 seconds then operational code will start 1 Start operational code 2 Start Boot Menu Select 1 2 2 Boot Menu Version 12 jun 2007 Options avai...

Page 50: ...198 002200 MHz PCI device BCM5675_A0 attached as unit 0 PCI device BCM5695_B0 attached as unit 1 PCI device BCM5695_B0 attached as unit 2 PCI device BCM5673_A1 attached as unit 3 PCI device BCM5673_A1 attached as unit 4 Adding BCM transport pointers Configuring CPUTRANS TX Configuring CPUTRANS RX st_state 0 0x0 st_state 1 0x3 st_state 2 0x2 Change Baud Rate Use option 2 to change the baud rate of ...

Page 51: ...on 4 when a new software version must be downloaded to replace corrupted files update or upgrade the system software To download software from the Boot menu 1 On the Boot menu select 4 and press Enter The following prompt displays Boot Menu 4 Ready to receive the file with XMODEM CRC Ready to RECEIVE File xcode bin in binary mode Send several Control X characters to cancel before transfer starts 2...

Page 52: ...he protocol is defined as XMODEM 6 Click Send The configuration file is downloaded The terminal emulation application such as HyperTerminal may display the loading process progress Display Operational Code Vital Product Data Use option 6 to view boot image information To display boot image information from the Boot menu 1 On the Boot menu select 6 and press Enter The following prompt displays Boot...

Page 53: ...tested y n y Input number of diagnostic iterations 1 Testing 2 x 28F128J3 base 0xfe000000 Iterations remaining 1 Erasing sector 0 Verify sector 0 erased Writing sector 0 Erasing sector 1 Verify sector 1 erased Writing sector 1 Erasing sector 2 Verify sector 2 erased Writing sector 2 Erasing sector 3 Verify sector 3 erased Writing sector 3 Erasing sector 4 Verify sector 4 erased Writing sector 4 Er...

Page 54: ...isplays Do you wish to update Boot Code y n y Erasing Boot Flash Done Wrote 0x10000 bytes Wrote 0x20000 bytes Wrote 0x30000 bytes Wrote 0x40000 bytes Wrote 0x50000 bytes Wrote 0x60000 bytes Boot code updated 2 The bootup process resumes Delete Operational Code Use option 9 to delete the active image from the flash memory User action is confirmed with a Y N question before executing the command To ...

Page 55: ... The bootup process resumes Restore Configuration To Factory Defaults Delete Configuration Files Use option 11 to load using the system default configuration and to boot without using the current startup configuration Selecting 11 from the Boot Menu restores system defaults Boot Sequence can then be started by selecting 1 from the Boot Menu To download software from the Boot menu 1 On the Boot men...

Page 56: ...nd monitor the system For information about how to manage and monitor the system by using the CLI see the D Link DWS 4000 Series CLI Command Reference Using the Web Interface To access the switch by using a Web browser the browser must meet the following software requirements HTML version 4 0 or later HTTP version 1 1 or later JavaScript version 1 5 or later Use the following procedures to log on ...

Page 57: ...on the switch This graphic appears at the top of each page to provide an alternate way to navigate to configuration and monitoring options The graphic also provides information about device ports current configuration and status table information and feature components The port coloring indicates if a port is currently active Green indicates that the port is enabled red indicates that an error has...

Page 58: ...he Web interface The tree view contains a list of various device features The branches in the navigation tree can be expanded to view all the components under a specific feature or retracted to hide the feature s components The tree consists of a combination of folders subfolders and configuration and status HTML pages Click the folder to view the options in that folder Each folder contains either...

Page 59: ...ontain command buttons The command buttons in the following table are used throughout the pages in the Web interface Table 2 Common Command Buttons Button Function Submit Clicking the Submit button sends the updated configuration to the switch Configuration changes take effect immediately but changes are not retained across a power cycle unless you save them to the system configuration file Note T...

Page 60: ... available until you switch to that particular mode with the exception of the User EXEC mode commands You can execute the User EXEC mode commands in the Privileged EXEC mode To display the commands available in the current mode enter a question mark at the command prompt To display the available command keywords or parameters enter a question mark after each word you type at the command prompt If ...

Page 61: ...Link DWS 4000 Series CLI Command Reference To configure an SNMPv3 profile by using the Web interface use the following steps 1 Select LAN Administration User Accounts from the hierarchical tree on the left side of the Web interface 2 From the User menu select Create to create a new user 3 Enter a new user name in the User Name field 4 Enter a new user password in the Password field and then retype...

Page 62: ...ation PoE Configuration Serial Port IP Address Network DHCP Client Options HTTP Configuration User Accounts Authentication List Configuration User Login Denial of Service Protection Multiple Port Mirroring Managing and Viewing Logs Telnet Sessions Outbound Telnet Client Configuration Ping Test TraceRoute Configuring SNTP Settings Configuring and Viewing Device Port Information Managing and Viewing...

Page 63: ... this switch You may use up to 31 alpha numeric characters The factory default is blank System Contact Enter the contact person for this switch You may use up to 31 alpha numeric characters The factory default is blank IP Address The IP Address assigned to the network interface To change the IP address see Serial Port on page 73 System Object ID The base object ID for the switch s enterprise MIB S...

Page 64: ...r network control traffic loss When 802 3x flow control is enabled lower speed switches can communicate with higher speed switches by requesting that the higher speed switch refrains from sending packets Transmissions are temporarily halted to prevent buffer overflows To display the Switch Configuration page click LAN Administration Switch Configuration in the navigation tree Figure 8 Switch Confi...

Page 65: ... Wired and Wireless Access System Oct 2015 Page 65 D Link UWS User Manual If you change the mode click Submit to apply the changes to the system If you want the switch to retain the new values across a power cycle you must perform a save ...

Page 66: ... factory To display the inventory information click LAN Monitoring Inventory Information page in the navigation tree Figure 9 Inventory Information Card Configuration The pages in the Slot folder provide information about the cards installed in the slots on the switch To access the Card Configuration page click LAN Administration Card Configuration in the navigation menu Figure 10 shows the fields...

Page 67: ...led This field is non configurable for read only users Power State Displays whether the slot is powered on of off This field is non configurable for read only users Inserted Card Model Displays the model identifier of the card plugged into the selected slot If no card has been plugged in this field is not shown Inserted Card Description Displays the description of the card plugged into the selecte...

Page 68: ... Click Refresh to display the most current information from the router Table 6 Slot Summary Fields Field Description Slot Identifies the slot using the format unit slot Status Displays whether the slot is empty or full Administrative State Displays whether the slot is administratively enabled or disabled Power State Displays whether the slot is powered on of off Card Model ID Displays the model ID...

Page 69: ...anagement modes The options are as follows Static In this mode the power initially requested by the powered device is reserved for the port alone The reserved power is also equal to the power limit of the port Thus the total power available for the prospective powered devices is less than the actual available power This configuration is useful in cases when the powered devices can draw variable po...

Page 70: ... which ports can supply power For ports with the same priority the lower numbered port will have a higher priority Power Limit Defines the maximum power which can be delivered by a port Time Range Use this field to impose a time limitation When you click Configure you can select a configured time range or create a new named time range To configure the time range values use the LAN Administration T...

Page 71: ...red to all ports Slot Port Interface associated with the data Admin Mode Enables Disables the ability of the port to deliver power Class The class of the Powered Device PD defines the range of power a PD is drawing from the system Class definitions 0 0 44 12 95 watts 1 0 44 3 83 watts 2 3 84 6 48 watts 3 6 49 12 95 watts Priority Used to determine which ports can deliver power when the system The ...

Page 72: ...rching Indicates port is not in one of the above states Time Range Time limitation of the port For more information of the time range please reference the LAN Administration Time Ranges Time Range Entry Configuration page POE Operational Mode Show the operation mode of the port The possible values are Enabled or Disabled POE Operational Reason Provides additional information about POE Operational ...

Page 73: ...em If you want the switch to retain the new values across a power cycle you must perform a save Table 9 Serial Port Fields Field Description Serial Port Login Timeout minutes Indicates how many minutes of inactivity should occur on a serial port connection before the switch closes the connection Enter a number between 0 and 160 The factory default is 5 Entering 0 disables the timeout Baud Rate bps...

Page 74: ...ctivity Fields Field Description Network Configuration Protocol Current Specify what the switch should do following power up The factory default is None The options are as follows BootP Transmit a Bootp request DHCP Transmit a DHCP request None Do not send any requests following power up IP Address The IP address of the network interface The factory default value is 0 0 0 0 Note Each part of the I...

Page 75: ...ess Type Select the MAC address to use for in band connectivity The factory default is to use the burned in MAC address Burned In Use the factory default MAC address Locally Administered Use the MAC address you entered in the Locally Administered MAC Address field Management VLAN ID Specifies the management VLAN ID of the switch The range is 1 3965 The management VLAN is used for management of the...

Page 76: ... Manual Figure 16 DHCP Client Options Table 11 DHCP Client Option Fields Field Description DHCP Vendor Class ID Mode Specify whether to enable or disable the vendor class identifier mode DHCP Vendor Class ID String Enter the text to add to DHCP requests as Option 60 which is the Vendor Class Identifier option ...

Page 77: ...Java Mode This applies to both secure and un secure HTTP connections The currently configured value is shown when the web page is displayed The default value is Enable HTTP Session Soft Timeout This field is used to set the inactivity timeout for HTTP sessions The value must be in the range of 0 to 60 minutes A value of zero corresponds to an infinite timeout The default value is 5 minutes The cur...

Page 78: ...e switch with the user account that Read Write privileges i e as admin you can use the User Accounts page to assign passwords and set security parameters for the default accounts You can also add up to five read only accounts You can delete all accounts except for the Read Write account To access the User Accounts page click LAN Administration User Accounts in the navigation tree Figure 18 User Ac...

Page 79: ... failed login attempts Password Override Complexity Check This selector lists the two options for Override Complexity Check Enable and Disable The default value is Disable Enable is to override the password strength check feature Disable is to perform the password strength check feature Password Expiration Date Indicates the date when this user s current password will expire This is determined by ...

Page 80: ...elete the existing name in the Username field and enter the new username To change the password delete any asterisks in the Password and Confirm Password fields and then enter and confirm the new password 3 Click Submit to update the switch with the values on this screen If you want the switch to retain the new values across a power cycle you must perform a save Deleting a User Account Use the fol...

Page 81: ...ltList which you cannot delete All newly created users are also assigned to the defaultList until you specifically assign them to a different list Table 14 Authentication Profile Fields Field Description Access Mode Select the access mode to configure which can be either Login or Enable A login list or enable list specifies the authentication method s you want used to validate switch or port acces...

Page 82: ...US server fails the switch automatically attempts to contact a backup RADIUS server If you select RADIUS or TACACS as the first method and an error occurs during the authentication the switch uses Method 2 to authenticate the user Tacacs The user s ID and password will be authenticated using the TACACS server configured on the LAN Security TACACS Configuration page If you select RADIUS or TACACS a...

Page 83: ...cycle you must perform a save Configuring an Authentication List To modify an authentication list use the following procedures 1 Select an existing list from the Authentication List menu 2 From the Method 1 field select the initial login method 3 If desired select the additional subsequent login method 4 Click Submit to apply the changes to the system To retain the changes across a power cycle you...

Page 84: ...he Authentication List Summary page has the following fields Table 15 Login Fields Field Description Login Authentication List Displays all login authentication profiles Method List Shows the order of the login methods configured for the list Possible options are Enable uses the enable password for authentication Line uses the Line password for authentication Local the user s locally stored ID and...

Page 85: ...tion List Table and the Authentication Lists and Authentication Methods configured for each List of Console Telnet SSH HTTPS HTTP and DOT1X are displayed respectively Click Refresh to update the information on the screen To assign users to a specific authentication list see User Login on page 87 To configure the 802 1X port security users see Port Access Control on page 381 ...

Page 86: ...d only fields Click Refresh to update the information on the screen Table 16 Login Session Fields Field Description ID Identifies the ID of this row User Name Shows the user name of the user who is currently logged on to the switch Connection From Shows the IP address of the system from which the user is connected If the connection is a local serial connection the Connection From field entry is EI...

Page 87: ...n them to a different list To create a new authentication list see Creating an Authentication List on page 83 To access the User Login page click LAN Administration User Login in the navigation tree Figure 22 User Login Table 17 User Login Fields Field Description User The menu contains all configured users in the system and a Non Configured user The Non configured user is a user who does not have...

Page 88: ...ser name from the User field s menu or select Non configured user to assign all users that are not configured on the switch to an authentication list The screen refreshes The list that the user is currently assigned to is highlighted in the Authentication List field 2 To assign the user to a different list click the list name in the Authentication List field to select the list 3 Click Submit to ap...

Page 89: ...allowed If ICMP DoS prevention is enabled the switch will drop ICMP ping packets that have a size greater than this configured Max ICMP Pkt Size The factory default is disabled Denial of Service L4 Port Enable or disable this option by selecting the corresponding line on the pulldown entry field Enabling L4 Port DoS prevention causes the switch to drop packets that have TCP UDP source port equal t...

Page 90: ...ived on the source port If the mirror is copying a transmitted packet the copied packet is VLAN tagged or untagged as it is being transmitted on the source port Use the Multiple Port Mirroring page to define port mirroring sessions To access the Multiple Port Mirroring page click LAN Administration Multiple Port Mirroring in the navigation menu Figure 24 Multiple Port Mirroring Table 19 Multiple P...

Page 91: ...nd the device is updated The source port appears in the Source Port list on the Multiple Port Mirroring page Note A Port will be removed from a VLAN or LAG when it becomes a destination mirror Table 20 Multiple Port Mirroring Add Source Fields Field Description Session ID Specifies the monitoring session Source Port s Select the unit and port from which traffic is mirrored Up to eight source ports...

Page 92: ...h a TCP IP protocol network Telnet is an alternative to a local login terminal where a remote login is required The switch supports up to five simultaneous telnet sessions All CLI commands can be used over a telnet session The Telnet Session Configuration page allows you to control inbound telnet settings on the switch Inbound telnet sessions originate on a remote system and allow a user on that s...

Page 93: ...ive sessions immediately Any sessions that have been idle longer than the new timeout value are disconnected immediately Maximum Number of Telnet Sessions From the drop down menu select how many simultaneous telnet sessions to allow The maximum is 5 which is also the factory default A value of 0 indicates that no outbound Telnet session can be established Allow New Telnet Sessions Controls whether...

Page 94: ... you change any data click Submit to apply the changes to the system If you want the switch to retain the new values across a power cycle you must perform a save Table 22 Outbound Telnet Fields Field Description Admin Mode Specifies whether the Outbound Telnet service is Enabled or Disabled The default value is Enabled Enable Users can initiate outbound telnet sessions from the switch CLI Disable ...

Page 95: ...n Ping Test in the navigation menu Figure 28 Ping Click Submit to send the ping If successful the results display as shown in Figure 29 Table 23 Ping Fields Field Description Hostname IP Address Enter the IP address or the host name of the station you want the switch to ping The initial value is blank This information is not retained across a power cycle Count Specify the number of pings to send I...

Page 96: ...TraceRoute Fields Definition Hostname IP Address Enter the IP address or the hostname of the station you want the switch to discover path for Probes Per Hop Enter the number of times each hop should be probed MaxTTL Enter the maximum time to live for a packet in number of hops InitTTL Enter the initial time to live for a packet in number of hops MaxFail Enter the maximum number of failures allowed...

Page 97: ...est was received by the server T3 Time at which the server sent a reply T4 Time at which the client received the server s reply The device can poll Unicast and Broadcast server types for the server time Polling for Unicast information is used for polling a server for which the IP address is known SNTP servers that have been configured on the device are the only ones that are polled for synchroniza...

Page 98: ...d SNTP messages processed Unicast SNTP operates in a point to point fashion A unicast client sends a request to a designated server at its unicast address and expects a reply from which it can determine the time and optionally the round trip delay and local clock offset relative to the server Broadcast SNTP operates in the same manner as multicast mode but uses a local broadcast address instead of...

Page 99: ... the first time out before attempting to use the next configured server when configured in unicast mode Allowed range is 0 to 10 Default value is 1 Table 26 SNTP Server Configuration Fields Field Description Server Select the IP address of a user defined SNTP server to view or modify information about an SNTP server or select Create to configure a new SNTP server You can define up to three SNTP se...

Page 100: ...the device is updated SNTP Server Status The SNTP Server Status page displays status information about the SNTP servers configured on your switch To access the SNTP Server Status page click LAN Monitoring SNTP Summary Server Status in the navigation menu Figure 32 SNTP Server Status Table 27 SNTP Server Status Fields Field Description Address Specifies all the existing Server Addresses If no Serve...

Page 101: ...ut A directed SNTP request timed out without receiving a response from the SNTP server Bad Date Encoded The time provided by the SNTP server is not valid Version Not Supported The SNTP version supported by the server is not compatible with the version supported by the client Server Unsynchronized The SNTP server is not synchronized with its peers This is indicated via the leap indicator field on t...

Page 102: ...layed These values are appropriate for all operational modes Other None of the following enumeration values Success The SNTP operation was successful and the system time was updated Request Timed Out A directed SNTP request timed out without receiving a response from the SNTP server Bad Date Encoded The time provided by the SNTP server is not valid Version Not Supported The SNTP version supported ...

Page 103: ... server for the last received valid packet Reference Clock Id Specifies the reference clock identifier of the server for the last received valid packet Server Mode Specifies the mode of the server for the last received valid packet Unicast Sever Max Entries Specifies the maximum number of unicast server entries that can be configured on this client Unicast Server Current Entries Specifies the numb...

Page 104: ...ck box is selected The summer time configuration is predefined for the United States and European Union To set the summer time for a location other than the USA or EU select None Start Month Select the starting month Start Date Select the starting date This field displays only when the Recurring check box is cleared Start Year Select the starting year This field displays only when the Recurring ch...

Page 105: ...ration Fields Field Description Summertime Enable or disable summer time mode Recurring Select the check box to indicate that the configuration is to be repeated every year Location This field displays only when the Recurring check box is selected The summer time configuration is predefined for the United States and European Union To set the summer time for a location other than the USA or EU sele...

Page 106: ...e Clock Detail page click LAN Monitoring Clock Detail in the navigation menu The following figure shows the Clock Detail page when Summertime is enabled Figure 37 Clock Detail Click Refresh to update the page with the most current information Table 32 Clock Detail Field Description Current Time This section displays the current time Time Zone This section displays the time zone settings Summertime...

Page 107: ...on The pages in the Port folder allow you to view and monitor the physical port information for the ports available on the switch Port Configuration Use the Port Configuration page to configure the physical interfaces on the switch To access the Port Configuration page click LAN Administration Port Configuration Port Configuration in the navigation tree Figure 38 Port Configuration ...

Page 108: ...es the Spanning Tree Protocol for this port Admin Mode Use the pulldown menu to select the port control administration state which can be one of the following Enable The port can participate in the network default Disable The port is administratively down and does not participate in the network Broadcast Storm Recovery Mode Enable or disable this option by selecting one of the following options on...

Page 109: ... duplex mode and speed will be set by the auto negotiation process The port s maximum capability full duplex and 100 Mbps will be advertised Speed Half Duplex The port speeds available from the menu depend on the platform on which the D Link DWS 4000 Series software is running and which port you select In half duplex mode the transmissions are one way In other words the port does not send and rece...

Page 110: ...r the Spanning Tree parameters Changing the selected MST ID will generate a screen refresh If is disabled which is the default the MST ID field shows the static value CST instead of a menu Slot Port Identifies the port that the information in the rest of the row is associated with Port Type For most ports this field is blank Otherwise the possible values are Mirrored Indicates that the port has be...

Page 111: ...roadcast traffic Disabled The port does not block broadcast traffic if traffic on the port exceeds the configured threshold The factory default is disabled Bcast Storm Level Shows the Broadcast Storm Recovery Level which is the data rate at which storm control activates The value is a percentage of port speed and ranges from 0 100 The factory default is 5 percent of port speed Mcast Storm Mode Sho...

Page 112: ...uto negotiation process The port s maximum capability full duplex and 100 Mbps will be advertised Speed Half Duplex The port speeds available from the menu depend on the platform on which the D Link DWS 4000 Series software is running and which port you select In half duplex mode the transmissions are one way In other words the port does not send and receive traffic at the same time Speed Full Dup...

Page 113: ...ion from the router Table 35 Port Description Fields Field Description Slot Port Select the interface for which data is to be displayed or configured Port Description Enter text to describe a port It can be up to 64 characters in length The description can contain spaces and non alphanumeric characters Slot Port Identifies the port Physical Address Displays the physical address of the specified in...

Page 114: ...ering of messages logged or forwarded based on severity and generating component The in memory log stores messages in memory based upon the settings for message component and severity Buffered Log Configuration The buffered log stores messages in memory based upon the settings for message component and severity Use the Buffered Log Configuration page to set the administrative status and behavior o...

Page 115: ...hows a log message 15 Aug 24 05 34 05 STK0 M 2110 mspt_api c 318 237 Interface 12 transitioned to root state on message age timer expiry This log message has a severity level of 7 15 mod 8 which is a debug message The system is not stacked STK0 The message was generated by the M component running in thread ID 2110 The message was generated on August 24 05 34 05 by line 318 of file m_api c This is ...

Page 116: ...iguration If you change the administrative mode click Submit to apply the change to the system Table 37 Command Logger Configuration Fields Field Description Admin Mode This field determines whether to log CLI commands in the system log file Enable The system logs CLI commands The commands appear in messages on the Buffered Log page For example the following log messages shows when the CLI command...

Page 117: ...nsole Logs with the severity level you select and all logs of greater severity print For example if you select Error the logged messages include Error Critical Alert and Emergency The default severity level is Alert 1 The severity can be one of the following levels Emergency 0 The highest level warning level If the device is down or not functioning properly an emergency log is saved to the device ...

Page 118: ...erved across system resets To access the Event Log page click LAN Monitoring Log System Log in the navigation tree Figure 45 Event Log Click Refresh to update the page with the latest log entries Table 39 Event Log Fields Field Description Entry The number of the entry within the event log The most recent entry is first Filename The D Link DWS 4000 Series source code filename identifying the code ...

Page 119: ...guration After you add a logging host the screen displays additional fields as Figure 47 shows Figure 47 Host Configuration with Logging Host Adding a Remote Logging Host Use the following procedures to add configure or delete a remote logging host 1 From the Host field select Add to add a new host or select the IP address of an existing host to configure the host If you are adding a new host ente...

Page 120: ...1000 messages Either the system startup log or the system operation log stores a message received by the log subsystem that meets the storage criteria but not both In other words on system startup if the startup log is configured it stores messages up to its limit The operation log if configured then begins to store the messages The system keeps up to three versions of the persistent logs named FI...

Page 121: ...ror Critical Alert and Emergency The default severity level is Alert 1 The severity can be one of the following levels Emergency 0 The highest level warning level If the device is down or not functioning properly an emergency log is saved to the device Alert 1 The second highest warning level An alert log is saved if there is a serious device malfunction such as all device features being down Crit...

Page 122: ...age 15 Aug 24 05 34 05 STK0 M 2110 mspt_api c 318 237 Interface 12 transitioned to root state on message age timer expiry This log message has a severity level of 7 15 mod 8 which is a debug message The system is not stacked STK0 The message was generated by the M component running in thread ID 2110 The message was generated on August 24 05 34 05 by line 318 of file m_api c This is the 237th messa...

Page 123: ... configured on the switch Enable Messages will be sent to all configured hosts syslog collectors or relays using the values configured for each host For information about syslog host configuration see Hosts Configuration on page 119 Disable Stops logging to all syslog hosts Disable means no messages will be sent to any collector relay Local UDP Port Specifies the port on the switch from which sysl...

Page 124: ...on Number of Traps Since Last Reset The number of traps generated since the trap log entries were last cleared Trap Log Capacity The maximum number of traps stored in the log If the number of traps exceeds the capacity the entries will overwrite the oldest entries Number of Traps Since Log Last Viewed The number of traps that have occurred since the traps were last displayed Displaying the traps b...

Page 125: ...m to SNMPv1 and SNMPv2 PDUs In addition the User Security Model USM is defined for SNMPv3 and includes Authentication Provides data integrity and data origin authentication Privacy Protects against disclosure of message content Cipher Bock Chaining CBC is used for encryption Either authentication is enabled on an SNMP message or both authentication and privacy are enabled on an SNMP message Howeve...

Page 126: ...follows public This SNMP community has Read Only privileges and its status set to enable private This SNMP community has Read Write privileges and its status set to enable Create Use this option to create a new user defined community string SNMP Community Name Use this field to reconfigure an existing community or to create a new one A valid entry is a case sensitive string of up to 16 characters ...

Page 127: ...ver Configuration from the navigation tree Figure 53 Trap Receiver Configuration Client IP Mask Along with the Client IP Address the Client IP Mask denotes a range of IP addresses from which SNMP clients may use that community to access this device Access Mode Specify the access level for this community Read Only The Community has read only access to the MIB objects configured in the view Read Wri...

Page 128: ...reate to configure the SNMP trap name for the SNMP trap packet to be sent to the trap manager If you have already configured an SNMP trap name you can select it from the drop down menu to change the settings or delete it SNMP Trap Name When the previous field is set to Create enter the SNMP trap name for the SNMP trap packet to be sent to the trap manager This may be up to 16 characters and is cas...

Page 129: ...pulldown entry field The factory default is enabled This trap is triggered when the same user ID is logged into the switch more than once at the same time either via telnet or the serial port Spanning Tree Enable or disable activation of spanning tree traps by selecting the corresponding line on the pulldown entry field The factory default is enabled ACL Traps Enable or disable activation of ACL t...

Page 130: ...the MIBs that the system currently supports To access the Supported MIBs page click LAN Monitoring Supported MIBs in the navigation menu A portion of the web screen is shown Figure 55 Figure 55 Supported MIBs Table 47 Supported MIBs Fields Field Description Name The RFC number if applicable and the name of the MIB Description The RFC title or MIB description ...

Page 131: ... 56 DHCP Server Global Configuration Table 48 DHCP Server Global Configuration Fields Field Description Admin Mode Enables or disables DHCP server operation on the switch The default value is Disable Ping Packet Count Specifies the number of packets a server sends to a Pool address to check for duplication as part of a ping operation Default value is 2 The valid range is 0 2 to 10 Setting the valu...

Page 132: ...the range boundaries Note It is strongly recommended not to add thousands of addresses in the range The larger the range more time will be taken by the DHCP server to assign an IP address From To exclude an address range specify the low address in the range To specify a single address to exclude enter the address in the From field and leave the To field at the default value of 0 0 0 0 For example ...

Page 133: ...tration DHCP Server Pool Configuration in the navigation tree In Figure 57 some of the blank fields where you add IP addresses have been edited out of the image for display purposes You can add up to eight addresses in the Default Router Addresses DNS Server Addresses NetBIOS name Server Addresses and IP Address Value fields If you select Dynamic or Manual from the Type of Binding drop down menu t...

Page 134: ...fix Length to specify the subnet mask but do not enter a value in both fields Prefix Length For dynamic bindings this field specifies the subnet number for a DHCP address of a dynamic pool You can enter a value in Network Mask or Prefix Length to specify the subnet mask but do not enter a value in both fields The valid range is 0 to 32 Client Name For manual bindings this field specifies a name fo...

Page 135: ...NS Server Addresses Specifies the list of DNS server IP addresses for the pool You can specify up to eight addresses in order of preference NetBIOSNameServer Addresses Specifies the list of NetBIOS name server IP addresses for the pool You can specify up to eight addresses in order of preference NetBIOS Node Type Specifies the NetBIOS node type for DHCP clients p node Peer to Peer Uses point to po...

Page 136: ...ns If any DHCP pools are configured on the system the Pool Options page contains the following fields To delete an option code for the selected Pool enter the option code in the folder and click Delete This button is not visible to a user with read only permission DHCP Server Summary Table 50 Pool Options Fields Field Description Pool Name Select the DHCP pool to with the options you want to view ...

Page 137: ...ess click Clear to remove the binding from the DHCP server Table 51 Reset Configuration Fields Field Description Clear Specifies what to clear from the DHCP server database All Dynamic Bindings Deletes all dynamic bindings from all address pools Specific Dynamic Binding Deletes the specified binding All Address Conflicts Deletes all address conflicts from the DHCP server database Specific Address ...

Page 138: ...Table 52 Bindings Information Fields Field Description DHCP Binding Select the bindings to display All Bindings Show all bindings Specific Binding Show a specific binding When you select this option the screen refreshes and the Binding IP Address field appears Binding IP Address Specify the IP address for which you want to view binding information This field is only available if you select Specifi...

Page 139: ...mber of expired bindings on the DHCP server Malformed Messages Shows the number of the malformed messages Message Received DHCPDISCOVER Shows the number of DHCPDISCOVER messages received by the DHCP server DHCPREQUEST Shows the number of DHCPREQUEST messages received by the DHCP server DHCPDECLINE Shows the number of DHCPDECLINE messages received by the DHCP server DHCPRELEASE Shows the number of ...

Page 140: ...62 Conflicts Information Table 54 Conflicts Information Fields Field Description DHCP Conflicts Select the DHCP conflicts to display All Conflicts Show all conflicts Specific Conflict Show a specific conflict When you select this option the screen refreshes and the Conflict IP Address field appears Conflict IP Address Specify the IP address for which you want to view conflict information This fiel...

Page 141: ...t from an ACL In other words for the ACL to reference a time range the time range must already exist For more information about configuring ACLs see Section 7 Configuring Access Control Lists on page 356 Time Range Configuration Use this page to create a named time range Each time range can consist of one absolute time entry and or one or more periodic time entries To access this page click LAN Ad...

Page 142: ...ation Time Range Summary Figure 64 Time Range Summary Table 56 Time Range Summary Field Description Time Range Name Identifies the user configured name of the time range Time Range Status Shows whether the time range is active or inactive A time range is inactive if the current day and time does not fall within the time entry specified in the time range Periodic Entry Count Shows the number of per...

Page 143: ...ent on the switch can obtain the correct date and time from the server Table 57 Time Range Entry Configuration Field Description Time Range Name Select the name of the time range to which you want to add a time range entry Time Range Entry Select Create New Time Range Entry to add a new entry to a time range To view or delete an existing time range entry select its ID from the menu Time Range Entr...

Page 144: ...n a 24 hour clock For example 6 00 PM is 18 00 End Day Periodic Days of Week only Select the day the time range entry ends End Time Specify the time when the entry ends The time is based on a 24 hour clock For example 6 00 PM is 18 00 Absolute Time Range Entry Absolute Start Date and Time Select the check box to configure the date and time when the time range entry begins Start Month Select the mo...

Page 145: ...ult domain name for DNS client messages The name should be no longer than 255 characters When the system is performing a lookup on an unqualified hostname this field is provided as the domain name e g if default domain name is com and the user enters hotmail then hotmail is changed to hotmail com to resolve the name By default no default domain name is configured in the system Retry Number Enter t...

Page 146: ...e configured response time then the request goes to the server with the next highest precedence To access this page click LAN Administration DNS Client Server Configuration Figure 67 DNS Server Configuration To create a new DNS server enter an IP address in standard IPv4 or IPv6 dot notation in the DNS Server Address and click Submit The server appears in the list below The precedence is set in th...

Page 147: ...apping in the navigation tree then click the Add Static Entry button Figure 68 DNS Host Name Mapping Configuration Click Submit to apply the new configuration and cause the change to take effect immediately These changes will not be retained across a power cycle unless a Save is performed Click Back to cancel and display the hostname IP mapping page to see the configured hostname IP mapping entrie...

Page 148: ...ned across a power cycle unless a Save is performed Click Clear Dynamic Entries to remove all Host Name IP Mapping entries A confirmation prompt will be displayed Click the button to confirm removal and the Host Name IP Mapping dynamic entries are cleared Click Refresh to refresh the page with the most current data from the switch Table 61 DNS Host Name IP Mapping Summary Fields Field Description ...

Page 149: ...ive mode To display the ISDP Global Configuration page click LAN Administration ISDP Global Configuration in the navigation tree Figure 70 ISDP Global Configuration The following table describes the fields available on the ISDP Global Configuration page Table 62 ISDP Global Configuration Field Description ISDP Mode Use this field to enable or disable the Industry Standard Discovery Protocol on the...

Page 150: ... device uses its platform specific format as the format for its Device ID Device ID Format Indicates the Device ID format of the device serialNumber Indicates that the value is in the form of an ASCII string containing the device serial number macAddress Indicates that the value is in the form of Layer 2 MAC address other Indicates that the value is in the form of a platform specific ASCII string ...

Page 151: ...tform Displays the ISDP Hardware Platform for the neighbor Port ID Displays the ISDP port ID string for the neighbor Protocol Version Displays the ISDP Protocol Version for the neighbor Last Time Changed Displays when entry was last modified Note If ISDP is enabled on an interface it must also be enabled globally in order for the interface to transmit ISDP packets If the ISDP mode on the ISDP Glob...

Page 152: ...DP PDUs received ISDPv1 Packets Transmitted Displays the number of v1 ISDP PDUs transmitted ISDPv2 Packets Received Displays the number of v2 ISDP PDUs received ISDPv2 Packets Transmitted Displays the number of v2 ISDP PDUs transmitted ISDP Bad Header Displays the number of ISDP PDUs that were received with bad headers ISDP Checksum Error Displays the number of ISDP PDUs that were received with ch...

Page 153: ... Packet Flow Sampling and Counter Sampling are performed by sFlow Instances associated with individual Data Sources within the sFlow Agent Packet Flow Sampling and Counter Sampling are designed as part of an integrated system Both types of samples are combined in sFlow datagrams Packet Flow Sampling will cause a steady but random stream of sFlow datagrams to be sent to the sFlow Collector Counter ...

Page 154: ... sFlow Receiver Configuration page click LAN Administration sFlow Receiver Configuration in the navigation tree Figure 75 sFlow Receiver Configuration Table 66 sFlow Agent Summary Field Description Version Uniquely identifies the version and implementation of this MIB The version string must have the following structure MIB Version Organization Software Revision where MIB Version 1 3 the version o...

Page 155: ...emaining before the sampler is released and stops sampling A management entity wanting to maintain control of the sampler is responsible for setting a new value before the old one expires Allowed range is 0 to 2147483647 secs A value of zero sets the selected receiver configuration to its default values No Timeout Select the check box to set the timeout value to non decrementing value of 214748364...

Page 156: ...n a short period i e five seconds of failing to meet the required Sampling Interval Periodically i e every second the sFlow Agent examines the list of counter sources and sends any counters that need to be sent to meet the sampling interval requirement To access the sFlow Poller Configuration page click LAN Administration sFlow Poller Configuration in the navigation tree Figure 76 sFlow Poller Con...

Page 157: ...acket When the counter reaches zero a sample is taken When a sample is taken the counter that indicates how many packets to skip before taking the next sample is reset The value of the counter is set to a random integer where the sequence of random integers used over time is the Sampling Rate To access the sFlow Sampler Configuration page click LAN Administration sFlow Sampler Configuration in the...

Page 158: ...lder contain a variety of information about the number and type of traffic transmitted from and received on the switch Switch Detailed The Switch Detailed page shows detailed statistical information about the traffic the switch handles To access the Switch Detailed page click LAN Monitoring System Statistics Switch Detail in the navigation menu Figure 78 Switch Detailed ...

Page 159: ...cast Packets Transmitted The total number of packets that higher level protocols requested be transmitted to a subnetwork unicast address including those that were discarded or not sent Multicast Packets Transmitted The total number of packets that higher level protocols requested be transmitted to a Multicast address including those that were discarded or not sent Broadcast Packets Transmitted Th...

Page 160: ...Figure 79 Switch Summary VLAN Deletes The number of VLANs on this switch that have been created and then deleted since the last reboot Time Since Counters Last Cleared The elapsed time in days hours minutes and seconds since the statistics for this switch were last cleared Table 71 Switch Summary Fields Field Description ifIndex This object indicates the ifIndex of the interface table entry associ...

Page 161: ...smitted Without Errors The total number of packets transmitted out of the interface Broadcast Packets Transmitted The total number of packets that higher level protocols requested to be transmitted to the Broadcast address including those that were discarded or not sent Transmit Packet Errors The number of outbound packets that could not be transmitted because of errors Address Entries Currently i...

Page 162: ...istics Fields Field Description Interface Use the drop down menu to select the interface for which data is to be displayed or configured ifIndex This field indicates the ifIndex of the interface table entry associated with this port on an adapter Packets RX and TX 64 Octets The total number of packets including bad packets received or transmitted that were 64 octets in length excluding framing bit...

Page 163: ...S octets Packets RX and TX 4096 9216 Octets The total number of packets including bad packets received or transmitted that were between 4096 and 9216 octets in length inclusive excluding framing bits but including FCS octets Total Packets Received Octets The total number of octets of data including those in bad packets received on the network excluding framing bits but including FCS octets This ob...

Page 164: ... section 10 3 1 4 10BASE2 These documents define jabber as the condition where any packet exceeds 20 ms The allowed range to detect jabber is between 20 ms and 150 ms Fragments Received The total number of packets received that were less than 64 octets in length with ERROR CRC excluding framing bits but including FCS octets Undersize Received The total number of packets received that were less tha...

Page 165: ...and etherStatsOctets objects should be sampled before and after a common interval Packets Transmitted 64 Octets The total number of packets including bad packets received that were 64 octets in length excluding framing bits but including FCS octets Packets Transmitted 65 127 Octets The total number of packets including bad packets received that were between 65 and 127 octets in length inclusive ex...

Page 166: ...ded multiple collision frames discarded and excessive frames discarded Total Output Packets Drops The total number of Aged packets Single Collision Frames A count of the number of successfully transmitted frames on a particular interface for which transmission is inhibited by exactly one collision Multiple Collision Frames A count of the number of successfully transmitted frames on a particular in...

Page 167: ... operation This counter does not increment when the interface is operating in half duplex mode GVRP PDUs Received The count of GVRP PDUs received in the GARP layer GVRP PDUs Transmitted The count of GVRP PDUs transmitted from the GARP layer GVRP Failed Registrations The number of times attempted GVRP registrations could not be completed GMRP PDUs Received The count of GMRP PDUs received from the G...

Page 168: ...for which data is to be displayed or configured ifIndex This field indicates the ifIndex of the interface table entry associated with this port on an adapter Total Packets Received Without Errors The total number of packets received that were without errors Packets Received With Error The number of inbound packets that contained errors preventing them from being deliverable to a higher layer proto...

Page 169: ...Defaults Use the Reset Configuration to Defaults page to reset the system configuration to the factory default values To access the Reset Configuration to Defaults page click Tool Reset Configuration in the navigation tree Figure 82 Reset Configuration to Defaults Click Reset to restore the factory default settings The screen refreshes and asks you to confirm the reset Click Reset again to complet...

Page 170: ...aults page click Tool Reset Password in the navigation tree Figure 83 Reset Passwords to Defaults Click Reset to restore the passwords for the default users to the factory defaults System Reset Use the System Reset page to reboot the system To access the System Reset page click Tool Reboot System in the navigation tree Figure 84 System Reset Click Reset to initiate the system reset If you have not...

Page 171: ...To access the Save All Applied Changes page click Tool Save Changes in the navigation tree Figure 85 Save All Applied Changes Click Save to save all changes applied to the system to NVRAM so that they are retained if the system reboots Download File To Switch TFTP Use the Download File to Switch page to download the image file the configuration files CLI banner file and SSH or SSL files from a TFT...

Page 172: ...tc and download it to that device SSH 1 RSA Key File SSH 1 Rivest Shamir Adleman RSA Key File To download SSH key files SSH must be administratively disabled and there can be no active SSH sessions SSH 2 RSA Key PEM File SSH 2 Rivest Shamir Adleman RSA Key File PEM Encoded To download SSH key files SSH must be administratively disabled and there can be no active SSH sessions SSH 2 DSA Key PEM File...

Page 173: ... or other file to be downloaded is available on the TFTP server 4 Complete the TFTP Server IP Address and TFTP File Name full path without TFTP server IP address fields 5 Click the Start File Transfer check box and then click Submit After you click Submit the screen refreshes and a File transfer operation started message appears After the software is downloaded to the device a message appears indi...

Page 174: ... DSA Key PEM File SSH 2 Digital Signature Algorithm DSA Key File PEM Encoded SSL Trusted Root Certificate PEM File SSL Trusted Root Certificate File PEM Encoded SSL Server Certificate PEM File SSL Server Certificate File PEM Encoded SSL DH Weak Encryption Parameter PEM File SSL Diffie Hellman Weak Encryption Parameter File PEM Encoded SSL DH Strong Encryption Parameter PEM File SSL Diffie Hellman ...

Page 175: ...de image Configuration Retrieve the stored startup configuration cfg and copy it to a TFTP server Text Configuration Retrieves the text configuration file startup config Error Log Retrieves the system error persistent log sometimes referred to as the event log Buffered Log Retrieves the system buffered in memory log Trap Log Retrieves the system trap records Image Specify the code image to upload ...

Page 176: ...torage One image is the active image and the second image is the backup image The active image is loaded during subsequent switch restarts This feature reduces switch down time when upgrading downgrading the D Link DWS 4000 Series software The system running an older software version will ignore not load a configuration file created by the newer software version When a configuration file created b...

Page 177: ...o update the image description on the switch If the file you uploaded contains the boot loader code only click Update Bootcode Table 77 Multiple Image Service Fields Field Description Image Name Select Active or Backup from the menu to activate on the next reload or to be deleted Current active Displays name of current active image Next active Displays the name of the image that is set to be activ...

Page 178: ...ice To display the Dual Image Status page click LAN Monitoring Dual Image Status in the navigation menu Figure 90 Dual Image Status Click Refresh to display the latest information from the router Table 78 Dual Image Status Fields Field Description Unit Displays the unit ID of the switch Active Displays the version of the active code file Backup Displays the version of the backup code file Current ...

Page 179: ...during the boot process no configuration file is found in device storage By communicating with a DHCP server AutoInstall obtains an IP address for the switch and an IP address for a TFTP server AutoInstall attempts to download a configuration file from the TFTP server and install is on the switch After obtaining IP addresses for both the switch and the TFTP server the AutoInstall feature attempts ...

Page 180: ...er If successful it applies the configuration file to the switch After starting the AutoInstall process you can monitor the status of the process by the messages in the AutoInstall State and Retry Count fields Click Stop to end the process AutoSave Mode Enable or Disable saving the network configuration to non volatile memory When enabled the configuration is saved after downloading from the TFTP ...

Page 181: ...2 Features folder contains links to the following features Configuring and Searching the Forwarding Database Managing VLANs Configuring Protected Ports Creating MAC Filters Configuring GARP Creating Port Channels Trunking Configuring IGMP Snooping Configuring IGMP Snooping Queriers Configuring MLD Snooping Configuring MLD Snooping Queriers Viewing Multicast Forwarding Database Information Configur...

Page 182: ...se the Configuration page to set the amount of time to keep a learned MAC address entry in the forwarding database The forwarding database contains static entries which are never aged out and dynamically learned entries which are removed if they are not updated within a given time To access the Configuration page click LAN L2 Features Forwarding DB Configuration in the navigation tree Figure 93 Fo...

Page 183: ...s you to search for an individual MAC address in the forwarding database table MAC Address A unicast MAC address for which the switch has forwarding and or filtering information The format is a two byte hexadecimal VLAN ID number followed by a six byte MAC address with each byte separated by colons For example 01 23 45 67 89 AB CD EF where 01 23 is the VLAN ID and 45 67 89 AB CD EF is the MAC addr...

Page 184: ...er it partitions the network into logical segments which provides better administration security and management of multicast traffic A VLAN is a set of end stations and the switch ports that connect them You may have many reasons for the logical division such as department or project membership The only physical requirement is that the end station and the port to which it is connected both belong ...

Page 185: ...icipate in this VLAN The factory default is Autodetect The possible values are Include All the ports are always a member of this VLAN This is equivalent to registration fixed in the IEEE 802 1Q standard Exclude All the ports are never a member of this VLAN This is equivalent to registration forbidden in the IEEE 802 1Q standard Auto detect Specifies that all ports may be dynamically registered in ...

Page 186: ...VLANs being created or deleted Single or Multiple VLANs can be specified at once This field can accept single VLAN ID or range of VLAN IDs or a combination of both in sequence separated by You can specify individual VLAN ID Eg 10 You can specify the VLAN range values separated by a E g 10 13 You can specify the combination of both separated by Eg 12 15 40 43 1000 1005 2000 The range of the VLAN ID...

Page 187: ...e 96 VLAN Status Click Refresh to display the latest information from the router Table 82 VLAN Status Fields Field Description VLAN ID The VLAN Identifier VID of the VLAN The range of the VLAN ID is 1 to 3965 VLAN Name The name of the VLAN VLAN ID 1 is always named Default VLAN Type The VLAN type which can be one of the following Default VLAN ID 1 always present Static A VLAN you have configured D...

Page 188: ...agged or priority tagged frames received on this port The factory default is 1 Acceptable Frame Types Specify how you want the port to handle untagged and priority tagged frames Whichever you select VLAN tagged frames will be forwarded in accordance with the IEEE 802 1Q VLAN standard The factory default is Admit All VLAN Only The port will discard any untagged or priority tagged frames it receives...

Page 189: ...s the actual VLAN ID in use for the port If the port was acquired by another module the actual value may differ from the configured VLAN ID For example if the port is a member of a port channel and the port channel has a different port VLAN ID setting than the configured value then the two may differ Acceptable Frame Types Indicates how the port handles untagged and priority tagged frames VLAN Onl...

Page 190: ...sign a port to a protocol based VLAN for a specific protocol untagged frames received on that port for that protocol will be assigned the protocol based VLAN ID Untagged frames received on the port for other protocols will be assigned the Port VLAN ID PVID which is either the default PVID 1 or a PVID you have specifically assigned to the port using the Port VLAN Configuration screen Use the Protoc...

Page 191: ... drop down menu to create a new group or to configure the selected protocol group You can create up to 128 groups Group ID Identifies the group to configure Group Name Optionally enter a name to associate with protocol group ID You can modify the name of an existing group You can enter up to 16 characters VLAN Specify the VLAN ID to associate with this group The range is 1 3965 Protocol list Speci...

Page 192: ...based VLAN Summary Click Refresh to reload the page and display the most current information Table 87 Protocol based VLAN Summary Fields Field Description Group Name Shows the user defined name associated with protocol group Group ID Shows the number that identifies the group you create Group IDs are automatically assigned when you create a group Protocols Shows the protocol keyword or protocol va...

Page 193: ...ion page click LAN L2 Features VLAN IP Subnet based VLAN Configuration in the navigation menu Figure 102 IP Subnet based VLAN Configuration If you make any changes on this page click Submit to apply the changes to the system To delete an existing binding select the source IP address from the IP Address drop down menu and then click Delete Table 88 IP Subnet based VLAN Configuration Fields Field De...

Page 194: ...cket is untagged or priority tagged the device shall associate it with the VLAN which corresponds to the source MAC address in its MAC based VLAN tables If there is no matching entry in the table then the packet is subject to normal VLAN classification rules of the device Use the MAC based VLAN Configuration page to map a MAC entry to the VLAN table After the source MAC address and the VLAN ID are...

Page 195: ...sed VLAN Summary page click Monitoring VLAN Summary MAC based VLAN Summary in the navigation menu Figure 105 MAC based VLAN Summary Click Refresh to reload the page and display the most current information Table 90 MAC based VLAN Configuration Fields Field Description MAC Address Specifies the source MAC address to map to a VLAN VLAN ID Specifies the VLAN to which the source MAC address is to be b...

Page 196: ... is received from an interface has a tag removed if one or more tags are present Use the Double VLAN Tunneling page to configure Double VLAN frame tagging on one or more ports To access the Double VLAN Tunneling page click LAN L2 Features VLAN Double VLAN in the navigation tree Figure 106 Double VLAN Tunneling If you make any changes to the page click Submit to apply the changes to the system Tabl...

Page 197: ... router Table 93 Double VLAN Tunneling Summary Fields Field Description Interface Select the physical interface for which you want to display or configure data Interface Mode This specifies the administrative mode for Double VLAN Tagging Enable Double VLAN Tagging is enabled for the specified port or All ports Disable Double VLAN Tagging is disabled for the specified port or All ports which is the...

Page 198: ...ng to send network traffic from the switch in a predictable manner The system uses the source MAC of the traffic traveling through the port to identify the IP phone data flow Voice VLAN is enabled per port basis A port can participate only in one voice VLAN at a time The Voice VLAN feature is disabled by default To display the Voice VLAN Configuration page click LAN L2 Features VLAN Voice VLAN Voi...

Page 199: ... service is disabled on this interface Note that the Admin mode field takes precedence i e if a particular interface is enabled but the Admin Mode field is set to Disabled then the service will not be operational VLAN ID The voice VLAN packets are uniquely identified by a number you assign All voice traffic carries this VLAN ID to distinguish it from other data traffic which is assigned the port s...

Page 200: ...roups and to assign physical ports to a group To display the Protected Port Configuration page click LAN L2 Features Protected Ports Configuration in the navigation tree Figure 110 Protected Port Configuration Table 95 Protected Port Configuration Fields Field Description Group ID The protected ports can be combined into a logical group Traffic can flow between protected ports belonging to differe...

Page 201: ... Summary Use the Protected Ports Summary page to view information about protected port groups and their included ports To view the Protected Ports Summary page click LAN Monitoring Protected Ports Summary in the navigation tree Figure 111 Protected Ports Summary Click Refresh to reload the page and display the most current information Table 96 Protected Ports Summary Fields Field Description Group...

Page 202: ...n menu If one or more MAC filters exist the list also contains the MAC address and associated VLAN ID of a configured filter MAC Address The MAC address of the filter in the format 00 01 1A B2 53 4D You can only change this field when you have selected the Create Filter option Note You cannot define filters for the following MAC addresses 00 00 00 00 00 00 01 80 C2 00 00 00 to 01 80 C2 00 00 0F 01...

Page 203: ...ick to select multiple ports 4 Click Submit to apply the changes to the system Modifying MAC Filters To change the port mask s for an existing filter select the entry from the MAC Filter field and then click or CTRL click the port s to include in the filter Only those ports that are highlighted when you click Submit are included in the filter To change the MAC address or VLAN associated with a fil...

Page 204: ...he same segment and for that information to be disseminated across all networking switches in the bridged LAN that support GARP Multicast Registration Protocol GMRP With the GARP Multicast Registration Protocol GMRP networking devices can dynamically register and de register group membership information with the networking devices attached to the same segment GMRP enables the group membership info...

Page 205: ...tive and Join Time Leave Time and Leave All Time have no effect Join Timer centisecs Shows the time between the transmission of GARP PDUs registering or re registering membership for a VLAN or multicast group in centiseconds Leave Timer centisecs Displays time lapse in centiseconds that the switch waits before leaving its GARP state Leave time is activated by a Leave All Time message sent received...

Page 206: ... If you make any changes to the page click Submit to apply the changes to the system Table 99 GARP Switch Configuration Fields Field Description Switch GVRP Mode Shows the GARP VLAN Registration Protocol administrative mode for the switch The switch GVRP mode must be enabled for the ports to function in GARP protocols even if GVRP is enabled on a port Switch GMRP Mode Shows the GARP Multicast Regi...

Page 207: ... the port by selecting enable or disable from the pulldown menu If you select disable the protocol will not be active and the Join Time Leave Time and Leave All Time will have no effect The factory default is disable Port GMRP Mode Choose the GARP Multicast Registration Protocol administrative mode for the port by selecting enable or disable from the pulldown menu If you select disable the protoco...

Page 208: ...An instance of this timer exists for each GARP participant for each port GARP Leave All Timer centisecs Displays time lapse in centiseconds that all switches wait before leaving the GARP state The leave all time must be greater than the leave time The possible field value is 200 6000 The default value is 1000 centisecs The Leave All Time controls how frequently LeaveAll PDUs are generated A LeaveA...

Page 209: ...channel must participate in the same protocols A static port trunk interface does not require a partner system to be able to aggregate its member ports Static LAGs are supported When a port is added to a LAG as a static member it neither transmits nor receives LACPDUs Port Channel Configuration Use the Port Channel Configuration page to group one or more full duplex Ethernet links to be aggregated...

Page 210: ...ther the link is Up or Down STP Mode Select the Spanning Tree Protocol Administrative Mode associated with the Port Channel Disable Spanning tree is disabled for this Port Channel Enable Spanning tree is enabled for this Port Channel Static Mode Select enable or disable from the pulldown menu The factory default is Disable Enable The port channel is statically maintained which means it does not tr...

Page 211: ...tatus in the navigation tree Figure 118 Port Channel Status Participation Select each port s membership status for the Port Channel you are configuring There can be a maximum of 8 ports assigned to a Port Channel Include The port participates in the port channel Exclude The port does not participate in the port channel which is the default Membership Conflicts Shows ports that are already members ...

Page 212: ...s If the status is Enabled traps are sent Configured Ports Lists the ports that are members of the Port Channel in Slot Port notation There can be a maximum of 8 ports assigned to a Port Channel Active Ports Lists the ports that are actively participating members of this Port Channel in Slot Port notation Load Balance Shows the hashing algorithm used to distribute the traffic load among available ...

Page 213: ...each of the remaining network segments in accordance with the IEEE MAC Bridge standard Eventually the packet is made accessible to all nodes connected to the network This approach works well for broadcast packets that are intended to be seen or processed by all connected nodes In the case of multicast packets however this approach could lead to less efficient use of network bandwidth particularly ...

Page 214: ...form a save if you want the changes to remain in effect over a power cycle Table 103 IGMP Snooping Global Configuration and Status Fields Field Description Admin Mode Select the administrative mode for IGMP Snooping for the switch from the pulldown menu The default is disable Multicast Control Frame Count Shows the number of multicast control frames that have been processed by the CPU Interfaces E...

Page 215: ...e from the group The valid range is from 2 to 3600 seconds The default is 260 seconds Max Response Time Specify the amount of time you want the switch to wait after sending a query on an interface because it did not receive a report for a particular group on that interface Enter a value greater or equal to 1 and less than the Group Membership Interval in seconds The default is 10 seconds The confi...

Page 216: ...s forwarding table entry upon receiving an IGMP leave message for that multicast group without first sending out MAC based general queries to the interface You should enable fast leave admin mode only on VLANs where only one host is connected to each layer 2 LAN port This prevents the inadvertent dropping of the other hosts that were connected to the same layer 2 LAN port but were still interested...

Page 217: ...er the amount of time in seconds that a switch waits for a query to be received on an interface before the interface is removed from the list of interfaces with multicast routers attached The range is 0 to 3600 seconds A value of 0 indicates an infinite time out i e no expiration Table 106 IGMP Snooping VLAN Status Fields Field Description VLAN ID Displays the VLAN IDs for which the IGMP Snooping ...

Page 218: ...u enable or disable multicast router configuration on an interface click Submit to apply the new settings to the switch Operational Maximum Response Time Displays the value for maximum response time of IGMP Snooping for the specified VLAN ID Its value is learned dynamically from the IGMPv2 or IGMPv3 queries received on this VLAN Multicast Router Expiry Time Shows the amount of time to wait before ...

Page 219: ... access the IGMP Snooping Multicast Router Statistics page click Monitoring IGMP Snooping Status Multicast Router Status in the navigation tree Figure 124 Multicast Router Status Click Refresh to re display the page with the latest information from the router Table 108 Multicast Router Status Fields Field Description Slot Port Select the physical or LAG interface to display Multicast Router Shows ...

Page 220: ...ast Router VLAN Configuration in the navigation tree Figure 125 Multicast Router VLAN Configuration If you enable or disable multicast router configuration for VLANs on an interface click Submit to apply the new settings to the switch Table 109 Multicast Router VLAN Configuration Fields Field Description Slot Port Select the physical or LAG interface to display VLAN ID Enter the VLAN ID to configu...

Page 221: ...atus Multicast Router VLAN Status in the navigation tree Figure 126 Multicast Router VLAN Status The IGMP Snooping Multicast Router VLAN Status page contains the following fields Click Refresh to re display the page with the latest information from the router Table 110 Multicast Router VLAN Status Fields Description Slot Port Select the physical or LAG interface to display VLAN ID If a VLAN is ena...

Page 222: ...Querier feature specify the IP address of the router to perform the querying and configure related parameters Users must have Read Write access privileges to change the data on this page To access this page click LAN L2 Features IGMP Snooping Querier IGMP Snooping Querier Configuration in the navigation tree Figure 127 IGMP Snooping Querier Configuration Table 111 IGMP Snooping Querier Configurati...

Page 223: ...interval in seconds after which the last querier information is removed The Querier Expiry Interval must be a value in the range of 60 and 300 The default value is 60 seconds Table 112 IGMP Snooping Querier VLAN Configuration Fields Field Description VLAN ID Specifies VLAN ID for which the IGMP Snooping Querier is to be enabled Select New Entry to create a new VLAN ID for IGMP Snooping Querier Ele...

Page 224: ...router Table 113 IGMP Snooping Querier VLAN Configuration Summary Fields Field Description VLAN ID Specifies the VLAN ID on which IGMP Snooping Querier is administratively enabled Querier Election Participate Mode Displays the querier election participate mode on the VLAN When this mode is disabled up on seeing a query of the same version in the VLAN the snooping querier moves to non querier state...

Page 225: ...itch will send out periodic queries with a time interval equal to the configured querier query interval If the snooping switch sees a better querier numerically lower in the VLAN it moves to non querier mode Non Querier The snooping switch is in non querier mode in the VLAN If the querier expiry interval timer expires the snooping switch moves into querier mode Disabled The snooping querier is not...

Page 226: ...ersion 2 MLDv2 is equivalent to IGMPv3 MLD is a subprotocol of Internet Control Message Protocol version 6 ICMPv6 and MLD messages are a subset of ICMPv6 messages The switch can snoop on both MLDv1 and MLDv2 protocol packets and bridge IPv6 multicast data based on destination IPv6 multicast MAC addresses The switch can be configured to perform MLD snooping and IGMP snooping simultaneously Configur...

Page 227: ...iguration on page 229 Table 116 MLD Snooping Interface Configuration Fields Field Description Interface Select the physical or LAG interfaces to configure Admin Mode Select the interface mode for the selected interface for MLD Snooping for the switch from the pulldown menu The default is Disable Group Membership Interval Specify the amount of time you want the switch to wait for a report for a par...

Page 228: ...n menu The default is Disable Table 117 MLD Snooping VLAN Status Fields Field Description VLAN ID Displays the VLAN IDs for which the MLD Snooping mode is Enabled Admin Mode Shows the MLD Snooping Mode for the VLAN ID Fast Leave Admin Mode Indicates whether MLD Snooping Fast leave is active on the VLAN Group Membership Interval Shows the amount of time in seconds that a switch will wait for a repo...

Page 229: ...immediately remove the layer 2 LAN interface from its forwarding table entry upon receiving an MLD leave message for that multicast group without first sending out MAC based general queries to the interface Enable fast leave admin mode only on VLANs where only one host is connected to each layer 2 LAN port This prevents the inadvertent dropping of the other hosts that were connected to the same la...

Page 230: ...Router Configuration in the navigation tree Figure 135 MLD Snooping Multicast Router Configuration If you enable or disable multicast router configuration on an interface click Submit to apply the new settings to the switch Multicast Router Expiry Time Enter the amount of time in seconds that a switch waits for a query to be received on an interface before the interface is removed from the list of...

Page 231: ...is page click Monitoring MLD Snooping Multicast Router Status in the navigation tree Figure 136 MLD Snooping Multicast Router Status Click Refresh to re display the page with the latest information from the router Table 120 MLD Snooping Multicast Router Status Fields Field Description Slot Port Select the slot and port number with the information to view Multicast Router Indicates whether the spec...

Page 232: ...outer VLAN Configuration in the navigation tree Figure 137 Multicast Router VLAN Configuration If you enable or disable multicast router configuration for VLANs on an interface click Submit to apply the new settings to the switch Table 121 Multicast Router VLAN Configuration Fields Field Description Interface Select the physical VLAN or LAG interface to display VLAN ID Enter the VLAN ID to configu...

Page 233: ...ter VLAN Status in the navigation tree Figure 138 MLD Snooping Multicast Router VLAN Status The MLD Snooping Multicast Router VLAN Statistics page contains the following fields Click Refresh to re display the page with the latest information from the router Table 122 MLD Snooping Multicast Router VLAN Status Fields Description Slot Port Select the physical or LAG interface to display VLAN ID If a ...

Page 234: ... the MLD Snooping Querier feature specify the IP address of the router to perform the querying and configure related parameters Users must have Read Write access privileges to change the data on this page To access this page click LAN L2 Features MLD Snooping Querier MLD Snooping Querier Configuration in the navigation tree Figure 139 MLD Snooping Querier Configuration Table 123 MLD Snooping Queri...

Page 235: ...te Querier Expiry Interval Specify the time interval in seconds after which the last querier information is removed The Querier Expiry Interval must be a value in the range of 60 and 300 The default value is 60 Table 124 MLD Snooping Querier VLAN Configuration Fields Field Description VLAN ID Specifies VLAN ID for which MLD Snooping Querier is to be enabled You can select New Entry to create a new...

Page 236: ...5 MLD Snooping Querier VLAN Configuration Summary Fields Field Description VLAN ID Specifies the VLAN ID on which MLD Snooping Querier is administratively enabled Querier Election Participate Mode Displays the querier election participate mode on the VLAN When this mode is disabled up on seeing a query of the same version in the VLAN the snooping querier moves to non querier state When this mode i...

Page 237: ...witch will send out periodic queries with a time interval equal to the configured querier query interval If the snooping switch sees a better querier in the VLAN i e with a numerically lower value it moves to non querier mode Non Querier The snooping switch is in non querier mode in the VLAN If the querier expiry interval timer expires the snooping switch moves into querier mode Disabled The snoop...

Page 238: ...on for all active multicast address entries The key for an entry consists of a VLAN ID and MAC address pair Entries may contain data for more than one protocol To access the MFDB Table page click LAN Monitoring Multicast Forwarding Database MFDB Table in the navigation tree Figure 143 MFDB Table Table 127 MFDB Table Fields Field Description MAC Address Enter the VLAN ID MAC Address pair whose MFDB...

Page 239: ...ace s The list of interfaces that are designated for forwarding Fwd and filtering Flt for the selected address Forwarding Slot Port s The resultant forwarding list is derived from combining all the forwarding interfaces and removing the interfaces that are listed as the static filtering interfaces Table 128 GMRP Table Fields Field Description MAC Address A VLAN ID multicast MAC address pair for wh...

Page 240: ... delete all of its entries from the multicast forwarding database Table 129 MFDB IGMP Snooping Table Fields Field Description MAC Address A VLAN ID multicast MAC address pair for which the switch has forwarding and or filtering information The format is 8 two digit hexadecimal numbers that are separated by colons for example 00 01 23 45 67 89 AB CD Type This displays the type of the entry Static e...

Page 241: ...to delete all of its entries from the multicast forwarding database Table 130 MLD Snooping Table Fields Field Description MAC Address A VLAN ID multicast MAC address pair for which the switch has forwarding and or filtering information The format is 8 two digit hexadecimal numbers that are separated by colons for example 00 01 23 45 67 89 AB CD Type This displays the type of the entry Static entri...

Page 242: ...ng Database Statistics Click Refresh to update the information on the screen with the most current data Table 131 Multicast Forwarding Database Statistics Fields Field Description Max MFDB Entries Shows the maximum number of entries that the Multicast Forwarding Database table can hold Most MFDB Entries Since Last Reset The largest number of entries that have been present in the Multicast Forwardi...

Page 243: ...he port to Forwarding The difference between the R and the traditional IEEE 802 1D is the ability to configure and recognize full duplex connectivity and ports which are connected to end stations resulting in rapid transitioning of the port to Forwarding state and the suppression of Topology Change Notification These features are represented by the parameters pointtopoint and edgeport M is compati...

Page 244: ...to identify the configuration currently being used It may be up to 32 alphanumeric characters Configuration Revision Level Number used to identify the configuration currently being used The values allowed are between 0 and 65535 The default value is 0 Configuration Digest Key Number used to identify the configuration currently being used The digest key is generated based on the association of VLAN...

Page 245: ...ST Configuration Status Table 133 Spanning Tree CST Configuration Status Fields Field Description Bridge Priority Specifies the bridge priority value When switches or bridges are running each is assigned a priority After exchanging BPDUs the switch with the lowest priority value becomes the root bridge The bridge priority is a multiple of 4096 If you specify a priority that is not a multiple of 40...

Page 246: ... domain borders and keep the active topology be consistent and predictable BPUD Filter Enable or disable the BPDU Filter When BPDU filtering is enabled the port drops the BPDUs received Spanning Tree Tx Hold Count Configure the maximum number of BPDUs the bridge is allowed to send within the hello time window The default value is 6 Bridge Identifier The bridge identifier for the CST It is made up ...

Page 247: ...play the Spanning Tree MST Configuration Status page click LAN L2 Features Spanning Tree MST Configuration Status Identification in the navigation tree If no MST instances exist or if you select Create from the MST field the MST Configuration Status page looks like the screen in Figure 150 Figure 150 Spanning Tree MST Configuration Status Figure 151 shows an example of the page with an MST instanc...

Page 248: ...For example if the priority is attempted to be set to any value between 0 and 4095 it will be set to 0 The default priority is 32768 The valid range is 0 61440 VLAN ID This gives a list box of all VLANs on the switch The VLANs associated with the MST instance which is selected are highlighted on the list These can be selected or unselected for reconfiguring the association of VLANs to MST instance...

Page 249: ... the Spanning Tree CST Port Configuration Status page to configure Common Spanning Tree CST and Internal Spanning Tree on a specific port on the switch To display the Spanning Tree CST Port Configuration Status page click LAN L2 Features Spanning Tree CST Port Configuration Status in the navigation tree Figure 152 Spanning Tree CST Port Configuration Status ...

Page 250: ...Specifies the switch Hello time which indicates the amount of time in seconds a port waits between configuration messages The valid range is 1 10 and the default value is 2 The value must be less than or equal to Bridge Max Age 2 1 The default hello time value is 2 External Port Path Cost Set the External Path Cost to a new value for the specified port in the spanning tree It takes a value in the ...

Page 251: ...s the lowest cost to the LAN It is made up from the port priority and the interface number of the port Topology Change Acknowledge Identifies whether the next BPDU to be transmitted for this port would have the topology change acknowledgement flag set It is either True or False Auto Edge Configuring the auto edge mode of a port allows the port to become an edge port if it does not see BPDUs for so...

Page 252: ...o display the Spanning Tree MST Port Configuration Status page click LAN L2 Features Spanning Tree MST Port Configuration Status in the navigation tree Figure 153 Spanning Tree MST Port Configuration Status Transitions Into Loop Inconsistent State Shows the number of times this interface has moved into a loop inconsistent state Transitions Out Of Loop Inconsistent State Shows the number of times t...

Page 253: ...s and Seconds Port Mode Shows whether is enabled on the port To enable on a port use the System Port Configuration page Port Forwarding State Indicates the current state of a port If enabled the port state determines what forwarding action is taken on traffic Possible port states are Disabled is currently disabled on the port The port forwards traffic while learning MAC addresses Blocking The port...

Page 254: ...rameter identifies whether the port is in a loop inconsistent state in the specified MST instance If the port is in a loop inconsistent state it does not forward packets Transitions Into Loop Inconsistent State Shows the number of times this interface has gone into a loop inconsistent state Transitions Out Of Loop Inconsistent State Shows the number of times this interface has gotten out of a loop...

Page 255: ...atabase is different than the interface where the message was received On untrusted interfaces the switch drops DHCP packets whose source MAC address does not match the client hardware address This feature is a configurable option The hardware identifies all incoming DHCP packets on ports where DHCP snooping is enabled DHCP snooping is enabled on a port if a DHCP snooping is enabled globally and b...

Page 256: ...e it may be processed by the DHCP relay agent the local DHCP server or forwarded as an IP packet DHCP snooping is disabled globally and on all VLANs by default Ports are untrusted by default To access the DHCP Snooping VLAN Configuration page click LAN L2 Features DHCP Snooping VLAN Configuration in the navigation tree Figure 156 DHCP Snooping VLAN Configuration Click Submit to apply the new confi...

Page 257: ...do not match the application logs the event and drops the message For valid client messages DHCP snooping compares the source MAC address to the DHCP client hardware address Where there is a mismatch DHCP snooping logs and drops the packet You can disable this feature using the DHCP Snooping Interface Configuration page shown in Figure 157 below or by using the no ip dhcp snooping verify mac addre...

Page 258: ... based on the configured status and operational state of the port D Link DWS 4000 Series allows LLDP to have multiple LLDP neighbors per interface The number of such neighbors is limited by the memory constraints A product specific constant defines the maximum number of neighbors supported by the switch There is no restriction on the number of neighbors supported on a per LLDP port If all the remo...

Page 259: ...bmit to apply the new settings to the system Table 141 LLDP Global Configuration Fields Field Description Transmit Interval Specifies the interval at which LLDP frames are transmitted The default is 30 seconds and the valid range is 5 32768 seconds Transmit Hold Multiplier Specifies multiplier on the transmit interval to assign to TTL The default is 4 and the range is 2 10 Re Initialization Delay ...

Page 260: ...es or disables the ability of the port to receive LLDP PDUs The default is disabled Notify When notifications are enabled LLDP interacts with the Trap Manager to notify subscribers of remote data change statistics The default is disabled Transmit Management Information Select the check box to enable the transmission of management address instance Clear the check box to disable management informati...

Page 261: ...Interface Displays all the ports on which LLDP 802 1AB can be configured Link Status Displays whether the link status of the ports is up or down Transmit Displays the LLDP 802 1AB transmit mode of the interface Receive Displays the LLDP 802 1AB receive mode of the interface Notify Displays the LLDP 802 1AB notification mode of the interface Optional TLV s Shows the LLDP 802 1AB optional type lengt...

Page 262: ...lar MAC Service Access Point MSAP has been deleted from the tables associated with the remote systems Total Drops Displays the number of times a complete set of information advertised by a particular MAC Service Access Point MSAP could not be entered into tables associated with the remote systems because of insufficient resources Total Ageouts Displays the number of times a complete set of informa...

Page 263: ...age outs that occurred on a given port An age out is the number of times the complete set of information advertised by a particular MAC Service Access Point MSAP has been deleted from tables associated with remote entries because the information timeliness interval had expired TLV Discards Displays the number of LLDP TLVs Type Length Value sets discarded for any reason by the LLDP agent on the cor...

Page 264: ...e Displays the string that describes the source of the chassis identifier Chassis ID Displays the string value used to identify the chassis component associated with the local system Port ID Subtype Displays the string describing the source of the port identifier Port ID Identifies the physical address of the port System Name Displays the system name of the local system System Description Displays...

Page 265: ...h the local system Table 147 LLDP Remote Device Information Fields Field Description Local Interface Select the slot port on the local system to display the LLDP information it has received Note If no LLDP data has been received on the select interface then a message stating so displays If the selected interface has received LLDP information from a remote device the following fields display Remote...

Page 266: ...m Capabilities Enabled Displays the system capabilities of the remote system which are supported and enabled Time to Live Displays the Time to Live value in seconds of the received remote entry Management Address Displays the advertised management address of the remote system Management Address Type Displays the type of the management address Table 148 LLDP Remote Device Summary Columns Field Desc...

Page 267: ...lobal parameters for LLDP MED operation To display this page click LAN L2 Features LLDP LLDP MED Global Configuration in the navigation tree Figure 166 LLDP Global Configuration Click Submit to updated the switch The changes take effect but will not be retained across a power cycle unless a save is performed Table 149 LLDP Global Configuration Fields Field Description Fast Start Repeat Count Speci...

Page 268: ...mmary of All interfaces The summary of individual interfaces is visible from the Interface Configuration page The Interface Configuration page for the All option will always display the LLDP MED mode and notification mode as disabled and check boxes for Transmit TLVs will always be unchecked LLDP MED Mode Enables or disables LLDP MED mode for the selected interface By enabling MED you will be effe...

Page 269: ...page with the latest information from the router Table 151 LLDP MED Interface Summary Fields Field Description Interface Specifies all the ports on which LLDP MED can be configured Link Status Specifies the link status of the ports as Up Down MED Status Specifies the transmit and or receive LLDP MED mode is enabled or disabled on this interface Operational Status Specifies whether the interface wi...

Page 270: ...Media Application Type Specifies the application type Types of application types are unknown voicesignaling guestvoice guestvoicesignalling softphonevoice videoconferencing streammingvideo vidoesignalling Each application type that is received has the VLAN ID priority DSCP tagged bit status and unknown bit status A port may receive one or many such application types If a network policy TLV has bee...

Page 271: ...ecifies firmware version Software Revisions Specifies software version Serial Number Specifies serial number Manufacturer Name Specifies manufacturer s name Model Name Specifies model name Asset ID Specifies asset ID Location Information Specifies if location TLV is present in LLDP frames Sub Type Specifies type of location information Location Information Specifies the location information as a s...

Page 272: ...DP MED Remote Device Information Fields Field Description Local Interface Specifies the list of all the ports on which LLDP MED is enabled Remote ID Specifies the remote client identifier assigned to the remote system Capability Information Specifies the supported and enabled capabilities that were received in MED TLV on this port Supported Capabilities Specifies supported capabilities that were r...

Page 273: ... Revisions Specifies hardware version of the remote device Firmware Revisions Specifies firmware version of the remote device Software Revisions Specifies software version of the remote device Serial Number Specifies serial number of the remote device Manufacturer Name Specifies manufacturer s name of the remote device Model Name Specifies model name of the remote device Asset ID Specifies asset I...

Page 274: ...figure additional ARP packet validation DAI Configuration Use the DAI Configuration page to configure global DAI settings To display the DAI Configuration page click LAN L2 Features Dynamic ARP Inspection DAI Configuration in the navigation tree Figure 171 Dynamic ARP Inspection Configuration Click Submit to apply the new configuration and cause the change to take effect These changes will not be ...

Page 275: ...ic ARP Inspection VLAN Configuration Field Description VLAN ID Select the VLAN ID for which information is to be displayed or configured Dynamic ARP Inspection Select whether Dynamic ARP Inspection is Enabled or Disabled on this VLAN The default is Disable Logging Invalid Packets Select whether Dynamic ARP Inspection logging is Enabled or Disabled on this VLAN The default is Disable ARP ACL Name T...

Page 276: ...is to be displayed or configured Trust State Indicates whether the interface is trusted for Dynamic ARP Inspection If you select Enable the interface is trusted ARP packets coming to this interface will be forwarded without checking If you select Disable the interface is not trusted ARP packets coming to this interface will be subjected to ARP inspection The default is Disable Rate Limit Specifies...

Page 277: ...RP Inspection ARP ACL Configuration Click Add to create a new ARP ACL Click Delete to remove the configured ARP ACL entry you selected in the Remove column Click Refresh to refresh the page with the most current data from the switch Table 157 Dynamic ARP Inspection ARP ACL Configuration Field Description ARP ACL Name Use this field to create a new ARP ACL for Dynamic ARP Inspection The name can be...

Page 278: ... ACL rule Click Submit to delete the entries selected in the Remove column Click Refresh to refresh the page with the most current data from the switch Table 158 Dynamic ARP Inspection ARP ACL Rule Configuration Field Description ARP ACL Name Select the ARP ACL for which information is to be displayed or configured Sender IP Address To create a new rule for the selected ARP ACL enter in this field...

Page 279: ...and the static flag is set on this VLAN DHCP Permits The number of ARP packets that were forwarded by DAI because there was a matching DHCP snooping binding entry found ACL Permits The number or ARP packets that were permitted by DAI because there was a matching ARP ACL rule found for this VLAN Bad Source MAC The number of ARP packets that were dropped by DAI because the sender MAC address in the ...

Page 280: ...e administrator or dynamically via a routing protocol The host table can have entries added either statically by the administrator or dynamically via ARP Managing the BOOTP DHCP Relay Agent The BootP DHCP Relay Agent enables BootP DHCP clients and servers to exchange BootP DHCP messages across different subnets The relay agent receives the requests from the clients and checks the valid hops and gi...

Page 281: ...able 160 BOOTP DHCP Relay Agent Configuration Fields Field Description Maximum Hop Count Enter the maximum number of hops a client request can take before being discarded Minimum Wait Time secs Enter a time in seconds This value is compared to the time stamp in the client s request packets which should represent the time since the client was powered up Packets are only forwarded when the time stam...

Page 282: ...are forwarded to the IP address you entered in the Server IP address field Minimum Wait Time secs The Minimum time in seconds This value is compared to the time stamp in the client s request packets which should represent the time since the client was powered up Packets are only forwarded when the time stamp exceeds the minimum wait time Circuit ID Option Mode This is the Relay agent option which ...

Page 283: ...the relay agent relays matching packets to each server address Interface configuration takes priority over global configuration If the destination UDP port for a packet matches any entry on the ingress interface the packet is handled according to the interface configuration If the packet does not match any entry on the ingress interface the packet is handled according to the global IP helper confi...

Page 284: ...UDP Destination Port will be relayed Hit Count Shows the number of times a packet has been forwarded or discarded according to this entry Remove To delete a configured helper entry select the Remove check box for the appropriate entry and click Submit Table 163 IP Helper Global Configuration Add Fields Field Description UDP Destination Port 0 65535 The destination UDP port ID Port Name of UDP pack...

Page 285: ...d on a particular interface Select All to display all the configured relay entries on all interfaces UDP Destination Port Shows the destination UDP port ID Port Name of UDP packets to be relayed Server Address Shows the Server Address to which the packets with the given UDP Destination Port will be relayed IsDiscard If True packets arriving on the given interface with the given destination UDP por...

Page 286: ...on the screen to the latest value of the switch Table 165 IP Helper Interface Configuration Add Fields Field Description Source IP Interface The the interface from the pulldown menu to for which user wants to configure the relay entry UDP Destination Port The the Destination UDP port Name from the pull down menu or configure the port number to configure the Relay Entry on selected interface Discar...

Page 287: ...mented once for each server DHCP Server Messages Received The number of DHCP responses received from the DHCP server This count only includes messages that the DHCP server unicasts to the relay agent for relay to the client DHCP Server Messages Relayed Specifies the number of DHCP server messages relayed to a client UDP Client Messages Received The number of valid UDP packets received This count i...

Page 288: ...is an ARP request or response Thus when an ARP request is broadcast to all stations on a LAN segment or virtual LAN VLAN every recipient has the opportunity to store the sender s IP and MAC address in their respective ARP cache The ARP response being unicast is normally seen only by the requestor who stores the sender information in its ARP cache Newer information always replaces existing content ...

Page 289: ...ter you enter an IP address and the associated MAC address click Submit to apply the changes to the system and create the entry in the ARP table Table 167 ARP Create Fields Field Description IP Address Enter the IP address you want to add It must be the IP address of a device on a subnet attached to one of the switch s existing routing interfaces MAC Address The unicast MAC address of the device E...

Page 290: ...s The default value for Age Time is 1200 seconds Response Time secs Enter the value you want the switch to use for the ARP response timeout You must enter a valid integer which represents the number of seconds the switch waits for a response to an ARP request The range for this field is 1 to 10 seconds The default value for Response Time is 1 second Retries Enter an integer which specifies the max...

Page 291: ...es listed specify the type of ARP Entry to be deleted All Dynamic Entries All Dynamic and Gateway Entries Specific Dynamic Gateway Entry Specific Static Entry Remove IP Address This field appears only if you select Specific Dynamic Gateway Entry or Specific Static Entry in the Remove from Table menu This field allows you to enter the IP Address against the entry that is to be removed from the ARP ...

Page 292: ...an support 1024 entries although this size is user configurable to any value less than 1024 When multiple network interfaces are supported by a device as is typical of a router either a single ARP cache is used for all interfaces or a separate cache is maintained per interface While the latter approach is useful when network addressing is not unique per interface this is not the case for Ethernet ...

Page 293: ...sed to an interface To display the page click LAN L3 Features IP Configuration in the navigation tree Figure 187 IP Configuration Table 171 IP Configuration Fields Field Description Default Time to Live The default value inserted into the Time To Live field of the IP header of datagrams originated by the switch if a TTL value is not supplied by the transport layer protocol Routing Mode Select Enab...

Page 294: ...the ICMP error packets you can specify the number of ICMP error packets that are allowed per burst interval By default the burst size is 100 packets When the burst interval is zero then configuring this field is not a valid option The valid burst size range is 1 to 200 Maximum Next Hops The maximum number of hops supported by the switch This is a read only value Maximum Routes The maximum number o...

Page 295: ...d VLAN routing interfaces Routing Interface Status Shows whether the IPv4 routing is up or down on the interface IP Address Configuration Method Specify whether the selected interface should receive an IP address dynamically through DHCP or statically through manual IP address assignment If you configure DHCP as the method additional buttons display at the bottom of the page that allow you to rene...

Page 296: ...40 This value is valid for physical interfaces For logical interfaces such as VLAN routing interfaces the field displays the system MAC address Encapsulation Type Select the link layer encapsulation type for packets transmitted from the specified interface from the dropdown menu The possible values are Ethernet and SNAP The default is Ethernet Proxy ARP Select to Disable or Enable Proxy ARP for th...

Page 297: ... a valid address to be received at this entity This count includes invalid addresses e g 0 0 0 0 and addresses of unsupported Classes e g Class E For entities which are not IP Gateways and therefore do not forward datagrams this counter includes datagrams discarded because the destination address was not a local address IpForwDatagrams The number of input datagrams for which this entity was not th...

Page 298: ... number of failures detected by the IP re assembly algorithm for whatever reason timed out errors etc Note that this is not necessarily a count of discarded IP fragments since some algorithms can lose track of the number of fragments by combining them as they are received IpFragOKs The number of IP datagrams that have been successfully fragmented at this entity IpFragFails The number of IP datagra...

Page 299: ...ack of buffers This value should not include errors discovered outside the ICMP layer such as the inability of IP to route the resultant datagram In some implementations there may be no types of error which contribute to this counter s value IcmpOutDestUnreachs The number of ICMP Destination Unreachable messages sent IcmpOutTimeExcds The number of ICMP Time Exceeded messages sent IcmpOutParmProbs ...

Page 300: ... be communicated with by this address which is always up and can receive traffic from any of the existing active interfaces Thus given reachability from a remote client the address of the loopback can be used to communicate with the router through various services such as telnet and SSH In this way the address on a loopback behaves identically to any of the local addresses of the router in terms o...

Page 301: ...ld this list of available loopback IDs displays Protocol Select IPv4 or IPv6 to configure the corresponding attributes on the loopback interface The protocol selected affects the fields that are displayed on this page IPv4 Address The primary IPv4 address for this interface in dotted decimal notation This option only displays when the Protocol specified is IPv4 IPv4 Subnet Mask The primary IPv4 su...

Page 302: ...1 7 Optionally click the Add Secondary field to add a secondary IP address and complete the Secondary Address Secondary IP Address and Secondary Subnet Mask fields 8 Click Submit Removing a Loopback 1 Open the Loopback Configuration page 2 Specify the loopback to remove in the Loopback menu 3 Click Delete Loopback The loopback is deleted and the device is updated Removing a Secondary Address 1 Ope...

Page 303: ... configured loopbacks To display the page click LAN Monitoring L3 Status Loopback Summary in the navigation tree Figure 193 Loopbacks Summary Click Refresh to update the information on the screen Table 176 Loopbacks Summary Fields Field Description Loopback Interface The ID of the configured loopback interface Addresses A list of the addresses configured on the loopback interface ...

Page 304: ...igure or disable RIP in Global mode To display the page click LAN L3 Features RIP Configuration in the navigation tree Figure 194 RIP Configuration Table 177 RIP Configuration Fields Field Description RIP Admin Mode Select Enable or Disable from the dropdown menu If you select Enable RIP is enabled for the switch The default is Disable Split Horizon Mode Select None Simple or Poison Reverse from t...

Page 305: ...ries in order to reduce the total number of entries The default is Disable Host Routes Accept Mode Select Enable or Disable from the dropdown menu If you select Enable the router accepts host routes The default is Enable Global Route Changes Displays the number of route changes made to the IP Route Database by RIP This does not include the refresh of a route s age Global Queries Displays the numbe...

Page 306: ...n authentication type other than None by clicking the Modify button You then see a new screen where you can select the authentication type from the dropdown menu Possible values are None This is the initial interface state If you select this option from the dropdown menu on the second screen you are returned to the first screen without any authentication protocols being run Simple If you select Si...

Page 307: ... Authentication Types The page refreshes and displays the RIP Interface Authentication Configuration page Figure 196 RIP Interface Authentication Configuration 5 Select the type of authentication to use If you select Simple or Encrypt as the authentication the screen refreshes and additional fields display Enter the required information into the new fields 6 Click Submit to apply the changes to th...

Page 308: ...on to which RIP control packets sent from the interface conform The default is RIP 2 Possible values are RIP 1 RIP version 1 packets are sent using broadcast RIP 1c RIP version 1 compatibility mode RIP version 2 formatted packets are transmitted using broadcast RIP 2 RIP version 2 packets are sent using multicast None RIP control packets are not transmitted Receive Version Specifies which RIP vers...

Page 309: ...t precedence ToS etc are ignored The source IP address is compared to the destination IP address of the route The source IP netmask in the access list rule is treated as a wildcard mask indicating which bits in the source IP address must match the destination address of the route Note that a 1 in the mask indicates a Don t Care in the corresponding address bit Table 180 RIP Route Redistribution Co...

Page 310: ... Summary in the navigation menu Figure 199 RIP Route Redistribution Summary Click Refresh to update the information on the screen Table 181 RIP Route Redistribution Summary Fields Field Description Source Protocol The Source Route to be Redistributed by RIP Metric The Metric of redistributed routes for the given source route Displays 0 when not configured Redistribute The route redistribution mode...

Page 311: ...ld Description Interface Select the router interface for which data is to be configured Advertise Mode Select Enable or Disable from the dropdown menu If you select Enable Router Advertisements are transmitted from the selected interface Advertise Address Enter the IP Address to be used to advertise the router Maximum Advertise Interval secs Enter the maximum time in seconds allowed between router...

Page 312: ...Router Discovery D Link Unified Wired and Wireless Access System Oct 2015 Page 312 D Link UWS User Manual If you make any changes to the page click Submit to apply the changes to the system ...

Page 313: ...tus in the navigation tree Figure 201 Router Discovery Status Table 183 Router Discovery Status Fields Field Description Interface The router interface for which data is displayed Advertise Mode The values are Enable or Disable Enable denotes that Router Discovery is enabled on that interface Advertise Address The IP Address used to advertise the router Maximum Advertise Interval secs The maximum ...

Page 314: ...on tree Figure 202 Route Table Minimum Advertise Interval secs The minimum time in seconds allowed between router advertisements sent from the interface Advertise Lifetime secs The value in seconds used as the lifetime field in router advertisements sent from the interface This is the maximum length of time that the advertised addresses are to be considered as valid router addresses by hosts Prefe...

Page 315: ...llowing Local Static Default RIP Next Hop Slot Port The outgoing router interface to use when forwarding traffic to the destination Next Hop IP Address The outgoing router IP address to use when forwarding traffic to the next router if any in the path towards the destination The next router is always one of the adjacent neighbors or the IP address of the local interface for a directly attached net...

Page 316: ... Figure 203 Best Routes Table Click Refresh to update the information on the screen Table 185 Best Routes Table Fields Field Description Total Number of Routes The total number of routes in the route table Network Address The IP route prefix for the destination Subnet Mask Also referred to as the subnet network mask this indicates the portion of the IP interface address that identifies the attache...

Page 317: ...e field Static Enter values for Network Address Subnet Mask Next Hop IP Address and Preference Static Reject Packets to these destinations will be dropped Table 186 Configured Routes Fields Field Description Network Address The IP route prefix for the destination Subnet Mask Also referred to as the subnet network mask this indicates the portion of the IP interface address that identifies the attac...

Page 318: ...ce must exist and the next hop IP Address must be on the same network as the routing interface Routing interfaces are created on the IP Interface Configuration page Valid next hop IP Addresses can be viewed on the Route Table page Subnet Mask Also referred to as the subnet network mask this indicates the portion of the IP interface address that identifies the attached network Next Hop IP Address T...

Page 319: ...n by selecting the route with the lowest preference value When there are multiple routes to a destination the preference values are used to determine the preferred route To display the page click LAN L3 Features Router Route Preferences Configuration in the navigation tree Figure 206 Route Preferences Configuration If you make changes to the page click Submit to apply the changes to the system Tab...

Page 320: ...e VLAN plus the internal bridge router interface if it was received on a routed VLAN Since a port can be configured to belong to more than one VLAN VLAN routing might be enabled for all of the VLANs on the port or for a subset VLAN Routing can be used to allow more than one physical port to reside on the same subnet It could also be used when a VLAN spans multiple physical networks or when additio...

Page 321: ... the ID of the first VLAN After you enter a new VLAN ID and click Create the non configurable data will be displayed Interface The logical slot and port number assigned to the VLAN Routing Interface MAC Address The MAC Address assigned to the VLAN Routing Interface IP Address The configured IP Address of the VLAN Routing Interface Note that if a VLAN is created and the IP address is not configured...

Page 322: ...s and subnet mask for the VLAN and configure any other interface settings 6 Click Submit to apply the settings to the VLAN routing interface 7 Navigate to the LAN Monitoring VLAN Routing Summary page to view the new VLAN in the table Deleting a VLAN Router Interface Click Delete to delete the selected VLAN routing interface ...

Page 323: ...se data is displayed in the current table row Slot Port The logical slot and port number assigned to the VLAN Routing Interface MAC Address The MAC Address assigned to the VLAN Routing Interface IP Address The configured IP Address of the VLAN Routing Interface Note that if a VLAN is created and the IP address is not configured the page by default shows an IP address of 0 0 0 0 To configure the IP...

Page 324: ... VRRP advocates the concept of a virtual router associated with one or more IP Addresses that serve as default gateways In the event that the VRRP Router controlling these IP Addresses formally known as the Master fails the group of IP Addresses and the default forwarding role is taken over by a Backup VRRP Router VRRP Configuration Use the VRRP Configuration page to enable or disable the administ...

Page 325: ...ting new Virtual Router in which case enter the VRID in the range 1 to 255 Interface This field is only configurable if you are creating new Virtual Router in which case select the interface for the new Virtual Router from the menu Pre empt Mode Select Enable or Disable from the dropdown menu If you select Enable a backup router preempts the master router if it has a priority greater than the mast...

Page 326: ...uter in the election for the master virtual router If the Virtual IP Address is the same as the interface IP Address the priority gets set to 255 no matter what you enter If you enter a priority of 255 when the Virtual and interface IP Addresses are not the same the priority gets set to the default value of 100 Priority The operational priority of the VRRP router This is relative to the configured...

Page 327: ...ecific interface IP state within the router that can alter the priority level of a virtual router for a VRRP group An exception to this is if that VRRP group is the IP address owner its priority is fixed at 255 and cannot be reduced through the tracking process To display the page click LAN L3 Features VRRP Virtual Router Configuration in the navigation tree then click the Track Interface button F...

Page 328: ...d from the Virtual Router Configuration page Figure 213 VRRP Interface Tracking Click Submit to send the updated configuration to the switch Configuration changes take effect immediately These changes will not be retained across a power cycle unless a Save configuration is performed Click Cancel to return to the VRRP Interface Tracking Configuration page Table 194 VRRP Track Interface Fields Field...

Page 329: ...hanges take effect immediately These changes will not be retained across a power cycle unless a Save configuration is performed Click Refresh to refresh the page with the most current data from the switch Click Cancel to return to the Virtual Router Configuration page Table 195 VRRP Route Tracking Configuration Fields Field Description Interface The interface associated with the Virtual Router ID ...

Page 330: ...ave is performed Click Cancel to return to the VRRP Route Tracking Configuration page Virtual Router Status Use the Virtual Router Status page to display virtual router status To display the page click LAN Monitoring L3 Status Virtual Router Status in the navigation tree Figure 216 Virtual Router Status Table 196 VRRP Route Tracking Fields Field Description Interface The Interface associated with ...

Page 331: ...y this virtual router Virtual IP Address The IP Address associated with the Virtual Router Interface IP Address The actual IP Address associated with the interface used by the Virtual Router Owner Set to True if the Virtual IP Address and the Interface IP Address are the same otherwise set to False If this parameter is set to True the Virtual Router is the owner of the Virtual IP Address and alway...

Page 332: ...ter Configured The Virtual Router Statistics page contains the fields listed below Many of the fields display only when there is a valid VRRP configuration Table 198 Virtual Router Statistics Fields Field Description Router Checksum Errors The total number of VRRP packets received with an invalid VRRP checksum value Router Version Errors The total number of VRRP packets received with an unknown or...

Page 333: ...hentication check IP TTL Errors The total number of VRRP packets received by the virtual router with IP TTL Time To Live not equal to 255 Zero Priority Packets Received The total number of VRRP packets received by the virtual router with a priority of 0 Zero Priority Packets Sent The total number of VRRP packets sent by the virtual router with a priority of 0 Invalid Type Packets Received The numb...

Page 334: ... must be QoS capable The presence of at least one node which is not QoS capable creates a deficiency in the network path and the performance of the entire packet flow is compromised Configuring Class of Service The Class of Service CoS queueing feature lets you directly configure certain aspects of switch queueing This provides the desired QoS behavior for different types of network traffic when t...

Page 335: ...the packet for the mapping table to be of any use so there are default actions performed when this is not the case These actions involve directing the packet to a specific CoS level configured for the ingress port as a whole based on the existing port default priority as mapped to a traffic class by the current 802 1p mapping table Table 199 802 1p Priority Mapping Field Description Interface Sele...

Page 336: ... Configuration Fields Field Description Interface The menu contains all CoS configurable interfaces Select the Global option to apply the same trust mode to all interfaces Select an individual interface from the menu to override the global settings on a per interface basis Interface Trust Mode Specifies whether or not an interface or all interfaces if the Slot Port field is set to Global trust a p...

Page 337: ...IP DSCP value to an internal traffic class To display the IP DSCP Mapping Configuration page click LAN QoS Class of Service IP DSCP Mapping Configuration in the navigation menu Figure 220 IP DSCP Mapping Configuration If you make changes to the page click Submit to apply the changes to the system Click Restore Defaults to reset all interfaces to the default trust value Table 201 IP DSCP Mapping Co...

Page 338: ...reset all interfaces to the default trust value Table 202 Interface Configuration Fields Field Description Interface Selects the CoS configurable interface to be affected by the Interface Shaping Rate Select Global to apply a rate to all interfaces Select an individual port to override the global setting Interface Shaping Rate Sets the limit on how much traffic can leave a port The limit on maximu...

Page 339: ...Queue Configuration in the navigation menu Figure 222 Interface Queue Configuration Table 203 Interface Queue Configuration Fields Field Description Interface Specifies the interface physical LAG or Global to configure Minimum Bandwidth Allocated Shows the sum of individual Minimum Bandwidth values for all queues in the interface The sum cannot exceed the defined maximum of 100 This value is consi...

Page 340: ...s the page displays see Table 203 on page 339 Scheduler Type Selects the type of queue processing from the dropdown menu Options are Weighted and Strict Defining on a per queue basis allows the user to create the desired service characteristics for different types of traffic Weighted Weighted round robin associates a weight to each queue This is the default Strict Strict priority services traffic ...

Page 341: ... a per class instance basis and it is these attributes that are applied when a match occurs A policy can contain multiples classes When the policy is active the actions taken depend on which class matches the packet Packet processing begins by testing the class match criteria for a packet A policy is applied to a packet when a class match within that policy is found The Differentiated Services men...

Page 342: ...nable While disabled the DiffServ configuration is retained and can be changed but it is not active While enabled Differentiated Services are active MIB Table Class Table Displays the current and maximum number of rows of the class table Class Rule Table Displays the current and maximum number of rows of the class rule table Policy Table Displays the current and maximum number of rows of the polic...

Page 343: ...h criteria in a class The logic is a Boolean logical AND for this criteria To display the page click LAN QoS Differentiated Services Class Configuration in the navigation menu The fields available on the Class Configuration page depend on whether you create a new class or configure a class that has already been created Figure 225 shows the Class Configuration page when the Class Selector option is...

Page 344: ...tch criteria and configurable fields are as follows Destination IP Address Requires a packet s destination IP address to match the address listed here In the IP Address field enter a valid destination IP address in dotted decimal format In the IP Mask field enter a valid subnet mask to determine which bits in the IP address are significant Note that this is not a wildcard mask Destination Layer 4 ...

Page 345: ... to prevent you adding another class reference since a specified class can reference at most one other class of the same type Additionally a Remove Class Reference button appears on the screen Click the button to remove the current class reference Source IP Address Requires a packet s source port IP address to match the address listed here In the IP Address field enter a valid source IP address in...

Page 346: ...licy Selector option shows a configured policy that has a member class To configure a member class see Class Configuration on page 343 Figure 229 Policy Configuration Table 206 Policy Configuration Fields Field Description Policy Selector To create a new policy select Create from the menu another page appears to facilitate creation of a new policy To change a policy name or to modify the class lis...

Page 347: ...figurable when you create a new policy After policy creation this becomes a non configurable field displaying the configured policy type Available Class List The menu lists all existing DiffServ class names The list is automatically updated as a new class is added or removed from the policy To associate a DiffServ class with a policy select the name of the class from the list and then click Add Se...

Page 348: ...om the list and then click Configure Selected Attribute The screen changes to the attribute configuration page for that attribute After you configure the attribute click Submit to apply the criteria to the class and return to the Policy Class Definition page To return to the Policy Class Definition page without applying the attribute click Cancel The attributes and configurable fields are as follo...

Page 349: ... KBytes Conform Action Selector Determines what happens to packets that are considered conforming below the police rate Select one of the following actions Send default These packets are presented unmodified by DiffServ to the system forwarding element Drop These packets are immediately dropped Mark IP DSCP These packets are marked by DiffServ with the specified DSCP value before being presented t...

Page 350: ...ted Services Service Configuration in the navigation menu Figure 233 Service Configuration To activate a policy on an interface select the interface and the policy and then click Submit Table 208 Service Configuration Fields Field Description Interface Selects the interface physical LAG or All to be affected from menus This is a list of all valid slot number and port number combinations in the sys...

Page 351: ... to display service level statistical information about all interfaces that have DiffServ policies attached To display the page click LAN Monitoring Differentiated Services Service Statistics in the navigation menu Figure 235 Service Statistics Table 209 Service Statistics Fields Field Description Counter Mode Selector Use the menu to determine the format of the displayed counter values which must...

Page 352: ...ational Status Shows the operational status of this service interface which is either Up or Down Offered Octets Shows the total number of packets octets offered to all class instances in this service policy before their defined DiffServ treatment is applied This is the overall count per interface per direction Discarded Octets Packets Shows the total number of packets octets discarded for all clas...

Page 353: ...ch a DiffServ policy is currently attached Policy Name Displays the policy currently attached to the selected interface and direction Operational Status Displays the operational status of the policy currently attached to the specified interface and direction The value is either Up or Down Member Classes List of all DiffServ classes currently defined as members of the selected Policy Name Choose on...

Page 354: ...ve data packets in order to provide better QoS The Auto VoIP feature explicitly matches VoIP streams in Ethernet switches and provides them with a better class of service than ordinary traffic If you enable the Auto VoIP feature on an interface the interface scans incoming traffic for the following call control protocols Session Initiation Protocol SIP H 323 Skinny Client Control Protocol SCCP Whe...

Page 355: ...Summary To display the Auto VoIP Summary page click LAN Monitoring Auto VoIP Summary in the navigation menu Figure 238 Auto VoIP Summary For information about the fields the page displays see Table 211 Table 211 Auto VoIP Configuration Fields Field Description Interface Specifies all Auto VoIP configurable interfaces The All option represents the most recent configuration settings done for all por...

Page 356: ...otocols source and destination IP and MAC addresses and other packet matching criteria Finally you use the ID number to assign the ACL to a port Configuring IP Access Control Lists IP access control lists ACL allow network managers to define classification actions and rules for specific ports ACLs are composed of access control entries ACE or rules that consist of the filters that determine traffi...

Page 357: ...address Extended IP ACL Allows you to permit or deny specific types of layer 3 or layer 4 traffic from a source IP address to a destination IP address This type of ACL provides more granularity and filtering capabilities than the standard IP ACL Named IP ACL Allows you to create an Extended IP ACL that is identified by a name rather than a number These ACLs have the same capabilities as Extended I...

Page 358: ...figuration page The access list definition includes rules that specify whether traffic matching the criteria is forwarded normally or discarded Additionally you can specify to assign traffic to a particular queue and or mirror the traffic to a particular port To display the IP ACL Rule Configuration page click LAN QoS Access Control Lists IP Access Control Lists Rule Configuration in the navigatio...

Page 359: ...ID to modify or select Create Rule to configure a new ACL Rule New rules cannot be created if the maximum number of rules has been reached For each rule a packet must match all the specified criteria in order to be true against that rule and for the specified rule action Permit Deny to take place Rule ID This field is only available if you select Create Rule from the Rule field Enter a new Rule ID...

Page 360: ...uration page Mirror Interface This field is only visible when the Action is Permit Use this field to specify the specific egress interface where the matching traffic stream is copied in addition to being forwarded normally by the device Click Configure and then select an interface from the dropdown list Packets that meet the rule are mirrored on the interface you select Click Submit or Cancel to r...

Page 361: ...es a packet s TCP UDP source port to match the port listed here Click Configure access the configuration page then complete one of the following fields Source L4 Keyword Select the desired L4 keyword from a list of source ports on which the rule can be based If you select a keyword other than Other the screen refreshes and the Source L4 Port Number field disappears Source L4 Port Number If the sou...

Page 362: ...her option in the menu and a text box will appear where you can enter the numeric value of the DSCP IP Precedence The IP Precedence field in a packet is defined as the high order three bits of the Service Type octet in the IP header This is an optional configuration This field matches the packet IP Precedence value to the rule when checked Enter the IP Precedence value an integer from 0 to 7 to ma...

Page 363: ...ssigned to the specified IP based ACL Deleting a Rule from an IP based ACL 1 Open the IP ACL Rule Configuration page 2 Select the desired ACL from the IP ACL menu 3 Select the rule to delete from the Rule field 4 Click Delete The new rule is assigned to the specified IP based ACL 5 Click Refresh to update the page with the most current information IP ACL Summary Use the IP ACL Summary page to view...

Page 364: ...s which are matched sequentially against a packet When a packet meets the match criteria of a rule the specified rule action Permit Deny is taken and the additional rules are not checked for a match On this menu the interfaces to which an MAC ACL applies must be specified Rules for the MAC ACL are specified created using the MAC ACL Rule Configuration menu To configure a MAC ACL 1 Use the MAC ACL ...

Page 365: ... MAC ACL menu enter a name for the ACL in the appropriate field and then click Submit To rename a MAC ACL select the ACL name from the MAC ACL menu Enter a new name for the ACL in the appropriate field and then click Rename The Rename button only appears if a configured MAC ACL is selected To delete a MAC ACL select the ACL name from the MAC ACL menu and then click Delete The Delete button only ap...

Page 366: ... list To display the MAC ACL Rule Configuration page click LAN QoS Access Control Lists MAC Access Control Lists Rule Configuration in the navigation menu The fields available on the page depend on whether the rule action is permit or deny and whether you select Create Rule or an existing rule from the Rule field Figure 245 shows the fields available when Create New Rule is selected in the Rule fi...

Page 367: ... page Rule Select an existing Rule ID to modify or select Create Rule to configure a new ACL Rule Enter a whole number in the range of 1 to 12 that will be used to identify the rule New rules cannot be created if the maximum number of rules has been reached For each rule a packet must match all the specified criteria in order to be true against that rule and for the specified rule action Permit De...

Page 368: ...L Click Configure and then select True or False from the dropdown list Then click Submit or Cancel to return to the Rule Configuration page Match Every is exclusive to the other filtering rules so if Match Every is True the other rules on the screen do not appear False indicates that it is not mandatory for every packet to match the selected ACL Rule Mirror Interface This field is only visible whe...

Page 369: ...enter a custom EtherType value Ethertype User Value This field only appears if you select User Value from the EtherType dropdown list The value you enter specifies a customized Ethertype to compare against an Ethernet frame The valid range of values is 0x0600 to 0xFFFF Source MAC Address Requires a packet s source port MAC address to match the address listed here Click Configure and then enter a M...

Page 370: ...been configured on the switch To access the page click LAN Monitoring Access Control Lists MAC Access Control Lists Summary Figure 248 MAC ACL Summary MAC ACL Rule Summary Use the MAC ACL Rule Summary page to view a summary of the MAC ACLs that have been configured on the switch To access the page click LAN Monitoring Access Control Lists MAC Access Control Lists Summary Figure 249 MAC ACL Rule Su...

Page 371: ...s the packet filtering direction for the ACL The system supports Inbound filtering inbound filtering means the system applies the ACL rules to packets as they enter the interface ACL Type Use the menu to select the ACL type to which incoming packets are matched Packets can be matched to IP or MAC based ACLs IP MAC ACL Select the ACL of the specified type to apply to the interface from the dropdown...

Page 372: ...e interface 5 Specify the priority in the Sequence field 6 Click Submit The ACL is attached to the specified interface s Removing an ACL from an Interface If an ACL is bound to an interface the Remove button appears on the page when you select the interface from the Slot Port menu To remove the ACL from the interface select the type of ACL to remove and its ID or name and then click Remove Note Wh...

Page 373: ...atically Note that both methods are used concurrently when a port is locked Dynamic locking implements a first arrival mechanism for Port Security You specify how many addresses can be learned on the locked port If the limit has not been reached then a packet with an unknown source MAC address is learned and forwarded normally Once the limit is reached no more addresses are learned on the port Any...

Page 374: ...tration page click LAN Security Port Security Administration in the navigation tree Figure 251 Port Security Administration Select Enable or Disable from the Port Security Mode list and click Submit Port Security Interface Configuration Use this page to configure the port security feature on a selected interface To access the Port Security Interface Configuration page click LAN Security Port Secur...

Page 375: ...kets with source MAC addresses that were not already learned are discarded You can effectively disable dynamic locking by setting the number of allowable dynamic entries to zero Maximum Number of Statically Locked MAC Addresses Allowed Sets the maximum number of statically locked MAC addresses on the selected interface Add a Static MAC Address Adds a MAC address to the list of statically locked MA...

Page 376: ...settings to the system The screen refreshes and the MAC address no longer appears in the table on the page Table 218 Port Security Static Fields Field Description Interface Select the physical interface or the LAG on which to view the dynamically learned MAC addresses MAC Address This column lists the static MAC addresses if any configured on the selected port VLAN ID Displays the VLAN ID correspo...

Page 377: ...y addresses can be learned on the locked port To access the Port Security Dynamic page click LAN Monitoring Port Security Port Security Dynamic in the navigation tree Figure 254 Port Security Dynamic Table 219 Port Security Dynamic Fields Field Description Interface Select the physical interface or the LAG on which to view the dynamically learned MAC addresses MAC Address This column lists the dyn...

Page 378: ...Status page click LAN Monitoring Port Security Port Security Violation in the navigation tree Figure 255 Port Security Violation Status Table 220 Port Security Violation Status Fields Field Description Interface Select the physical interface or the LAG on which to view security violation information Last Violation MAC Address Displays the source MAC address of the last packet that was discarded at...

Page 379: ...ield Description Admin Mode Enables or Disables the Administrative Mode of Secure HTTP The currently configured value is shown when the web page is displayed The default value is Disable You can only download SSL certificates when the HTTPS Admin mode is disabled TLS Version 1 Enables or Disables Transport Layer Security Version 1 0 The currently configured value is shown when the web page is disp...

Page 380: ...rom the TFTP server is on the server in the appropriate directory The file is in the correct format The switch has a path to the TFTP server Use the following procedures to download an SSL certificate 1 Click the Download Certificates button at the bottom of the page The Download Certificates button links to the File Download page as Figure 257 on page 381 shows HTTPS Session Hard Timeout Sets the...

Page 381: ...ncryption Parameter File PEM Encoded 3 Verify the IP address of the TFTP server and ensure that the software image or other file to be downloaded is available on the TFTP server 4 Complete the TFTP Server IP Address and TFTP File Name full path without TFTP server IP address fields 5 Select the Start File Transfer check box and then click Submit After you click Submit the screen refreshes and a Fi...

Page 382: ... Fields Field Description Admin Mode This select field is used to Enable or Disable the administrative mode of SSH The currently configured value is shown when the web page is displayed The default value is Disable SSH Version 1 This select field is used to Enable or Disable Protocol Level 1 for SSH The currently configured value is shown when the web page is displayed The default value is Enable ...

Page 383: ...loading SSH Host Keys For the switch to accept SSH connections from a management station the switch needs SSH host keys or certificates The switch can generate its own keys or certificates or you can generate these externally i e off line and download them to the switch To download an SSH host key from a TFTP server to the switch use the instructions in Downloading SSL Certificates on page 380 How...

Page 384: ...hat help you view and configure system Captive Portal settings Captive Portal Global Configuration CP Configuration Local User Interface Association CP Global Status Interface Status Client Connection Status SNMP Trap Configuration Captive Portal Global Configuration From the CP Global Configuration page you can control the administrative state of the CP feature and configure global settings that ...

Page 385: ...ter a port number between 0 65535 excluding ports 80 443 and the configured switch management secure port Additional HTTP Secure Port HTTP traffic over SSL HTTPS uses port 443 but you can configure an additional port for HTTPS traffic Enter a port number between 0 65535 excluding ports 80 443 and the configured switch management secure port Peer Switch Statistics Reporting Interval When clustering...

Page 386: ... portal click LAN Security Captive Portal CP Configuration Figure 260 Captive Portal Summary To create a CP configuration enter the configuration name in the text box and click Add After you add the configuration the CP Configuration page for that configuration appears and a new tab with the name of that configuration is created To delete an existing CP select the check box for the CP to remove an...

Page 387: ...e Protocol Indicates whether the portal uses HTTP or HTTPS Verification Specifies which type of user verification to perform Guest The user does not need to be authenticated by a database Local The switch uses a local database to authenticated users RADIUS The switch uses a database on a remote RADIUS server to authenticate users To configure authorized users on the local or remote RADIUS database...

Page 388: ...ication Redirect To User Original URL Redirect user to original page that opened before redirect to CP login page Redirect URL Specify the URL to which the newly authenticated client is redirected if the URL Redirect Mode is enabled RADIUS Auth Server If the verification mode is RADIUS click the button and select the name of the RADIUS server used for client authentications The switch acts as the ...

Page 389: ...the page users see after they successfully Max Transmit Enter the maximum number of bytes that a client is allowed to transmit when using the captive portal After this limit has been reached the user will be disconnected Max Total Enter the maximum number of bytes the user is allowed to transfer sum of bytes transmitted and received After this limit has been reached the user will be disconnected U...

Page 390: ...ou modify the fields within a category make sure you click Submit before you select a different category otherwise your changes are not saved To see an example of the Authentication Welcome Logout or Logout Success page click Preview The page opens in a new browser window To configure the portal users in a remote RADIUS server see Configuring Users in a Remote RADIUS Server on page 398 Figure 262 ...

Page 391: ...tal Configuration D Link Unified Wired and Wireless Access System Oct 2015 Page 391 D Link UWS User Manual Figure 263 CP Web Page Customization Authentication page Figure 264 CP Web Page Customization Welcome Page ...

Page 392: ...stomization Field Description Global Parameters Available Images The menu shows the images that are available to use for the page background branding and the account image To add images click Browse and select an image on your local system or accessible from your local system Click Download to download the image to the switch The image should be 5KB max 200x200 pixels GIF or JPG format To delete a...

Page 393: ... Image Shows the name of the current branding image on the Authentication Page This field can be modified from the CP WEB Customization Global Parameters page Browser Title Enter the text to display on the client s Web browser title bar or tab Page Title Enter the text to use as the page title This is the text that identifies the page Colors Select the colors to use for the CP page Click the butto...

Page 394: ...ccessfully connects to the network Welcome Text Enter the optional text to display to further identify the network to be access by the CP user This message displays under the Welcome Title Logout Page Note The fields on this page are only applicable when the User Logout Mode is enabled but you can modify the fields whether the feature is enabled or disabled Browser Title Enter the text to display ...

Page 395: ...mary Table 227 describes the fields on the Local User Summary page To access the configuration page for a specific user listed on the page click the user name The following buttons are available at the bottom of the Local User table Add Click Add to add a new user to the Local User database Delete Select the check box next to the user to remove and click Delete Select multiple check boxes to delet...

Page 396: ...number of users the Local User database supports Figure 268 Adding a New User The following table describes the fields available when you add a new user to the local CP database After you complete the fields click Add to add the user and return to the Local User Summary page Table 228 Local User Configuration Field Description User Name Enter the name of the user Password Enter a password for the ...

Page 397: ...w users are assigned to the 1 Default user group by default Session Timeout Enter the number of seconds a user is permitted to remain connected to the network Once the Session Timeout value is reached the user is logged out automatically A value of 0 means that the user does not have a Session Timeout limit Idle Timeout Enter the number of seconds the user can remain idle before the switch automat...

Page 398: ... portal After this limit has been reached the user will be disconnected Max Total Enter the maximum number of bytes the user is allowed to transfer sum of bytes transmitted and received After this limit has been reached the user will be disconnected Table 230 Captive Portal User RADIUS Attributes Attribute Number Description Range Usage Default User Name 1 User name to be authorized 1 32 character...

Page 399: ...r not present then use the value configured for the captive portal Integer Optional D Link Max Output Octets 171 125 Maximum number of octets the user is allowed to receive After this limit has been reached the user will be disconnected If the attribute is 0 or not present then use the value configured for the captive portal Integer Optional D Link Max Total Octets 171 126 Maximum number of octets...

Page 400: ...physical interface Captive portal and 802 1X cannot be enabled on the same physical interface Port security and captive portal cannot be enabled on the same physical interface If a physical interface is made a LAG member the captive portal becomes disabled on the interface Table 231 Global Captive Portal Configuration Field Description CP Configuration Lists the captive portals configured on the s...

Page 401: ...onfiguration list 2 In the Associated Interfaces field select the interface or interfaces to remove To select more than one interface hold CTRL and click multiple interfaces 3 Click Delete The interface is removed from the Associated Interface list and appears in the Interface List CP Global Status The CP Global Status page contains a variety of information about the CP feature From the CP Global ...

Page 402: ...ure is enabled CP Global Disable Reason Indicates the reason for the CP to be disabled which can be one of the following None Administratively Disabled No IPv4 Address Routing Enabled but no IPv4 routing interface Supported Local Users Shows the number of entries that the Local User database supports Configured Local Users Shows the number of users configured in the system System Supported Users S...

Page 403: ... reason The portal instance may be disabled for the following reasons None CP is enabled Administratively Disabled RADIUS Authentication mode enabled but RADIUS server is not defined Not associated with any interfaces The associated interfaces do not exist or do not support the CP capability Blocked Status Indicates whether authentication attempts to the captive portal are currently blocked Use th...

Page 404: ...hich you want to view information Figure 273 Interface Activation Status The following table describes the fields on the Interface Activation Status page Table 234 Interface Activation Status Field Description Operational Status Shows whether the portal is active on the specified interface Disable Reason If the selected CP is disabled on this interface this field indicates the reason which can be ...

Page 405: ...se the drop down menu to select the interface with the information to display Table 235 describes the fields on the Interface Capability Status page Table 235 Interface and Capability Status Parameter Description Bytes Received Counter Shows whether the interface supports displaying the number of bytes received from each client Bytes Transmitted Counter Shows whether the interface supports display...

Page 406: ... the client click the MAC address of the client To view information about the wireless clients connected to the DWS 4000 Series switch through the captive portal click LAN Security Captive Portal Client Connection Status Figure 275 Client Summary The following table describes the fields on the Client Summary page To force the captive portal to disconnect an authenticated client select the check bo...

Page 407: ...ing Protocol Shows the current connection protocol which is either HTTP or HTTPS Session Time Shows the amount of time that has passed since the client was authorized Switch Type Shows whether the switch handling authentication for this client is the local switch or a peer switch in the cluster User Name Displays the user name or Guest ID of the connected client Interface Identifies the interface ...

Page 408: ... Statistics page Viewing the Client Interface Association Status Use the Interface Client Status page to view clients that are authenticated to a specific interface Figure 278 Interface Client Status The drop down menu lists each interface on the switch To view information about the clients connected to a CP on this interface select it from the list Table 238 Client Interface Association Connectio...

Page 409: ...ent is authenticated by a peer switch In order words the cluster controller was not the authenticator IP Address Identifies the IP address of the wireless client CP Configuration Identifies the captive portal the client used to access the network Protocol Shows the current connection protocol which is either HTTP or HTTPS Verification Shows the current account type which is Guest Local or RADIUS T...

Page 410: ...l traps only if the Captive Portal Trap Mode is enabled which you configure on the LAN Administration SNMP Manager Trap Flags page Table 241 SNMP Trap Configuration Field Description Captive Portal Trap Mode Displays the captive portal trap mode status To enable or disable the mode use Captive Portal menu on the LAN Administration SNMP Manager Trap Flags page Client Authentication Failure Traps If...

Page 411: ... servers configured on the system To access the RADIUS Configuration page click LAN Security RADIUS RADIUS Configuration in the navigation menu Figure 281 RADIUS Configuration Table 242 RADIUS Configuration Fields Field Description Number of Configured Authentication Servers The number of RADIUS authentication servers configured on the system The value can range from 0 to 32 Number of Configured A...

Page 412: ...in attempt all user interfaces will be blocked until the RADIUS application returns a response Timeout Duration secs The timeout value in seconds for request retransmissions The valid range is 1 30 See the Max Number of Retransmits field description for more information about configuring the timeout duration Accounting Mode Use the menu to select whether the RADIUS accounting mode is enabled or di...

Page 413: ...urity RADIUS RADIUS Authentication Server Configuration in the navigation menu If there are no RADIUS servers configured on the system or if you select Add from the RADIUS Server Host Address menu a subset of the fields described in the following table are available After you enter the RADIUS host address and click Submit the additional configuration fields appear Figure 282 RADIUS Server Configur...

Page 414: ...lly attachment mechanism is enabled or disabled The default value is clear disable RADIUS Server Domain Name Indicates which domain to automatically attach to the captive portal user For instance if Domain Name checkbox is selected RADIUS Server Domain Name field is configured as example com and the captive portal username is test user controller will use test user example com as username for Radi...

Page 415: ...e server is a backup server If more than one RADIUS server is configured with the same name the switch selects one of the servers to be the current server from the group of servers with the same name When the switch sends a RADIUS request to the named server the request is directed to the server selected as the current server Initially the primary server is selected as the current server If the pr...

Page 416: ... new RADIUS accounting server configure settings for a new or existing RADIUS accounting server and view RADIUS accounting server status information The RADIUS client on the switch supports up to 32 named authentication and accounting servers If there are no RADIUS accounting servers configured on the system or if you select Add from the Accounting Server Host Address menu a subset of the fields d...

Page 417: ... to configure additional RADIUS servers Port Identifies the authentication port the server uses to verify the RADIUS accounting server authentication The port is a UDP port and the valid range is 1 65535 The default port for RADIUS accounting is 1813 Secret Specifies the shared secret to use with the specified accounting server This field is only displayed if you are logged into the switch with RE...

Page 418: ...rent information Table 246 Named Accounting Server Fields Field Description RADIUS Accounting Server Name Shows the RADIUS accounting server name Multiple RADIUS accounting servers can have the same name In this case RADIUS clients can use RADIUS servers with the same name as backups for each other IP Address Shows the IP address of the RADIUS server Port Number Identifies the authentication port ...

Page 419: ... in the navigation menu Figure 289 RADIUS Accounting Server Statistics Clear Statistics Use the RADIUS Clear Statistics page to reset all RADIUS authentication and accounting statistics to zero To access the RADIUS Clear Statistics page click LAN Security RADIUS Clear RADIUS Statistics in the navigation menu Figure 290 RADIUS Clear Statistics To clear all statistics for the RADIUS authentication a...

Page 420: ...he authentication on behalf of the authenticator and indicates whether the user is authorized to access system services Global Port Access Control Configuration Use the Port Based Access Control Configuration page to enable or disable port access control on the system To display the Port Based Authentication page click LAN Security Port Access Control Configuration in the navigation menu Figure 29...

Page 421: ...ort Configuration in the navigation menu Figure 292 Port Access Control Port Configuration Dynamic VLAN Creation Mode Select Enable to allow the switch to dynamically create a RADIUS assigned VLAN if it does not already exist in the VLAN database Monitor Mode Select Enable to permit network access even when the 802 1X authentication process fails The switch logs the results of the authentication p...

Page 422: ...e is 0 to 3965 The default value is 0 Enter zero 0 to clear the Guest VLAN ID on the interface Guest VLAN Period secs Defines the Guest VLAN period for the selected port The Guest VLAN period is the value in seconds of the timer used by the Guest VLAN Authentication The Guest VLAN timeout must be a value in the range of 1 to 300 The default value is 90 Unauthenticated VLAN ID Defines the Unauthent...

Page 423: ...e is auto If the button is not selectable it will be grayed out Once this button is pressed the action is immediate It is not required to press the Submit button for the action to occur Port Access Entity Capability Configuration Use the Port Access Entity PAE Capability Configuration page to configure a port as an authenticator or supplicant To access the PAE Capability Configuration page click L...

Page 424: ... authentication server Force Authorized Places the interface into an authorized state without being authenticated The interface sends and receives normal traffic without client port based authentication Force Unauthorized Denies the selected interface system access by moving the interface into unauthorized state The switch cannot provide authentication services to supplicants through this interfac...

Page 425: ...page to view information about the port access control settings on a specific port To access the Port Access Control Port Status page click Security Port Access Control Port Status in the navigation menu Figure 295 Port Access Control Status Figure 296 on page 426 is an example of the fields displayed for the port when the Control mode of the port is MAC based ...

Page 426: ...ty of the selected port Possible values are Authenticator or Supplicant This field is not configurable Control Mode Defines the port authorization state The control mode is only set if the link status of the port is link up The possible field values are Auto Automatically detects the mode of the interface Force Authorized Places the interface into an authorized state without being authenticated Th...

Page 427: ...plays the configured transmit period for the selected port The transmit period is the value in seconds of the timer used by the authenticator state machine on the specified port to determine when to send an EAPOL EAP Request Identity frame to the supplicant The transmit period is a number in the range of 1 and 65535 Guest VLAN ID Displays the Guest VLAN ID configured on the interface The valid ran...

Page 428: ...ed port This is a configurable field The possible values are true and false If the value is true reauthentication will occur Otherwise reauthentication will not be allowed Key Transmission Enabled This field displays if key transmission is enabled on the selected port This is not a configurable field The possible values are true and false If the value is false key transmission will not occur Other...

Page 429: ...eauthenticate If the termination action is Default then at the end of the session the client details are initialized Otherwise re authentication is attempted Note This field is displayed only when the port control mode of the selected port is not MAC based Logical Port Displays the logical port number associated with the supplicant that is connected to the port This field is not configurable Note ...

Page 430: ...face into unauthorized state The switch cannot provide authentication services to the client through the interface MAC based Sets the mode of the interface to authentication on a per supplicant basis Operating Control Mode Indicates the control mode under which the port is actually operating Possible values are as follows ForceUnauthorized ForceAuthorized Auto MAC based N A If the port is in detac...

Page 431: ... All physical interfaces are valid EAPOL Frames Received Displays the number of valid EAPOL frames received on the port EAPOL Frames Transmitted Displays the number of EAPOL frames transmitted via the port EAPOL Start Frames Received Displays the number of EAPOL Start frames received on the port EAPOL Logoff Frames Received Displays the number of EAPOL Log off frames that have been received on the...

Page 432: ...om the switch EAP Request ID Frames Transmitted Displays the number of EAP Requested ID frames transmitted via the port EAP Request Frames Transmitted Displays the number of EAP Request frames transmitted via the port Invalid EAPOL Frames Received Displays the number of unrecognized EAPOL frames received on this port EAPOL Length Error Frames Received Displays the number of EAPOL frames with an in...

Page 433: ...avigation menu Figure 300 Port Access Privileges Table 255 Port Access Privileges Fields Field Description Port Selects the port to grant or deny access To grant or deny port access privileges to a user on all ports select All from the drop down menu Users Lists the users configured on the system The users that are highlighted have access to the selected port By default all users have access to al...

Page 434: ...CS server checks the user privileges The TACACS protocol ensures network security through encrypted protocol exchanges between the device and TACACS server TACACS Configuration The TACACS Configuration page contains the TACACS settings for communication between the switch and the TACACS server you configure To display the TACACS Configuration page click LAN Security TACACS Configuration in the nav...

Page 435: ...select the IP address of the server from the RADIUS Server IP Address drop down menu and then click Remove Table 257 TACACS Configuration Fields Field Description TACACS Server Use the drop down menu to select the IP address of the TACACS server to view or configure If fewer than five TACACS servers are configured on the system the Add option is also available Select Add to configure additional TA...

Page 436: ...TACACS Settings D Link Unified Wired and Wireless Access System Oct 2015 Page 436 D Link UWS User Manual ...

Page 437: ...nt UAP DWL 6600AP UAP DWL 3600AP UAP Each DWS 4000 Series switch can manage up to 64 UAPs Each access point radio can handle up to 200 associated wireless clients so a dual radio AP can handle up to 400 wireless clients The switch tracks the status and statistics for all associated WLAN traffic and devices To support larger networks wireless switches can be configured to belong to a cluster peer g...

Page 438: ... The DWL 8600AP UAP is a dual radio access point The DWL 6600AP UAP is a dual radio access point The DWL 3600AP is a single radio access point The DWL X600AP models include the same set of software features Any reference to the DWL X600AP or UAP includes all three models The UAP can operate in one of two modes Standalone Mode or Managed Mode In Standalone Mode the UAP acts as an individual access ...

Page 439: ...f a L2 discovery message The L2 discovery works automatically when the devices are directly connected or connected by using a layer 2 bridge For more information about L2 Discovery see L2 VLAN Discovery on page 546 Note For an AP to be managed by a switch the managed mode on the AP must be enabled To enable managed mode on the AP log on to the AP CLI and use the set managed mode up command or acce...

Page 440: ...CP connection If the AP does not receive an invitation from the first DWS 4000 Series switch configured in its list it sends a UDP discovery message to the second DWS 4000 Series switch configured in the list five seconds after sending the message to the first DWS 4000 Series switch When an IP address of a DWS 4000 Series switch is configured on the AP the AP only associates with that switch even ...

Page 441: ... DNS names through DHCP option 43 the Vendor Information option in the DHCP response If you configured a static IP address in the AP the AP ignores DHCP option 43 The format for DHCP option 43 values are defined by RFC 2132 The procedures to add the DHCP option to the DHCP server depend on the type of DHCP server you use on your network If you use a Microsoft Windows 2000 or Microsoft Windows 2003...

Page 442: ...P address in hexadecimal format You repeat the data type and address length codes for each address you enter For example to add the four switch IP addresses 192 168 1 10 192 168 2 10 192 168 3 10 and 192 168 4 16 to Option 43 you enter the following hexadecimal numbers into the Data Entry field 01 04 0C A8 01 0A 01 04 0C A8 02 0A 01 04 0C A8 03 0A 01 04 0C A8 04 10 The following image shows the fo...

Page 443: ...ly one DWS 4000 Series switch An alternative approach is to configure the RADIUS server to return a switch IP address during AP MAC address checking in the AP authentication process If the RADIUS server indicates that the AP is a valid managed AP and returns an IP address of a switch that is not the same as this switch then the switch sends a re link message to the access point with the IP address...

Page 444: ...in Standalone Mode Configure the DHCP option 43 with the IP addresses of additional switches in the cluster Monitoring Status and Statistics The Status Statistics folder contains links to the following pages that help you monitor the status and statistics for your D Link Unified Switch network Monitoring Status and Statistics Managed AP Status Associated Client Status Statistics Peer Switch Status...

Page 445: ...tistics D Link Unified Wired and Wireless Access System Oct 2015 Page 445 D Link UWS User Manual Figure 303 Global WLAN Status Statistics Table 258 on page 446 describes the fields on the Wireless Global Status Statistics page ...

Page 446: ...sabled due to one of the following reasons No Loopback Interface The switch does not have a loopback interface Global Routing Disabled Even if the routing mode is enabled on the WLAN switch interface it must also be enabled globally for the operational status to be enabled IP Address IP address of the switch Peer Switches Number of peer WLAN switches detected on the network Cluster Controller Indi...

Page 447: ...er of clients in the database This total includes clients with an Associated Authenticated or Disassociated status Authenticated Clients Total number of clients in the associated client database with an Authenticated status 802 11a Clients Total number of IEEE 802 11a only clients that are authenticated 802 11b g Clients Total number of IEEE 802 11b g only clients that are authenticated 802 11n Cl...

Page 448: ...eived across all APs managed by the switch that were dropped Distributed Tunnel Packets Transmitted Total number of packets sent by all APs via distributed tunnels Distributed Tunnel Roamed Clients Total number of clients that successfully roamed away from Home AP using distributed tunneling Distributed Tunnel Clients Total number of clients that are associated with an AP that are using distribute...

Page 449: ...er of TSPEC packets sent from the AP to the wireless client The number is a total for all APs managed by the switch Total TSPEC Bytes Received The number of TSPEC bytes sent from the wireless client to the AP The number is a total for all APs managed by the switch Total TSPEC Bytes Transmitted The number of TSPEC bytes sent from the AP to the wireless client The number is a total for all APs manag...

Page 450: ...the sum of Managed Access Points Connection Failed Access Points and Discovered Access Points Managed Access Points Number of APs in the managed AP database that are authenticated configured and have an active connection with the wireless switch Discovered Access Points APs that have a connection with the switch but haven t been completely configured This value includes all managed APs with a Disc...

Page 451: ...d by the switch WLAN Bytes Transmit Dropped Total bytes transmitted across all APs managed by the switch that were dropped WLAN Bytes Received Dropped Total bytes received across all APs managed by the switch that were dropped WLAN Packets Transmitted Total packets transmitted across all APs managed by the switch WLAN Packets Received Total packets received across all APs managed by the switch WLA...

Page 452: ...PEC bytes sent from the wireless client to the AP The number is a total for all APs managed by the switch Total TSPEC Bytes Transmitted The number of TSPEC bytes sent from the AP to the wireless client The number is a total for all APs managed by the switch Total TSPECs Accepted The number of TSPEC packets that were accepted by all APs that the switch manages Total TSPECs Rejected The number of TS...

Page 453: ...that can be configured in the IP Discovery list Total Number of Configured Entries Shows the number of IP addresses that have been configured in the IP Discovery list Total Number of Polled Entries Identifies how many of the IP addresses in the IP Discovery list the switch has attempted to contact Total Number of Not Polled Entries Identifies how many of the IP addresses in the IP Discovery list t...

Page 454: ...has not attempted to contact the IP address in the L3 IP Discovery list Polled The switch has attempted to contact the IP address Discovered The switch contacted the peer switch or the AP in the L3 IP Discovery list and has authenticated or validated the device Discovered Failed The switch contacted the peer switch or the AP with IP address in the L3 IP Discovery list and was unable to authenticat...

Page 455: ...s information about the configuration a switch has received from one of its peers Figure 306 Configuration Received Table 258 describes the fields on the Wireless Global Status page Table 261 Peer Switch Configuration Field Description Current Receive Status Indicates the global status when wireless configuration is received from a peer switch The possible status values are as follows Not Started ...

Page 456: ...mary information about the AP Hardware support the radios and IEEE modes supported by the hardware and the software images that are available for download to the APs Figure 307 AP Hardware Capability Information Configuration Indicates which portions of configuration were last received from a peer switch which can be one or more of the following Global Discovery Channel Power AP Database AP Profil...

Page 457: ...her the hardware supports one radio or two radios Image Type Specifies the type of software the hardware requires Table 263 AP Hardware Capability Radio Detail Field Description AP Selector Use the drop down menu to select the AP model Radio Selector If the selected AP is a dual radio AP select Radio 1 or Radio 2 to view information about the selected radio Radio Count Displays the number of radio...

Page 458: ...nts that it manages To update the AP with the correct software the UWS can store up to three AP software images to support different AP hardware types This page displays the image ID to hardware type mapping Figure 309 Image Table Table 264 AP Image Capability Field Description Image Type ID Shows the ID number assigned to the image Image Type Description Provides a basic description of the image ...

Page 459: ...es in the cluster including information about the APs peer switches manage and the clients associated to those APs Figure 310 Peer Switch Status Command Buttons The page includes the following button Refresh Updates the page with the latest information Table 265 Peer Switch Status Field Description Cluster Controller IP Address IP address of the switch that controls the cluster Peer Switches Displ...

Page 460: ...page and click the Configuration Received tab Table 266 Peer Switch Configuration Status Field Description Peer IP Address Shows the IP address of each peer wireless switch in the cluster that received configuration information Configuration Switch IP Address Shows the IP Address of the switch that sent the configuration information Configuration Identifies which parts of the configuration the swi...

Page 461: ...itch Managed AP Status page Command Buttons The page includes the following button Refresh Updates the page with the latest information Table 267 Peer Switch Managed AP Status Field Description Switch Selector Select the IP address of the peer switch with the information to view or select All to view information about all APs managed by peer switches in the cluster Peer Managed AP MAC Shows the MA...

Page 462: ...C address of the AP Table 268 Monitoring All Access Points Field Description MAC Address Shows the MAC address of the access point Location A location description for the AP This is the value configured in the valid AP database either locally or on the RADIUS server Switch Port The physical port in the slot port format on the switch that the AP is connected to either directly or indirectly in the ...

Page 463: ... on the switch This can also happen with the local database when the configuration has been received from a peer switch Profile Mismatch Hardware Type The AP hardware type specified in the AP Profile is not compatible with the actual AP hardware Connection Failed The AP was previously authenticated and managed but currently does not have connection with the wireless switch A connection failed entr...

Page 464: ... Valid AP database as an Acknowledged Rogue Refresh Updates the page with the latest information Managed AP Status From the WLAN Monitoring Access Point Managed AP Status page you can access a variety of information about each AP that the switch manages The pages you access from the Status tab provide configuration and association information about managed APs and their neighbors The pages you acc...

Page 465: ...wireless clients associated with an AP or detected by the AP radio VAP Shows summary information about the virtual access points VAPs for the selected AP and radio interface on the APs that the switch manages Distributed Tunneling Shows information about the L2 tunnels currently in use on the AP The following table provides summary information about the APs that the switch manages If the switch is...

Page 466: ...n Progress The switch is currently sending the AP profile configuration packet to the AP Success The entire profile has been sent to the AP and there were no configuration errors Partial Success The entire profile has been sent to the AP and there were configuration errors for example some configuration parameters were not accepted but the AP is operational Failure The profile has been sent to the...

Page 467: ...iated with the access point will be disassociated To refresh the status information for the AP click Refresh Note You can sort the list of APs by clicking any of the column headings For example to sort the APs by the profile they use click Profile Table 270 Detailed Managed Access Point Status Field Description IP Address The IP address of the managed AP IP Subnet Mask The subnet mask of the manag...

Page 468: ...e AP Success The entire profile has been sent to the AP and there were no configuration errors Partial Success The entire profile has been sent to the AP and there were configuration errors but the AP is operational Failure The profile has been sent to the AP and there were configuration errors the AP is not operational Configuration Failure Error Message This field appears if the configuration st...

Page 469: ... IP DHCP The managed AP learned the current DWL X600AP IP address through DHCP option 43 L2 Poll Received The AP was discovered through the D Link Wireless Device Discovery protocol Protocol Version Indicates the protocol version supported by the software on the AP which is learned from the AP during discovery Authenticated Clients Total number of clients currently associated to the AP that have b...

Page 470: ...Monitoring Status and Statistics D Link Unified Wired and Wireless Access System Oct 2015 Page 470 D Link UWS User Manual Back Returns to the Managed AP Status page ...

Page 471: ...e for the managed access point status Table 271 Managed AP Radio Summary Field Description MAC Address The Ethernet address of the DWS 4000 Series switch managed AP If the MAC address of the AP is followed by an asterisk it is managed by a peer switch Location A location description for the AP this is the value configured in the valid AP database either locally or on the RADIUS server Radio Indica...

Page 472: ...s radio The valid values are None No request has been made to change the power Requested A power adjustment has been requested by the user but has not been processed by the switch In Progress The switch is processing a power adjustment request for this radio Success A power adjustment request is complete Failure A power adjustment request failed Total Neighbors Total number of neighbors both APs a...

Page 473: ...o mode will be displayed as Off Table 274 on page 474 describes the fields you see on the Neighbor APs page for the managed access point status Medium Time Admitted Current sum of medium time bandwidth allocated to clients using a traffic stream on the radio Medium time is measured in 32 μsec sec units Medium Time Unallocated Amount of medium time bandwidth not currently allocated for clients conn...

Page 474: ...e will be displayed as Off The Delete All Neighbors button clears the Neighbor AP and Neighbor Clients lists The list is repopulated as neighbors and associated clients are discovered Table 274 Managed AP Neighbor Status Field Description Neighbor AP MAC The Ethernet MAC address of the neighbor AP network this could be a physical radio interface or VAP MAC address For D Link APs this is always a V...

Page 475: ...00 where 1 is the weakest signal strength Channel The managed AP channel the client frame was received on which may be different than the operating channel for this radio Discovery Reason Indicates one or more discovery methods for the neighbor client One or more of the following values may be displayed RF Scan Discovered The client was reported from an RF scan on the radio Note that client statio...

Page 476: ...e switch you can view information about the traffic that uses a traffic specification TSPEC A TSPEC is a set of parameters that define Quality of Service QoS characteristics of a traffic flow A QoS capable wireless client sends a TSPEC request to the AP to enable the AP to prioritize traffic streams and deliver appropriate resources to time and delay sensitive network traffic TSPECs are commonly u...

Page 477: ...kets identified by the wireless client as belonging to a particular user priority An example of a voice traffic stream is a Wi Fi Certified telephone handset that marks its codec generated data packets as voice priority traffic An example of a video traffic stream is a video player application on a wireless laptop that prioritizes a video conference feed from a corporate server Number of Traffic S...

Page 478: ...int Distributed Tunneling Status page for the managed access point status Command Buttons The page includes the following button Refresh Updates the page with the latest information Table 278 Distributed Tunneling Status Field Description Distributed Tunnel Clients using AP as Home Number of clients that roamed away from this AP using distributed tunneling mode and are tunneling data back to this ...

Page 479: ...and type of packets transmitted and received on a specific AP Radio Shows per radio information about the number and type of packets transmitted and received for a specific AP VAP Shows per VAP information about the number of packets transmitted and received and the number of wireless client failures for a specific AP Distributed Tunneling Shows information about the L2 tunnels currently in use on...

Page 480: ...d with the MAC address Table 281 describes the fields you see on the Detail page for the managed access point statistics Note You can sort the list of APs by clicking any of the column headings For example to sort the APs by the number of packets transmitted click Packets Transmitted Table 280 Managed Access Point Ethernet Summary Statistics Field Description MAC Address The Ethernet address of th...

Page 481: ...quests that the AP converted from a broadcast packet to a unicast packet before sending to the wireless link Filtered ARP Requests Number of ARP requests that AP was able to drop instead of sending on the wireless link Broadcasted ARP Requests The number of ARP requests sent as broadcasts on the VAPs This counter does not include WDS links The same ARP frame may be counted multiple times when it i...

Page 482: ...face that were dropped WLAN Packets Transmit Dropped Number of packets transmitted by the AP on this radio interface that were dropped WLAN Bytes Transmit Dropped Number of bytes transmitted by the AP on this radio interface that were dropped Fragments Received Count of successfully received MPDU frames of type data or management Fragments Transmitted Number of transmitted MPDU with an individual ...

Page 483: ...n encrypted or that frame was discarded due to the receiving station not implementing the privacy option TSPEC Statistics Voice and Video Total TSPEC Packets Received The number of TSPEC packets sent from the wireless client to the AP on the radio Total TSPEC Packets Transmitted The number of TSPEC packets sent from the AP to the wireless client on the radio Total TSPEC Bytes Received The number o...

Page 484: ...kets Transmitted The number of TSPEC packets sent from the AP to the wireless client on the VAP Total TSPEC Bytes Received The number of TSPEC bytes sent from the wireless client to the AP on the VAP Total TSPEC Bytes Transmitted The number of TSPEC bytes sent from the AP to the wireless client on the VAP Table 284 Managed Access Point Distributed Tunneling Statistics Field Description Bytes Trans...

Page 485: ...away from this AP and were timed out due to age of the tunnel Client Limit Denials Number of times the AP denied the clients attempt to set up a distributed tunnel due to the AP reaching the configured tunneled client limit Client Max Replication Denials Number of times the AP denied the clients attempt to set up a distributed tunnel due to the AP reaching the configured maximum number of VLAN rep...

Page 486: ...d by the server RADIUS Challenged The RADIUS server is configured to use the Challenge Response authentication mode which is incompatible with the AP RADIUS Unreachable The RADIUS server that the AP is configured to use is unreachable Invalid RADIUS Response The AP received a response packet from the RADIUS server that was not recognized or invalid Invalid Profile ID The profile ID specified in th...

Page 487: ...thernet address of the AP If the MAC address of the AP is followed by an asterisk it was reported by a peer switch IP Address The IP address of the AP Last Failure Type Indicates the last type of failure that occurred which can be one of the following Local Authentication No Database Entry Not Managed RADIUS Authentication RADIUS Challenged RADIUS Unreachable Invalid RADIUS Response Invalid Profil...

Page 488: ...rk IP address of the AP Last Failure Type Indicates the last type of failure that occurred which can be one of the following Local Authentication No Database Entry Not Managed RADIUS Authentication RADIUS Challenged RADIUS Unreachable Invalid RADIUS Response Invalid Profile ID Profile Mismatch Hardware Type AP Relink Vendor ID Vendor of the AP software Protocol Version Indicates the protocol versi...

Page 489: ... Configuration on page 549 The DWS 4000 Series switch considers an access point to be a rogue if is detected during the RF scan process and is classified as a threat by one of the threat detection algorithms To view the threat detection algorithms enabled on the system go to the WLAN Administration Advanced Configuration WIDS Security page From the WLAN Monitoring Access Point AP RF Scan Status pa...

Page 490: ... AP Status Indicates the managed status of the AP whether this is a valid AP known to the switch or a Rogue on the network The valid values are Managed The neighbor AP is managed by the wireless system Standalone The AP is managed in standalone mode and configured as a valid AP entry local or RADIUS Rogue The AP is classified as a threat by one of the threat detection algorithms Unknown The AP is ...

Page 491: ...ue status of the selected AP in the RF Scan database Acknowledge All Rogues Acknowledges all APs with a Rogue status The status of an acknowledged rogue is returned to the status it had when it was first detected If the detected AP fails any of the tests that classify it as a threat it will be listed as a Rogue again Refresh Updates the page with the latest information Viewing Details About an AP ...

Page 492: ...he initial status is the classification prior to this AP becoming rogue Transmit Rate Indicates the rate at which the AP is currently transmitting data WIDS Rogue AP Mitigation Status indicating whether rogue AP mitigation is in progress for this AP If mitigation is not in progress then this field displays the reason which can be one of the following Not Required AP s not rogue Already mitigating ...

Page 493: ...ddress of the AP with the information to view Figure 320 AP Triangulation Status Table 289 shows the information the Access Point Triangulation Status page shows for an individual access point Table 289 Access Point Triangulation Status Field Description Detected AP MAC Address The Ethernet MAC address of the detected AP This could be a physical radio interface or VAP MAC For D Link APs this is al...

Page 494: ...igger the classification If an AP is classified as a rogue the system provides additional information to identify the threat type that caused the switch to classify the AP as a rogue The WIDS RF Security encompasses three functions Detect wireless devices by listening to control and data frames in the air Classify whether the wireless device is a threat by comparing the received data to various da...

Page 495: ...nfigured rogue AP Managed SSID received form an unknown AP Managed SSID from a fake managed AP Managed SSID received from an AP without an SSID Beacon Received from a fake managed AP on a invalid channel Managed SSID detected with incorrect security configuration Invalid SSID received from managed AP AP is operating on an illegal channel Standalone AP is operating with unexpected configuration Une...

Page 496: ...AP then the wireless system does not attempt to use the attack because that attack may deny service to a legitimate AP and provide another avenue for a hacker to attack the system The de authentication attack is not effective against Ad hoc networks because these networks do not use authentication The APs operating on channels outside of the country domain are not attacked because sending any traf...

Page 497: ...ws the managed APs that are within range of the wireless clients which can help you determine the managed AP an associated client might use for roaming Distributed Tunneling Shows information about the Distributed Tunnel status of the client SSID Status Shows the SSID and client MAC address of all clients connected to specific networks VAP Status Shows the clients associated with a specific VAP on...

Page 498: ...g Client Associated Clients Summary page for the associated client status Table 292 Associated Client Status Summary Field Description MAC Address The Ethernet address of the client station If the MAC address is followed by an asterisk the client is associated with an AP managed by a peer switch AP MAC Address The Ethernet address of the AP SSID The network on which the client is connected BSSID T...

Page 499: ...ect the MAC address of the client with the information to view Figure 325 Associated Client Status Detail Table 293 on page 500 describes the information available on the Detail page for the associated client status Status Indicates whether or not the client has associated and or authenticated The valid values are Associated The client is currently associated to the managed AP Authenticated The cl...

Page 500: ...the associated client supports the IEEE 802 11n standard NetBIOS Name Identifies the NetBIOS name of the wireless client For Microsoft Windows hosts the NetBIOS name is typically the same as or based on the host name Tunnel IP Address This field is blank for all non tunneled clients For a tunneled client this is the assigned tunnel IP address Associating Switch Shows whether the AP that the wirele...

Page 501: ...atus Table 294 on page 501 describes the information available on the Client QoS page for the associated client status Captive Portal If client is authenticated via Captive Portal this field contains a link to the associated Captive Portal client status page Note This field is visible only for Captive Portal enabled switch configurations Table 294 Associated Client QoS Status Field Description Act...

Page 502: ...onfigured value rounded down to the nearest 64 kbps A value of 0 means no bandwidth limiting is in effect in this direction Bandwidth Limit Up Shows the maximum rate at which the client transmits traffic to the AP in bits per second The rate shown in this field is the configured value rounded down to the nearest 64 kbps A value of 0 means no bandwidth limiting is in effect in this direction Access...

Page 503: ...Home AP The AP the client roams to is called the Association AP Use the menu above the table to select the MAC address of the client with the information to view Figure 328 Associated Client Distributed Tunneling Status Discovery Reason Indicates one or more discovery methods for the neighbor client One or more of the following values may be displayed RF Scan The client was reported from an RF sca...

Page 504: ...sociated with a network that supports L2 distributed tunneling Client Roam Status Indicates whether the client is on the Home AP or has roamed to another AP and is using a tunnel The field can display one of the following values Home Client is not using a tunnel Roaming Client is using a tunnel If distributed tunneling is disabled the field displays the roam status as Roaming Home AP MAC Address S...

Page 505: ...as one or more active traffic streams on an AP managed by the switch Traffic Stream Identifier TID Identifying number of the traffic stream as specified in the TSPEC The TID range is 0 7 Access Category AC The access category to which the traffic stream corresponds which is either voice or video Direction The direction of the traffic stream as indicated in the TSPEC The possible values are Uplink ...

Page 506: ...lect the MAC address of the client with the information to view Radio Radio number to which the client is associated Roam TS managed AP only Indicates whether this traffic stream was established by a roaming client Table 298 Associated Client RRM Status Field Description RRM Mode Indicates whether this client support 802 11k resource radio measurement RRM Location Mode Indicates whether this clien...

Page 507: ...t associated with a managed AP has used for WLAN access To disconnect a client from an AP select the box next to the SSID and then click Disassociate Figure 331 SSID Associated Client Status Command Buttons The page includes the following buttons Disassociate Disassociates the client from the managed AP Refresh Updates the page with the latest information RRM Beacon Passive Measurement Mode Indica...

Page 508: ... Client Status Command Buttons The page includes the following buttons Disassociate Disassociates the client from the managed AP Refresh Updates the page with the latest information Table 300 VAP Associated Client Status Field Description BSSID Indicates the Ethernet MAC address for the managed AP VAP where this client is associated SSID Indicates the SSID for the managed AP VAP where this client ...

Page 509: ...ociated Figure 333 Switch Associated Client Status To disconnect a client from an AP select the box next to the switch IP address and then click Disassociate Command Buttons The page includes the following buttons Disassociate Disassociates the client from the managed AP Refresh Updates the page with the latest information Table 301 Switch Associated Client Status Field Description Switch IP Addre...

Page 510: ...ring Client Associated Clients Statistics Association Summary displays the Associated Client Statistics page This page shows information about the traffic a wireless client receives and transmits while it is associated with a single AP Figure 334 Associated Client Association Summary Statistics Command Buttons The page includes the following button Refresh Updates the page with the latest informat...

Page 511: ...other AP but remains connected to the same network the session continues and the session statistics continue to accumulate If the client closes the wireless connection or roams out of the range of an AP managed by the switch the session ends Command Buttons The page includes the following button Refresh Updates the page with the latest information Table 303 Associated Client Session Summary Statis...

Page 512: ...ive Dropped Number of packets received from the client station that were dropped Bytes Receive Dropped Number of bytes received from the client station that were dropped Packets Transmit Dropped Number of packets transmitted to the client station that were dropped Bytes Transmit Dropped Number of bytes transmitted to the client station that were dropped Fragments Received Total fragmented packets ...

Page 513: ...ent Session Detail Statistics Duplicates Received Total duplicate packets received from the client station Table 305 Associated Client Session Detail Statistics Field Description Packets Received Total packets received from the client station Bytes Received Total bytes received from the client station Packets Transmitted Total packets transmitted to the client station Bytes Transmitted Total bytes...

Page 514: ...tted Total fragmented packets transmitted to the client station Transmit Retries Number of times transmits to client station succeeded after one or more retries Transmit Retries Failed Number of times transmits to client station failed after one or more retries TS Violate Packets Received Number of packets sent from a client to the AP in excess of its active traffic stream TS uplink bandwidth or f...

Page 515: ...efault action specified for a wireless client Allow Deny or Global Action go to the WLAN Administration Advanced Configuration Clients Known Client page and click the MAC address of the client to view or configure The switch does not remove MAC entries from this list even when a client successfully authenticates with an AP The historical ad hoc data gives you more time to take action against clien...

Page 516: ...age click WLAN Monitoring Client Detected Clients The Cluster Controller receives information about associated clients from all switches in the cluster and you can disassociate clients on any AP in the cluster from the Cluster Controller Table 307 Ad Hoc Client Status Field Description MAC Address The Ethernet address of the client If the Detection Mode is Beacon then the client is represented as ...

Page 517: ...ription MAC Address The Ethernet address of the client Client Name Shows the name of the client if available from the Known Client Database If client is not in the database then the field is blank Client Status Shows the client status which can be one of the following Authenticated The wireless client is authenticated with the wireless system Detected The wireless client is detected by the wireles...

Page 518: ...ients detected on the wireless network To view information about other clients detected on the network return to the Detected Clients page and click a different client MAC address Figure 341 Detailed Detected Client Status Table 309 Detailed Detected Client Status Field Description MAC Address The Ethernet address of the client Client Status Shows the client status which can be one of the followin...

Page 519: ...8 dBm Probe Req Recorded Number of probe requests recorded so far during the probe collection interval Probe Collection Interval Shows the amount of time spent in each probe collection period The probe collection helps the switch decide whether the client is a threat Highest Probes Detected Shows the largest number of probes that the switch detected during a probe collection interval Channel Ident...

Page 520: ... the results of these tests If a client has been classified as a rogue this page provides information about which tests the client might have failed to trigger the classification To view WIDS information about another client detected through the RF Scan return to the main Detected Clients page and click the MAC address of the client with the information to view Broadcast BSSID Probes Shows the num...

Page 521: ...thentication requests Client exceeds the maximum number of failing authentications Known Client is authenticated with an Unknown AP Client OUI is not in the OUI Database Condition Detected Indicates whether the result of the test was true or false Reporting MAC Address Identifies the MAC address of the AP that reported the test results Radio Identifies which physical radio on the reporting AP was ...

Page 522: ...Monitoring Status and Statistics D Link Unified Wired and Wireless Access System Oct 2015 Page 522 D Link UWS User Manual Refresh Updates the page with the latest information ...

Page 523: ... shows information about the pre authentication requests that the detected client has made Figure 343 Detected Client Pre Authentication History Table 311 describes the fields on the Detected Client Pre Authentication History page Command Buttons The page includes the following button Refresh Updates the page with the latest information Table 311 Detected Client Pre Authentication History Field De...

Page 524: ...ss MAC address of the client Sentry Identifies whether the radio that detected the client is in sentry or non sentry mode Non Sentry The radio that detected the client is not configured in sentry mode This means the radio can accept connections from wireless clients and send and receive traffic Sentry The radio that detected the client is configured in sentry mode Networks that deploy sentry APs o...

Page 525: ...one slot up Figure 345 Detected Client Roam History The following table describes the fields on the Detected Client Roam History page Command Buttons The page includes the following button Refresh Updates the page with the latest information Table 313 Detected Client Roam History Field Description MAC Address MAC address of the detected client AP MAC Address MAC Address of the managed AP to which ...

Page 526: ...s associated with captures all pre authentication requests and sends them to the switch The Detected Client Pre Authentication History Summary page lists detected clients that have made pre authentication requests and identifies the APs that have received the requests Figure 346 Detected Client Pre Authentication History Summary The following table describes the fields on the Detected Client Pre A...

Page 527: ...at least one AP and provides information about the roaming history Figure 347 Detected Client Roam History Summary The following table describes the fields on the Detected Client Roam History Summary page Command Buttons The page includes the following button Refresh Updates the page with the latest information Table 315 Detected Client Roam History Field Description MAC Address MAC address of the...

Page 528: ...ration page allows you to ask a client to measure utilization on a specified channel for a specified duration The page displays the results of the currently loaded channel The Channel Load feature is intended for network debugging The Wireless System does not take any automatic actions based on the reported channel utilization Figure 348 RRM Channel Load Configuration The following table describes...

Page 529: ...of the following Not Started In Progress Success Last measurement completed Timed Out Last measurement timed out Aborted Administrator aborted the last request Incapable Client is not capable of taking the requested measurement Refused Client refused to perform the measurement Time Remaining Number of seconds before the measurement request times out New Request Configuration Client MAC Address Ent...

Page 530: ...ge Command Buttons The page includes the following buttons Delete All Remove all entries from the list Refresh Updates the page with the latest information Table 317 RRM Channel Load History Field Description Client MAC Address MAC Address of the client that reported the channel load measurement Channel Channel on which the client measured utilization Duration How long the client measured the chan...

Page 531: ...bors for all APs Figure 350 RRM Neighbors The following table describes the fields on the RRM Neighbors Summary page Command Buttons The page includes the following button Delete All Remove all entries from the list Refresh Updates the page with the latest information Table 318 RRM Neighbors Summary Field Description AP MAC Address The MAC address of the managed AP VAP MAC Address The VAP on the m...

Page 532: ...using WPA2 Personal authentication and AES encryption For more information about the WDS feature see Configuring the Wireless Distribution System on page 641 WDS Group Status Summary The WDS Group Status Summary page displays summary information about configured WDS links At least one group must be configured for the fields to display To configure a WDS AP group use the pages available within the ...

Page 533: ...gured bidirectional links in the WDS AP group Detected WDS Links Count Number of WDS links detected in the system APs on both sides of the link must detect each other in order for the link to be counted Table 320 WDS AP Group Status Field Description Group ID Use the drop down menu above the fields to select the group number that identifies the configured WDS AP group Configured AP Count Number of...

Page 534: ...isabled Root AP Satellite AP External Device Root is not one of the APs Config WDS Link Count Number of configured bidirectional links in the WDS AP group Detect WDS Links Count Number of WDS links detected in the system APs on both sides of the link must detect each other in order for the link to be counted Blocked WDS Link Count Number of WDS links blocked by the spanning tree protocol If the AP...

Page 535: ...ster Satellite Mode Indicates whether the AP is a satellite AP connected to the network via a WDS link or a root AP connected to the network via a wired link Root Mode Indicates whether this AP is the root of the spanning tree If spanning tree is disabled then the AP is always reported as Not Root Root Path Cost Spanning Tree Path Cost to the root The root AP always reports this value as 0 If span...

Page 536: ...nfiguration Table 322 WDS AP Link Status Summary Field Description WDS AP Group ID The group number that identifies the configured WDS AP group Source MAC Address The MAC address of one end point of the WDS link Radio Source The radio number of the WDS link endpoint on the source AP Destination MAC Address The MAC address of the Source AP in the group Destination Radio The radio number of the WDS ...

Page 537: ...est information Source State Spanning Tree State of the link on the source AP which is one of the following Disabled is disabled or Link is down Forwarding Learning Listening Blocking Destination State Spanning Tree State of the link on the destination AP which is one of the following Disabled is disabled or Link is down Forwarding Learning Listening Blocking Table 322 WDS AP Link Status Summary F...

Page 538: ...DS AP Group ID The group number that identifies the configured WDS AP group Source MAC Address The MAC address of one end point of the WDS link Radio Source The radio number of the WDS link endpoint on the source AP Destination MAC Address The MAC address of the Source AP in the group Destination Radio The radio number of the WDS link endpoint on the destination AP Source AP Packets Sent Number of...

Page 539: ...address of the AP must be added to the Valid AP database to allow the switch to manage the AP Wireless Global Configuration In order for the DWS 4000 Series switch to be able to discover and manage access points the WLAN admin mode on the switch must be enabled and the WLAN Switch Operational Status must report that it is enabled However before you enable the WLAN Switch field set the correct coun...

Page 540: ...one of the following values Enabled Enable Pending Disabled Disable Pending If the status is pending click Refresh to update the screen with the latest information WLAN Switch Disable Reason If the status is disabled this field is displayed and one of the following reasons is listed None The cause for the disabled status is unknown Administrator disabled The Enable WLAN Switch check box has been c...

Page 541: ...IP Assign Mode is enabled then this setting is ignored AP Validation AP MAC Validation For a DWS 4000 Series switch to manage an AP you must add the MAC address of the AP to the Valid AP database which can be kept locally on the switch or in an external RADIUS server When the switch discovers an AP that is not managed by another DWS 4000 Series switch it looks up the MAC address of the AP in the V...

Page 542: ...Security RADIUS Accounting Server Configuration RADIUS Accounting Select this option to enable RADIUS accounting for wireless clients Country Code Select the country code that represents the country where your switch and APs operate When you click Submit a pop up message asks you to confirm the change Wireless regulations vary from country to country Make sure you select the correct country code s...

Page 543: ...ve on the WLAN switch not the AP To perform a save click Tool Save Changes Regenerate X 509 Certificate Status Status of the request to generate an X 509 certificate To initiate X 509 certificate generation go to the Advanced Configuration Switch Provisioning page The field has one of the following values Certificate Generation is not in progress Start Certificate Generation Certificate Generation...

Page 544: ...one of following four mechanisms 1 Manually add the IP address of the switch to the AP when it is in Standalone mode 2 Configure a DHCP server to include the switch IP address in the DHCP response to the AP DHCP client request 3 Use VLANs to broadcast the L2 Wireless Device Discovery Protocol 4 Manually add the IP address of the AP to the switch The Discovery tab is available from the WLAN Basic S...

Page 545: ...esses in the DWS 4000 Series switch for potential peer switches and APs The switch sends association invitations to all IP addresses in this list If the device accepts the invitation and is successfully validated by the switch the switch and the AP or peer switch are associated This discovery method mechanism is useful for peer switch discovery and AP discovery when the devices are in different IP...

Page 546: ...onfigured IP List By default L3 IP Discovery is enabled IP List Shows the list of IP addresses configured for discovery To remove entries from the list select one or more entries and click Delete There are no default entries and the maximum number of entries supported is 256 IP Address Range This text field is used to add a range of IP address entries to the IP List Enter the IP address at the sta...

Page 547: ...gate to the WLAN Monitoring Peer Switch page Command Buttons The page includes the following buttons Add Adds the data in the IP Address or VLAN field to the appropriate list Delete Deletes the selected entry from the IP or VLAN list Refresh Updates the page with the latest information Submit Updates the switch with the values you enter To retain the new values across a power cycle you must perfor...

Page 548: ... not the AP To perform a save click Tool Save Changes Next Navigates to the next page in the Basic Setup configuration Any changes you made to the current page are saved before the next page is displayed To retain the new values across a power cycle you must perform a save on the WLAN switch not the AP To perform a save click Tool Save Changes Table 327 Profile Field Description Hardware Type ID S...

Page 549: ...an broadcast in one of the following modes IEEE 802 11b and IEEE 802 11g modes IEEE 802 11b IEEE 802 11g and IEEE 802 11n modes 2 4 GHz IEEE 802 11n mode The DWL 3600AP supports one radio that can broadcast in one of the following modes IEEE 802 11b and IEEE 802 11g modes IEEE 802 11b IEEE 802 11g and IEEE 802 11n modes 2 4 GHz IEEE 802 11n mode You configure the default radio settings from the WL...

Page 550: ...igure By default Radio 1 operates in IEEE 802 11a mode and Radio 2 operates in IEEE 802 11b g mode If you change the mode the labels for the radios change accordingly Changes to the settings apply only to the selected radio The DWL 3600AP is a single radio AP Any settings you configure for Radio 1 802 11a are not applied to the DWL 3600AP If the selected Hardware Type ID for the AP profile is DWL ...

Page 551: ...y 802 11n wider RF bandwidth up to 160 MHz more MIMO spatial streams up to eight down link multi user MIMO up to four clients and high density modulation up to 256 QAM IEEE 802 11n ac operates in the 5 GHz ISM band and includes support for both 802 11n and 802 11ac devices Radio 2 supports IEEE 802 11b g operates in the 2 4 GHz ISM band IEEE 802 11b is an enhancement of the initial 802 11 PHY to i...

Page 552: ...the clients served by this access point should check for buffered data still on the AP awaiting pickup Specify a DTIM period within the given range 1 255 The measurement is in beacons For example if you set this field to 1 clients will check for buffered data on the AP at every beacon If you set this field to 10 clients will check on every 10th beacon Beacon Period Beacon frames are transmitted by...

Page 553: ...ess clients will not detect the signal or experience poor WLAN performance If the power level is too high the RF signal might interfere with other APs within range Automatic power uses a proprietary algorithm to automatically adjust the RF signal to broadcast far enough to reach wireless clients but not so far that it interferes with RF signals broadcast by other APs The power level algorithm incr...

Page 554: ...he access point to advertise Rates are expressed in megabits per second Basic These numbers indicate the data rates that all stations associating with the AP must support Supported These numbers indicate rates that the access point supports You can select multiple rates The AP automatically chooses the most efficient rate based on factors like error rates and distance of client stations from the A...

Page 555: ...e the VAPs use the same channel there is no risk of RF interference among the networks that are on a single AP VAPs can help you maintain better control over broadcast and multicast traffic which affects network performance You can also configure different security mechanisms for each VAP A VAP is a physical entity Each VAP maps directly to a MAC address A network is a logical entity that you appl...

Page 556: ...networks on the switch and apply them across multiple radio and VAP interfaces By default 16 networks are pre configured and applied in order to the VAPs on each radio Enabling a VAP on one radio does not automatically enable it on the other radio Note You cannot disable the default VAP VAP0 Note The IEEE 802 11n standard prohibits static WEP and dynamic WEP IEEE802 1X security modes Additionally ...

Page 557: ...hich is an alphanumeric key that identifies a wireless local area network You can configure up to 64 different networks on the DWS 4000 Series switch Each network can have a unique SSID or you can configure multiple networks with the same SSID When you click Edit on the VAP page the Wireless Network Configuration page appears as the following figure shows Figure 361 Configuring Network Settings ...

Page 558: ...probe request Select this option to prohibit the AP from responding to client probe requests Clear this option to allow the AP to respond to client probe requests VLAN A virtual LAN VLAN is a software based logical grouping of devices on a network that allow them to act as if they are connected to a single physical network even though they may not be The nodes in a VLAN share resources and bandwid...

Page 559: ...is done prior to the 802 1X authentication Redirect Select the HTTP option in the Redirect field to redirect wireless clients to a custom Web page When redirect mode is enabled the user will be redirected to the URL you specify after the wireless client associates with an AP and the user opens a Web browser on the client to access the Internet The custom Web page must be located on an external Web...

Page 560: ... it will push the client to connect to the less congested 5GHz network If band steering is enabled APs will suppresses probe responses and 802 11 authentication responses on 2 4 GHz channels to provide opportunity or wireless clients to associate on 5GHz bands The factory default is disabled Enable Enables the band steering mode Disable Disables the band steering mode RADIUS Authentication Server ...

Page 561: ...eless clients that associate with the AP using the SSID in the previous field Client QoS provides control over certain QoS aspects of wireless clients that connect to the network such as the amount of bandwidth and type of traffic an individual client is allowed to send and receive To control general categories of traffic such as HTTP traffic or traffic from a specific subnet you can configure ACL...

Page 562: ... the deny or permit action for each rule After switching the packet to the outbound interface the ACL rules are checked for a match The packet is transmitted if it is permitted and discarded if it is denied Client QoS Access Control Up Select the name of the access list applied to traffic in the inbound up direction Only existing IP access lists are listed in the menu and are prefixed with the acc...

Page 563: ...e listed in the menu To create a DiffServ policy use the pages in the LAN QoS Differentiated Services folder On the Class Configuration page create a class and define class criteria On the Policy Configuration page create a policy and then associate a class with the policy On the Policy Class Definition page define policy statements to define what happens to a packet when it matches the class crit...

Page 564: ...roblem solving but it is not recommended for regular use on the internal network because it is not secure Using Static or Dynamic WEP Wired Equivalent Privacy WEP is a data encryption protocol for 802 11 wireless networks If you select this security mechanism all wireless clients and access points on the network are configured with a 64 bit 40 bit secret key 24 bit initialization vector IV or 128 ...

Page 565: ...no more fields to configure The AP uses the global RADIUS server or the RADIUS server you specify for the wireless network The switch will not accept WEP as the security method if the AP profile includes a radio that operates in the 802 11n mode Note For information about how to configure the global RADIUS server settings on the DWS 4000 Series switch see Wireless Global Configuration on page 539 ...

Page 566: ...tions Using WPA WPA2 Personal or Enterprise WPA and WPA2 are Wi Fi Alliance IEEE 802 11i standards which include AES CCMP and TKIP mechanisms The WPA WPA2 Personal employs a pre shared key to perform an initial check of credentials The WPA WPA2 Enterprise security uses a RADIUS server to authenticate users WEP Key Length Specify the length of the key by clicking one of the radio buttons 64 bits 12...

Page 567: ... RADIUS server settings on the DWS 4000 Series switch see Wireless Global Configuration on page 539 WPA Versions Select the types of client stations you want to support WPA If all client stations on the network support the original WPA but none support the newer WPA2 then select WPA WPA2 If all client stations on the network support WPA2 D Link suggests using WPA2 which provides the best security ...

Page 568: ...The pre authentication information is relayed from the access point the client is currently using to the target access point Enabling this feature can help speed up authentication for roaming clients who connect to multiple access points Only clients that connect by using WPA2 can use this feature It is not supported by the original WPA Pre AuthenticationLimit Enter the number of pre authenticatio...

Page 569: ... a Valid AP Table 333 Valid Access Point Summary Field Description AP Database Identifies the total number of APs that have been added to the AP database Managed AP Identifies the number of APs in the database with an AP Mode set to Managed Rogue AP Identifies the number of APs in the database with an AP Mode set to Rogue Standalone AP Identifies the number of APs in the database with an AP Mode s...

Page 570: ...ch profile the AP uses If you use the local database for AP validation the switch maintains the database of access points that you validate When you add the MAC address of an AP to the database you can specify whether the AP is a managed AP standalone AP or a rogue If the AP is to be managed by the switch you can assign an AP profile to the device When the switch collects and reports information f...

Page 571: ...tch and you manage it by using the DWS 4000 Series switch If an AP is in Managed Mode the Administrator Web UI and SNMP services on the AP are disabled Rogue Select Rogue as the AP mode if you wish to be notified through an SNMP trap if enabled when this AP is detected in the network Additionally the when this AP is detected through an RF scan the status is listed as Rogue If you select the Rogue ...

Page 572: ...rference can occur when multiple access points within range of each other are broadcasting on the same or overlapping channels The impact of this interference on network performance can intensify during busy times when a large amount of data and media traffic is competing for bandwidth If you select auto the AP scans the RF area for occupied channels and selects a channel from the available non in...

Page 573: ...APs must be reset to complete their removal from the Valid AP database Submit Updates the switch with the values you enter To retain the new values across a power cycle you must perform a save Tool Save Changes Table 335 Valid AP Configuration Standalone Mode Field Description Expected SSID Enter the SSID that identifies the wireless network on the standalone AP Expected Channel Select the channel...

Page 574: ...tons The page includes the following buttons Add Adds the OUI value and description information to the local OUI database Delete Deletes any selected OUI entries from the local OUI database This button is available if the check box next to at least one OUI entry is selected Delete All Deletes all manually added entries from the local OUI database Refresh Updates the page with the latest informatio...

Page 575: ...h before resetting the hardware To reset one or more APs click AP Management Reset Figure 368 Access Point Reset Command Buttons The page includes the following buttons Reset Resets the selected APs To select an AP click the check box next to the MAC address Reset All Resets all managed APs listed on the page Factory Reset Factory resets the selected APs To select an AP click the check box next to...

Page 576: ...52 56 60 64 149 153 157 161 165 IEEE 802 11n mode can operate in either the 2 4 GHz or 5 GHz frequency Interference can occur when multiple access points within range of each other are broadcasting on the same or overlapping channels The impact of this interference on network performance can intensify during busy times when a large amount of data and media traffic is competing for bandwidth For th...

Page 577: ...uto Channel Configuration ACA uses the neighbor AP signal strength readings to decide when to change channels You can configure the following parameters that affect the ACA algorithm operation The 2 4GHz and 5GHz bands have their own set of configuration parameters The channel plan runs independently in each band To configure Channel Plan and Power Adjustment settings click AP Management RF Manage...

Page 578: ...dicates whether the ACA should pay attention only to APs managed by the cluster or all detected APs when deciding what channel to select for the radio The parameter is enabled by default In many deployments the managed network is the primary 802 11 network All other 802 11 APs are expected to plan their channels around the managed network or be removed For example in a school students often bring ...

Page 579: ...n the cluster that are eligible for channel assignment and were successfully assigned a new channel Figure 370 Channel Plan History Table 339 describes the Channel Plan History fields Power Adjustment Mode This field indicates the power adjustment mode The mode of power adjustment can be one of the following Manual In this mode you run the proposed power adjustments manually from the Manual Power ...

Page 580: ...tatus This field shows whether the switch is using the automatic channel adjustment algorithm on the AP radios Last Iteration The number in this field indicates the most recent iteration of channel plan adjustments The APs that received a channel adjustment in previous iterations cannot be assigned new channels in the next iteration to prevent the same APs from being changed time after time On the...

Page 581: ...efresh Updates the page with the latest information Start Initiate the channel plan algorithm Table 340 Manual Channel Plan Field Description Current Status Shows the status of the plan which is one of the following states None The channel plan algorithm has not been manually run since the last switch reboot Algorithm In Progress The channel plan algorithm is running Algorithm Complete The channel...

Page 582: ...rent status of the plan which is one of the following states None The power adjustment algorithm has not been manually run since the last switch reboot Algorithm In Progress The power adjustment algorithm is running Algorithm Complete The power adjustment algorithm has finished running A table displays to indicate proposed power adjustments Each entry shows the AP along with the current and new po...

Page 583: ...er wireless switches To upgrade one or more AP from the switch that manages it click the WLAN Administration AP Management Software Downloads tab Figure 373 Software Download After you provide the information about the upgrade file as described in the following table click Start to begin the upgrade process Additional fields appear after the download begins and provide information about upgrade st...

Page 584: ... img_dwl6700 and img_dwl8710 img_dwl8600 img_dwl3600 6600 img_dwl2600 img_dwl8610 img_dwl6610 img_dwl6700 img_dwl8710 Note To download all images make sure you specify the file path and file name for both images in the appropriate File Path and File Name fields Managed AP The list shows all the APs that the switch manages If the switch is the Cluster Controller then the list shows the APs managed ...

Page 585: ...s AP but the AP is not in the current download group so it hasn t been told to start the download yet Code Transfer In Progress The AP has been told to download the code Failure The AP reported a failing code download Aborted The download was aborted before the AP loaded code from the TFTP server Waiting For APs To Download A download finished on this AP and it is waiting for other APs to finish d...

Page 586: ...atabase Table 343 describes the Advanced features you can configure for the AP Table 343 Advanced AP Management Field Description MAC Address Shows the MAC address of the AP Location Shows the AP location which is based on the value configured in the RADIUS or local Valid AP database Debug To help you troubleshoot you can enable Telnet access to the AP so that you can debug the device from the CLI...

Page 587: ... you can set a new power level for the AP The manual power change overrides the power setting configured in the AP profile and is not retained when the AP reboots or when the AP profile is reapplied Table 345 on page 589 describes the fields on the new page Table 344 Managed AP Debug Field Description MAC Address Shows the MAC address of the access point Location Shows the location of the access p...

Page 588: ... password is encrypted you must retype the password to confirm the password Enable Debug Select or clear the Enable check box to enable or disable debugging Once once you Telnet to the AP you get an AP interface login prompt The user name is admin Enter the password you set in the previous field The default password is admin if you did not specify a new password From the AP CLI you can also access...

Page 589: ...els depends on the country in which the APs operate Note For radios that use 5 GHz modes some countries have a regulatory domain that requires radar detection For these countries based on the country code setting the radio automatically uses the 802 11h protocol for selecting the channel if radar is detected on the statically assigned channel Interference can occur when multiple access points with...

Page 590: ...e cluster AP Provisioning Summary Status Use the AP Provisioning Summary Status page to view information about all provisioned APs Figure 377 AP Provisioning Summary Status The following table shows the fields available on the AP Provisioning Summary Status page Note The AP Provisioning Summary and Detail pages display data only when the switch is configured as the Cluster Controller Table 346 AP ...

Page 591: ...the AP Select the MAC address of the AP from the drop down menu to view provisioning information about that AP Status Status of the most recently issued AP provisioning command which has one of the following values Not Started Provisioning has not been done for this AP Success Provisioning finished successfully for this switch The AP Provisioning Status table should reflect the latest provisioning...

Page 592: ...e The configured re provisioning mode in the AP which is one of the following Enable The AP can be reprovisioned when it is not managed Disable The AP cannot be reprovisioned when it is not managed AP Provisioning Status Status of the most recently issued AP provisioning command which is one of the following Not Started Provisioning has not been done for this AP Success Provisioning finished succe...

Page 593: ...ile and X 509 Certificate distribution to the Primary and Backup switches This status is changed as a result of the AP provisioning command The X 509 certificate is sent to the primary and backup switches only if mutual authentication is enabled The status is one of the following Not Started No information for this AP has been sent to the primary and backup switch Success AP Profile and X 509 Cert...

Page 594: ...ttings Known Client Wireless Network List AP Profiles Peer Switch WIDS Security Known Client Switch Provisioning This section also describes the Unified Wired and Wireless Access System support for the AeroScout engine in Enabling AeroScout Engine Support on page 641 Advanced Global Settings The fields on the advanced Wireless Global Configuration page are settings that apply to the DWS 4000 Serie...

Page 595: ...ows an age and when the age reaches the value you configure in the timeout field the entry is deleted MAC Authentication Mode Select the global action to take on wireless clients in the white list Select this option to specify that any wireless clients with MAC addresses that are specified in the Known Client database and are not explicitly denied access are granted access If the MAC address is no...

Page 596: ...in place but any ACLs or DiffServ policies applied to wireless traffic are not enforced The Client QoS feature extends the primary QoS capabilities of the DWS 4000 Series switch to the wireless domain More specifically access control lists ACLs and differentiated service DiffServ policies are applied to wireless clients associated to the AP TSPEC Violation Report Interval A TSPEC is a traffic spec...

Page 597: ...ou can configure the SNMP agent on the switch to send traps to the SNMP manager on your network from the Administration Advanced Configuration Global SNMP Traps tab Figure 380 SNMP Trap Configuration When an AP is managed by a switch it does not send out any traps The switch generates all SNMP traps based on its own events and the events it learns about through updates from the APs it manages All ...

Page 598: ...SNMP agent sends a trap for one of the following reasons associated with a peer switch Peer Switch Discovered Peer Switch Failed Peer Switch Unknown Protocol Discovered Configuration command received from peer switch The switch need not be Cluster Controller for generating this trap RF Scan Traps If you enable this field the SNMP agent sends a trap when the RF scan detects a new AP wireless client...

Page 599: ... Traps If you enable this field the SNMP agent sends a trap if the operational status of the DWS 4000 Series switch it need not be Cluster Controller for this trap changes It sends a trap if the Channel Algorithm is complete or the Power Algorithm is complete It also sends a trap if any of the following databases or lists has reached the maximum number of entries Managed AP database AP Neighbor Li...

Page 600: ...d the new AP becomes the Home AP for the client Figure 381 Distributed Tunneling Configuration Table 350 shows the fields on the Distributed Tunneling Configuration page Command Buttons The page includes the following buttons Submit Updates the switch with the values you enter To retain the new values across a power cycle you must perform a save Tool Save Changes Refresh Updates the page with the ...

Page 601: ...ion page to configure settings for the Device Location feature Figure 382 Device Location Configuration The following table shows the fields on the Device Location Configuration page Command Buttons The page includes the following buttons Submit Updates the switch with the values you enter To retain the new values across a power cycle you must perform a save Tool Save Changes Refresh Updates the p...

Page 602: ...ou cannot delete networks 1 16 Table 352 Wireless Network List Field Description ID Shows an automatically generated unique identifier for the network IDs up to 16 are assigned to the 16 networks created by default The switch supports up to 64 networks SSID Identifies the name of the network The SSID is a hyperlink to the Wireless Network Configuration page for the network VLAN Shows the VLAN ID t...

Page 603: ...Network Discovery VLAN ID Radio settings SSID settings QoS configuration Figure 383 shows ten APs that are managed by a DWS 4000 Series switch in a campus network Each building has multiple APs and the users in one building have different network requirements than the users in other buildings The administrator of this WLAN has created two AP profiles on the switch in addition to the default profil...

Page 604: ...onfiguration AP Profile Access Point Profile Summary page you can create copy or delete AP profiles You can create up to 16 AP profiles on the DWS 4000 Series switch To create a new profile enter the name of the profile in the Profile Name field and then click Add Figure 384 Adding a Profile After you add the profile the Global Configuration page for the profile appears and a new tab with the name...

Page 605: ...e profile is configured and one or more APs managed by the switch are associated with this profile Associated Modified The profile has been modified since it was applied to one or more associated APs the profile must be re applied for the changes to take effect Apply Requested After you select a profile and click Apply the screen refreshes and shows that an apply has been requested Apply In Progre...

Page 606: ...lobal Radio Network or QoS settings for the profile you select and update the appropriate fields For more information about the fields on the Global page see Profile on page 548 For more information about the fields on the Radio page see Radio Configuration on page 549 For more information about the fields on the Network page see Wireless Default VAP Configuration on page 555 For more information ...

Page 607: ... you select a profile and click Apply the screen refreshes and shows that an apply has been requested Apply In Progress The profile is being applied to all APs that use this profile During this process the APs reset and all wireless clients are disassociated from the AP Configured The profile is configured but no APs managed by the switch currently use this profile Note When you apply new AP Profi...

Page 608: ...dd a new profile this page automatically appears and is populated with the default AP settings Table 354 Access Point Profile Global Configuration Field Description Profile Name The Access Point profile name you added Use 0 to 32 characters Only alphanumeric characters are allowed No special characters are allowed Hardware Type ID Select the hardware type for the APs that use this profile The hard...

Page 609: ...ates in the 5 GHz frequency of the radio spectrum The Access Point Profile Radio Configuration page contains several fields that are not available on the Basic Setup Radio page for the default AP Profile DDP Support DDP D Link Discover Protocol supports basic command IP factory reset F W upgrade etc to setting UAP and user can use DNA D Link Network Assistance to control UAP The factory default is...

Page 610: ...Configuring Advanced Settings D Link Unified Wired and Wireless Access System Oct 2015 Page 610 D Link UWS User Manual Figure 388 AP Profile Radio Settings ...

Page 611: ... accordingly Changes to the settings apply only to the selected radio The DWL 3600AP is a single radio AP Any settings you configure for Radio 1 802 11a are not applied to the DWL 3600AP If the selected Hardware Type ID for the AP profile is DWL 3600AP the radio selectors are not available State Specify whether you want the radio on or off by clicking On or Off If you turn off a radio the AP sends...

Page 612: ...ireless networking standard in the 802 11 family developed in the IEEE Standards Association process providing high throughput wireless local area networks WLANs on the 5 GHz band This is accomplished by extending the air interface concepts embraced by 802 11n wider RF bandwidth up to 160 MHz more MIMO spatial streams up to eight down link multi user MIMO up to four clients and high density modula...

Page 613: ...this information to the DWS 4000 Series switch If you select the Scan Other Channels option the radio periodically moves away from the operational channel to scan other channels Enabling this mode causes the radio to interrupt user traffic which may be noticeable with voice connections When the Scan Other Channels option is cleared the AP scans only the operating channel RF Scan Sentry Select this...

Page 614: ...0 MHz channel available with other modes The 40 MHz channel enables higher data rates but leaves fewer channels available for use by other 2 4 GHz and 5 GHz devices The 40 MHz option is enabled by default for 802 11a n modes and 20 MHz for 802 11b g n modes You can use this setting to restrict the use of the channel bandwidth to a 20 MHz channel Protection The protection feature contains rules to ...

Page 615: ...he auto channel selection algorithm to allow the DWS 4000 Series switch to adjust the channel on APs as WLAN conditions change By default the global auto channel mode is set to manual To enable the automatic channel selection mode go to the AP Management RF Management page and select Fixed or Interval for the Channel Plan mode You can also run the automatic channel selection algorithm manually fro...

Page 616: ...mission Receive Lifetime Shows the number of milliseconds to wait before terminating attempts to reassemble the MMPDU or MSDU after the initial reception of a fragmented MMPDU or MSDU Station Isolation When this option is selected the AP blocks communication between wireless clients It still allows data traffic between its wireless clients and wired devices on the network but not among wireless cl...

Page 617: ... numbers indicate rates that the access point supports You can select multiple rates The AP automatically chooses the most efficient rate based on factors like error rates and distance of client stations from the AP Forced Roaming Forced Roaming aims to improve users network experience by forcing a client to disassociate with the already associated UAP where the radio signal strength among the cli...

Page 618: ...eless Access System Oct 2015 Page 618 D Link UWS User Manual Clear Resets the settings on the page to the default values Submit Updates the switch with the values you enter To retain the new values across a power cycle you must perform a save Tool Save Changes ...

Page 619: ...scribes the fields on the Access Point Profile VAP Configuration page Table 356 Default VAP Configuration Field Description 1 802 11a n 2 802 11b g n From this field you can select the radio with the settings to configure Settings for each radio are configured separately By default Radio 1 operates in IEEE 802 11a n mode and Radio 2 operates in IEEE 802 11b g n mode If you change the mode the labe...

Page 620: ...ES WPA cypher to be enabled If the AP profile includes the 802 11n radio mode you cannot select a configured network from the Network menu if the network uses static or dynamic WEP as the security method or if the CCMP AES WPA cypher is not enabled To configure additional networks click Advanced Configuration Networks Edit Click Edit to modify settings for the corresponding network When you click ...

Page 621: ...ce you want to configure QoS is configured per radio interface Figure 390 QoS Configuration Configuring Quality of Service QoS on the D Link Unified Switch consists of setting parameters on existing queues for different types of wireless traffic and effectively specifying minimum and maximum wait times through Contention Windows for transmission The settings described here apply to data transmissi...

Page 622: ...d streaming media are automatically sent to this queue Data 1 Video High priority queue minimum delay Time sensitive video data is automatically sent to this queue Data 2 best effort Medium priority queue medium throughput and delay Most traditional IP data is sent to this queue Data 3 Background Lowest priority queue high throughput Bulk data that requires maximum throughput and is not time sensi...

Page 623: ...With WMM enabled QoS settings on the D Link Unified Switch control downstream traffic flowing from the access point to client station AP EDCA parameters and the upstream traffic flowing from the station to the access point station EDCA parameters Disabling WMM deactivates QoS control of station EDCA parameters on upstream traffic flowing from the station to the access point With WMM disabled you c...

Page 624: ... window for data transmission during a period of contention for The value specified in the Minimum Contention Window is the upper limit in milliseconds of a range from which the initial random backoff wait time is determined The first random number generated will be a number between 0 and the number specified here If the first random backoff wait time expires before the data frame is sent a retry ...

Page 625: ... the TSPEC settings for Radio 1 and Radio 2 separately Use the radio button to select the desired radio TSPEC Mode Enable or disable TSPEC operation on this radio Voice ACM Mode Regulates mandatory admission control ACM for the voice access category The options are Enabled A station is required to send a TSPEC request for bandwidth to the AP before sending or receiving a voice traffic stream The A...

Page 626: ...r the video access category TSPEC requests that would cause this limit to be exceeded are rejected Roam Reserve Limit Defines the portion of bandwidth in the Voice ACM Limit and Video ACM Limit parameters to hold in reserve for roaming clients only If this value exceeds the Voice ACM limit or Video ACM limit respectively then that entire ACM limit is used exclusively for roaming clients Setting th...

Page 627: ...s the fields on the Peer Switch Configuration Request Status page Table 359 Peer Switch Configuration Request Status Field Description Configuration Request Status Indicates the global status for a configuration push operation to one or more peer switches The status can be one of the following Not Started Receiving Configuration Saving Configuration Success Failure Invalid Code Version Failure Inv...

Page 628: ...request on one switch in order to copy any configuration to its peers The following table shows the fields on the detail page for Peer Switch Configuration Enable Disable page Table 360 Peer Switch Configuration Enable Disable Field Description Global Enable this field to include the basic and advanced global settings in the configuration that the switch pushes to its peers The configuration does ...

Page 629: ...ers To view the contents of the local AP Database click the WLAN Administration Advanced Configuration Clients Known Client page Captive Portal Enable this field to include the Captive Portal information in the configuration that the switch pushes to its peers To view the Captive Portal settings on the local switch click the pages available in the Security Captive Portal folder Note You can access...

Page 630: ...Table 361 Mutual Authentication Field Description Switch Provisioning Mode When this field is enabled switches can send and receive provisioning messages As a security feature you can disable switch provisioning When switch provisioning mode is disabled the switch does not accept provisioning messages Network Mutual Authentication Mode Select Enable to require mutual authentication on the wireless...

Page 631: ...ed on identifying APs that are advertising managed SSIDs but are not in fact managed APs Detecting such an AP means that a network is either miss configured or that a hacker set up a honeypot AP in the attempt to collect passwords or other secure information Although operational mode radios can detect most threats the sentry radios detect the threats faster especially when a potential rogue is ope...

Page 632: ...ames The AP would still send probe responses to clients that send probe requests for the managed SSID fooling the clients into associating with the hacker s AP This test detects and flags APs that transmit beacons without the SSID field The test is automatically disabled if any of the radios in the profiles are configured not to send SSID field which is not recommended because it does not provide ...

Page 633: ... test checks whether the AP is detected on the wired network If the AP state is Unknown then the test changes the AP state to Rogue The flag indicating whether AP is detected on the wired network is reported as part of the RF Scan report If AP is managed and is detected on the network then the switch simply reports this fact and doesn t change the AP state to Rogue In order for the wireless system...

Page 634: ...WIDS feature tracks the following types of management messages that each detected client sends Probe Requests 802 11 Authentication Requests 802 11 De Authentication Requests In order to help determine whether a client is posing a threat to the network by flooding the network with management traffic the system keeps track of the number of times the AP received each message type and the highest mes...

Page 635: ...est This test checks whether a client in the Known Client database is authenticated with an unknown AP Client Threat Mitigation Select enable to send de authentication messages to clients that are in the Known Clients database but are associated with unknown APs The Authentication with Unknown AP Test must also be enabled in order for the mitigation to take place Select disable to allow clients in...

Page 636: ...e contains wireless client MAC addresses and names The database is used to retrieve client descriptive names from the RADIUS server as well as implement MAC Authentication Figure 397 Known Client Summary Probe Requests Threshold Interval Specify the number of seconds an AP should spend counting the probe messages sent by wireless clients Probe Requests Threshold Value Specify the number of probe r...

Page 637: ...own Client database Delete Removes the selected client from the Known Client database Delete All Removes all clients in the list from the Known Client database Refresh Updates the page with the latest information Table 364 Known Client Summary Field Description MAC Address Shows the MAC address of the known client Name Shows the descriptive name configured for the client when it was added to the K...

Page 638: ...s the switch with the values you enter To retain the new values across a power cycle you must perform a save Tool Save Changes Table 365 Known Client Configuration Field Description MAC Address Shows the MAC address of the client To view or configure the name or authentication action for another client in the Known Client database select its MAC address from the menu Name Enter a descriptive name ...

Page 639: ... following table shows the fields available on the Switch Certificate Request page Command Buttons The page includes the following buttons Start Initiates the X 509 certificate request Refresh Updates the page with the latest information Table 366 Switch Certificate Request Field Description Switch IP Address Enter the IP address of the wireless switch from which this switch requests an X 509 cert...

Page 640: ... latest information Table 367 Switch Provisioning Field Description Switch IP Address Enter the IP address of the switch in a cluster to which a new switch establishes a connection to obtain provisioning information The provisioning information enables the new switch to join the cluster Switch Provisioning Status Shows the status of the provisioning which is one of the following Not Started Succes...

Page 641: ...he Wireless Distribution System WDS Managed AP feature allows you to add managed APs to the cluster using over the air WDS links through other managed APs This capability is critical in providing a seamless experience for roaming clients and for managing multiple wireless networks It can also simplify the network infrastructure by reducing the amount of cabling required With WDS APs may be located...

Page 642: ... and Satellite AP1 and one link is between the Root AP and Satellite AP2 The Ethernet port on Satellite AP2 is enabled to allow wired LAN access to remote office PCs By default an AP is configured as a root AP For an AP to be attached to the Wireless System as a satellite AP configure the following settings on the AP while it is in stand alone mode Satellite AP mode This setting enables the satell...

Page 643: ...annel Use one of the following methods to control the channel When you configure the satellite AP in stand alone mode use the Radio page to set a static channel When you configure the AP in the Valid AP database specify the channel that the radio must use By default the channel is set to Auto On the Radio page for the AP profile select only one channel in the list of Auto Eligible channels By defa...

Page 644: ... includes the following buttons Add Adds the group with the name entered into the field Delete Deletes the selected group Refresh Updates the page with the latest information Push Config Push the WDS Managed AP group information to all switches that are members of the cluster Note To ensure that the network is operating as intended always push the configuration after making all desired changes to ...

Page 645: ... Group Name A descriptive name of the WDS AP group From this field you can modify the name of an existing group if desired Spanning Tree Specifies whether to enable spanning tree on all APs in this WDS AP group Spanning tree must be enabled if there are any potential loops in the network For example if a satellite AP has links to two root APs then spanning tree must be enabled Note The spanning tr...

Page 646: ...eletes the selected AP Refresh Updates the page with the latest information Note After you change WDS Managed AP group settings make sure you push the configuration to other switches in the cluster Table 370 WDS Managed AP Summary Field Description WDS Group ID Select the ID associated with the group to configure AP MAC Address MAC Address of the AP AP Hardware Type The hardware type for the AP Pr...

Page 647: ... MAC Address field The AP does not need to be in the Valid AP database to add it to the WDS group Hardware Type Select the hardware type for the AP The hardware type is determined in part by the number of radios the AP supports single or dual and the IEEE 802 11 modes that the radio supports a b g or a b g n WDS AP MAC Address MAC Address of the AP to add to the WDS managed group If the AP is not ...

Page 648: ...roup to configure Source AP MAC Address MAC Address of the source AP The AP must be included in the selected WDS group Note The WDS links are bidirectional The terms Source and Destination simply reflect the WDS link endpoints specified when the WDS link is created Source Radio The radio number of the WDS link endpoint on the source AP Source AP Hardware Type The hardware type identifier associate...

Page 649: ...this page you can create WDS links between APs in the WDS group Figure 407 WDS Link Create The following table shows the fields available on the WDS Link Create page Note If no links have been configured for the selected WDS group only the Add and Refresh buttons display Note After you change WDS Managed AP group settings make sure you push the configuration to other switches in the cluster Table ...

Page 650: ...an up to date view of the wireless network and pushes any configuration changes to the switch You can use the WLAN Visualization tool to trigger the location search and to display the computed probability map Managed AP Location The pages available from the Managed AP Location link allow you to define the buildings and floors that make up the wireless network You can also manually enter coordinate...

Page 651: ...igured in the database Refresh Updates the page with the latest information Table 374 Building Field Description Building Number Unique number from 1 8 that identifies a building within the wireless system Building Description A description for the building such as an address or function The name can be up to 64 characters The default name is Building n where n is the building number Total Floor C...

Page 652: ...etes the selected floor from the building Delete All Deletes all configured floors from the building Refresh Updates the page with the latest information Table 375 Building Floor Field Description Building Number Select the number of the building with the floors to define Floor Number Unique number from 1 20 that identifies the floor within the selected building Floor Description A description use...

Page 653: ...the page with the latest information Table 376 Managed AP Coordinates Field Description Building Number Select the number that identifies the building where the AP is located Floor Number Select the number that identifies the floor where the AP is located AP MAC Address Identifies the MAC address of the AP Measurement Units Specify whether the coordinate units are meters or feet X Coordinate Speci...

Page 654: ... Summary The following table shows the fields available on the Managed AP Location Summary page Command Buttons The page includes the following button Refresh Updates the page with the latest information Table 377 Managed AP Location Summary Field Description Building Floor Number Identifies the building and floor where the AP is located AP MAC Address Identifies the MAC address of the AP X Coordi...

Page 655: ...ng to be searched for devices Select All to search all floors within the selected building Type of Device Specify whether to search for APs or wireless clients Device MAC If the checkbox is clear specify the MAC address of the device to locate in the Target Device MAC Address field If the checkbox is selected you can choose the target device MAC address from a list of MAC addresses of devices that...

Page 656: ...nitiates the On Demand Location process Refresh Updates the page with the latest information On Demand Location Trigger Status Use the page available from the On Demand Location Trigger Status link to view the results of the On Demand Location process On Demand Location Trigger Global Status Use the On Demand Location Trigger Global Status page to view the results of the most recent On Demand Loca...

Page 657: ...Location Procedure Status Identifies the current status of the On Demand Location procedure Not Started In Progress Device Located Device is not located No APs Available for Locating Device Time Since Device Location Triggered Amount of time in days hours minutes and seconds that has passed since the search was initiated If the on demand device location was never triggered the time stamp is 0d 00 ...

Page 658: ...or of the building that was searched for the device Device Found Indicates whether the device was found on the selected floor Number of Detecting APs Number of managed APs that detected the device Solution Type Indicates whether the probability map is a circle around the managed AP Circle or the solution is an X Y coordinate Point Solution X Coordinate Identifies the X axis offset of the managed A...

Page 659: ...oller periodically iterates through the triangulation tables for all APs in the RF Scan table and computes the location for each device The pages available from the AP Triangulation Location link provide device location information derived from the AP triangulation tables AP Triangulation Summary Use the AP Triangulation Summary page to view a summary of device location information that the Cluste...

Page 660: ...ts MAC address from the available menu Figure 416 Detailed AP Triangulation Status Table 381 AP Triangulation Summary Field Description Device MAC Address MAC address of the AP Device Type Indicates whether the device is a Managed AP or a Detected AP If the type of device changes the change might not be reflected until the device location is next computed Building Floor Number Number that identifi...

Page 661: ...ocation is next computed Location Computation Status The status of the last iteration of the location computation algorithm Not Executed Success Failure Last Successful Computation Amount of time in days hours minutes and seconds that has passed since the triangulation information was last computed successfully Building Number Number that identifies the building where the device is detected A valu...

Page 662: ...r all clients in the Detected Clients table and computes the location for each device Use the pages available from the Client Triangulation Location link to view device location information derived from the Client triangulation table Client Triangulation Summary Use the Client Triangulation Summary page to view a summary of device location information that the Cluster Control computes based on the...

Page 663: ...ess from the available menu Figure 418 Detailed Client Triangulation Status Table 383 Client Triangulation Summary Field Description Device MAC Address MAC address of the wireless client Device Type Indicates whether the device is an Associated Client or a Detected Client If the type of device changes the change might not be reflected until the device location is next computed Building Floor Numbe...

Page 664: ...l the device location is next computed Location Computation Status The status of the last iteration of the location computation algorithm Not Executed Success Failure Last Successful Computation Amount of time in days hours minutes and seconds that has passed since the triangulation information was last computed successfully Building Number Number that identifies the building where the device is d...

Page 665: ...order to achieve security and reduce power consumption You can also use the AP Scheduler to allow access to VAPs for wireless clients only during specific times of day AP Scheduler Configuration To access the AP scheduler configuration page click WLAN Scheduler in the navigation menu Figure 419 AP Scheduler Configuration Table 385 AP Scheduler Configuration Field Description AP Scheduler Configura...

Page 666: ...cable Days Specify the day s when the time entry occurs Daily Has the same start and end time every day Weekdays Has the same start and end time Monday through Friday Weekdays Has the same start and end time on Saturday and Sunday Days of the Week Select the day of the week when the entry starts and stops You do not need to use the same day of the week for the start and end time Start Day Periodic...

Page 667: ... This section contains the following subsections to help you manage the WLAN Visualization component of the D Link Unified Switch WLAN Visualization Overview Importing and Configuring a Background Image Setting Up the Graph Checking the Location of an AP or Client Understanding the Menu Options and Icons Viewing Component Information WLAN Visualization Overview Figure 420 shows an example of a flo...

Page 668: ...vered devices Importing and Configuring a Background Image By default the WLAN Visualization graph does not have a background image You can upload one or more images such as your office floor plan to provide a site context and site related information You can upload up to 16 images with a total size limit of 1 MB Images that you upload should be in one of the following two file formats GIF Graphic...

Page 669: ...of each building within the wireless system Graphs can be created and edited only when Live Visualization is disabled To disable Live Visualization click the Live Visualization control button so that it flashes red Figure 421 Live Visualization Control To create a new graph and load the background image launch the WLAN Visualization tool and use the following steps 1 Ensure that Live Visualization...

Page 670: ... determines the scale of the background image in relation to the network components The scale of the background image affects the way the WLAN Visualization tool presents the radio frequency RF coverage of the access points so it is important to be as accurate as possible when you specify the length 6 Click Save The WLAN Visualization window refreshes and displays the background image and a yellow...

Page 671: ...raph right click the component and select Edit Un Graph The component returns to the appropriate window in the ungraphed components area Checking the Location of an AP or Client To trigger the On Demand Location search for a specific device that is located on the graph right click the device and select the Command Check Location option To find the location of an ungraphed device right click the MA...

Page 672: ...If you clear the Use Operational Radios option or if additional APs become managed before the search starts you can recalculate the number of search APs by clicking Count Search APs Click Start Search to initiate the device search A pop up window displays and asks you to confirm the search Click Yes to begin the search After you start the search the Device Location feature might take several minut...

Page 673: ...XY coordinates The Solution menu provides a textual summary of the device location results The Commands menu provides access to the following actions To remove the point solution map from the graph select Clear this device location icon To move the located device from the ungraphed component list or another point on the graph to its detected probable location select Graph device to this location T...

Page 674: ...ing the Menu Options and Icons The following table provides an overview of the menu items available in the WLAN Visualization tool Table 386 WLAN Visualization Menu Bar Options Menu Item Description File Force Refresh Resynchronizes the Java client application If you edit the graph you can force a refresh to manually update the view Reconnect and Refresh Disconnects the client application from the...

Page 675: ...same channel or channels that are close together and are within each other s transmission range the APs will interfere with each other and wireless clients will experience poor WLAN performance To reduce interference you can take one of the following steps Reduce the transmit power on the APs Physically place the APs further apart Use the automatic channel adjustment algorithm on the APs or static...

Page 676: ... Target Client Select this option to allow the wireless system to search for a client and update its location based on the received search information When you select this option a window opens that allows you to select the MAC address of the client to search for and to specify the location search parameters Legend Images Shows the icons associated with each WLAN component on the graph Channel Col...

Page 677: ...Figure 430 Legend As the legend shows the Managed AP icon can be blue green or red depending on the status of the AP Blue The AP has been discovered and by the switch but it is in a transitional state The AP could be waiting to be authenticated or it has been validated and authenticated but not configured Green The AP profile configuration has been applied to the AP and it is operating in managed ...

Page 678: ...The Channel Color legend maps the color of the power display image to the channel that the image color represents The color corresponds to the channel that the radio is using for transmission The available channels depend on the mode and country of operation Viewing Component Information After you place a component on the graph you can right click the component to learn more information about it u...

Page 679: ...tocol Configuring a Virtual Access Point Configuring Differentiated Services for VoIP Configuring a Network with WDS Managed APs Configuring a Network to Use WPA2 Enterprise and Dynamic VLANs Optimizing WLAN Traffic Detecting and Preventing Wireless Intrusion Configuring VLANs The diagram in this section shows a switch with four ports configured to handle the traffic for two VLANs Port 0 2 handles...

Page 680: ... option and enter 2 to 3 in the range fields 4 Click Submit 5 Select VLAN 2 from the VLAN ID and Name List 6 Select the Participate option in the VLAN field 7 For ports 0 1 and 0 2 select Include from the Participation menu to specify that these ports are members of VLAN 2 8 From the Tagging menu select Tagged in the first row All to specify that frames will always be transmitted Port 0 1 VLAN 2 P...

Page 681: ...ecify that these ports are members of VLAN 3 13 Click Submit 14 Go to the LAN L2 Features VLAN Port Configuration page 15 From the Slot Port menu select 0 1 16 In the Acceptable Frame Types field select VLAN Only to specify that untagged frames will be rejected on receipt 17 Click Submit 18 From the Slot Port menu select 0 2 19 In the Port VLAN ID field enter 3 to assign VLAN 3 as the default VLAN...

Page 682: ...ID Individual option and enter 10 d Click Submit e Repeat the steps to add VLAN 20 2 Enable M on the switch and change the configuration name 3 Changing the configuration name allows all the bridges that want to be part of the same region to join a Go to the LAN L2 Features Spanning Tree Switch Configuration Status page b From the Mode menu select Enable c In the Configuration Name field enter dli...

Page 683: ...10 from the MST menu b Enter 16384 in the Bridge Priority field c Click VLAN 10 to select it from the VLAN ID field d Click Submit 6 Use similar procedures to associate MST instance 20 to VLAN 20 and assign it a bridge priority value of 61440 By using a lower priority for MST 20 MST 10 becomes the root bridge 7 Enable on port 0 1 a Go to the LAN Administration Port Configuration Port Configuration...

Page 684: ...anual 8 Use similar procedures to enable on port 0 2 9 Force port 0 2 to be the root port for MST 20 which is the non root bridge a Go to the LAN L2 Features Spanning Tree MST Port Configuration Status page b From the MST ID menu select 20 c From the Slot Port menu select 0 2 d In the Port Priority field enter 64 e Click Submit ...

Page 685: ...and Wireless Access System software to provide the VLAN routing support shown in the diagram Figure 434 VLAN Routing Example Network Diagram Use the following screens to perform the same configuration using the Web Interface 1 From the LAN L2 Features VLAN VLAN Configuration page perform the following configuration Create VLANs 10 and 20 Include interfaces 0 1 and 0 2 as members of VLAN 10 and set...

Page 686: ...rt ID assigned to the VLAN routing interface which is 4 1 for VLAN 10 in this example 6 Enter 20 in the VLAN ID field and then click Create Note that the VLAN is assigned an interface ID of 4 2 7 To enable routing on the switch go to the LAN L3 Features IP Configuration page select Enable from the Routing Mode menu and click Submit ...

Page 687: ...IP addresses and subnet masks for the virtual router ports a From the Interface menu select 4 1 b From the IP Address Configuration Method menu select Manual c Enter 192 150 3 1 in the IP Address field d Enter 255 255 255 0 in the Subnet Mask field e Click Submit 9 Select interface 4 2 from the Interface menu and configure it with an IP address of 192 150 4 1 and subnet mask of 255 255 255 0 ...

Page 688: ...work resources are located Figure 435 Switch with 802 1X Network Access Control If a user or supplicant attempts to communicate via the switch on any interface except interface 0 1 the system challenges the supplicant for login credentials The system encrypts the provided information and transmits it to the RADIUS server If the RADIUS server grants access the system sets the 802 1X port state of t...

Page 689: ... secret and select the Apply option f Click Submit 9 To enable the RADIUS accounting mode go to the LAN Security RADIUS RADIUS Configuration page select Enable from the Accounting Mode menu and then click Submit 10 Create an authentication list a Go to the LAN Administration Authentication List Configuration page b Enter radiusList in the Authentication List Name field c Click Submit d Select RADI...

Page 690: ... uses a DiffServ policy to expedite the voice traffic The policy must already be configured in order to associate it with the Voice network You configure the policy by using the pages available from the LAN QoS Differentiated Services folder For information about configuring DiffServ policies see Configuring Differentiated Services for VoIP on page 694 1 Access the WLAN Administration Basic Setup ...

Page 691: ... apply the settings to the switch 3 Click the SSID tab to return to the Wireless Default VAP Configuration page 4 Select the check box next to network 2 and then click Edit 5 Configure the second VAP a Delete the existing SSID and enter Corporate in the SSID field b In the VLAN field enter 20 c From the Security option select WPA Additional security fields appear d Clear the WPA option so that onl...

Page 692: ...ributed Tunneling Mode field select Enable to allow the clients to roam among APs in different subnets without losing their network connection h From the DiffServ Policy UP field select the policy to apply to traffic transmitted from wireless clients to the AP i Click Submit Note Because this VAP uses WPA Enterprise wireless clients must authenticate by using an external RADIUS server Make sure th...

Page 693: ...Configuring a Virtual Access Point D Link Unified Wired and Wireless Access System July 2012 Page 693 D Link UWS User Manual ...

Page 694: ... for UDP traffic have that traffic marked on the inbound side and then expedite the traffic on the outbound side The configuration script is for Router 1 in the accompanying diagram a similar script should be applied to Router 2 Figure 436 DiffServ VoIP Example Network Diagram 1 To set queue 5 on all ports to use strict priority mode go to the LAN QoS Class of Service CoS Interface Queue Configura...

Page 695: ... then click Submit 5 Select IPv4 as the Class Layer 3 Protocol and then click Submit 6 Select Protocol from the Class Match Selector menu and then click Add Match Criteria 7 Select UDP from the Protocol Keyword menu and then click Submit 8 Create a second DiffServ classifier named class_ef and define a single match criterion to detect a DiffServ code point DSCP of ef expedited forwarding This hand...

Page 696: ... Select pol_viop from the Policy Selector menu class_ef from the Member Class List menu and Assign Queue from the Policy Attribute Selector and then click Configure Selected Attribute b In the Queue ID Value field enter 5 and then click Submit c Select pol_viop from the Policy Selector menu class_voip from the Member Class List menu and Assign Queue from the Policy Attribute Selector and then clic...

Page 697: ...describes how to configure the WDS Managed settings on the APs and switch involved in the network shown in Figure 437 Figure 437 WDS Managed APs in the Network The WDS group in Figure 437 has the following characteristics The WDS Managed AP group name is annex and it includes one root AP and two satellite APs The DWS 4000 switch manages the root AP and the two satellite APs The group has two WDS A...

Page 698: ...en you configure the WDS Managed AP settings on the switch you must provide the MAC address of the AP c Access the Manage Managed Access Point page d For the WDS Managed Mode option select Satellite AP e For the WDS Managed Ethernet Port option select Enabled This enables the LAN port on the AP to allow wired access to the network f In the WDS Group Password field enter the password for the group ...

Page 699: ...hile it is in stand alone mode b Log on to Satellite AP2 The default username is admin and the default password is admin On the home page Basic Settings note the MAC address of the AP When you configure the WDS Managed AP settings on the switch you must provide the MAC address of the AP c Access the Manage Managed Access Point page d For the WDS Managed Mode option select Satellite AP e In the WDS...

Page 700: ...dministration Basic Setup Valid AP page enter the MAC address and optionally location of the Root AP in the appropriate fields and click Add The Valid Access Point Configuration page is displayed 5 In the Radio 1 field set the channel to 36 and click Submit Note You do not need to configure any settings on the Root AP By default the WDS Managed Mode for an AP is Root AP and the Root AP obtains the...

Page 701: ...July 2012 Page 701 D Link UWS User Manual 6 Repeat Step 4 and Step 5 to add Satellite AP1 and Satellite AP2 to the Valid AP database 7 From the WLAN Administration WDS Configuration Group Configuration page enter the group name and click Add The WDS Managed AP Group Configuration page appears ...

Page 702: ...ppropriate group ID before you click Add 11 Select the MAC address of the Root AP from the Valid AP MAC Address menu to populate the WDS AP MAC Address field with the MAC address of the Root AP The Valid AP MAC Address menu contains the MAC addresses of all APs that have been added to the Valid AP Database on the WLAN Administration Basic Setup Valid AP page 12 Click Submit 13 Repeat Step 11 and S...

Page 703: ...ttings Source AP MAC Address 1C AF F7 1F 27 40 Root AP Source AP Radio 1 Destination AP MAC Address 5C D9 98 2F 52 40 Satellite AP1 Destination AP Radio 1 Link Cost You do not need to provide a value for this field because is disabled By default the link cost is 40 17 Click Submit 18 On the WDS Link Create page configure the link between the Root AP and Satellite AP2 with the following settings So...

Page 704: ...ify the link settings 21 Deploy the APs if they have not already been deployed After the Root AP is discovered and has become managed it will scan for the Satellite APs As they are discovered they will become managed 22 To verify that the WDS links and APs are operating as expected navigate to WLAN Monitoring WDS Managed APs Note It might take several minutes for the APs to establish WDS links and...

Page 705: ...Configuring a Network with WDS Managed APs D Link Unified Wired and Wireless Access System July 2012 Page 705 D Link UWS User Manual ...

Page 706: ...loyee who connects to this network must be authenticated by a network RADIUS server By default users on this network are assigned to VLAN 20 However when an Accounting Department user authenticates to the Corporate network the user is assigned to VLAN 30 The VLAN assignment in the RADIUS profile for an Accounting Department employee takes precedence over the default VLAN of the VAP Table 388 shows...

Page 707: ...ADIUS org with the users in Table 389 To configure the FreeRADIUS server 1 Edit the etc raddb users conf file which contains the user account information and add the new users The following code shows an example of the entry for the accountant and engineer users accountant User Password accountant Tunnel Type 13 Tunnel Medium Type 6 Tunnel Private Group ID 30 engineer User Password engineer 2 Edit...

Page 708: ... control none and enter the show network command to view the switch IP address 2 Configure the RADIUS server information a Go to the LAN Security RADIUS RADIUS Authentication page b Configure the RADIUS server host address for example 10 27 64 120 c Configure the RADIUS server name for example RADIUS d Click Submit Additional fields appear on the screen e To configure the password shared secret th...

Page 709: ...t 4 Configure the Wireless Network Information for the Visitor network a Go to the WLAN Administration Basic Setup SSID page b Select the radio to configure This example configures Radio 2 802 11b g n c For Network 1 dlink1 click Edit d Configure the following information in the appropriate fields SSID Visitor VLAN 10 Redirect HTTP Redirect URL http www dlink com tw ...

Page 710: ...ual e Click Submit 5 Configure the Wireless Network Information for the Corporate network a Click the SSID tab or click WLAN Administration Basic Setup SSID to return to the Wireless Default VAP Configuration page b Select the radio to configure This example configures Radio 2 802 11b g n c Select the option next to Network 2 dlink2 and click Edit ...

Page 711: ...cess System July 2012 Page 711 D Link UWS User Manual d Configure the following information in the appropriate fields SSID Corporate VLAN 20 Radius Authentication Server Name RADIUS Security WPA WPA2 WPA Enterprise Note The WPA Enterprise option is available only after you select the WPA WPA2 option ...

Page 712: ...he WLAN Administration Basic Setup Valid AP page b Specify the MAC address of the AP in the appropriate field c Optionally specify the location or a name that identifies the AP for example AP_1 d Click Add When the AP becomes managed the default profile is applied If you make changes to the default profile after the AP is managed you must reapply the profile to push the changes to the AP from the ...

Page 713: ...t Managed AP Status and verify that the AP_1 status is Managed and the Configuration status is Success 2 Verify that the engineer user can connect to the Corporate network and is assigned to VLAN 20 a Use a wireless client to access the wireless network with the Corporate SSID b When prompted for the username and password enter engineer for both fields c To verify the VLAN assigned to the engineer...

Page 714: ...assigned to VLAN 30 a Use a wireless client to access the wireless network with the Corporate SSID b When prompted for the username and password enter accountant for both fields c To verify the VLAN assigned to the engineer user go to the WLAN Monitoring Client Associated Clients page and select the MAC address of the client Note the VLAN of the accountant user is VLAN 30 which has been dynamicall...

Page 715: ...busy times when a large amount of data and media traffic is competing for bandwidth When APs are within broadcast range of each other the radios must use different channels to avoid causing RF interference For the 802 11b g radio neighboring APs must operate on channels that are at least five channels apart For example if AP1 and AP2 are neighbors AP1 can operate on channel 6 while AP2 operates on...

Page 716: ... can periodically evaluate the operating channel and can automatically change the channel if the current operating channel is noisy The cluster controller runs the ACA algorithm for the whole cluster Non cluster controller switches do not run the ACA algorithm The setting to enable or disable the ACA algorithm is on the WLAN Administration Basic Settings Radio page Figure 440 Automatic Channel Adj...

Page 717: ...y or Interval once every 6 24 hours Figure 441 shows a channel plan that is configured to run at 3 15 AM every day Figure 441 Fixed Channel Plan Running and Applying a Manual Channel Plan The following procedures describe how to run and apply the channel plan manually 1 Go to the WLAN Administration AP Management RF Management page and note the Channel Plan Mode setting The default mode is Manual ...

Page 718: ... algorithm determined that the best operating channel for Radio 1 on AP_3 is channel 149 and not its current operating channel 5 To apply the suggested channel plan click Apply Note If the ACA algorithm determines that the APs are currently operating on the best channel the Current Status field reports Algorithm Complete No Change Required Note D Link recommends that you apply the channel plan whe...

Page 719: ...ignal broadcasts beyond the physical confines of your building or network it increases the security threat to the network The Automatic Power Adjustment algorithm works by setting the minimum power of the AP to the value specified in the AP profile The power is then periodically adjusted to a level based on the presence or absence of packet transmission errors The power is changed in increments of...

Page 720: ...profile go to the WLAN Administration Basic Settings Radio page and set the Minimum Power field to a percentage lower than 100 for example 60 2 Click Submit 3 Optionally select Radio 2 and configure the Minimum Power setting and then click Submit 4 If the APs are already managed use the following steps to reapply the profile so the new settings take effect a Go to the WLAN Administration Advanced ...

Page 721: ...e setting The default mode is Manual If the mode is Interval you cannot run the APA algorithm manually 7 Click the Manual Power Adjustment tab 8 Click Start to allow the algorithm to run and determine whether any power adjustments are appropriate 9 To view the adjustments that the APA algorithm recommends click Refresh Note The APA recommends power adjustments based on the presence or absence of p...

Page 722: ...tected a high number of transmission errors on AP_2 and that the power level should be increased by 10 to increase the transmission area 10 To apply the recommendation and allow the AP to adjust its transmission power level click Apply 11 Verify that the power level has been adjusted by viewing the WLAN Monitoring Access Points Managed AP Status Radio Summary page ...

Page 723: ...neighboring AP if it is within range If an AP frequently reaches the network utilization limit it might indicate that you should add another AP nearby For each AP profile you can enable and configure load balancing on a per radio basis You can also monitor WLAN utilization for each AP and switch within the Unified Wired and Wireless Access System By monitoring the WLAN utilization information for ...

Page 724: ...he profile you modified c Click Apply A message appears and indicates that the AP radios will be reset which will disassociate any associated wireless clients Click OK to continue 6 To monitor the current WLAN utilization rate for a radio go to the WLAN Monitoring Access Point Managed AP Status Radio Detail page and select the AP listed by MAC address and its radio The WLAN Utilization field displ...

Page 725: ...urrent WLAN utilization rate for the FASTPATH Unified Wireless System go to the WLAN Monitoring Global page and view the WLAN Utilization field 8 If the FASTPATH Unified Wireless System includes multiple switches in a cluster click the Switch Status tab to view WLAN Utilization information for an individual switch within the cluster ...

Page 726: ... for violations of the WIDS tests Alternately separate APs can be configured as dedicated sentry APs When a radio operates in sentry mode the radio performs a continuous radio scan In sentry mode no beacons are sent and no clients are allowed to associate with the AP through the sentry radio If a dedicated sentry radio or AP is not configured the active radios still scan other channels but will do...

Page 727: ...AP Profiles page b Select the check box next to the profile you modified c Click Apply Configuring and Monitoring WIDS WIPS to Detect Rogue APs All passive WIDS detection algorithms for APs are enabled by default on the Unified Switch The tests are passive because they can detect and report rogue APs and clients but do not attempt to prevent these devices from interfering with the network It the r...

Page 728: ...DWS 4000 Series switch in this scenario a hacker has set up a Honeypot AP in the parking lot of the company s building This AP is configured with the SSID Corporate to try to get valid clients from inside the company to associate to it in an attempt to gather passwords and other confidential information that will allow the hacker to gain further access to the company s resources Figure 443 Honeypo...

Page 729: ...owever one client within the company has unknowingly associated with the honeypot AP that is physically located outside the walls of the company In this situation the WIDS system on the AP automatically tags the honeypot AP as a Rogue on the WLAN Monitoring Access Point All AP Status page Figure 444 All AP Status with Rogue Click the MAC address of the rogue AP to view additional information about...

Page 730: ...ue because it triggered the Managed SSID from an unknown AP test In other words the honeypot AP which is an unknown AP to the company is using the same SSID as the legitimate AP inside the building At this point no further action is taken by the DWS 4000 Series switch because the AP deauthentication attack feature is disabled To enable the AP to take further action enable the AP De Authentication ...

Page 731: ...cation attack causes deauthentication frames to be sent to the rogue AP and to clients communicating with the rogue AP All clients connected to the rogue AP will experience poor connectivity The intent of the attack is to serve as a temporary measure until the rogue AP is located and disabled Note Radios in non sentry mode transmit deauthentication frames only on their active channel Therefore D L...

Page 732: ...rameters for wireless clients click WLAN Administration Advanced Configuration WIDS Security Client Configuration Figure 450 shows the default values on the WIDS configuration page for the client Figure 450 WIDS Client Configuration If a client exhibits suspicious behavior by triggering a test or exceeding the acceptable threshold values configured on the page it is marked as Rogue To view informa...

Page 733: ...uthentication 12 times Figure 451 Excessive Authentication Failures Click the Rogue Classification tab to view information about why the client is classified as a rogue Figure 452 Client Rogue Classification The WIDS client rogue classification information indicates that either the user has forgotten his password or perhaps someone is trying to guess a password to gain access to the network The ne...

Page 734: ...d If the administrator were to accidentally classify a neighboring store s AP as Rogue and jam the other store s traffic she could potentially be liable for interrupting the business of the adjacent store Employees can be prevented from using the tablet PCs to access public networks for non work related functions or to circumvent corporate firewalls which could expose company data To add the clien...

Page 735: ...cified on the Wireless Global Configuration page Only the MAC addresses in the Known Client database are marked as Known Clients 4 Specify a name to identify the client in the Name field 5 Click Submit 6 Repeat Step 2 Step 5 until all allowed clients are in the Known Clients database 7 To configure the client based WIDS security tests and enable the client threat mitigation feature go to the WLAN ...

Page 736: ... it is associated to the Corporate SSID Other detected clients have failed the Known Clients Database test and are listed as Rogue Note If the client status for some clients stays as Detected check the age of the connection Rogue classification is performed only on current clients and only when the Known Clients Database Test is enabled Clients that existed in the Detected Clients database prior t...

Page 737: ...attack The WLAN Monitoring Client Detected Clients page shows that the Tablet_5 client now has a client status of Rogue Click the MAC address of the client to display the client s Detected Client Status page As the following figure shows the client is detected as a threat and the threat mitigation feature caused the AP to send a deauthentication request to the client Traffic transmitted by the rog...

Page 738: ...nd Preventing Wireless Intrusion D Link Unified Wired and Wireless Access System Oct 2015 Page 738 D Link UWS User Manual Click the Rogue Classification tab to confirm the WIDS security test results for the client ...

Page 739: ...iquidators expressly disclaim their warranty obligation pertaining to the product and in that case the product is being sold As Is without any warranty whatsoever including without limitation the Limited Warranty as described herein notwithstanding anything stated herein to the contrary Submitting A Claim The customer shall return the product to the original purchase point based on its return poli...

Page 740: ...opyright Statement No part of this publication or documentation accompanying this product may be reproduced in any form or by any means or used to make any derivative such as translation transformation or adaptation without permission from D Link Corporation D Link Systems Inc as stipulated by the United States Copyright Act of 1976 and any amendments thereto Contents are subject to change without...

Page 741: ...Registration Register your D Link product online at http support dlink com register Product registration is entirely voluntary and failure to complete or return this form will not diminish your warranty rights ...

Page 742: ...onfiguration Please refer to the user manual to learn more or visit http www mydlink com for more information Also feel free to contact us U S and Canadian customers can contact D Link Technical Support through our website USA http support dlink com Canada http support dlink ca ...

Page 743: ...SISTENCIA TÉCNICA SUPPORTO TECNICO TECHNISCHE ONDERSTEUNING POMOC TECHNICZNA TECHNICKÁ PODPORA TECHNICKÁ PODPORA TECHNIKAI TÁMOGATÁS TEKNISK SUPPORT TEKNISK SUPPORT TEKNISK STØTTE TEKNINEN TUKI ASSISTÊNCIA TÉCNICA ΤΕΧΝΙΚΉ ΥΠΟΣΤΉΡΙΞΗ TEHNIČKA PODRŠKA TEHNIČNA PODPORA SUPORT TEHNIC ТЕХНИЧЕСКА ПОДДРЪЖКА ...

Page 744: ...and Indonesia Malaysia Philippines Vietnam customers Singapore www dlink com sg Thailand www dlink co th Indonesia www dlink co id Malaysia www dlink com my Philippines www dlink com ph Vietnam www dlink com vn Korea customers Tel 82 2 2028 1810 Monday to Friday 9 00am to 6 00pm Web http d link co kr E mail g2b d link co kr New Zealandcustomers Tel 0800 900 900 24 7 Technical Support Web http www ...

Page 745: ... 971 4 8809033 General Inquiries info me dlinkmea com Tech Support support me dlinkmea com Egypt customers 1 Makram Ebeid Street City Light Building floor 5 Nasrcity Cairo Egypt Tel 2 02 23521593 2 02 23520852 Technical Support 2 02 26738470 General Inquiries info eg dlinkmea com Tech Support support eg dlinkmea com Kingdom of Saudi Arabia customers Office 84 Al Khaleej Building Mujamathu Al Khale...

Page 746: ...echnical Support 92 21 34548310 34305069 General Inquiries info pk dlinkmea com Tech Support support pk dlinkmea com Iran customers Unit 5 5th Floor No 20 17th Alley Bokharest St Argentine Sq Tehran IRAN Postal Code 1513833817 Tel 98 21 88880918 19 98 21 88706653 54 General Inquiries info ir dlinkmea com Tech Support support ir dlinkmea com Morocco customers M I T C Route de Nouaceur angle RS et C...

Page 747: ... Support 973 1 3332904 Kuwait customers Technical Support 965 22453939 965 22453949 Türkiye customers Büyükdere Cad Ferro Plaza No 155 D 1 K 1 Zincirlikuyu Istanbul Tel 90 212 289 56 59 Email info tr dlink com tr לארשי ןולטמ רטנס חר םימישגמה 20 תירק ןולטמ פ ת 49348 ת ד 7060 לט 03 9215173 לט 073 7962797 אוד ל יללכ info dlink co il אוד ל הכימת support dlink co il ...

Page 748: ...pport dlink ru Офисы Россия Москва Графский переулок 14 Тел 7 495 744 00 99 E mail mail dlink ru Україна Київ вул Межигірська 87 А Тел 38 044 545 64 40 E mail ua dlink ua Moldova Chisinau str C Negruzzi 8 Tel 373 22 80 81 07 E mail info dlink md Беларусь Мінск пр т Незалежнасці 169 Тэл 375 17 218 13 65 E mail support dlink by Қазақстан Алматы қ Құрманғазы 143 үй Тел 7 727 378 55 90 E mail almaty d...

Page 749: ...avor revise el número telefónico del Call Center de su país en http www dlinkla com soporte call center Soporte Técnico de D Link a través de Internet Horario de atención Soporte Técnico en www dlinkla com e mail soporte dlinkla com consultas dlinkla com ...

Page 750: ...Clientes de Brasil Caso tenha dúvidas na instalação do produto entre em contato com o Suporte Técnico D Link Acesse o site www dlink com br suporte ...

Page 751: ... D Link 免付費技術諮詢專線 0800 002 615 手機付費電話 02 6600 0123 8715 服務時間 週一至週五 早上9 00到晚上9 00 週六日及國定假日 不含農曆春節 早上10 00到晚上7 00 網 站 http www dlink com tw 電子郵件 dssqa_service dlink com tw 如果您是台灣地區以外的用戶 請參考D Link網站 全球各地分公司 的聯絡資訊以取得相關支援服務 產品保固期限 台灣區維修據點查詢 請參考以下網頁說明 http www dlink com tw 產品維修 使用者可直接送至全省聯強直營維修站或請洽您的原購買經銷商 ...

Page 752: ...langgan Tel 62 21 5731610 Dukungan Teknis D Link melalui Internet Email support dlink co id Website http support dlink co id 日本のお客様 この度は弊社製品をお買い上げいただき 誠にありがとうございます 製品に同梱されている保証書の購入元にお問い合わせください 中國客戶 技術支持中心電話 400 629 6688 技術支持中心郵箱 dlink400 cn dlink com 各地維修中心地址請登陸官方網站查詢 網址 http www dlink com cn 400電話工作時間 工作日9 00 19 00 節假日9 00 18 00 ...

Page 753: ... site 1 employee 2 9 10 49 50 99 100 499 500 999 1000 or more 3 What network protocol s does your organization use XNS IPX TCP IP DECnet Others_____________________________ 4 What network operating system s does your organization use D Link LANsmart Novell NetWare NetWare Lite SCO Unix Xenix PC NFS 3Com 3 Open Cisco Network Banyan Vines DECnet Pathwork Windows NT Windows 98 Windows 2000 ME Windows...

Page 754: ......

Reviews: