REAR SUSPENSION
Stabilizer Bar
Page 9-6 2001 Pioneer 900 Gasoline Vehicle Maintenance and Service Manual
9
STABILIZER BAR
Read WARNING on page 9-1.
STABILIZER BAR REMOVAL
1. Place chocks at the front wheels and lift the rear of the vehicle with a chain hoist or floor jack. Position
jack stands under the side stringer, just forward of each rear wheel. Lower vehicle to let the jack stands
support the vehicle.
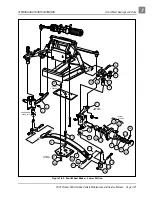
2. Remove bolt (6), lock washer (7), flat washers (4), compression mounts (3) and spacer (2) from left and
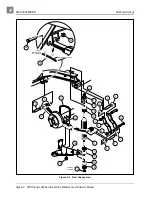
right stabilizer bar links (5). Do not remove the stabilizer bar links from frame (Figure 9-6, Page 9-7).
3. Remove bolts (14) and locknuts (15) from the left and right stabilizer bar bushing support (12) and
remove supports and stabilizer bar (1) from vehicle (Figure 9-6, Page 9-7).
4. Remove bushings (13) from stabilizer bar (1) (Figure 9-6, Page 9-7).
STABILIZER BAR INSTALLATION
1. Position stabilizer bar at the transaxle mounting brackets. Install a bushing (13) onto bar, making sure
the bushing is located in the center of the four mounting holes in the bracket (Figure 9-6, Page 9-7).
2. Place the bushing support (12) onto the bushing. Install four hex head bolts (14) through the bushing
support and transaxle mounting bracket (Figure 9-6, Page 9-7).
3. Install four locknuts (15) and tighten to 75 in-lb (8.4 N·m).
4. Repeat steps 1, 2 and 3 for the other side of the stabilizer bar.
5. Place lock washer (7), flat washer (4), spacer (2), and compression mount (3) onto bolt (6). Install bolt
through mounting hole in stabilizer bar and place another compression mount (3) and flat washer (4)
onto bolt (Figure 9-6, Page 9-7).
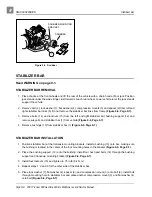
Figure 9-5 Snubber
Club Car
SNUBBER
SNUBBER MOUNTING
BRACKET
1
2

