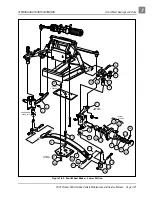


REAR SUSPENSION
Multi-Leaf Springs
2001 Pioneer 900 Gasoline Vehicle Maintenance and Service Manual Page 9-3
9
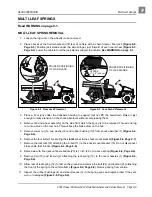
MULTI-LEAF SPRINGS
Read WARNING on page 9-1.
MULTI-LEAF SPRING REMOVAL
1. Loosen the lug nuts on the wheel(s) to be removed.
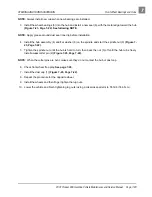
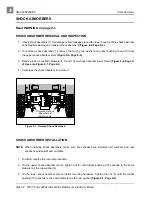
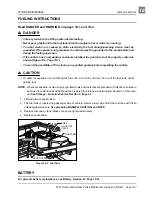
2. Place chocks at the front wheels and lift rear of vehicle with a chain hoist or floor jack (Figure 9-2,
Page 9-3). Position jack stands under the side stringer, just forward of each rear wheel (Figure 9-3,
Page 9-3). Lower the vehicle to let the jack stands support the vehicle. See WARNING on page 9-1.
3. Place a floor jack under the transaxle housing to support (but not lift) the powertrain. Raise it just
enough to relieve tension on the shock absorbers without compressing them.
4. Remove tire and wheel assembly on the side from which the spring is to be removed. Thread one lug
nut onto a stud on the rear hub. This will keep the brake drum on the hub.
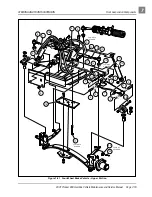
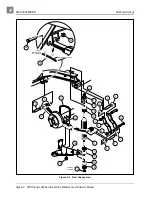
5. Remove lower nut (5), cup washer (9) and rubber bushing (10) from shock absorber (7) (Figure 9-4,
6. Remove the four bolts (14) securing the stabilizer bar to the shock mount bracket (Figure 9-6, Page 9-7).
7. Remove the locknuts (14) attaching the U-bolt (11) to the shock mount bracket (16). Do not disconnect
brake cable from bracket (Figure 9-4, Page 9-4).
8. Raise axle with floor jack until axle saddle (23) is 1 inch (2.5 cm) above spring (Figure 9-4, Page 9-4).
9. Remove bolt (15) and locknut (2) attaching the leaf spring (12) to the rear shackles (1) (Figure 9-4,
10. Allow rear of leaf spring (12) to rest on the ground and remove the bolt (24) and locknut (25) attaching
the front of the spring to the vehicle frame (Figure 9-4, Page 9-4). Remove spring from vehicle.
11. Inspect the rubber bushings (4) and steel sleeves (3) in the spring eyes and replace them if they are
worn or damaged (Figure 9-4, Page 9-4).
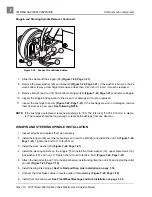
Figure 9-2 Floor Jack Placement
Figure 9-3 Jack Stand Placement
PROPER POSITIONING
OF FLOOR JACK
PROPER POSITIONING
OF JACK STANDS
APPROX.
17-1/2" (44.5 cm)