ELECTRICAL COMPONENTS
Ignition Coil
2001 Pioneer 900 Gasoline Vehicle Maintenance and Service Manual Page 12-25
12
4. Reconnect black wire at the bullet connector to the white/black wire.
5. Connect battery cables, positive cable first and tighten the terminals to 20 ft-lb (27.1 N·m). Coat termi-
nals with Battery Protector Spray (CCI 1014305).
6. Release the prop rod and lower the bed.
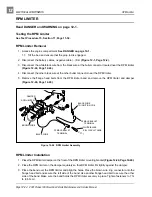
IGNITION COIL
Read DANGER and WARNING on page 12-1.
Testing the Ignition Coil
See Section 11, Test Procedure 14, Page 11-33, and Test Procedure 16, Page 11-35.
Ignition Coil Removal
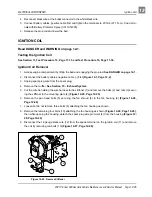
1. Access engine compartment by tilting the bed and engaging the prop rod. See DANGER on page 12-1.
2. Disconnect the battery cables, negative cable (–) first (Figure 12-1, Page 12-2).
3. Unplug spark plug wire from the spark plug.
4. Remove the muffler. See Section 15 – Exhaust System.
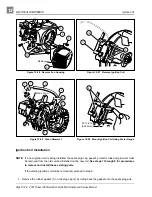
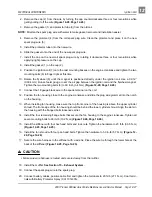
5. Cut the wire tie holding the wire harness to the stiffener (1) and remove the bolts (2) and nuts (3) secur-
ing the stiffener to the mounting plate (4) (Figure 12-25, Page 12-25).
6. Remove the pan head bolts (5) securing the fan shroud (8) to the fan housing (9) (Figure 12-26,
7. Loosen but do not remove three bolts (6) attaching the fan housing as shown.
8. Remove the remaining four bolts (10) attaching the fan housing as shown (Figure 12-26, Page 12-26),
then while opening the housing, detach the spark plug wire grommet (4) from the housing (Figure 12-
28, Page 12-26).
9. Disconnect the 18 gauge black wire (12) from the spade terminal on the ignition coil (11) and remove
the coil by removing two bolts (10) (Figure 12-27, Page 12-26).
Figure 12-25 Remove Stiffener
ClubCar
3
4
1
2

