


ELECTRICAL COMPONENTS
RPM Limiter
Page 12-24 2001 Pioneer 900 Gasoline Vehicle Maintenance and Service Manual
12
RPM LIMITER
Read DANGER and WARNING on page 12-1.
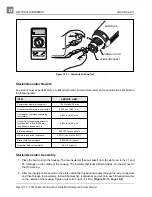
Testing the RPM Limiter
See Test Procedure 15, Section 11, Page 11-34.
RPM Limiter Removal
1. Access the engine compartment. See DANGER on page 12-1.
1.1. Tilt the bed and ensure that the prop rod is engaged.
2. Disconnect the battery cables, negative cable (–) first (Figure 12-1, Page 12-2).
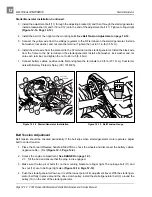
3. Disconnect the white/black wire from the black wire at the bullet connector located near the RPM limiter
4. Disconnect the other black wire at the other bullet connector near the RPM limiter.
5. Remove the flange head bolts from the RPM limiter band and remove the RPM limiter and damper
RPM Limiter Installation
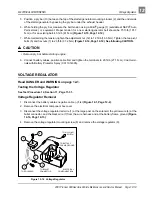
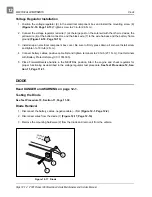
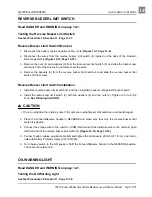
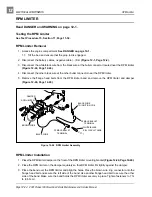
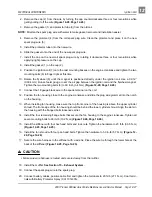
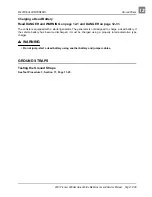
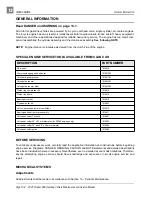
1. Place the RPM limiter damper on the front of the RPM limiter mounting bracket (Figure 12-24, Page 12-24).
2. Place the RPM limiter on the damper squarely so that RPM limiter fits tightly against the damper.
3. Place the band over the RPM limiter and align the holes. Place the brown wire ring connector onto the
flange head bolt and secure the left side of the band. Use another flange head bolt to secure the other
side of the band. Make sure the band holds the RPM limiter securely in place. Tighten fasteners to 7 ft-
lb (9.5 N·m).
Figure 12-24 RPM Limiter Assembly
FEMALE BULLET
TERMINAL
BLACK WIRE
BROWN WIRE
RPM LIMITER
FEMALE BULLET
TERMINAL
BLACK WIRE
TO IGNITION COIL
WHITE/BLACK
KILL CIRCUIT WIRE
DAMPER


