31
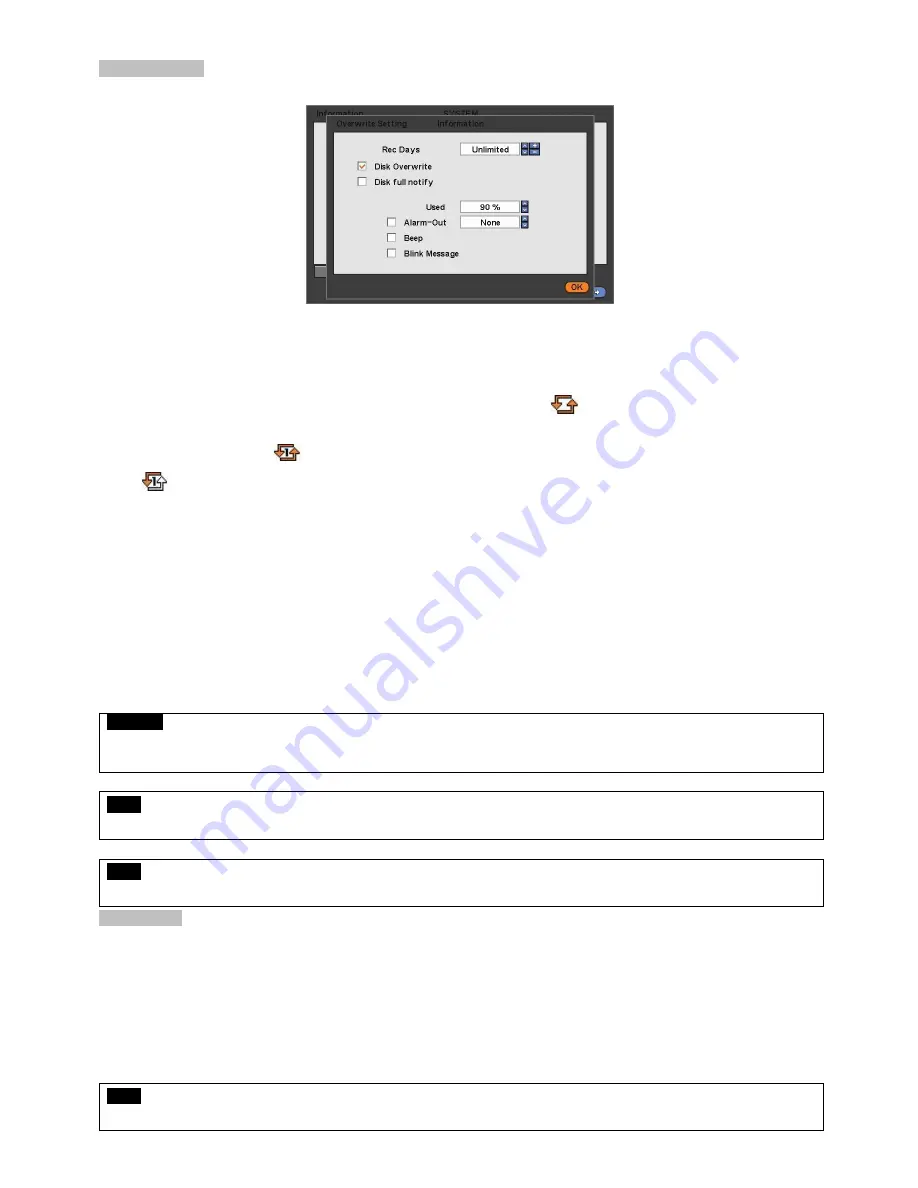
Overwrite Setting
Click (
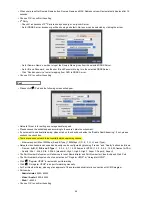
) Overwrite Setting button and the following screen will appear.
User shall designate the total recording days from 1 day to 30 days and unlimited.
User may set for beeping or notifying messages that notify the used percentage of disk.
Check Disk Overwrite and user may activate the overwrite function.
-
This function makes restart the recording from the beginning when the HDD is full. The previous recorded data will be
erased from the first one. Following icon will display in bottom of live mode
.
①
Uncheck (
□
) Disk Overwrite, recording will stop automatically when the HDD is full.
②
At no Overwrite mode,
icon will appear when HDD capacity is full that indicates the recording has stopped and,
icon will appear while the recording is going on.
③
If user changes this setting, the warning message will appear. Then click (
)
“confirmation” button and user may change
the setting.
If user checks (
) Disk full notify item, the warning message will appear as the used amount of disk.
①
Used
-
User may set the certain value of HDD usage for notification. It will notify at that point. The values are from 50 ~ 100%.
②
Alarm-Out
-
The Alarm-out will happen at the used amount of HDD which is specified at Used.
③
Beep
-
Check (
), the warning sound will happen at the used amount of HDD which is specified at Used.
④
Blink Message
-
Check (
), the warning message “Disk Used(xx%)!” will appear on the OSD.
CAUTION
IF USER USES
“Rec Days” FUNCTION, DVR WILL STORE ONLY THE DATE(S) THAT SPECIFIED BY USER. PLEASE
BEWARE OF DATA LOSS DUE TO
“Rec Days” FUNCTION.
NOTE
Notify setting does not affect saving the recorded data. It only gives notification and keep recording until hard disk is full.
NOTE
For more specific setting about Alarm-out, use Setup>DEVICES>Alarm Out.
Clear All Data
Use to delete or purge all normal recorded data from database. Please follow the procedure below.
①
Click (
) Clear All Data frame.
②
When a dialogue box
asking “Remove All Data?” shows, choose ‘OK’.
③
Then, Progress window will appear and the process starts.
④
When all data are deleted, a dialogue box asking “Are you sure to remove log?” will pop up.
⑤
Choose ‘OK’ to delete all the recorded data as well as System Log.
When user finished all the necessary inputs to SYSTEM menu, please click (
) ‘OK’ on the bottom to go back to SETUP
screen.
NOTE
This might take a while to completely delete all data, and DVR will reboot after the data is cleared.
Summary of Contents for KQ0824 Series
Page 13: ...13 B Type 4 channel Series HD SDI DVR...
Page 14: ...14 C Type 4 8 16 channel Series HD SDI DVR...
Page 15: ...15 D Type 4 8 channel Series HD SDI DVR...
Page 16: ...16 E Type 4 channel Series HD SDI DVR...
Page 17: ...17 F Type 16 channel Series Hybrid DVR...
Page 93: ...93 Professional Central Monitoring Software...
Page 110: ...110 7 4 5 Help 7 4 5 1 About The version of CMS Pro can be checked here...


