

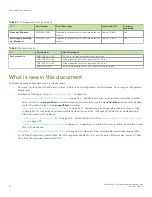


TABLE 6
Installation and basic system configuration (continued)
Task
Task details or additional information
Completed
•
Mount the device in a two-post rack. Refer to the instructions in this guide for
mounting your device in a two-post rack.
Check the airflow of the power supply and
fan assembly
The airflow direction of the power supply and fan should match. The power supplies and
fan trays are clearly labeled with either a green arrow with an "E", or an orange arrow with
an "I." For more details, refer to
on page 182.
Gather all components required for the
initial setup
Refer to
on page 66.
Provide power to the device
Refer to
Connecting power cord to AC power supplies
Attach a management station, establish a
serial connection, and change the default
passwords (optional)
Refer to
Establishing a serial connection to the device
on page 73. After completing this
task, log in to the serial port to configure the device.
Set the IP address, subnet mask, and the
default gateway IP address
Use the
ipaddrset
command to configure a static device IP address, subnet mask, and
gateway IP address, or you can use a DHCP server to obtain the information dynamically.
Refer to
on page 74.
Set the date and time
•
Use the
date
command to display and set the date and time.
•
Use the
tstimezone
command to display and set the time zone.
•
Use the
tsclockserver
command to synchronize the time with an external NTP
server.
Refer to
on page 77 for more information.
Customize the switch name and chassis
name
•
Use the
switchname
command to change the default switch name.
•
Use the
chassisname
command to change the default chassis name.
Refer to
Customizing the chassis and switch name
on page 80 for more information.
Establish an Ethernet connection
By establishing an Ethernet connection, you can complete the device configuration using
a serial session, Telnet, or management application, such as Brocade Network Advisor.
Refer to
Establishing an Ethernet connection to the device
Optional: Configure the DNS service
Use the
dnsconfig
command to create DNS server entries. Refer to the
Brocade Fabric
OS Administration Guide
.
Optional: Customize the domain ID
Use the
configure
command to change the domain ID (default ID is 1). Refer to
on page 77 for more information.
Verify that the device operates correctly
•
Check the LEDs to verify operation of functional parts. Refer to the
Monitoring
the Device
section of this guide.
•
The following commands can be useful to establish an operational baseline for
the device. Refer to the
Brocade Fabric OS Command Reference
for more
information on these commands.
–
psshow
–
fanshow
–
tempshow
–
historyshow
–
errdump
Back up the configuration
Use the interactive
configupload
command to back up the configuration. Refer to
on page 82 for more information.
Optional: Power off the devices
Enter the
shutdown
command and wait for the device to power down, and then unplug
the power cords. Refer to
on page 83 for more information.
Items shipped
When unpacking the device, follow procedures under "Unpacking and transporting the device". Verify that you have the following items.
Save shipping cartons and packaging in the event you need to return the device.
Items shipped
Brocade X6-4 Director Hardware Installation Guide
26
53-1004106-07
Summary of Contents for X6-4
Page 12: ...Brocade X6 4 Director Hardware Installation Guide 12 53 1004106 07...
Page 20: ...Brocade X6 4 Director Hardware Installation Guide 20 53 1004106 07...
Page 28: ...Brocade X6 4 Director Hardware Installation Guide 28 53 1004106 07...
Page 64: ...Brocade X6 4 Director Hardware Installation Guide 64 53 1004106 07...
Page 86: ...Brocade X6 4 Director Hardware Installation Guide 86 53 1004106 07...
Page 102: ...Brocade X6 4 Director Hardware Installation Guide 102 53 1004106 07...
Page 130: ...Brocade X6 4 Director Hardware Installation Guide 130 53 1004106 07...
Page 140: ...Brocade X6 4 Director Hardware Installation Guide 140 53 1004106 07...
Page 166: ...Brocade X6 4 Director Hardware Installation Guide 166 53 1004106 07...
Page 196: ...Brocade X6 4 Director Hardware Installation Guide 196 53 1004106 07...
Page 200: ...Brocade X6 4 Director Hardware Installation Guide 200 53 1004106 07...
Page 204: ...Brocade X6 4 Director Hardware Installation Guide 204 53 1004106 07...
Page 210: ...Brocade X6 4 Director Hardware Installation Guide 210 53 1004106 07...
Page 224: ...Brocade X6 4 Director Hardware Installation Guide 224 53 1004106 07...
Page 238: ...Brocade X6 4 Director Hardware Installation Guide 238 53 1004106 07...