


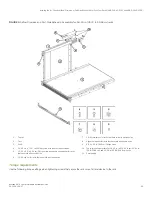


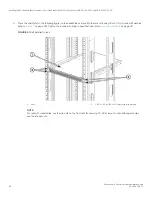
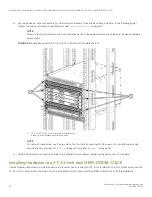


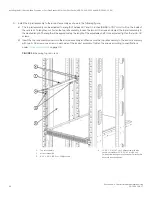


3. Install the shelf saddle (refer to
on page 33) to the nonport side of the rack. Install the saddle in the same vertical
location as where the shelf installs on the port side of the rack. In using the previous figure as example, if the shelf is installed in
location 23 on the port side, install the saddle in location 23 on the nonport side. Ensure that the words "THIS SIDE UP" on the
saddle face towards the port side of the rack (see the following figure).
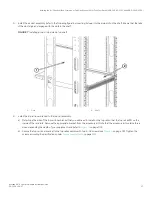
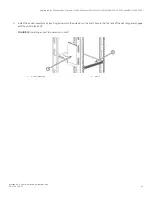
Secure the saddle to the rack using four 10-32 screws with washers (refer to
on page 33), two screws on each side of
the saddle. Tighten the screws according to specifications under
on page 33.
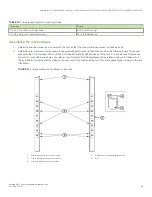
FIGURE 5
Installing saddle to equipment rack
1.
Shelf saddle
2.
10-32 x .5 in. (1.27 cm) Phillips screw with blue Loctite on
threads or 10-32 x .63 in.(1.60 cm) Phillips screw with square
cone washer for racks that have rails with round holes. Use
either 10-32 retainer nut for racks that have rails with square
holes or 10-32 clip nut for racks that have rails with round
holes to retain screws.
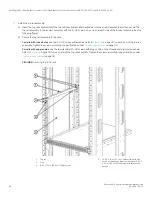
NOTE
For rails with round holes, use the clip nuts (refer to
on page 33) on the rails for securing 10-32 screws. For
rails with square holes, use the retainer nuts (see
on page 33). Also refer to
Installing the 8U Chassis Airflow Diversion or Port Side Exhaust Kit for Four-Post Racks (XBR-DCX4S-0121 and XBR-DCX4S-0130)
Brocade X6-4 Director Hardware Installation Guide
53-1004106-07
35
Summary of Contents for X6-4
Page 12: ...Brocade X6 4 Director Hardware Installation Guide 12 53 1004106 07...
Page 20: ...Brocade X6 4 Director Hardware Installation Guide 20 53 1004106 07...
Page 28: ...Brocade X6 4 Director Hardware Installation Guide 28 53 1004106 07...
Page 64: ...Brocade X6 4 Director Hardware Installation Guide 64 53 1004106 07...
Page 86: ...Brocade X6 4 Director Hardware Installation Guide 86 53 1004106 07...
Page 102: ...Brocade X6 4 Director Hardware Installation Guide 102 53 1004106 07...
Page 130: ...Brocade X6 4 Director Hardware Installation Guide 130 53 1004106 07...
Page 140: ...Brocade X6 4 Director Hardware Installation Guide 140 53 1004106 07...
Page 166: ...Brocade X6 4 Director Hardware Installation Guide 166 53 1004106 07...
Page 196: ...Brocade X6 4 Director Hardware Installation Guide 196 53 1004106 07...
Page 200: ...Brocade X6 4 Director Hardware Installation Guide 200 53 1004106 07...
Page 204: ...Brocade X6 4 Director Hardware Installation Guide 204 53 1004106 07...
Page 210: ...Brocade X6 4 Director Hardware Installation Guide 210 53 1004106 07...
Page 224: ...Brocade X6 4 Director Hardware Installation Guide 224 53 1004106 07...
Page 238: ...Brocade X6 4 Director Hardware Installation Guide 238 53 1004106 07...