


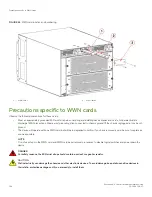


Complete the following steps to download the firmware from a USB device to the replacement blade.
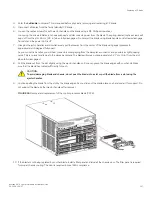
1. Insert the USB device into the active CP blade.
2. Attach a serial cable from the PC to the active CP blade.
3. Log in to the active CP blade as
admin
if you are not still logged in and enter
usbStorage -e
to enable the USB device.
4. Remove the serial cable from the active CP blade and attach it to the standby CP blade and log in as
admin
.
5. Run
firmwareDownload -s
to download the firmware to the standby CP blade. Enter all requested information. The -s option
disables the autoreboot, so you will have to manually issue a reboot after the download finishes to initiate firmwarecommit. Use
all default values, except use USB [Y] so that USB will be used for downloading.
6. When the download process finishes, run
firmwareDownloadStatus
to verify that the firmware has been updated. The
command displays a running account of the progress of the
firmwareDownload
command until the command has completed.
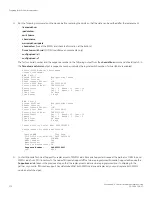
The final message is similar to the following and will appear with a date and time stamp.
Slot 1 (CP0, active): Firmwaredownload command has completed successfully. Use firmwareshow to
verify the firmware versions.
7. Ensure that you are still logged in to the standby CP blade (the blade for which you just changed the firmware level) and type
reboot
. The reboot of the standby CP will initiate a
firmwarecommit
to the secondary partition and log you out.
Chassis_1: admin> reboot
Broadcast message from root (ttyS0) Fri Jun 17 14:49:45 2016...
The system is going down for reboot NOW !!
INIT: Switching to runlevel: 6
INIT: Sending processes the TERM signal Chassis_1:admin> HAMu Heartbeat down, stop FSS
Unmounting all ##exiting due to signal: 9, pending signals: 0x20000, 0x0
ilesystems.
Please stand by while rebooting the system...
Restarting system.
The system is coming up, please wait...
.
.
.
Fri Jun 17 14:53:13 2016: Doing firmwarecommit now.
Please wait ...
Fri Jun 17 14:55:27 2016: Firmware commit completes successfully.
Validating the filesystem ...
Fri Jun 17 22:36:05 2016: Doing firmwarecommit now.
Please wait ...
Fri Jun 17 22:36:48 2016: Firmware commit completes successfully.
2016/06/17-14:56:50, [SULB-1004], 908, SLOT 2 | CHASSIS, INFO, Brocade_X6, Firmwarecommit has
completed.
2010/06/17-14:56:50, [SULB-1036], 909, SLOT 2 | CHASSIS, INFO, Brocade_X6, The new Version: Fabric
OS [version]
2010/06/17-14:56:50, [SULB-1002], 910, SLOT 2 | CHASSIS, INFO, Brocade_X6, Firmwaredownload command
has completed successfully.
NOTE
The time stamp on the co-CPU may not be in sync with the main CPU on the blade. This is not a cause for concern.
8. Log back in to the standby CP blade and enter
firmwareDownloadStatus
on the standby CP blade to validate a successful
commit. This may take 10 minutes.
9. If you are upgrading through several levels of the Fabric OS, repeat step 5 through step 8 as often as necessary based on the
path outlined in the preceding table. Otherwise, proceed to step 10.
10. Log out of the standby CP blade and log in to the active CP blade.
11. Proceed to the procedures to "Completing the replacement."
Replacing a CP blade
Brocade X6-4 Director Hardware Installation Guide
53-1004106-07
161
Summary of Contents for X6-4
Page 12: ...Brocade X6 4 Director Hardware Installation Guide 12 53 1004106 07...
Page 20: ...Brocade X6 4 Director Hardware Installation Guide 20 53 1004106 07...
Page 28: ...Brocade X6 4 Director Hardware Installation Guide 28 53 1004106 07...
Page 64: ...Brocade X6 4 Director Hardware Installation Guide 64 53 1004106 07...
Page 86: ...Brocade X6 4 Director Hardware Installation Guide 86 53 1004106 07...
Page 102: ...Brocade X6 4 Director Hardware Installation Guide 102 53 1004106 07...
Page 130: ...Brocade X6 4 Director Hardware Installation Guide 130 53 1004106 07...
Page 140: ...Brocade X6 4 Director Hardware Installation Guide 140 53 1004106 07...
Page 166: ...Brocade X6 4 Director Hardware Installation Guide 166 53 1004106 07...
Page 196: ...Brocade X6 4 Director Hardware Installation Guide 196 53 1004106 07...
Page 200: ...Brocade X6 4 Director Hardware Installation Guide 200 53 1004106 07...
Page 204: ...Brocade X6 4 Director Hardware Installation Guide 204 53 1004106 07...
Page 210: ...Brocade X6 4 Director Hardware Installation Guide 210 53 1004106 07...
Page 224: ...Brocade X6 4 Director Hardware Installation Guide 224 53 1004106 07...
Page 238: ...Brocade X6 4 Director Hardware Installation Guide 238 53 1004106 07...