


Steps 1 and 2 describe removing the logo bezel, if it is attached over the air vents at the top of the chassis, and installing ball studs into
the chassis for attaching the door. If the bezel has been removed and door ball studs are installed, skip to step 3 to install the door.
1. Use the following steps to remove the logo bezel.
Save bezel and other parts for future installation.
a)
Unfasten the bezel from its chassis mounting bracket by removing the single 6-32 X 3/8 in. panhead Phillips screw
located on the top center of the bezel using a Phillips screwdriver.
b) While supporting the bezel, use a Phillips screwdriver to remove the 6-32 X 1/4 in. flathead Phillips screws securing each
end of the bezel to the chassis and remove bezel.
c)
Remove the bezel's mounting bracket from the chassis by removing the single 6-32 X 1/4 in. Phillips screw securing the
bracket to the chassis.
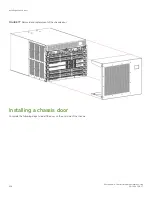
FIGURE 78
Removing logo bezel from Brocade X6-4 chassis
1. Chassis mounting bracket for logo bezel
2. 6-32 x 1/4 in. 100 degree flathead Phillips screw
3. 6-32 x 3/8 in. panhead Phillips with a square cone sem
4. Logo bezel
5. 6-32 x 1/4 in. 100 degree flathead Phillips screw
6. 6-32 x 1/4 in. 100 degree flathead Phillips screw
Installing a chassis door
Brocade X6-4 Director Hardware Installation Guide
53-1004106-07
207
Summary of Contents for X6-4
Page 12: ...Brocade X6 4 Director Hardware Installation Guide 12 53 1004106 07...
Page 20: ...Brocade X6 4 Director Hardware Installation Guide 20 53 1004106 07...
Page 28: ...Brocade X6 4 Director Hardware Installation Guide 28 53 1004106 07...
Page 64: ...Brocade X6 4 Director Hardware Installation Guide 64 53 1004106 07...
Page 86: ...Brocade X6 4 Director Hardware Installation Guide 86 53 1004106 07...
Page 102: ...Brocade X6 4 Director Hardware Installation Guide 102 53 1004106 07...
Page 130: ...Brocade X6 4 Director Hardware Installation Guide 130 53 1004106 07...
Page 140: ...Brocade X6 4 Director Hardware Installation Guide 140 53 1004106 07...
Page 166: ...Brocade X6 4 Director Hardware Installation Guide 166 53 1004106 07...
Page 196: ...Brocade X6 4 Director Hardware Installation Guide 196 53 1004106 07...
Page 200: ...Brocade X6 4 Director Hardware Installation Guide 200 53 1004106 07...
Page 204: ...Brocade X6 4 Director Hardware Installation Guide 204 53 1004106 07...
Page 210: ...Brocade X6 4 Director Hardware Installation Guide 210 53 1004106 07...
Page 224: ...Brocade X6 4 Director Hardware Installation Guide 224 53 1004106 07...
Page 238: ...Brocade X6 4 Director Hardware Installation Guide 238 53 1004106 07...