


NOTE
Depending on the blade configuration of the chassis and the number of power supplies installed, the chassis may be able to
continue operating while replacing a power supply. Refer to "Power Supply Requirements" in
Brocade X6 Directors Technical
on page 225 for minimum power supplies required for AC low and high voltage line operation, redundancy in
case of power supply failure, and other specifications. If there is insufficient power, the chassis will start powering down blades
until the power demand can be met.
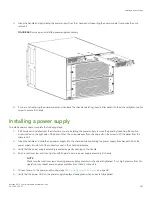
Installing additional power supply (hot-install)
If your chassis is up and running, has empty slots for power supplies, and you want to install additional power supplies, complete the
following steps.
1. Remove filler panel from empty power supply assembly slot.
2. Insert the new power supply assembly.
3. Plug power cord into the new power supply assembly from power source.
4. Verify power supply assembly status LED.
Replacing power supply assembly (hot-swap)
If your chassis is up and running, but a power supply has failed, complete the following steps.
NOTE
Removing more than one power supply could result in insufficient system power which could cause some blades to power
down. Ensure that there is an adequate number of active power supply assemblies when removing a single power unit during
hot-swap. Refer to "Power supply specifications" and "Power supply requirements" in
Brocade X6 Directors Technical
on page 225 for minimum power supplies required for low and high voltage line operation.
1. Unplug power cable from failed power supply assembly.
2. Remove power supply assembly.
3. Insert new power supply assembly.
4. Plug power cord into new power supply assembly from power source.
5. Verify power supply assembly status LED.
Replace or install power supply assembly (cold-install or cold-swap)
If your chassis is up and running, but you want to power down the chassis to install additional power supply assemblies or replace failed
power supply assemblies, complete the following steps.
1. Shut down the system using the
sysShutdown
command.
2. Unplug power cords from all power supply assemblies.
3. If adding a power supply assembly, remove filler panel from empty power supply assembly slot.
4. Install or replace power supply assemblies.
5. Plug power cords into all power supply assemblies from power sources.
6. Verify the power supply assembly status LEDs.
Power supply assembly task guide
Brocade X6-4 Director Hardware Installation Guide
53-1004106-07
185
Summary of Contents for X6-4
Page 12: ...Brocade X6 4 Director Hardware Installation Guide 12 53 1004106 07...
Page 20: ...Brocade X6 4 Director Hardware Installation Guide 20 53 1004106 07...
Page 28: ...Brocade X6 4 Director Hardware Installation Guide 28 53 1004106 07...
Page 64: ...Brocade X6 4 Director Hardware Installation Guide 64 53 1004106 07...
Page 86: ...Brocade X6 4 Director Hardware Installation Guide 86 53 1004106 07...
Page 102: ...Brocade X6 4 Director Hardware Installation Guide 102 53 1004106 07...
Page 130: ...Brocade X6 4 Director Hardware Installation Guide 130 53 1004106 07...
Page 140: ...Brocade X6 4 Director Hardware Installation Guide 140 53 1004106 07...
Page 166: ...Brocade X6 4 Director Hardware Installation Guide 166 53 1004106 07...
Page 196: ...Brocade X6 4 Director Hardware Installation Guide 196 53 1004106 07...
Page 200: ...Brocade X6 4 Director Hardware Installation Guide 200 53 1004106 07...
Page 204: ...Brocade X6 4 Director Hardware Installation Guide 204 53 1004106 07...
Page 210: ...Brocade X6 4 Director Hardware Installation Guide 210 53 1004106 07...
Page 224: ...Brocade X6 4 Director Hardware Installation Guide 224 53 1004106 07...
Page 238: ...Brocade X6 4 Director Hardware Installation Guide 238 53 1004106 07...