


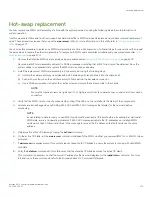


Cold-swap procedure
Use this procedure to replace both CP blades while the device power is off. You must power off the device to replace both CP blades. To
replace a single blade, refer to the hots-swap replacement procedures.
Removing a blade
Use the following procedure to power down the device and remove CP blades. You can replace a single CP blade or both blades one at a
time using the hot-swap procedure.
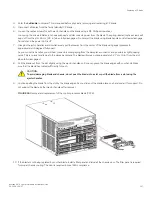
1. Be sure to perform all steps under
on page 155.
2. Power down the device.
3. Remove the chassis door.
4. Disconnect all cables from the CP blades.
5. Loosen the captive screws for both ejector handles on the blade using a #1 Phillips screwdriver.
Loosening the screws initiates a hot-swap request and disconnects power from the blade. The spring-loaded captive screws will
pop out from the slot .63 cm (.25 in.) when fully disengaged. Do not eject the blade using blade handles until screws disengage
from slot and the power LED is off.
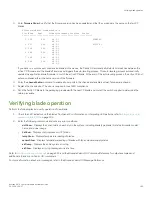
6. Grasp both ejector handles and simultaneously pull them away from the center of the blade using equal pressure to
approximately 45 degrees (fully open).
As you move the handles, you will hear connectors disengaging from the backplane connector and possibly a slight popping
noise. This is normal and is due to the dense backplane. The blade will move out approximately 1.27 cm (.5 in.) from the slot
when fully disengaged.
7. Pull the blade out from the slot slightly using the ejector handles until you can grasp the blade edges with your hands. Make
sure that the blade has cooled sufficiently to touch.
CAUTION
To avoid damaging blade and chassis, do not push the blade into a slot or pull the blade from a slot using the
ejector handles.
Replacing a CP blade
Brocade X6-4 Director Hardware Installation Guide
162
53-1004106-07
Summary of Contents for X6-4
Page 12: ...Brocade X6 4 Director Hardware Installation Guide 12 53 1004106 07...
Page 20: ...Brocade X6 4 Director Hardware Installation Guide 20 53 1004106 07...
Page 28: ...Brocade X6 4 Director Hardware Installation Guide 28 53 1004106 07...
Page 64: ...Brocade X6 4 Director Hardware Installation Guide 64 53 1004106 07...
Page 86: ...Brocade X6 4 Director Hardware Installation Guide 86 53 1004106 07...
Page 102: ...Brocade X6 4 Director Hardware Installation Guide 102 53 1004106 07...
Page 130: ...Brocade X6 4 Director Hardware Installation Guide 130 53 1004106 07...
Page 140: ...Brocade X6 4 Director Hardware Installation Guide 140 53 1004106 07...
Page 166: ...Brocade X6 4 Director Hardware Installation Guide 166 53 1004106 07...
Page 196: ...Brocade X6 4 Director Hardware Installation Guide 196 53 1004106 07...
Page 200: ...Brocade X6 4 Director Hardware Installation Guide 200 53 1004106 07...
Page 204: ...Brocade X6 4 Director Hardware Installation Guide 204 53 1004106 07...
Page 210: ...Brocade X6 4 Director Hardware Installation Guide 210 53 1004106 07...
Page 224: ...Brocade X6 4 Director Hardware Installation Guide 224 53 1004106 07...
Page 238: ...Brocade X6 4 Director Hardware Installation Guide 238 53 1004106 07...