


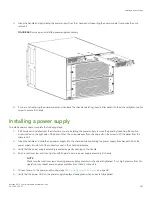


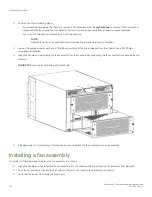


4. Push in on each captive screw and tighten with #1 Phillips screwdriver to secure the fan assembly to the chassis.
NOTE
Be sure that captive screws are tightened. If not, high pressure from fan operation may unseat fan from chassis
connectors.
Verifying fan operation
Perform the following tasks to verify operation of a fan assembly:
1. Check the LED indicators on the fan assemblies. The fan assemblies are located on the nonport side of the device. The LED
patterns may temporarily change during POST and other diagnostic tests. For information on interpreting LED patterns, refer to
Interpreting fan assembly LEDs
2. Check the fan assembly status using the following commands:
•
fanShow
- Displays the status for each fan assembly as OK, Absent, or Faulty. The RPM of each fan in the assembly is
also provided. If a fan assembly displays absent or faulty, contact the chassis supplier to order replacement parts. Both
physically absent or faulty could also be the result of the fan not being properly seated in the chassis slot.
•
sensorShow
- Displays current temperature and status of fan and power supply sensors located in the chassis.
•
errShow
- Displays error log messages one at a time.
•
errDump
- Displays the entire system error log.
Refer to
Brocade Fabric OS Command Reference
for output examples and
additional information on Fabric OS commands.
For more information about error messages, refer to the
Brocade Fabric OS Message Reference
.
Verifying fan operation
Brocade X6-4 Director Hardware Installation Guide
53-1004106-07
195
Summary of Contents for X6-4
Page 12: ...Brocade X6 4 Director Hardware Installation Guide 12 53 1004106 07...
Page 20: ...Brocade X6 4 Director Hardware Installation Guide 20 53 1004106 07...
Page 28: ...Brocade X6 4 Director Hardware Installation Guide 28 53 1004106 07...
Page 64: ...Brocade X6 4 Director Hardware Installation Guide 64 53 1004106 07...
Page 86: ...Brocade X6 4 Director Hardware Installation Guide 86 53 1004106 07...
Page 102: ...Brocade X6 4 Director Hardware Installation Guide 102 53 1004106 07...
Page 130: ...Brocade X6 4 Director Hardware Installation Guide 130 53 1004106 07...
Page 140: ...Brocade X6 4 Director Hardware Installation Guide 140 53 1004106 07...
Page 166: ...Brocade X6 4 Director Hardware Installation Guide 166 53 1004106 07...
Page 196: ...Brocade X6 4 Director Hardware Installation Guide 196 53 1004106 07...
Page 200: ...Brocade X6 4 Director Hardware Installation Guide 200 53 1004106 07...
Page 204: ...Brocade X6 4 Director Hardware Installation Guide 204 53 1004106 07...
Page 210: ...Brocade X6 4 Director Hardware Installation Guide 210 53 1004106 07...
Page 224: ...Brocade X6 4 Director Hardware Installation Guide 224 53 1004106 07...
Page 238: ...Brocade X6 4 Director Hardware Installation Guide 238 53 1004106 07...