background image

68

5.2

Using WorkBench

If you have not just completed the Mint Configuration Tool Wizard, you will need to start Mint
WorkBench manually. On the Windows

Start

menu, select

Programs

,

Mint v4

,

Mint WorkBench

.

5.2.1

Selecting the controller

Before WorkBench can communicate with the MintDrive, it must scan the PC’s serial ports to find where
it is connected. To do this, click

Tools

on the main menu and choose

Select Controller...

.

The Select Controller dialog box will appear and WorkBench will scan the serial ports until it finds the
MintDrive. When it has found the MintDrive, click

OK

.

Note:

The MintDrive logic supply must be powered otherwise it will not be found.
If WorkBench was started automatically when you completed the MCT Wizard, you do not
need to do this step.

5.2.2

Menus and buttons

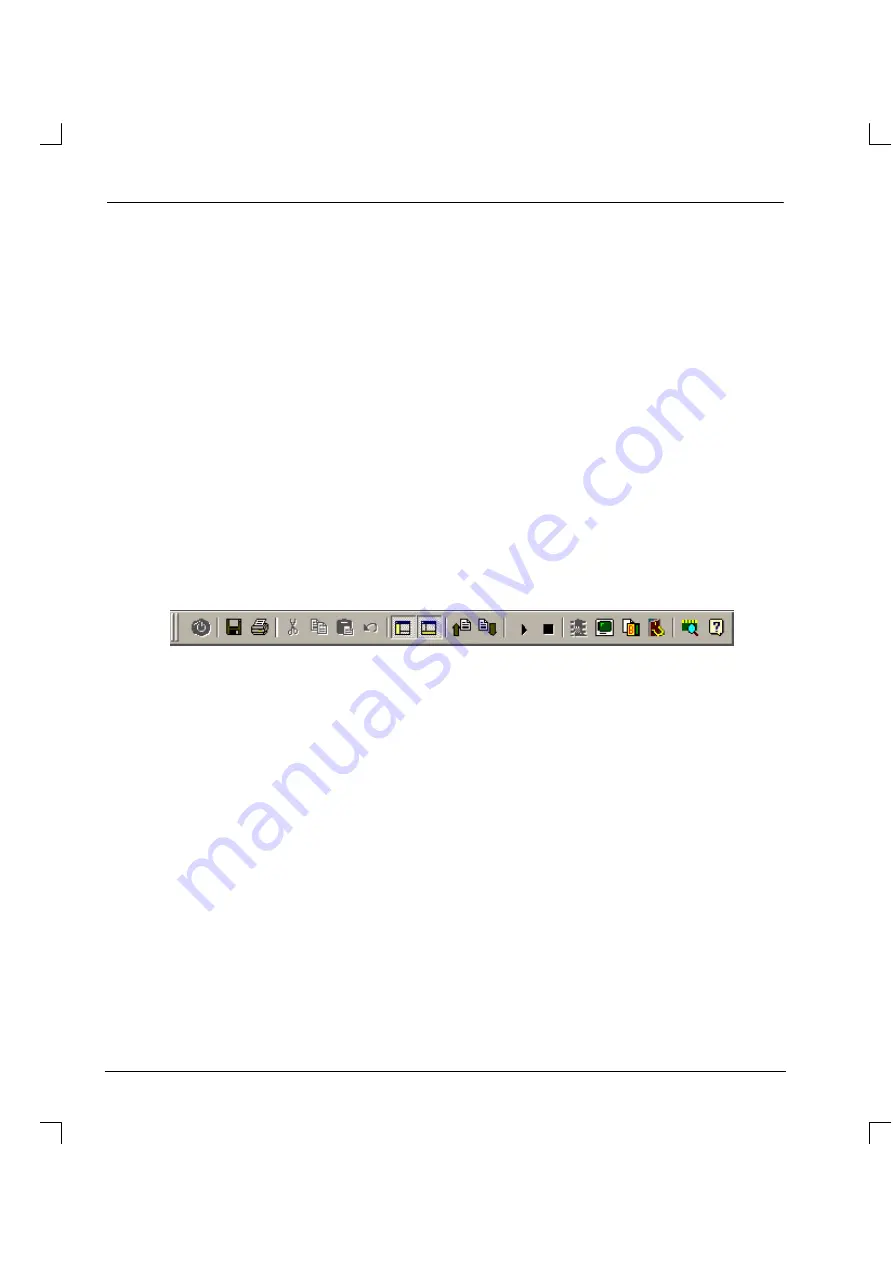
The main Mint WorkBench window contains a menu system and toolbars. Many functions can be
accessed from the menu or by clicking a button - use whichever you prefer. Most buttons include a
’tool-tip’; hold the mouse pointer over the button (don’t click) and its description will appear.

5.2.2.1

Standard toolbar functions

1

2

3

4

5

6

7

8

9

10 11 12 13 14 15 16 17 18 19

1

Controller reset

(Not available on MintDrive)

.

2

Save

Displays the save dialog box.

3

Print

Displays the print dialog box.

4

Cut

Cuts the text selected in the editor window and places it on the clipboard.

5

Copy

Copies the text selected in the editor window and places it on the clipboard.

6

Paste

Pastes the text on the clipboard into the editor window at the cursor location.

7

Undo

Reverses the last editing action.

8

Watch window

Turns the watch window on or off.

9

CAN window

Turns the CAN window on or off.

10

Upload

Uploads the current file

from

the MintDrive

to

WorkBench.

11

Download

Downloads the current file

to

the MintDrive

from

WorkBench.

12

Run

Runs the current configuration and program files in the MintDrive.

13

Stop

Stops the current program running on the MintDrive.

14

DPR Watchwindow

(Not available on MintDrive)

.

15

Terminal

Displays the Terminal window (CTRL+T has the same effect).

16

Copy parameters

Copies the current drive tuning parameters to the clipboard.

17

Digital I/O

Displays the digital I/O watch window.

18

Platform information

Displays the platform information window.

19

About

Displays WorkBench version number information.

Summary of Contents for MintDrive

Page 1: ...pair services USA 1 888 932 9183 Canada 1 905 829 2505 Emergency After hours 1 416 624 0386 Servicing USA and Canada Scroll down to view your document Over 100 years cumulative experience 24 hour rush...

Page 2: ...MN1274 06 2001 Installation Manual Installation Manual...

Page 3: ......

Page 4: ...installation and removal inconvenience or consequential damage including injury to any person or property caused by items of our manufacture or sale Some countries and U S states do not allow exclusi...

Page 5: ...this equipment WARNING Be sure all wiring complies with the National Electrical Code and all regional and local codes Improper wiring may result in unsafe conditions WARNING The stop input to this eq...

Page 6: ...nstead we recommend using a four wire Wye CAUTION Drives are intended to be connected to a permanent main power source not a portable power source Suitable fusing and circuit protection devices are re...

Page 7: ...er rotation or incorrect commutation CAUTION The threaded holes in the top and bottom of the enclosure are for cable clamps Be sure to use a M4 bolt no longer than 12mm in length Longer bolts might sh...

Page 8: ...nical installation and location requirements 8 2 2 1 Dimensions and mounting 9 2 3 Power connections 10 2 3 1 Grounding 11 2 3 2 Input power conditioning 12 2 3 3 Power disconnect and protection devic...

Page 9: ...4 7 Optional breakout board for connector X5 48 3 4 8 CAN peripherals 48 4 Tuning and Configuration 49 4 1 Outline 49 4 1 1 Connecting the MintDrive to the PC 49 4 1 2 Installing the software 49 4 1...

Page 10: ...ndow 74 5 4 2 Program window 74 5 4 3 Terminal window 75 5 4 4 Useful commands for testing 75 5 4 5 Firmware update 77 6 Specifications 79 6 1 Outline 79 6 1 1 General specifications 79 6 1 2 Power 80...

Page 11: ...2 3 Configuring nodes 111 B 2 4 Network manager node 1 111 B 2 5 Scanning nodes 111 B 2 6 Connecting to nodes 112 B 2 7 Monitoring CAN events 113 B 2 8 Controller nodes 114 B 2 9 I O nodes 115 B 2 10...

Page 12: ...CE compliant components 130 C 1 4 EMC wiring technique 130 C 1 5 EMC installation suggestions 131 C 1 6 Wiring of shielded screened cables 132 D Accessories and options 135 D 1 Outline 135 D 1 1 Cable...

Page 13: ...xii...

Page 14: ...eneral purpose analog outputs H CANopen protocol for peer to peer communications with other Mint v4 controllers and other third party devices H Proprietary CAN protocol for control of Baldor remote I...

Page 15: ...The catalog number describing the model is marked on a label on the side of the unit It is a good idea to look for the catalog number sometimes shown as ID No and write it in the space provided below...

Page 16: ...LEDs The CAN 1 and 2 LEDs refer to the independent CAN buses CAN1 and CAN2 Green The bus is operational Red Green The bus is passive see page 94 Red The bus is OFF see page 94 Off No primary power to...

Page 17: ...henry phase ms millisecond s microsecond ns nanosecond Kbaud kilobaud the same as Kbit s in most applications MB megabytes CDROM Compact Disc Read Only Memory CTRL E on the PC keyboard press Ctrl then...

Page 18: ...some applications such as those with high deceleration rates there may be a requirement for a dynamic brake or regeneration resistor Note Without the braking resistor the drive may produce an overvolt...

Page 19: ...below using the example number CBL030SF ALM Meaning Alternatives CBL The item is a cable 030 Indicates the length in this example 3 0 meters Various lengths are available SF The cable is a Servo motor...

Page 20: ...required for the drive enable input the digital outputs and the digital inputs 24V cannot be sourced from the MintDrive unit itself A mains source installation over voltage category III or less in th...

Page 21: ...output current 2 5 per 1 8 F 1 C from 104 F 40 C to 122 F 50 C maximum H The MintDrive must be installed in relative humidity levels of less than 80 for temperatures up to 87 F 31 C decreasing linearl...

Page 22: ...o the front panel The MintDrive must be mounted upright to ensure adequate cooling you can check this by ensuring that the Hazardous Voltages warning information is clearly readable to you M5 bolts or...

Page 23: ...t of the MintDrive for a fail safe method to disconnect power The MintDrive will remain in a powered condition until all input power is removed from the MintDrive and the internal bus voltage is deple...

Page 24: ...rce There should be a separate connection from the earth at the mains source to the plant ground rod Three phase units Route wires L1 L2 L3 and Earth Ground together in conduit or cable Power wires mu...

Page 25: ...r line additional protection is required A Transient Voltage Surge Suppressor TVSS of the proper rating must be installed between the AC line reactor or isolation transformer and the AC input to the M...

Page 26: ...aker and fuse not supplied For CE Compliance see Appendix C Circuit Breaker L3 PE L3 L2 L3 L1 L2 L3 Figure 6 Circuit breaker and fuse three phase package size C Note Metal conduit or shielded cable sh...

Page 27: ...MD1A02xx xxxx 115V 1 2 5A 6 6 14 2 5 MD2A02xx xxxx 230V 1 2 5A 6 6 14 2 5 MD1A05xx xxxx 115V 1 5A 10 10 14 2 5 MD2A05xx xxxx 230V 1 5A 10 10 14 2 5 MD1A07xx xxxx 115V 1 7 5A 16 16 14 2 5 MD2A07xx xxx...

Page 28: ...mm in length Longer bolts may short circuit the electrical components inside the MintDrive 2 3 6 Single phase connection to package size C Location Connector X1 single or 2 part connector Part number...

Page 29: ...ol supply Depending on model a 24VDC control supply may be required to provide power to the control electronics when power is removed from the amplifier see page 2 This is useful for safety where powe...

Page 30: ...Vcc Vcc External drive Vcc Vcc Vcc Vcc External drive Vcc Vcc Vcc Vcc Regeneration Resistor Note It is important to ensure that the total current required by the powering drive the external drive s an...

Page 31: ...lter will be necessary to comply with CE specifications Schaffner filters are recommended with part numbers shown below Voltage 230VAC 1 115VAC 1 MintDrive current rating 2 5A FN2070 10 06 FN9675 3 06...

Page 32: ...tDrive UVW outputs The MintDrive might be damaged CAUTION The motor leads U V and W must be connected to their corresponding U V or W terminal on the motor Mis connection will result in uncontrolled m...

Page 33: ...r certain circumstances it may also be necessary to fit a brake to the motor This is important with hanging loads where disconnecting the motor windings could result in the load falling Contact Baldor...

Page 34: ...age Resistor power rating MintDrive current rating 230VAC 115VAC power rating 7 5A RG39 RG22 100W 10A RG10 RG4 7 320W 15A RG10 RG4 7 320W Table 2 Baldor regeneration resistor catalog numbers All the r...

Page 35: ...on connector X3 for master slave type applications Encoder based MintDrives duplicate the encoder signals entering X2 The following points must be observed when wiring the feedback device H The feedba...

Page 36: ...e metallic shell of the D type connector Location Connector X2 15 pin D type female connector Pin Resolver function 1 SIN 2 COS 3 REF 4 5 not connected 6 SIN 7 COS 8 REF 9 10 not connected 11 External...

Page 37: ...ber CBL030SF ALM Signal name X2 pin Motor cable pin Resolver cable wire color REF 3 1 Red REF 8 2 Blue COS 2 3 Green COS 7 4 Yellow SIN 1 5 Pink SIN 6 6 Grey 1 2 3 4 5 6 7 8 9 10 11 12 Cable connector...

Page 38: ...to the metallic shell of the D type connector Location Connector X2 15 pin D type female connector Pin Encoder function 1 CHA 2 CHB 3 CHZ 4 Hall U 5 Hall U 6 CHA 7 CHB 8 CHZ 9 Hall W 10 Hall V 11 5V 1...

Page 39: ...ntrols the sense of the digital inputs DIN10 to DIN17 see pages 35 to 37 Active high To cause the digital inputs to be active high active when a voltage of 24VDC is applied to them connect 24VDC to pi...

Page 40: ...optically isolated from internal generated power rails therefore care must be taken to avoid earth loops and similar associated problems The input buffers do not offer any low pass filtering of the a...

Page 41: ...mpedance 4k Sampling interval 5ms Note There is a 15V reference voltage supplied on X11 pin 3 from a 1 96k resistor A linear command potentiometer of 5k may be used with X11 pin 2 connected to the wip...

Page 42: ...10VDC Resolution auto selecting as follows 12 bit with sign 1V DC input 9 bit with sign 1V DC input Common mode rejection 40dB Input impedance 5k Sampling interval 5ms Optional 4 20mA current mode con...

Page 43: ...te channels of the ADC a Maxim MAX197 There is some input protection should the input voltage exceed the maximum rating shown above although this is for protection against transitional over voltage lo...

Page 44: ...ill return the value as a percentage where 0V 0 10V 100 and 10V 100 CAUTION The isolation provided on the inputs outputs master encoder and CAN is nominal The primary function of the isolation is to b...

Page 45: ...f various control conditions The voltage from the output buffer is supplied through a 50 resistor for short circuit protection AOUT2 AUXDAC 2 6 7 X11 Output 2 Output 3 1 GND AOUT3 AUXDAC 3 Figure 13 A...

Page 46: ...an 3 They are derived from a high frequency PWM pulse train from the main processor which is subsequently filtered These signals are buffered by an operational amplifier in the MintDrive and are capab...

Page 47: ...rt any of the following typical functions H Stop input H Home input H Forward limit H Reverse limit H Interrupts controlled from Mint H General purpose use DIN0 and DIN2 are also capable of special al...

Page 48: ...gured for any number of user definable functions These inputs are sampled every 15 36ms If a faster response is required DIN0 DIN9 on connector X5 can be used Each of the AC optically isolated digital...

Page 49: ...rent capability of at least 3A to fulfill all the current requirements of the above loads The sense of the inputs can also be controlled individually in Mint using the keyword INPUTACTIVELEVEL See als...

Page 50: ...The digital inputs DIN0 DIN9 can be read individually using the associated Mint IN keyword for example IN 0 and can be configured for any number of user definable functions These inputs are sampled e...

Page 51: ...ent requirements of the above loads The sense of the inputs can also be controlled individually in Mint using the keyword INPUTACTIVELEVEL The inputs are compatible with mechanical switches or open co...

Page 52: ...with some sinking current while others source current However if the outputs are used to directly drive a relay a suitably rated flyback diode must be fitted across the relay coil observing the correc...

Page 53: ...3 X5 25 USR V S D Relay coil with flyback diode USR GND VN330SP output driver 250mA max OUT 4 X5 10 Figure 19 X5 Digital output circuit These MOSFET type outputs are driven from ST VN330SP devices and...

Page 54: ...n Shielded twisted pair cable is recommended If a resolver is fitted to the MintDrive the output resolution is 1024 ppr pulses per revolution This is equivalent to a 1024 line encoder giving 4096 quad...

Page 55: ...ed The input receiver circuit allows only encoders with differential line drivers RS422 to be used Single ended operation is not supported The interface also provides an isolated 5V supply for the enc...

Page 56: ...43 Figure 22 Auxiliary encoder circuit...

Page 57: ...RS485 RS422 connections on a single 9 pin female D type connector X7 is a 9 pin male D type connector for the single MintDrive serial port The four wire RS485 connections are also available on the thi...

Page 58: ...e feed carriage return LF CR combination but only expects a carriage return CR from the host terminal The RS232 connections are brought out onto a 9 pin male D type connector an identical pin configur...

Page 59: ...d to the impedance of the transmission line cable Each TX RX network requires a termination resistor at the final RX connnection but intermediate devices must not be fitted with termination resistors...

Page 60: ...hen the following connections should be made 7 RTS 8 CTS 3 TXD 2 RXD 5 GND 1 RXD 2 TXD 3 GND 5 Baldor HMI PLC PORT MintDrive X7 Figure 25 Cable wiring if hardware handshaking is not required If hardwa...

Page 61: ...inputs and analog outputs of the MintDrive s X5 connector together with indicator LEDs Figure 27 Optional breakout board The catalog number for the breakout board is OPT017 501 A 2m 6ft cable is avail...

Page 62: ...ial cable with catalog number CBL001 501 must not be used with the MintDrive as this may result in damage to the unit Please use serial cable CBL023 501 or see pages 44 and 45 If this is the first tim...

Page 63: ...te If the Ready LED is red after powering the unit turn off the power immediately This indicates that the drive has detected a fault see section 7 1 3 on page 87 If this is a severe error condition su...

Page 64: ...the way it controls the motor This information can then be stored in a configuration file together with other information The Mint Configuration Tool MCT provides a simple way to tune the MintDrive an...

Page 65: ...lect Counts per revolution in the Scale to box This means that references to movement can be expressed in revolutions rather than encoder counts Note Mint defines all positional and speed related moti...

Page 66: ...it is safe for the motor to operate If it is safe for the motor to rotate click Coarse Tune Motor Parameters Click OK to confirm that you wish to begin the tests MCT will begin the motor tests 8 For t...

Page 67: ...al so hard you go right past Demand To try and stay level you ease off the gas but end up falling behind a little You keep repeating this and after a few tries you end up level with Demand travelling...

Page 68: ...m stability This gain allows a faster response to demand speed changes with lower following errors for example you would increase KVELFF to reduce the following error during the slew section of a trap...

Page 69: ...his click Calculate The Calculate Current Proportional Gain dialog box will appear Click Use this value to use the theoretical value The following information should be considered if you change any of...

Page 70: ...lick Calculate The Calculate Velocity Feedforward Gain dialog box will appear Click Use this value to enter the value 4 In the Shape Parameters frame ensure the Move Type box is set to Step Click in t...

Page 71: ...ifferent response With only KVELFF defined you will get very little response The Proportional gain term KPROP should be used to overcome the large following error 6 Click the Position Loop Tuning tab...

Page 72: ...ics tab shows measured values which can be used as a further guide to tuning 8 When you have tuned the motor click Next to continue 4 3 4 Jog test This tab allows you to perform a jog test on the moto...

Page 73: ...guration of other parameters such as inputs and outputs If you have not used the MCT before it is recommended that you continue using the Wizard mode to guide you through all the stages of configurati...

Page 74: ...b allows you to define how each digital input will be triggered and optionally if it is to be allocated to a special function for example the Forward Limit If you do not wish to configure any inputs a...

Page 75: ...onfigure any outputs at this stage click Next and go to section 4 4 3 1 Drag the appropriate icons to setup the digital outputs If you do not understand an item click in its box and read the informati...

Page 76: ...reset all the items on the tab to their original values When you have finished click Next to continue 4 4 4 Axis0 error configuration The Axis0 Error Configuration tab allows you to setup various axi...

Page 77: ...window The Undo Changes button can be used to reset all the items on the tab to their original values When you have finished click Next to continue 4 4 6 Miscellaneous configuration The Miscellaneous...

Page 78: ...n box is showing Mint Configuration File Format If it is not then select this option Click Next to continue 2 The completed configuration file will be shown If you wish to go back and make any further...

Page 79: ...The second file to save is the configuration file This is the file that can be loaded into Mint Workbench and sent to the MintDrive Select a folder and enter a filename for the configuration file Cli...

Page 80: ...information on Mint programming see the Mint v4 Programming Guide 5 1 1 Completing configuration To complete the configuration process the configuration file must be downloaded to the MintDrive On th...

Page 81: ...ption will appear 5 2 2 1 Standard toolbar functions 1 2 3 4 5 6 7 8 9 10 11 12 13 14 15 16 17 18 19 1 Controller reset Not available on MintDrive 2 Save Displays the save dialog box 3 Print Displays...

Page 82: ...os Displays the Assign Macros to Function Keys F1 F12 dialog box 2 Execute macro Starts the macro assigned to that button 5 2 2 4 Status bar The status bar provides information for the currently selec...

Page 83: ...elect a parameter to be monitored click one of the parameter boxes on the right of the QuickWatch tab In the drop down box that appears click on the item you wish to monitor The value will appear in t...

Page 84: ...is set by MCT during the tuning process If you need to recalculate this value use the formula KIPROP 740 L A V VAC where L Line to neutral inductance of the motor in mH A V Amps volt scaling of the c...

Page 85: ...on to see details of the error Depending on the type of error that occurred you might need to click the Clear Motion Errors button before further moves can be performed Depending on the type of move c...

Page 86: ...only available after a Position move has been performed Normally the graph will automatically scale itself to show the largest maximum and minimum captured values for the selected plot types However t...

Page 87: ...the dialog box that appears click Yes to confirm download Saved configuration files can also be loaded into the configuration window using File Open Config on the main menu 5 4 2 Program window If th...

Page 88: ...be a useful tool for performing simple tests Before testing can begin check that the enable button on the motion toolbar is pressed the MintDrive Monitor LED display should be showing the symbol The f...

Page 89: ...at half of one revolution per second To try it type MOVER 2 followed by the Enter key GO followed by the Enter key Combining commands on one line Commands can be combined on one line by separating th...

Page 90: ...and save them before updating the firmware From the Tools menu select Update Firmware and follow the instructions on screen Once the firmware has been updated both the Configuration and Program flash...

Page 91: ...78...

Page 92: ...oftware configurable for forward limit reverse limit stop and home Two inputs configurable for high speed position latch CAPT on axis position and master encoder position H 9 optically isolated digita...

Page 93: ...minal DC Bus voltage VDC 160 Minimum DC Bus voltage 135 Maximum DC Bus voltage 176 Output voltage line line VDC Bus 320V VRMS 0 230 Nominal phase current 10 ARMS 2 5 5 0 7 5 10 15 Peak phase current 1...

Page 94: ...8 195 off 183 188 on 188 195 off 183 188 Nominal power kW 0 25 1 0 Peak power kW 2 7 15 Maximum regeneration switching current ARMS 10 40 Maximum load inductance mH 100 Note 2 5A model contains an int...

Page 95: ...esolver Encoder 1024ppr simulated 1024ppr 2500ppr actual encoder lines Baldor BSM series motor Master auxiliary encoder input Unit All models Signal RS422 Operating mode A B quadrature Maximum input f...

Page 96: ...erating temperature range C F Minimum Maximum Derate 5 40 2 5 C between 40 C and 50 C max 41 104 2 5 1 8 F between 40 C and 50 C max Storage temperature range 25 70 13 158 Humidity 10 90 non condensin...

Page 97: ...84...

Page 98: ...g number of the motor that you are using H The version of Mint WorkBench that you are using click Help About on the main menu H Give a clear description of what you are trying to do for example trying...

Page 99: ...232 cable is connected between the PC serial port and to connector X7 on the MintDrive Check the wiring of the RS232 cable or try an alternate cable If available on the PC try an alternative serial po...

Page 100: ...nitor LED indicates E The MintDrive has detected a motion error Type PRINT AXISERROR at the command line or click on the error button on the motion toolbar to find the error code s Click the Clear Mot...

Page 101: ...been reset but failed to clear error flag Try clearing the error manually using CANCEL type CANCEL and power cycle the MintDrive If the same message re appears or the Ready LED stays red contact Bald...

Page 102: ...ually and proceed to the feedback alignment test Feedback alignment test fails If the MintDrive has the internal 24VDC supply check that the mains is powered and connected Check that the motor UVW cab...

Page 103: ...motor data If after removing Mint gains the motor is still unstable try reducing the Speed Proportional gain and Speed Integral gain I get a Following Error AXISERROR bit 5 is set and the drive disabl...

Page 104: ...control board and current sensor Contact Baldor Technical Support 7 Power Base fault Desaturation of power device occurred or the bus current threshold was exceeded If this occurs when enabling the dr...

Page 105: ...m threshold If this occurs during acceleration then the load may be too great for the acceleration selected Try reducing the value of the Mint ACCEL parameter Check that the correct AC voltage is bein...

Page 106: ...nd the drive Ensure that the unit is adequately ventilated If the problem persists add additional cooling 21 Lost User Data Battery backed RAM parameters have been lost or corrupted If the fault did n...

Page 107: ...LED is flashing red The CAN bus is passive This means that the bus is operational but errors are occurring Check that all nodes are running at the same baud rate Check that each node has been assigne...

Page 108: ...een assigned a unique NodeID Check that the network has been terminated at each end If the MintDrive is at the end of the network check that the CAN2 switch on the front panel is in the ON position Ch...

Page 109: ...96...

Page 110: ...for the motor The corrective signal is calculated by a PIDVF Proportional Integral Derivative and Velocity Feed Forward algorithm On the following page Figure A 1 shows the MintDrive s positional spee...

Page 111: ...98 Figure A 1 MintDrive Closed Loop System Motor Speed Filter 16 Sample Filter...

Page 112: ...00 demand This effect can be limited using the KINTLIMIT keyword which limits the effect of the integral gain at a defined percentage of the demand output The final term in the control loop is velocit...

Page 113: ...algorithm Every servo tick the measured position and velocity are sampled The profiler generates a new demand position speed and acceleration according to the move type requested and the specified par...

Page 114: ...d to operate in 3 different modes H as a servo drive where speed and position loops are active and the motion profiler produces a speed demand CONFIG 1 H as a velocity servo drive similar to the servo...

Page 115: ...ge This is useful for tuning the motor to overcome following error and decrease response time The trapezoid move type performs a trapezoidal move based on a given acceleration slew speed and decelerat...

Page 116: ...y noise on the velocity measurement and introduce oscillations Click on the Position Loop tab and enter 0 as an initial value for KVEL KINT Integral gain The integral term KINT can be used to overcome...

Page 117: ...by introducing a value for the damping terms KVEL and KDERIV The Step Response Statistics tab can be used to analyze the response to the step move A 1 7 3 Position Loop Tuning using a trapezoidal mov...

Page 118: ...t becomes stiff to turn Use WorkBench to perform test moves and monitor results If KVEL is increased too much instability will occur Typically KVELFF is found to be close to KVEL when operating the co...

Page 119: ...106...

Page 120: ...ame controller via the CAN link using the CAL protocol Up to 63 mixed type CAN peripherals may be connected to the MintDrive CAN network with the limitation that only 4 enabled keypads are allowed at...

Page 121: ...be tied together through the CAN cabling This ensures that the CAN signal levels transmitted by MintDrive or CAN peripheral devices are within the common mode range of the receiver circuitry of other...

Page 122: ...mited to 500Kbaud owing to the propagation delay of the opto isolators Correct operation of CAN1 can only be achieved with screened shielded twisted pair cabling CAN1 and CAN1 must form a twisted pair...

Page 123: ...ller Baldor 41 _ntOPERATOR_PANEL HMI operator panel Baldor A third party CANopen I O node may have a combination of analog and digital I O modules The node type for such a node is a bitmap of the type...

Page 124: ...s via nodeguarding and supervision of the bus status H SDO Manager Setting up and maintaining a list of all connections that are active between nodes comms array links and groups H Configuration Manag...

Page 125: ...twork manager node to automatically access the comms array of live controller nodes over CAN If the user wants a controller node n to access the comms array of the network manager node a connection mu...

Page 126: ...il they are read using the CANEVENT keyword When one or more events are held in the buffer the Mint CAN event handler subroutine for bus 1 will be called CAN1 if it exists The CANEVENT and CANEVENTINF...

Page 127: ...ode 23 is valid before it is used PAUSE CONNECTSTATUS 23 1 For node 7 to access its own comms array index 5 for example the following commands can be used COMMS 5 6 to write a value v COMMS 5 to read...

Page 128: ...cations COMMS 1 to COMMS 5 are mapped to subroutines COMMS1 to COMMS5 B 2 9 I O nodes A variety of third party I O nodes are available that include devices with fixed configuration a fixed number of a...

Page 129: ...output channel 3 on node 2 Similarly REMOTEDAC 1 2 3 100 will set the value of analog output channel 3 on node 2 to 100 B 2 9 3 Extra Analog I O Functionality Mint provides some extra functionality wi...

Page 130: ...Baldor controllers Communication between a Baldor controller and a HMI operator panel is achieved via the comms array in the HMI This comms array consists of the following H 254 x 32 bit integer vari...

Page 131: ...int CAN event handler subroutine CAN1 and the associated CAN event information read using CANEVENTINFO will inform the user which HMI comms location has changed The COMMS keyword can then be used to r...

Page 132: ...y of the opto isolators Correct operation of CAN2 can only be achieved with screened shielded twisted pair cabling CAN2 and CAN2 must form a twisted pair with the shield connected to the connector bac...

Page 133: ...by fitting a jumper to JP3 Also when connecting a CAN peripheral to a MintDrive controller the peripheral s CAN Bus channel 2 must be selected by fitting jumpers JP1 and JP2 to position 2 Jumpers JP4...

Page 134: ...de 2 _ntOUTPUT_NODE_8 7 125 8 relay output node 3 _ntRELAY_NODE_8 7 125 Reserved 4 7 ioNode 24 24 8 _ntIONODE24_24 8 125 KeypadNode 9 _ntKEYPAD 14 125 B 3 6 Static configuration To perform static conf...

Page 135: ...ve jumpers JP4 and JP5 B 3 7 Adding the node to the network Now that the peripheral has been given its unique node ID it can be added to the network For example assuming a RelayNode 8 has been statica...

Page 136: ...ve and there is a problem with communication To list all the present nodes together with their type and if they are live type VIEW NODELIVE Live on Node 7 will have been abbreviated to L and the outpu...

Page 137: ...nal channel to be used The terminal channel for a KeypadNode is assigned using the Mint constant _tmLCD1 _tmLCD2 _tmLCD3 or _tmLCD4 For example assuming the KeypadNode is configured as node 14 the def...

Page 138: ...onfigured onto the bus other Mint terminal keywords such as PRINT INKEY LOCATE and CLS can be used See the CAN Peripherals Installation Manual and the Mint Programming Guide for more details about the...

Page 139: ...n page 121 H Statically configure the two InputNode 8 nodes with Node IDs 1 and 2 H Statically configure the two OutputNode 8 nodes with Node IDs 3 and 4 H Statically configure the RelayNode 8 node wi...

Page 140: ...UTERROR ROE LOCATE LOCATE REMOTEOUTX ROX NODELIVE NL REMOTERESET RR NODETYPE NT REMOTESETUP RMS PRINT REMOTESTATUS RS READKEY RK TERMINAL TM B 3 14 1 Using abbreviations Abbreviations can make text en...

Page 141: ...128...

Page 142: ...that the products are only components and not ready for immediate or instant use within the meaning of Safety law of appliance EMC Law or Machine directive The final mode of operation is defined only...

Page 143: ...rce at the time of installing into service in the same way as the system integrator previously mentioned Remember it is the instructions of installation and use coupled with the product that comply wi...

Page 144: ...ould be made with a grounding strap from each element to a central grounding point H Keep the power wiring motor and power cable and control wiring separated If these wires must cross be sure they cro...

Page 145: ...all screen Conductive Clamp Must contact bare cable shield and be secured to metal backplane Twisted pairs Cable MintDrive Figure C 2 Grounding cable screens Cable 1 6 2 7 3 8 MintDrive X2 Twisted pai...

Page 146: ...e Twisted pairs Connector backshell Connector backshell Figure C 4 Handwheel Encoder cable grounding 1 6 2 7 3 8 11 13 MintDrive X2 Encoder Connector Housing Connection of shields to digital ground is...

Page 147: ...134...

Page 148: ...M CBL091SP FHM CBL106SP FHM CBL122SP FHM CBL152SP FHM CBL229SP FHM CBL305SP FHM 5 10 15 20 25 30 35 40 50 75 100 1 5 3 0 4 6 6 1 7 6 9 1 10 6 12 2 15 2 22 9 30 5 20 Amps Power Cable Assembly Quick Con...

Page 149: ...F ALM CBL379SF ALM 5 10 15 20 25 30 35 40 50 75 100 125 1 5 3 0 4 6 6 1 7 6 9 1 10 6 12 2 15 2 22 9 30 5 37 9 Resolver Feedback Cable Assembly Quick Connect Style CBL030SF ALQ CBL061SF ALQ CBL076SF AL...

Page 150: ...ated volts Rated amps 40 C Leakage current mA Weight lbs kg Baldor catalog number FN 2070 6 06 250 6 0 4 0 99 0 45 ASR30545 FN 2070 10 06 250 10 0 4 1 61 0 73 FN2070 10 06 FN 2070 12 06 250 12 0 4 1 6...

Page 151: ...2070 12 06 L K J H G F E D C B A Dimensions inches mm Dimension FN2070 6 06 FN2070 10 06 FN2070 12 06 A 4 47 113 5 6 14 156 B 2 26 57 5 C 1 83 46 6 D 3 70 94 5 14 130 5 E 4 06 103 5 63 143 F 0 98 25 G...

Page 152: ...a fault 1 over voltage occurs Baldor catalog number MintDrive 115VAC drives 230VAC drives MintDrive current rating Package size Baldor catalog number Power rating W Baldor catalog number Power rating...

Page 153: ...break out board The break out board often referred to as a card mounts on a 35mm DIN rail The board has two part screw terminals for all of the digital inputs digital outputs analog inputs and analog...

Page 154: ......

Page 155: ...rinted in USA 6 00 CH TEL 41 52 647 4700 FAX 41 52 659 2394 D TEL 49 89 90 50 80 FAX 49 89 90 50 8491 UK TEL 44 1342 31 5977 FAX 44 1342 32 8930 I TEL 39 11 562 4440 FAX 39 11 562 5660 AU TEL 61 29674...

Reviews: