


6.5
Servo-trimming of axes 7-12
6.5.1
Preparation
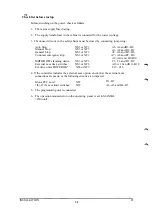
Equipment required:
- Two channel printer (chart recorder) 25-125 mm/s, e.g. Brush 220
- Cables
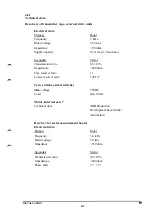
Settings required in the control system:
- Speed controller parameters for internal axis 7
- Position-controller parameters for axes 7-12
Settings required in externall driv systemet:
- Speed-controller parameters
- Current limit
- Overload protection
For setting and trimming of external driv systemet, please refer to the relevant
documentation. When trimming the external, driv systemet, the control system can generate
speed reference. A description of this, together with some general hints for trimming the
speed regulator are given in section 6.5.2.
Connect and start the external axes as described in section 6.4.2.
Start by trimming the speed controller and then continue with the position controller. All
axis speed supervision functions are not active during trimming.
6.5.2
Speed controller, internal axis 7
1. If the axis has variable moment of inertia.the gain should be trimmed with the
smallest possible moment of inertia. The integral part of the gain should be trimmed with the
maximum possible moment of inertia.
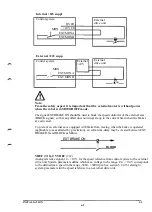
2. Connect the printer channels to the test outputs on the robot computer. (Marked 1
and 2 with common zero point ground. Voltage level ±10 V).
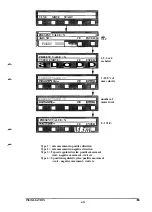
3. TSIG. Activate test signals via the P-unit using function TSIG (see section 6.5.4.1):
- CHANNEL 0 (output 1) = TEST SIGNAL 17 (speed, high) or 18 (speed low).
- CHANNEL 1 = TEST SIGNAL 16 (torque reference)
4. TRIM. TUNE. The TUNE function is not yet available. The tuning parameters are
entered as system parameters.
External axes are servo-trimmed according to the suppliers instructions. Offset
error should be eliminated. That is to say, when supplied with zero reference, the
axis should be at stand still. The following example is valid for an internal axis 7.
- P = approx. 5 times
- I = 2.5 s
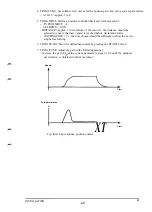
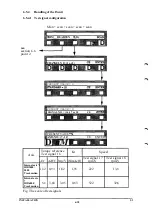
5. TRIM, MOVE. (The robot first has to be synchronized) Define a back and forth
trimming movement using the MOVE function (see section 6.5.4.2):
- TYPEOFMOVE = 3
- VELOCITY = approx. 5%, the speed must be low enough to guarantee not
encountering the current limit but high enough to prevent the friction from
affecting result.
- DISTANCE = 1 revolution of the resolver, the distance should be selected to
ensure that max. speed is reached before declaration starts.
- WATTING TIME = 1 s, the time chosen should be sufficient to allow the axis to
stop before turning.
6. TRIM, START. Start the defined movement by pressing the START button (see
section 6.5.4.2).
INSTALLATION S3
6:15
Summary of Contents for IRB 2000
Page 8: ...Description 1KB 2000 ...
Page 10: ...Description 1KB 2000 ...
Page 12: ...Description 1KB 2000 6 ...
Page 20: ...Description 1KB 2000 14 ...
Page 32: ...Description 1KB 2000 26 ...
Page 40: ...5 3 2 Dimensional drawings Description 34 1KB 2000 ...
Page 41: ..._200 _D D_ Description 35 1KB 2000 ...
Page 44: ...Description 1KB 2000 38 ...
Page 64: ...Description 1KB 2000 58 ...
Page 77: ...Safety 1KB 2000 IBB 3000 12 1KB 3200 1KB 6000 ...
Page 80: ...Installation H B 2000 ...
Page 82: ...Installation 1KB 2000 ...
Page 91: ...Installation 1KB 2000 12 ...
Page 95: ...Installation 1KB 2000 16 ...
Page 110: ...INSTALLATION S3 0 4 ...
Page 112: ...INSTALLATION S3 1 2 ...
Page 160: ...INSTALLATION 3 46 ...
Page 234: ...INSTALLATION 5 70 ...
Page 262: ...INSTALLATION S3 7 6 ...


