Videonics PowerScript
Setting Object Attributes
35
4
Click the Resize handle and drag down and to the right. Release the mouse button
when the oval object is about twice its original size and as near to a perfect circle as you
can make it.
5
Click the Move handle and drag the oval object about one-third of the way down from
the top-left corner of the screen.
Compare your page to the one shown at the left.
Make sure the oval object is selected before continuing with the following steps.
Setting Object Attributes
1
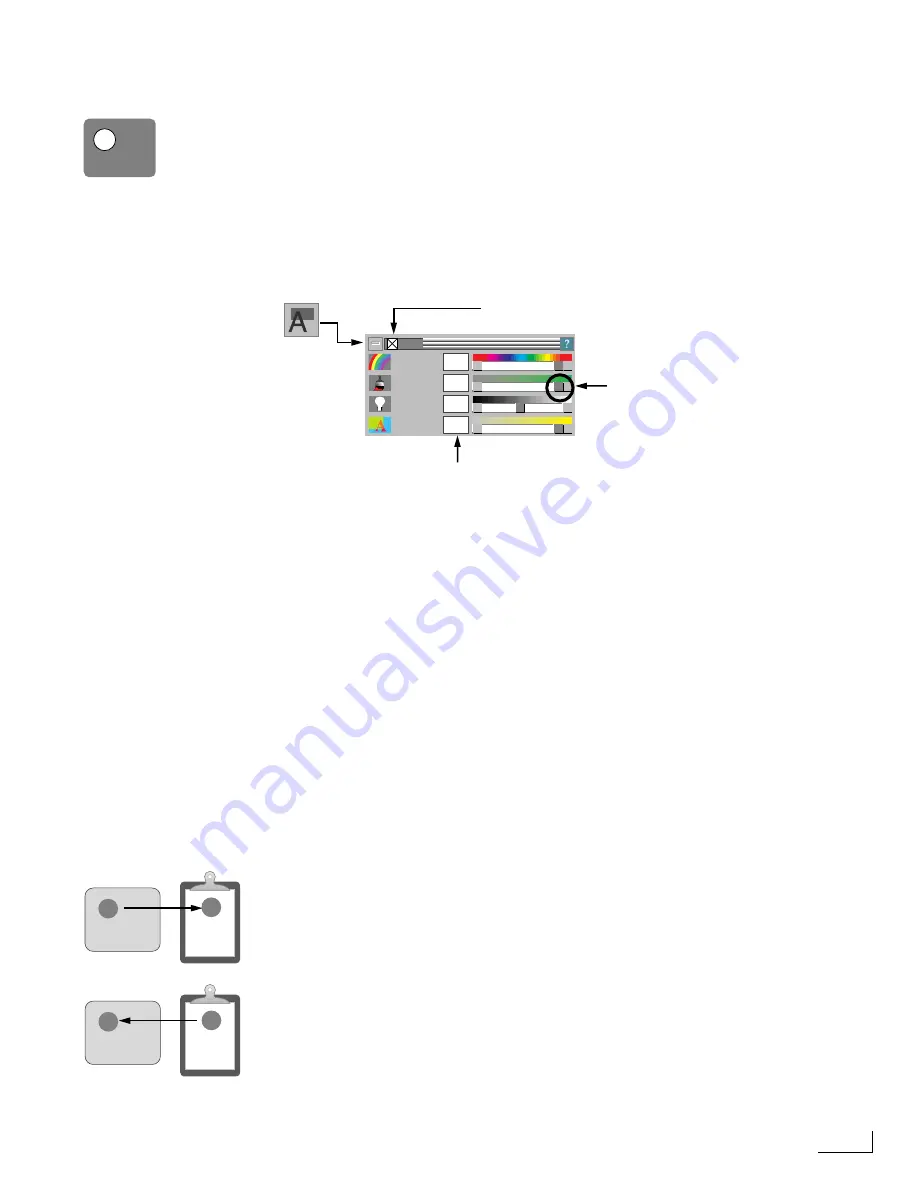
Click the
Fill
option on the MAIN MENU to display the FILL menu.
The FILL menu determines the object’s color and opacity (or, transparency). You can approx-
imate colors using the slider knobs for each of the values—but to create precise values, it’s
best to enter them in the text boxes.
2
Click inside the
Hue
text box and enter “100” to specify the color red.
3
Using the same procedure, enter “100” in the
Saturation
text box, and “70” in the
Brightness
text box. Leave the
Opacity
text box set to 100.
4
In order for the fill attribute you’ve specified to appear with the object, you must select
the
Fill On/Off
option—that is, the box must contain an X. If the box does not contain
an X, click the box to select the option—otherwise, leave it as is.
5
Close the FILL menu.
You now have a red circle on the page. In the following steps, you create the “bull’s-eye
target” by copying, pasting, resizing, and setting the fill color for the other elements of the
target.
6
With the oval object still selected, press and hold the Ctrl key on the keyboard, type the
letter C (for Copy), then release both keys.
You have just used
control keys
as a shortcut. PowerScript provides many different control key
combinations that you can use to display menus, select menu options, and so forth, rather
than having to display a menu and click an option every time. In this particular case, the
control key you entered (hereafter expressed as
Ctrl+C
, or whatever combination applies) is
the same as displaying the
CLIP
menu and selecting the
Copy
option. From here on in this
tutorial, we normally use control keys rather than the menus and options for the sake of effi-
ciency. For a complete list of control key combinations, see the PowerScript Quick Reference
Card.
The
Copy
option you just executed places a duplicate of the selected object (the oval) on the
PowerScript clipboard—a temporary area in memory. The original object remains on the
page, and the clipboard now contains a copy of the object.
7
Deselect the oval object on the page (by clicking in any open area of the page), then
enter Ctrl+V (for Paste).
The
Ctrl+V
control key executes the
Paste
option—which places the current contents of the
clipboard on the page. You now have two oval objects on the page (one directly on top of the
other) with the one you just pasted currently selected. You can now change the size and fill
color of the new object.
FILL
HUE
SATURATION
BRIGHTNESS
OPACITY
100
100
5 0
100
Fill On/Off
Slider Knobs
Text Boxes
Page
Clipboard
Copy
Paste
Содержание PowerScript PS4000S
Страница 22: ...Notes ...
Страница 38: ...Notes ...
Страница 72: ...Notes ...
Страница 96: ...Notes ...
Страница 122: ...Notes ...
Страница 156: ...Notes ...
Страница 174: ...Notes ...
Страница 226: ...Notes ...
Страница 236: ...Notes ...


