Section 8 Request
8-27
2.8.4.7
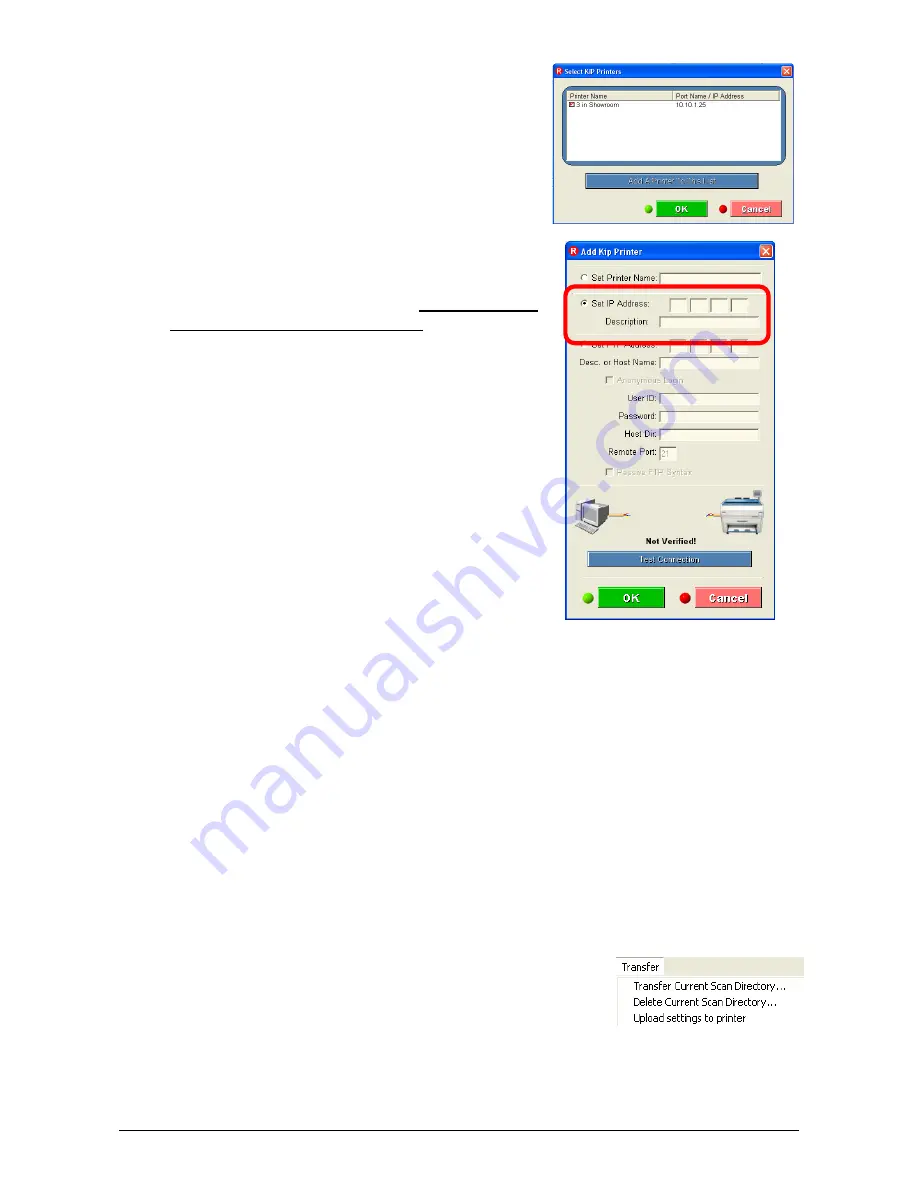
Find KIP Printers
This menu allows users to attach to KIP Printers
or Add a new KIP Printer.
FIND KIP PRINTERS
will automatically search for shared KIP Printers
installed, and will add them to the list of available
printers. Simply check the box next to the
printers to which you would like to submit prints.
Click OK to finish.
Add a Printer
There are two methods to adding a printer to the
list. By IP address or IPS name. We recommend
IP address only for the
CX8036
. Please contact
the Network Administrator for the IP address of
your
CX8036
.
Details of the settings / configuration are noted in
Section 5 - Request Installation.
2.8.5 Manage
From the MANAGE Menu, users can VIEW THE
SELECTED PRINTER’S QUEUE. This option will display
the contents of the Printer Queue. Users will be able to
see the main IPS screen, but will not be able to
manipulate it in any way.
Users can also MANAGE THE KIP PRINT QUEUE if they know the Request Master
Password.
NOTE: A user who can MANAGE the queue is able to manipulate the system!
It has been incorporated for ease of use for making file updates to the KIP internal
controller. This feature works with IP based printers only. Upon clicking this feature, the
user is prompted with an explorer window to choose and pick a file meant to be placed on
the KIP controller. For example, if the user was making an update to the IPS software with
a new executable, one would select the file at the ‘Requester’ workstation. Upon selecting
and clicking ok, the new executable would be copied into ‘C:\Monpath1\Installers’ on the
KIP IPS. An administrator would then use the management capability of Request to open
up the print queue. Upon opening Windows explorer on the KIP IPS, the administrator
could browse to the C:\Monpath1\Installers folder and perform the required upgrade. This
function has mainly been established for ease of use by any administrator to make
software upgrades.
2.8.6 Transfer
See Section 3.0 for Scan Retrieval / Deletion . Upload Settings
is a network administrator function. See Admin Service
Function )
Содержание CX 8036
Страница 1: ...Instruction Handbook CX 8036 Large Format System ...
Страница 68: ...Section 2 Copy Mode 2 28 ...
Страница 94: ...Section 4 Job Info Screen 4 8 ...
Страница 110: ...5 16 Section 5 Help Configuration d Select Printer Driver from List e Choose Keep existing Driver ...
Страница 111: ...5 17 Section 5 Help Configuration f Setup Queue name all Caps in English g It is not necessary to Share driver ...
Страница 138: ...Section 6 Windows Driver 6 22 ...
Страница 150: ...Section 7 AutoCAD HDI Driver 7 12 5 0 Custom Settings 1 2 7 3 8 4 9 10 6 5 ...
Страница 201: ...Section 8 Request 8 45 ...
Страница 206: ...Section 8 Request 8 50 ...
Страница 224: ...9 18 Section 9 KIP Print Net KIP PrintNet on Opera ...
Страница 228: ...9 22 Section 9 KIP Print Net ...
Страница 242: ...Section 11 Connectivity 11 8 ...
Страница 246: ... 4 ...
Страница 252: ...2 2 Select the Applications folder 3 Select the Utilities folder ...
Страница 253: ...3 4 Find the Printer Setup Utility 5 On the top menu bar select Printers and then Add a Printer ...
Страница 255: ...5 8 Select Add 9 The printer set up will be in the Printer List ...
Страница 256: ...6 10 In the menu bar on top select Printers then select Create Desktop Printer from the pull down choices ...
Страница 265: ......
Страница 268: ...UTAX GmbH Ohechaussee 235 22848 Norderstedt Germany ...


