Section 8 Request
8-14
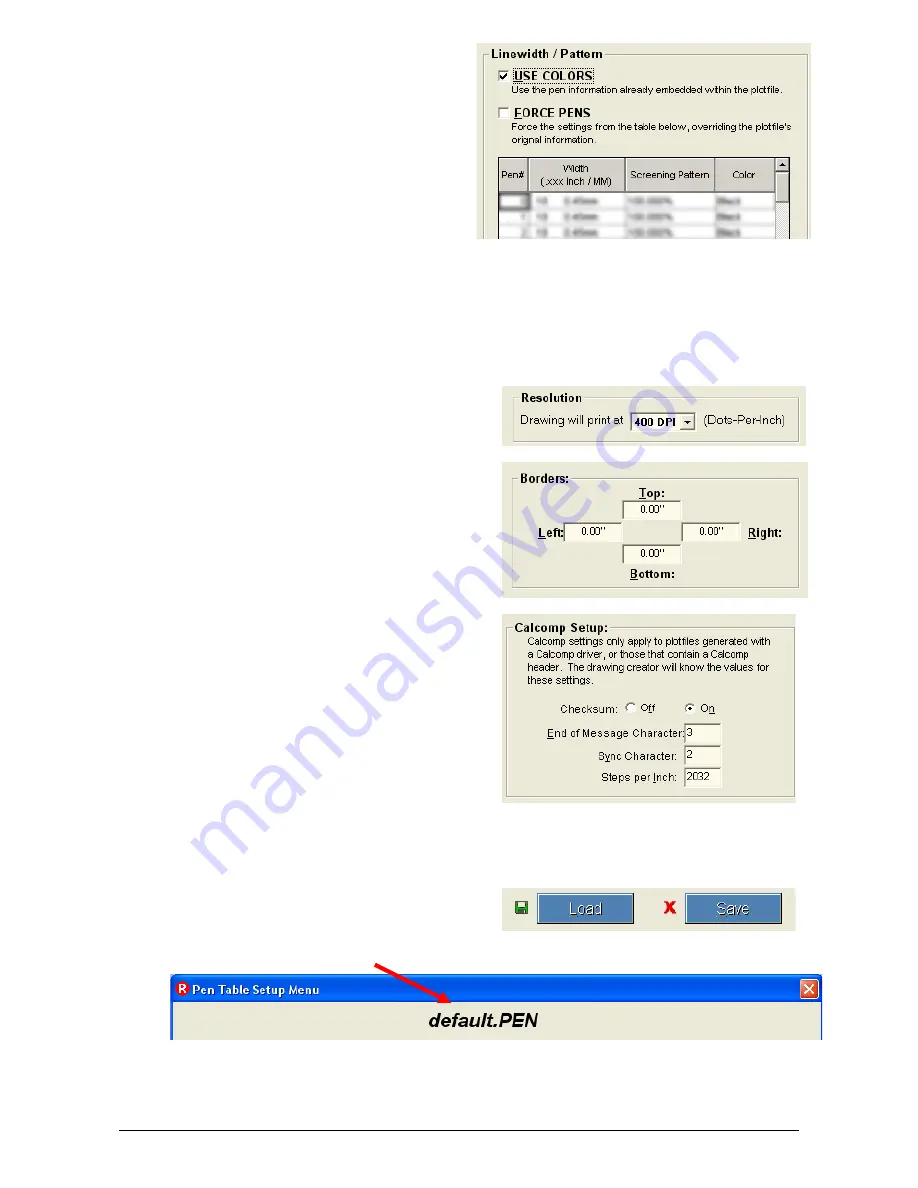
2.5.1.1 Use
Colors
– Applies a
file’s native pen width information, and
half toning information. Unless you
are making changes to a customer’s
file, USE COLORS is the setting most
often used. When USE COLORS is
applied, the Pen Table is shaded.
2.5.1.2 Force
Pens
– Request allows you to edit pen widths and screening
by pen number (with a range of Pen 0 to Pen 255.)Forces the settings in the KIP
Pen Table to override the pen information originally embedded in the file. Most
users will only need to Force Pens if the customer needs to make changes to an
existing file.
2.5.1.3 Resolution
– Allows the
selection the dots-per-inch, or resolution,
for their documents to be converted.
The
system
is a 600 DPI device.
2.5.1.4 Border
– allows a border to
be used in the file. A maximum border of
five inches can be applied to each edge.
2.5.1.5 Calcomp
setup
– Only use
this when submitting a Calcomp language
file. Allows the change of Calcomp file
settings so that the printer will interpret
any Calcomp file correctly. These settings
include Checksum, Sync Character, End
of Message Character, and Steps Per
Inch. Calcomp settings only apply to plot
files with a Calcomp text header. Most
plot files do not contain Calcomp text
headers.
2.5.1.6 Load
/
Save
–save changes in a custom Pen Table or load a table to
see or make changes. Save the table
once the changes have been made. The
current Pen Table name is displayed at
the top of the Pen Table Setup Menu.
Содержание CX 8036
Страница 1: ...Instruction Handbook CX 8036 Large Format System ...
Страница 68: ...Section 2 Copy Mode 2 28 ...
Страница 94: ...Section 4 Job Info Screen 4 8 ...
Страница 110: ...5 16 Section 5 Help Configuration d Select Printer Driver from List e Choose Keep existing Driver ...
Страница 111: ...5 17 Section 5 Help Configuration f Setup Queue name all Caps in English g It is not necessary to Share driver ...
Страница 138: ...Section 6 Windows Driver 6 22 ...
Страница 150: ...Section 7 AutoCAD HDI Driver 7 12 5 0 Custom Settings 1 2 7 3 8 4 9 10 6 5 ...
Страница 201: ...Section 8 Request 8 45 ...
Страница 206: ...Section 8 Request 8 50 ...
Страница 224: ...9 18 Section 9 KIP Print Net KIP PrintNet on Opera ...
Страница 228: ...9 22 Section 9 KIP Print Net ...
Страница 242: ...Section 11 Connectivity 11 8 ...
Страница 246: ... 4 ...
Страница 252: ...2 2 Select the Applications folder 3 Select the Utilities folder ...
Страница 253: ...3 4 Find the Printer Setup Utility 5 On the top menu bar select Printers and then Add a Printer ...
Страница 255: ...5 8 Select Add 9 The printer set up will be in the Printer List ...
Страница 256: ...6 10 In the menu bar on top select Printers then select Create Desktop Printer from the pull down choices ...
Страница 265: ......
Страница 268: ...UTAX GmbH Ohechaussee 235 22848 Norderstedt Germany ...


