5-10 Section 5 Help-Configuration
4.7
Default Mode
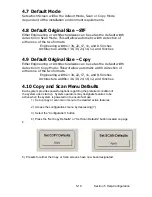
Sets which Screen will be the default Mode, Scan or Copy Mode
dependent of the installation environment requirements.
4.8
Default Original Size – STF
Either Engineering or Architectural sizes can be set as the default width
detection in Scan Mode. This will allow automatic width detection of
either one of the two formats.
Engineering widths = 34, 22, 17, 11, and 8.5 inches
Architecture widths = 36, 30, 24, 18, 12, and 9 inches
4.9
Default Original Size – Copy
Either Engineering or Architectural sizes can be set as the default width
detection in Copy Mode. This will allow automatic width detection of
either one of the two formats.
Engineering widths = 34, 22, 17, 11, and 8.5 inches
Architecture widths = 36, 30, 24, 18, 12, and 9 inches
4.10
Copy and Scan Menu Defaults
Each system provides powerful options regarding the preferred condition of
the system upon start up.
S
ystem operators may designate features to be
active when the system is powered on to ensure fast use.
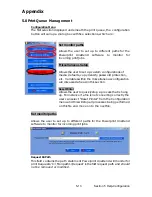
1) Set up copy or scan main menu to the desired active features
2) Access the configurations menu by depressing (?)
3) Select the “Configuration” button
4) Press the “Set Copy Defaults” or “Set Scan Defaults” button located on page
4.
5) Presets for either the Copy or Scan screens have now been designated.
Содержание CX 8036
Страница 1: ...Instruction Handbook CX 8036 Large Format System ...
Страница 68: ...Section 2 Copy Mode 2 28 ...
Страница 94: ...Section 4 Job Info Screen 4 8 ...
Страница 110: ...5 16 Section 5 Help Configuration d Select Printer Driver from List e Choose Keep existing Driver ...
Страница 111: ...5 17 Section 5 Help Configuration f Setup Queue name all Caps in English g It is not necessary to Share driver ...
Страница 138: ...Section 6 Windows Driver 6 22 ...
Страница 150: ...Section 7 AutoCAD HDI Driver 7 12 5 0 Custom Settings 1 2 7 3 8 4 9 10 6 5 ...
Страница 201: ...Section 8 Request 8 45 ...
Страница 206: ...Section 8 Request 8 50 ...
Страница 224: ...9 18 Section 9 KIP Print Net KIP PrintNet on Opera ...
Страница 228: ...9 22 Section 9 KIP Print Net ...
Страница 242: ...Section 11 Connectivity 11 8 ...
Страница 246: ... 4 ...
Страница 252: ...2 2 Select the Applications folder 3 Select the Utilities folder ...
Страница 253: ...3 4 Find the Printer Setup Utility 5 On the top menu bar select Printers and then Add a Printer ...
Страница 255: ...5 8 Select Add 9 The printer set up will be in the Printer List ...
Страница 256: ...6 10 In the menu bar on top select Printers then select Create Desktop Printer from the pull down choices ...
Страница 265: ......
Страница 268: ...UTAX GmbH Ohechaussee 235 22848 Norderstedt Germany ...


