Using the Tape Capture Web Application
Tape Capture Controls and Operation Status
183
Lightspeed Live Capture User Guide
Capturing Clips
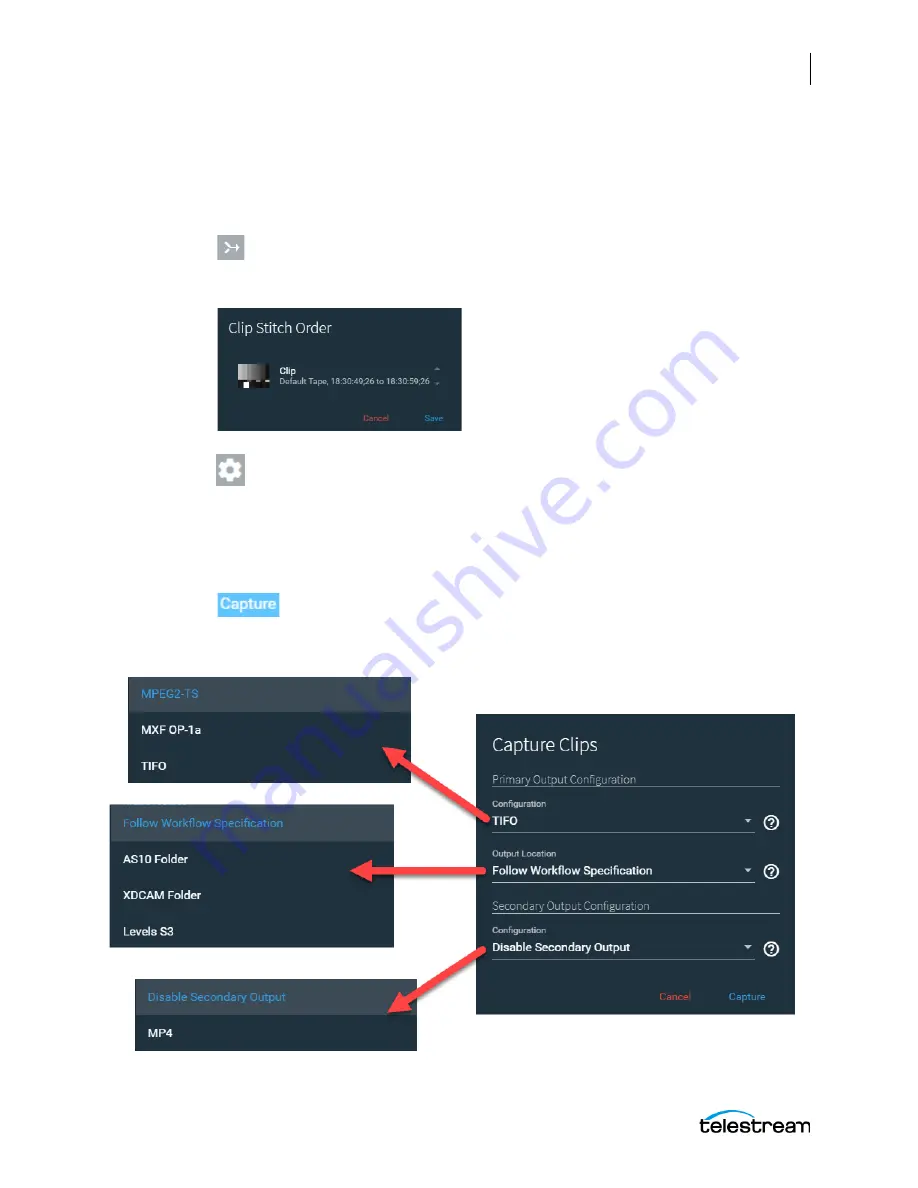
The Capture controls are at the top of the Log panel, just above the current clip panel.
See the
descriptions for details about the Stitch, Gear, and Capture controls.
The procedure for using those controls to capture clips to tape is described below.
Set the order in which clips are stitched
—Click to open a dialog listing the clips
included on a tape. Click to select a clip and use the up and down arrows to move the clip
within the clip order list.
Gear
—Click the gear icon to open the Customize Parameters dialog and configure
any Tape action parameters that have been bound to a variable. Any description
contained in a variable is displayed by selecting the question mark tooltip (?) next
to each parameter. The question mark (?) also provides a tooltip to explain the
parameter.
Also see
Configuring Tape Parameters that are Bound to Variables
.
Capture
—Click Capture to capture clips in the current Clip Log to
corresponding output media files. When Capture is selected the Capture Clips
dialog opens.
Содержание lightspeed live capture
Страница 1: ...June 2019 277130 Lightspeed Live Capture Guide Live Capture 3 0 with ComponentPac 7 2...
Страница 22: ...Contents 22...
Страница 52: ...Installing and Maintaining the Server Monitoring Lightspeed Live via SNMP 52 Lightspeed Live Capture User Guide...
Страница 196: ...Using the Tape Capture Web Application Using the Job Status View in Tape Capture 196 Lightspeed Live Capture User Guide...
Страница 208: ...Calculating Live Capture Resources Lightspeed Live Capture Resource Calculator 208 Lightspeed Live Capture User Guide...
Страница 216: ...Appendix A Support Using Log Files and Other Support Information 216 Lightspeed Live Capture User Guide...
Страница 316: ...Appendix B Containers Codecs and Vantage Actions Vantage Actions 316 Lightspeed Live Capture User Guide...


