5-9
SCANNER/INTERNET FAX
Contents
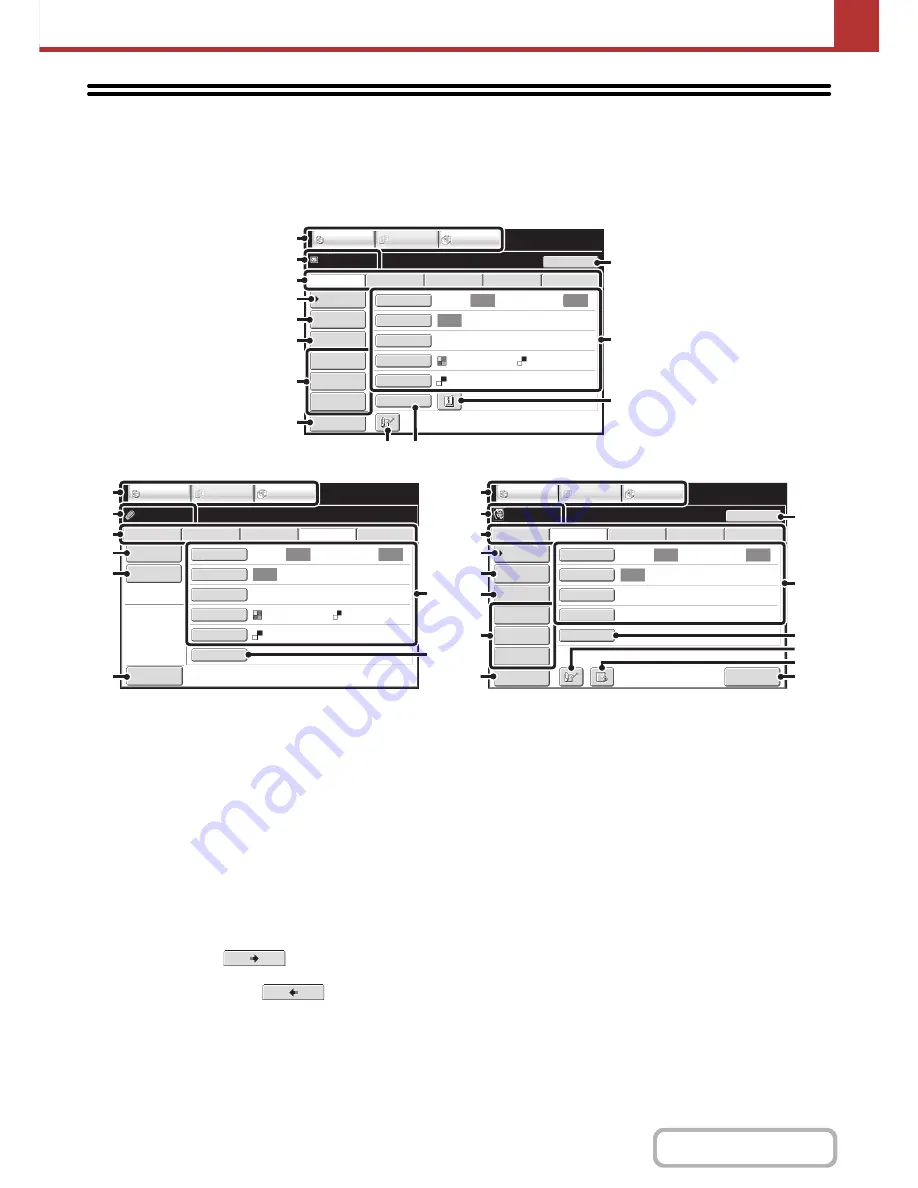
BASE SCREEN
Scan mode, USB memory mode, Internet fax mode, and PC scan mode are used by selecting operations and settings in
the base screens of those modes. To display the base screen of a mode, touch the [IMAGE SEND] key in the touch
panel and then touch the tab of the mode that you wish to use.
(1)
Mode select keys
Use these keys to switch between copy, image send, and
document filing modes.
To use scan mode, USB memory mode, Internet fax
mode, PC scan mode, or data entry mode, touch the
[IMAGE SEND] key.
(2)
Various messages are displayed here.
The icon of the selected mode appears on the left.
(3)
Send mode tabs
Touch one of these tabs to change the image send mode.
Tabs of modes that cannot be used because the
corresponding options are not installed do not appear.
If the [USB Mem. Scan] and [PC Scan] tabs do not
appear, touch the
tab to move the screen.
If the [Scan], [Internet Fax], [Fax], and [Data Entry] tabs
do not appear, touch the
tab move the
screen.
The [Data Entry] tab appears when the application
integration module is installed. For information on
metadata delivery using the [Data Entry] tab, see
"
METADATA DELIVERY
" (page 5-124).
(4)
[Address Book] key
Touch this key to use a one-touch key or a group key. When
the key is touched, the address book screen appears.
☞
RETRIEVING A DESTINATION FROM THE
ADDRESS BOOK
(page 5-18)
(5)
[Address Entry] key
Touch this key to manually enter an destination address
instead of using a one-touch key.
☞
ENTERING AN ADDRESS MANUALLY
(page 5-22)
(6)
[Send Settings] key
Touch this key to select or enter the subject, file name,
sender name, or body text, which has been previously
stored in the Web page.
Scan modes:
☞
CHANGING THE SUBJECT, FILE NAME,
REPLY-TO, AND BODY TEXT
(page 5-32)
Internet fax mode:
☞
CHANGING THE SUBJECT, FILE NAME, AND
BODY TEXT
(page 5-44)
Auto
Auto
Auto
File
Quick File
Address Review
Send Settings
Address Entry
Address Book
USB Mem. Scan
Fax
Internet Fax
PC Scan
Resend
Special Modes
Colour Mode
File Format
Resolution
Exposure
Original
Scan:
Scan
Send:
Text
200X200dpi
Ready to send.
IMAGE SEND
DOCUMENT
FILING
COPY
Preview
Mono2
(1)
(2)
(3)
(7)
(8)
(4)
(5)
(6)
(9)
(11)
(10)
(12) (13)
Auto
Auto
Auto
USB Mem. Scan
Fax
Scan
PC Scan
Special Modes
Colour Mode
File Format
Resolution
Exposure
File Name
Original
Scan:
Internet Fax
Send:
Text
200X200dpi
Ready to send.
IMAGE SEND
DOCUMENT
FILING
COPY
Stored to
Preview
Mono2
(1)
(2)
(3)
(15)
(8)
(14)
(13)
(10)
I-Fax Manual
Reception
TIFF-F
Auto
Auto
Auto
File
Quick File
Address Review
Send Settings
Address Entry
Address Book
USB Mem. Scan
Fax
Internet Fax
PC Scan
Resend
Special Modes
File Format
Resolution
Exposure
Original
Scan:
Scan
Send:
200X100dpi
Ready to send.
IMAGE SEND
DOCUMENT
FILING
COPY
Preview
(1)
(2)
(3)
(7)
(
8
)
(4)
(5)
(6)
(9)
(17)
(16)
(13)
(10)
(12)
Base screen of scan mode
Base screen of USB memory mode
Base screen of Internet fax mode
Содержание MX-M282N
Страница 11: ...Conserve Print on both sides of the paper Print multiple pages on one side of the paper ...
Страница 34: ...Search for a file abc Search for a file using a keyword Search by checking the contents of files ...
Страница 35: ...Organize my files Delete a file Delete all files Periodically delete files Change the folder ...
Страница 322: ...3 19 PRINTER Contents 4 Click the Print button Printing begins ...
Страница 870: ...MXM502N GB Z1 Operation Guide MODEL MX M282N MX M362N MX M452N MX M502N ...


