4-63
FACSIMILE
Contents
CHECKING THE IMAGE BEFORE PRINTING
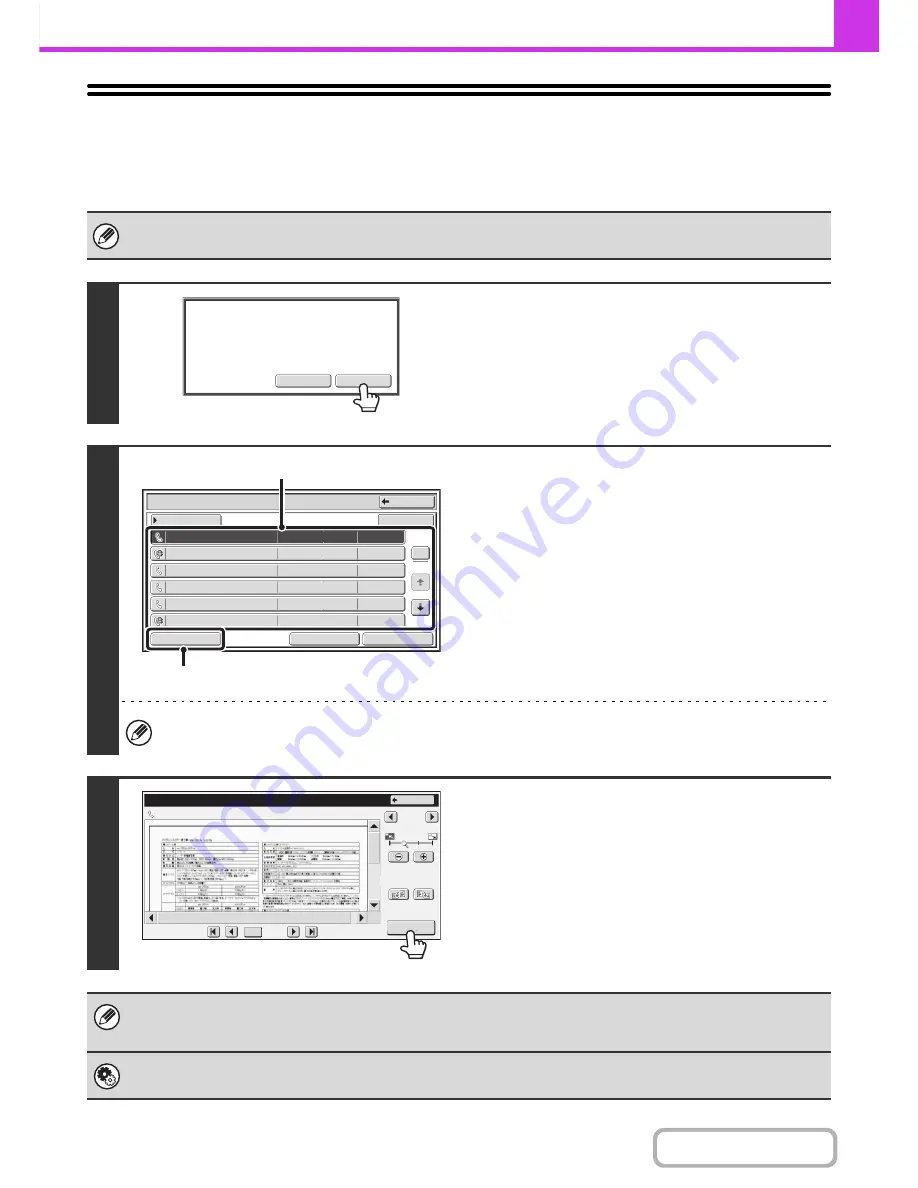
When "Received Data Image Check Setting" is enabled* in the system settings (administrator), you can check a received
image in the touch panel before printing it out. When this function is enabled, follow the steps below to print a received image.
* The factory default setting is disabled.
Depending on the size of the received data, part of the image in the image check screen on the touch panel may not appear.
1
When an image is received, a confirmation
prompt will appear. Touch the [Yes] key.
If this message appears while you are configuring settings of any type
and you touch the [Yes] key, the settings that you are configuring will
be cancelled. If this message appears in another mode, you will return
to the base screen of image send mode after checking the image.
2
Select the received image
(1) Touch the key of the received image that
you want to check.
Multiple received images can be checked.
(2) Touch the [Image Check] key.
• To show thumbnails of the received images, touch the
[Thumbnail] key.
• To delete an image that has been selected, touch the
[Delete] key. To print an image that has been selected,
touch the [Print] key.
When the [Select All] key is touched, it will change into the [Cancel All] key. When all received data has been selected
using the [Select All] key, the selection can be cancelled by touching the [Cancel All] key.
3
Check the received image and then
touch the [Print] key.
Printing begins.
For information on the image check screen, see "
IMAGE
CHECK SCREEN
" (page 4-64).
If the screen of step 1 appears when you are configuring settings in the setting screens of any of the modes, the configured
settings will be cancelled if you view the image. After viewing the image, you will return to the base screen of image send
mode, regardless of which mode you were in previously.
System Settings (Administrator): Received Data Image Check Setting
Use this to specify whether or not a received fax can be viewed before it is printed.
Yes
No
The
memory
has
received
data.
Check
the
data
?
Received Data List
Back
Not checked
10
:
28
04/04/2010
04/04/2010
BBB BBB
0612345678
BBB BBB
CCC CCC
0123456789
9876543210
BBB BBB
0123456789
1
5
Thumbnail
Select All
04/04/2010
04/04/2010
04/04/2010
04/04/2010
10
:
14
10
:
12
10
:
08
10
:
00
10
:
00
Not checked
Not checked
Checked
Checked
Checked
Image Check
Delete
(1)
(2)
Image Check
Back
Display Rotation
1 / 3
0123456789
04/04/2010
10
:
28
/0010
0001
Содержание MX-M282N
Страница 11: ...Conserve Print on both sides of the paper Print multiple pages on one side of the paper ...
Страница 34: ...Search for a file abc Search for a file using a keyword Search by checking the contents of files ...
Страница 35: ...Organize my files Delete a file Delete all files Periodically delete files Change the folder ...
Страница 322: ...3 19 PRINTER Contents 4 Click the Print button Printing begins ...
Страница 870: ...MXM502N GB Z1 Operation Guide MODEL MX M282N MX M362N MX M452N MX M502N ...


