Chapter 6: Using the Web Interface
75
Important: Although it is possible to selectively enable/disable logging for
individual sensors on the PXE in Step 4, it is NOT recommended and
this capability may be removed in the future.
Configuring SMTP Settings
The PXE can be configured to send alerts or event messages to a
specific administrator by email. To do this, you have to configure the
SMTP settings and enter an IP address for your SMTP server and a
sender's email address.
Note: See
Event Rules and Actions
(on page 121) for information on
creating event rules to send email notifications.
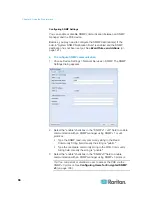
To set SMTP server settings:
1. Choose Device Settings > SMTP Server. The SMTP Server Settings
dialog appears.
2. Type the name or IP address of the mail server in the Server Name
field.
3. Type the port number for the SMTP server in the Port field. The
default is 25.
4. Type an email address for the sender in the Sender Email Address
field.
5. Type the number of email retries in the Number of Sending Retries
field. The default is 2 retries.
6. Type the time interval between email retries in the "Time Interval
Between Sending Retries (in minutes)" field. The time is measured in
minutes. The default is 2 minutes.
7. If your SMTP server requires password authentication, do this:
a. Select the Server Requires Authentication checkbox.
b. Type a user name in the User Name field.
c. Type a password in the Password field.
8. Now that you have set the SMTP settings, you can test it to ensure it
works properly. Do the following:
a. Type the recipient's email address in the Recipient Email
Addresses field. Use a comma to separate multiple email
addresses.
b. Click Send Test Email.
c. Check if the recipient(s) receives the email successfully.
9. Click
OK.
Содержание PXE
Страница 1: ...Copyright 2014 Raritan Inc PXE 0C v3 0 E August 2014 255 80 0008 00 Raritan PXE User Guide Release 3 0...
Страница 12: ...Contents xii To Assert and Assertion Timeout 352 To De assert and Deassertion Hysteresis 354 Index 357...
Страница 16: ......
Страница 50: ...Chapter 5 Using the PDU 34 4 Pull up the operating handle until the colorful rectangle or triangle turns RED...
Страница 200: ...Chapter 6 Using the Web Interface 184 10 To print the currently selected topic click the Print this page icon...
Страница 339: ...Appendix A Specifications 323 RS 485 Pin signal definition al 4 5 6 D bi direction al Data 7 8...
Страница 353: ...Appendix D LDAP Configuration Illustration 337 5 Click OK The PX_Admin role is created 6 Click Close to quit the dialog...
Страница 380: ...Index 364 Z Zero U Products 1...
Страница 381: ......

