Chapter 8: Using the Command Line Interface
251
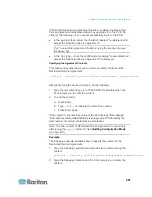
If the Restricted Service Agreement feature is enabled, the Restricted
Service Agreement is displayed when any user logs in to the PXE. Do
either of the following, or you cannot successfully log in to the PXE:
In the web interface, select the checkbox labeled "I understand and
accept the Restricted Service Agreement."
Tip: To select the agreement checkbox using the keyboard, press
the Space bar.
In the CLI, type
y
when the confirmation message "I understand and
accept the Restricted Service Agreement" is displayed.
Specifying the Agreement Contents
This command syntax allows you to create or modify contents of the
Restricted Service Agreement.
config:#
security restrictedServiceAgreement bannerContent
After performing the above command, do the following:
1. Type the text comprising up to 10,000 ASCII characters when the
CLI prompts you to enter the content.
2. To end the content:
a. Press
Enter.
b. Type
--END--
to indicate the end of the content.
c. Press Enter again.
If the content is successfully entered, the CLI displays this message
"Successfully entered Restricted Service Agreement" followed by the
total number of entered characters in parentheses.
Note: The new content of Restricted Service Agreement is saved only
after typing the
apply
command. See
Quitting Configuration Mode
(on page 219).
Example
The following example illustrates how to specify the content of the
Restricted Service Agreement.
1. Type the following command and press Enter to start entering the
content.
config:#
security restrictedServiceAgreement bannerContent
2. Type the following content when the CLI prompts you to enter the
content.
Содержание PXE
Страница 1: ...Copyright 2014 Raritan Inc PXE 0C v3 0 E August 2014 255 80 0008 00 Raritan PXE User Guide Release 3 0...
Страница 12: ...Contents xii To Assert and Assertion Timeout 352 To De assert and Deassertion Hysteresis 354 Index 357...
Страница 16: ......
Страница 50: ...Chapter 5 Using the PDU 34 4 Pull up the operating handle until the colorful rectangle or triangle turns RED...
Страница 200: ...Chapter 6 Using the Web Interface 184 10 To print the currently selected topic click the Print this page icon...
Страница 339: ...Appendix A Specifications 323 RS 485 Pin signal definition al 4 5 6 D bi direction al Data 7 8...
Страница 353: ...Appendix D LDAP Configuration Illustration 337 5 Click OK The PX_Admin role is created 6 Click Close to quit the dialog...
Страница 380: ...Index 364 Z Zero U Products 1...
Страница 381: ......


