Chapter 6: Using the Web Interface
98
Changing the Default Policy
The default policy is to accept all traffic from all IP addresses regardless
of the role applied to the user.
To change the default policy:
1. Choose Device Settings > Security > Role Based Access Control.
The Configure Role Based Access Control Settings dialog appears.
2. To determine the default policy for IPv4 addresses:
a. Click the IPv4 tab if necessary.
b. Ensure the "Enable Role Based Access Control for IPv4"
checkbox is selected.
c. Select the action you want from the Default Policy drop-down list.
Allow: Accepts traffic from all IPv4 addresses regardless of
the user's role.
Deny: Drops traffic from all IPv4 addresses regardless of the
user's role.
3. To determine the default policy for IPv6 addresses:
a. Click the IPv6 tab.
b. Ensure the "Enable Role Based Access Control for IPv6"
checkbox is selected.
c. Select the action you want from the Default Policy drop-down list.
Allow: Accepts traffic from all IPv6 addresses regardless of
the user's role.
Deny: Drops traffic from all IPv6 addresses regardless of the
user's role.
4. Click
OK.
Creating Role-Based Access Control Rules
Role-based access control rules accept or drop traffic, based on the
user's role and IP address. Like firewall rules, the order of rules is
important, since the rules are executed in numerical order.
To create role-based access control rules:
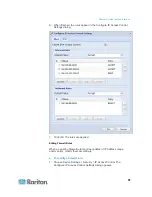
1. Choose Device Settings > Security > Role Based Access Control.
The Configure Role Based Access Control Settings dialog appears.
2. Click the IPv4 tab for creating IPv4 firewall rules, or click the IPv6 tab
for creating IPv6 firewall rules.
Содержание PXE
Страница 1: ...Copyright 2014 Raritan Inc PXE 0C v3 0 E August 2014 255 80 0008 00 Raritan PXE User Guide Release 3 0...
Страница 12: ...Contents xii To Assert and Assertion Timeout 352 To De assert and Deassertion Hysteresis 354 Index 357...
Страница 16: ......
Страница 50: ...Chapter 5 Using the PDU 34 4 Pull up the operating handle until the colorful rectangle or triangle turns RED...
Страница 200: ...Chapter 6 Using the Web Interface 184 10 To print the currently selected topic click the Print this page icon...
Страница 339: ...Appendix A Specifications 323 RS 485 Pin signal definition al 4 5 6 D bi direction al Data 7 8...
Страница 353: ...Appendix D LDAP Configuration Illustration 337 5 Click OK The PX_Admin role is created 6 Click Close to quit the dialog...
Страница 380: ...Index 364 Z Zero U Products 1...
Страница 381: ......

