


Pronar RC2100-2
SECTION 5
5.16
Fully unscrew the bolt of the brake crank mechanism (1).
Dismantle shackle (6), loosen nuts (5) of cable clamps (4).
Dismantle cable (2).
Lubricate parking brake mechanism (1) and pins of cable guide rollers (6).
Install new cable, adjust cable tension.
After the first loading of cable, re-check the condition of cable ends, correct if
necessary.
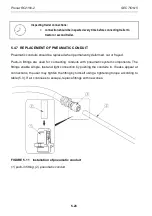
FIGURE 5.8
Installation of steel cable
(1) steel cable, (2) clamp jaw, (3) thimble, (4) nut, (5) heat shrink tubing
Installation of steel cable
Secure cable ends by means of heat shrink tubing (5).
Install thimble (3) on cable (1).
Install clamp jaws (2) and tighten nuts (4).
The distance between the clamps should be at least 15 mm.
Clamp jaws must be placed on the side of the load bearing cable - see figure
(5.8).
The first clamp should be placed directly on the thimble.
Содержание RC2100-2
Страница 2: ......
Страница 6: ......
Страница 10: ...5 11 TROUBLESHOOTING 5 31 ...
Страница 11: ...SECTION 1 BASIC INFORMATION ...
Страница 24: ...PRONAR RC2100 2 SECTION 1 1 14 ...
Страница 25: ...SECTION 2 SAFETY ADVICE ...
Страница 40: ...Pronar RC2100 2 SECTION 2 2 16 FIGURE 2 3 Locations of information and warning decals ...
Страница 41: ...SECTION 3 DESIGN AND OPERATION ...
Страница 59: ...SECTION 4 CORRECT USE ...
Страница 78: ...Pronar RC2100 2 SECTION 4 4 20 ...
Страница 79: ...SECTION 5 MAINTENANCE ...
Страница 110: ...Pronar RC2100 2 SECTION 5 5 32 FIGURE 5 12 Lubrication points part 1 ...
Страница 111: ...SECTION 5 Pronar RC2100 2 5 33 FIGURE 5 13 Lubrication points part 2 ...
Страница 119: ...NOTES ...
Страница 120: ... ...
Страница 121: ...ANNEX A Tyre dimensions LP TYRES WHEEL RIM 1 215 75 R17 5 135 133 J 17 5x6 75 ...