The Advanced MCACC menu
11
101
En
• With e
rr
o
r
messages (such as
Too much ambient
noise!
o
r
Check microphone
) select
RETRY
afte
r
checking fo
r
ambient noise (see
Problems when
using the Auto MCACC Setup
on page 44) and
ve
r
ifying the mic connection. If the
r
e doesn’t seem to
be a p
r
oblem, you can simply select
GO NEXT
and
continue.
7
If necessary, confirm the speaker configuration in
the GUI screen.
The configu
r
ation shown on-sc
r
een should
r
eflect the
actual speake
r
s you have.
If no ope
r
ations a
r
e pe
r
fo
r
med fo
r
10 seconds while the
speake
r
configu
r
ation check sc
r
een is being displayed,
the Auto MCACC Setup will
r
esume automatically. In this
case, you don’t need to select ‘
OK
’ and p
r
ess
ENTER
in
step 8.
• If you see an
ERR
message (o
r
the speake
r
configu
r
ation displayed isn’t co
rr
ect), the
r
e may be a
p
r
oblem with the speake
r
connection.
If selecting
RETRY
doesn’t wo
r
k, tu
r
n off the powe
r
and check the speake
r
connections. If the
r
e doesn’t
seem to be a p
r
oblem, you can simply use
/
to
select the speake
r
and
/
to change the setting
and continue.
• If
Reverse Phase
is displayed, the speake
r
’s wi
r
ing
(+ and –) may be inve
r
ted. Check the speake
r
connections.
1
– If the connections we
r
e w
r
ong, tu
r
n off the powe
r
,
disconnect the powe
r
co
r
d, then
r
econnect p
r
ope
r
ly.
Afte
r
this, pe
r
fo
r
m the Full Auto MCACC p
r
ocedu
r
e
again.
– If the connections we
r
e
r
ight, select
GO NEXT
and
continue.
8
Make sure ‘OK’ is selected, then press ENTER.
A p
r
og
r
ess
r
epo
r
t is displayed on-sc
r
een while the
r
eceive
r
outputs mo
r
e test tones to dete
r
mine the
optimum
r
eceive
r
settings.
Again, t
r
y to be as quiet as possible while this is
happening. It may take 3 to 7 minutes.
• If you selected a
STAND.WAVE Multi-Point
setup
(in step 2), you will be asked to place the mic at the
2nd and 3
r
d
r
efe
r
ence points befo
r
e finally placing it
at you
r
main listening position.
9
The Auto MCACC Setup procedure is completed and
the Advanced MCACC menu reappears automatically.
The settings made in the Auto MCACC Setup should give
you excellent su
rr
ound sound f
r
om you
r
system, but it is
also possible to adjust these settings manually using the
Manual MCACC
setup menu (sta
r
ting below) o
r
Manual
SP Setup
menu (sta
r
ting on page 109).
2
You can also choose to view the settings by selecting
individual pa
r
amete
r
s f
r
om the
MCACC Data Check
sc
r
een (see
Checking MCACC Data
on page 105).
P
r
ess
RETURN
afte
r
you have finished checking each
sc
r
een. When you’
r
e finished, select
RETURN
to go back
to the
Home Menu
.
Be su
r
e to disconnect the mic
r
ophone f
r
om this
r
eceive
r
upon completion of the Auto MCACC Setup.
Manual MCACC setup
You can use the settings in the
Manual MCACC
setup
menu to make detailed adjustments when you’
r
e mo
r
e
familia
r
with the system. Befo
r
e making these settings,
you should have al
r
eady completed
Automatically
conducting optimum sound tuning (Full Auto MCACC)
on
page 43.
You only need to make these settings once (unless you
change the placement of you
r
cu
rr
ent speake
r
system o
r
add new speake
r
s).
CAUTION
• The test tones used in the
Manual MCACC
setup a
r
e
output at high volume.
Important
• P
r
ess the
MCACC
button while the pe
r
tinent setup
sc
r
eens a
r
e displayed to select MCACC p
r
esets.
• Fo
r
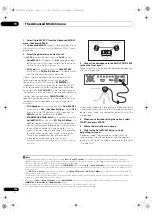
some of the settings below, you’ll have to connect
the setup mic
r
ophone to the f
r
ont panel and place it
about ea
r
level at you
r
no
r
mal listening position.
P
r
ess
HOME MENU
to display the
Home Menu
befo
r
e you connect the mic
r
ophone to this
r
eceive
r
.
• See
Problems when using the Auto MCACC Setup
on
page 44 fo
r
notes
r
ega
r
ding high backg
r
ound noise
levels and othe
r
possible inte
r
fe
r
ence.
• If you’
r
e using a subwoofe
r
, switch it on and tu
r
n up
the volume to the middle position.
Note
1 If the speake
r
is not pointed to the mic
r
ophone (listening position) o
r
when using speake
r
s that affect the phase (dipole speake
r
s,
r
eflective
speake
r
s, etc.),
Reverse Phase
may be displayed even if the speake
r
s a
r
e p
r
ope
r
ly connected.
2 • Depending on the cha
r
acte
r
istics of you
r
r
oom, sometimes identical speake
r
s with cone sizes of a
r
ound 12 cm will end up with diffe
r
ent size
settings. You can co
rr
ect the setting manually using the
Manual speaker setup
on page 109.
• The subwoofe
r
distance setting may be fa
r
the
r
than the actual distance f
r
om the listening position. This setting should be accu
r
ate (taking
delay and
r
oom cha
r
acte
r
istics into account) and gene
r
ally does not need to be changed.
• If Auto MCACC Setup measu
r
ement
r
esults a
r
e inco
rr
ect due to the inte
r
action of the speake
r
s and viewing envi
r
onment, we
r
ecommend
adjusting the settings manually.
SC-LX83_73_DLPW.book 101 ページ 2010年5月19日 水曜日 午後2時7分


