


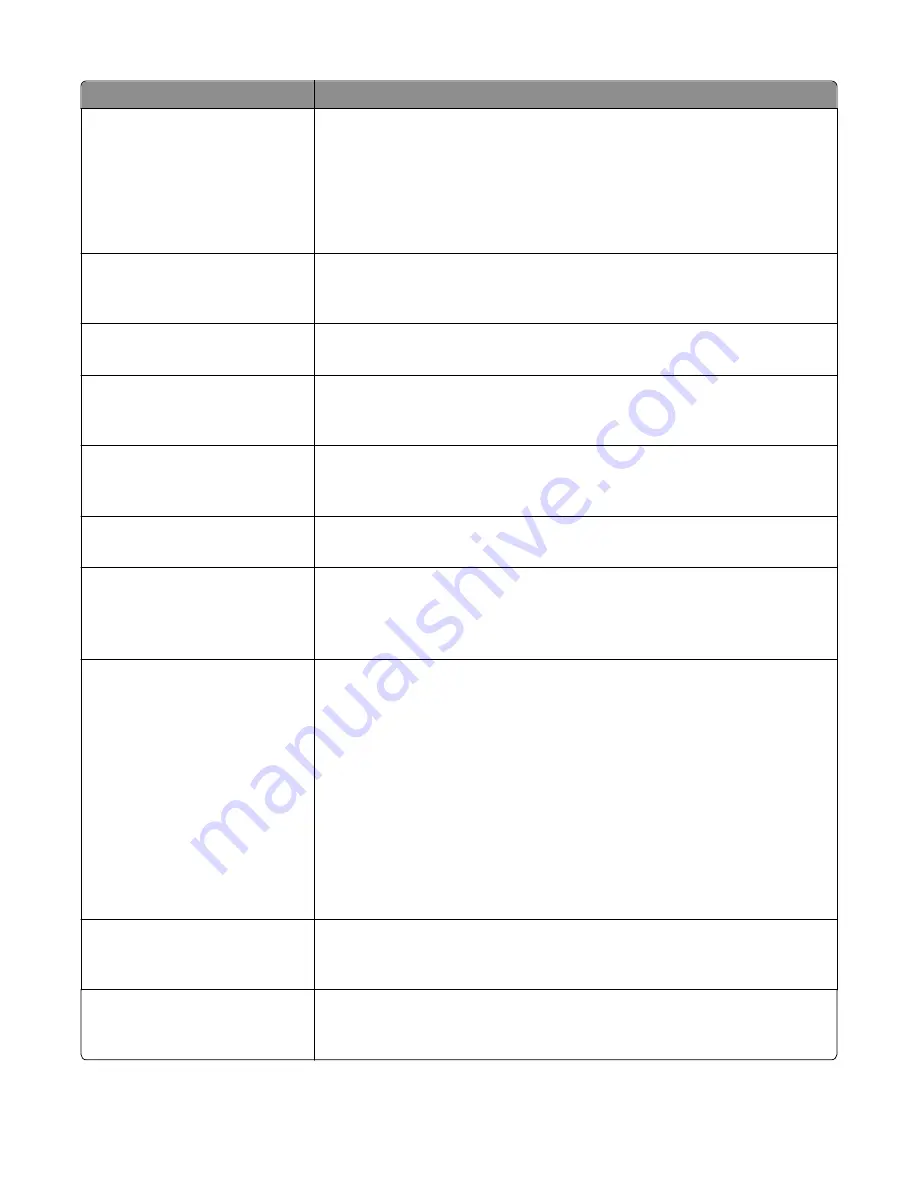
Menu item
Description
Use Multi
‑
Page TIFF
On
Off
Provides a choice between single-page TIFF files and multiple
‑
page TIFF files. For a
multiple-page scan to FTP job, either one TIFF file is created containing all the pages,
or multiple TIFF files are created with one file for each page.
Notes:
•
On is the factory default setting.
•
This menu applies to all scan functions.
Scan Bit Depth
8 bit
1 bit
Enables the Text/Photo mode to have smaller file sizes by using 1
‑
bit images when
Color is set to Off
Note:
8 bit is the factory default setting.
File Name
Lets you enter a base file name
Note:
A maximum of 53 characters is allowed.
Custom Job Scanning
Off
On
Lets you copy a document containing mixed paper sizes in a single copy job
Note:
Off is the factory default setting.
Scan Preview
Off
On
Specifies whether a preview appears on the display for scan jobs
Note:
Off is the factory default setting.
Background Removal
‑
4 to 4
Adjusts the amount of background visible on a copy
Note:
0 is the factory default setting.
Color Balance
Cyan - Red
Magenta - Green
Yellow - Blue
Enables an equal balance of colors in the scanned image
Color Dropout
Color Dropout
None
Red
Green
Blue
Default Red Threshold
0–255
Default Green Threshold
0–255
Default Blue Threshold
0–255
Specifies which color to drop during scanning, and how much to increase or decrease
in the dropout
Notes:
•
None is the factory default setting for Color Dropout.
•
128 is the factory default setting for each color threshold.
Contrast
Best for content
0–5
Specifies the contrast of the scanned image
Note:
“Best for content” is the factory default setting.
Mirror Image
Off
On
Creates a mirror image of the original document
Note:
Off is the factory default setting.
Understanding printer menus
216
Содержание X950 Series
Страница 28: ...Touch To Reset Reset values on the screen Understanding the home screen 28 ...
Страница 242: ...4 Locate the printhead wipers Maintaining the printer 242 ...
Страница 244: ...7 Slide the release lever to the right to lock the cover 8 Close the front door Maintaining the printer 244 ...
Страница 245: ...Emptying the hole punch box 1 Open door G 2 Pull out the hole punch box Maintaining the printer 245 ...
Страница 254: ...11 Close the cover 12 Rotate the release lever clockwise to lock the cover Maintaining the printer 254 ...
Страница 259: ...7 Lower the cover 8 Slide out the printhead wipers 3x 3x 3x Maintaining the printer 259 ...
Страница 260: ...9 Slide the printhead wipers back into place 10 Close the cover Maintaining the printer 260 ...
Страница 266: ...3 Hold the tabs on both sides of the staple cartridge Maintaining the printer 266 ...
Страница 267: ...4 Rotate the booklet staple cartridge at an angle Maintaining the printer 267 ...
Страница 285: ...2 Open the top cover 1 2 2 3 Firmly grasp the jammed paper on each side and then gently pull it out Clearing jams 285 ...


