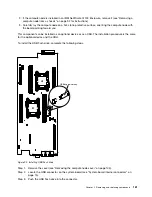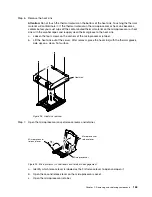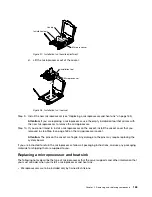
Step 6.
Install the heat sink onto the microprocessor as described in Step 10 on page 170.
Removing the compute node
Use this information to remove the compute node.
Notes:
1. This procedure should be performed only by trained service technicians.
2. Before you replace the system board, make sure that you backup any features on demand (FoD) keys
that were enabled. Reactivate any Features on Demand features after replacing the system board.
Instructions for automating the activation of features and installing activation keys is in the
IBM Features
on Demand User's Guide
. To download the document, go to /http://www.ibm.com/systems/x/fod/,
log in, and click
Help
.
3. When you replace the system board, you must either update the server with the latest firmware or
restore the pre-existing firmware that the customer provides on a diskette or CD image. Make sure that
you have the latest firmware or a copy of the pre-existing firmware before you proceed.
4. When you replace the system board, make sure that you remove the Integrated Management Module
Advanced Upgrade and place it on the new system board. For information about the Advanced
Upgrade, see “Using the remote presence and blue-screen capture features” on page 33
Note:
You have to reactivate the Features on Demand (FoD) after replacing the system board.
Before you remove the compute node, complete the following steps:
1. Read “Safety” on page v and “Installation guidelines” on page 89.
2. If the compute node is installed in an IBM NeXtScale n1200 Enclosure, remove it (see “Removing a
compute node from a chassis” on page 92 for instructions).
3. Carefully lay the compute node on a flat, static-protective surface, orienting the compute node with
the bezel pointing toward you.
4. Obtain the following for use during the replacement procedure (see Chapter 4 “Parts listing, IBM
NeXtScale nx360 M4 Compute Node Type 5455” on page 81).
• Alcohol wipes (part number 59P4739)
• RFID tag (required only if the compute node came with a RFID tag attached to the bezel)
• T8 torx screwdriver (part number 00FK488, provided on the back of the chassis)
• Thermal grease kit (part number 41Y9292)
Important:
When you replace the system board, you must update the compute node with the latest
firmware or restore the preexisting firmware. Make sure that you have the latest firmware or a copy of the
preexisting firmware before you proceed.
See “System-board layouts” on page 15 for more information about the locations of the connectors,
jumpers, and LEDs on the system board.
To remove the system-board assembly, complete the following steps:
Step 1.
Remove the cover (see “Removing the compute node cover” on page 105).
Step 2.
Remove all of the installed components in the following list from the system-board assembly; then,
place them on a static-protective surface or install them on the new system-board assembly.
• DIMMs (see “Removing a memory module” on page 129).
• Air baffles (see “Removing the air baffle” on page 108).
• Hard disk drives and hard disk drive bay fillers (see “Removing a 3.5-inch hard disk drive” on
page 142, “Removing a 2.5-inch hard disk drive” on page 144, and “Removing a 1.8-inch hard
disk drive” on page 148).
Removing and replacing components
173
Содержание NeXtScale nx360 M4
Страница 1: ...IBM NeXtScale nx360 M4 Installation and Service Guide Machine Type 5455 ...
Страница 6: ...iv IBM NeXtScale nx360 M4 Installation and Service Guide ...
Страница 34: ...20 IBM NeXtScale nx360 M4 Installation and Service Guide ...
Страница 58: ...44 IBM NeXtScale nx360 M4 Installation and Service Guide ...
Страница 94: ...80 IBM NeXtScale nx360 M4 Installation and Service Guide ...
Страница 192: ...178 IBM NeXtScale nx360 M4 Installation and Service Guide ...
Страница 538: ...524 IBM NeXtScale nx360 M4 Installation and Service Guide ...
Страница 562: ...548 IBM NeXtScale nx360 M4 Installation and Service Guide ...
Страница 722: ......
Страница 730: ......
Страница 737: ......
Страница 738: ...Part Number 00KC216 Printed in China 1P P N 00KC216 1P00KC216 ...


