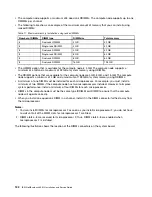
Table 18. Normal mode DIMM installation sequence
Number of installed
microprocessor
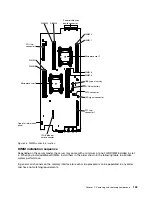
DIMM connector population sequence
One microprocessor installed
4, 3, 1, 2
Two microprocessors installed
4, 5, 3, 6, 1, 8, 2, 7
Memory mirrored channel
Memory mirrored channel mode replicates and stores data on two pairs of DIMMs within two channels
simultaneously.
If a failure occurs, the memory controller switches from the primary pair of memory DIMMs to the backup
pair of DIMMs. To enable memory mirrored channel through the Setup utility, select
System Settings
➙
Memory
. For more information, see “Using the Setup utility” on page 25. When you use the memory
mirrored channel feature, consider the following information:
• When you use memory mirrored channel, you must install a pair of DIMMs at a time. The two DIMMs in
each pair must be identical in size, type, and rank (single, dual, or quad), and organization, but not in
speed. The channels run at the speed of the slowest DIMM in any of the channels.
• The maximum available memory is reduced to half of the installed memory when memory mirrored
channel is enabled. For example, if you install 8 GB of memory using RDIMMs, only 4 GB of addressable
memory is available when you use memory mirrored channel.
The following table shows the installation sequence for memory mirrored channel mode:
Table 19. Memory mirrored channel mode DIMM population sequence
Number of installed
microprocessor
DIMM connector population sequence
One microprocessor installed
4, 3, 1, 2
Two microprocessors installed
4, 3, 5, 6, 1, 2, 8, 7
Replacing a memory module
Use this information to install a DIMM.
Step 1.
Read the safety information that begins on “Safety” on page v and “Installation guidelines”
on page 89.
Step 2.
Turn off the server and peripheral devices and disconnect the power cords and all external cables,
if necessary.
Step 3.
Remove the cover (see “Removing the compute node cover” on page 105).
Step 4.
Remove the air baffle (see “Removing the air baffle” on page 108).
Step 5.
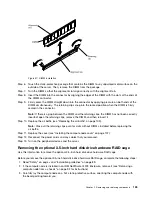
Carefully open the retaining clips on each end of the DIMM connector and remove the DIMM.
Attention:
To avoid breaking the retaining clips or damaging the DIMM connectors, open and
close the clips gently.
134
IBM NeXtScale nx360 M4 Installation and Service Guide
Содержание NeXtScale nx360 M4
Страница 1: ...IBM NeXtScale nx360 M4 Installation and Service Guide Machine Type 5455 ...
Страница 6: ...iv IBM NeXtScale nx360 M4 Installation and Service Guide ...
Страница 34: ...20 IBM NeXtScale nx360 M4 Installation and Service Guide ...
Страница 58: ...44 IBM NeXtScale nx360 M4 Installation and Service Guide ...
Страница 94: ...80 IBM NeXtScale nx360 M4 Installation and Service Guide ...
Страница 192: ...178 IBM NeXtScale nx360 M4 Installation and Service Guide ...
Страница 538: ...524 IBM NeXtScale nx360 M4 Installation and Service Guide ...
Страница 562: ...548 IBM NeXtScale nx360 M4 Installation and Service Guide ...
Страница 722: ......
Страница 730: ......
Страница 737: ......
Страница 738: ...Part Number 00KC216 Printed in China 1P P N 00KC216 1P00KC216 ...


