1 Introduction
8
When taking exposures, operators and service personnel
must protect themselves from radiation and remain at least
two meters (six feet) away from the unit during exposure.
Protect the patient from scattered radiation by placing a
protective lead apron over the patient.
The unit must be installed and serviced according to the unit
Installation & adjustments manual by a qualified technician.
Only personnel trained and approved by the manufacturer
of the unit are allowed to service the unit.
3D imaging should not be used for routine or screening
examinations in which a radiograph is taken regardless of
the presence or absence of clinical signs and symptoms. 3D
imaging examinations must be justified for each patient to
demonstrate that the benefits outweigh the risks.
Where it is likely that evaluation of soft tissues will be
required as part of the patient’s radiological assessment,
the imaging should be done using conventional medical CT
or MR, rather than 3D imaging using Cone Beam
technology.
Cone beam computed tomography images are not
adequate for the analysis of soft tissue.
Panoramic and 3D exposures should not be used if
conventional intraoral radiographic images (like bitewing
exposures) would be sufficient.
Make sure that patient’s thyroid glands are protected by a
lead apron during the exposure.
The place where the unit is to be installed and the position
from where the user will take exposures must be correctly
shielded from the radiation that is generated when the unit
is operated. Ensure to fulfill or exceed the requirements of
your local regulations.
The unit or its parts must not be changed or modified in any
way without approval and instructions from the
manufacturer.
When servicing use only approved replacement parts
supplied by the manufacturer.
The use of accessories not complying with the equivalent
safety requirements of this equipment may lead to a
reduced level of safety of the resulting system.
Содержание ORTHOPANTOMOGRAPH OP 3D Pro
Страница 1: ...ORTHOPANTOMOGRAPH OP 3D Pro 3D Dental X Ray System Installation Manual ENGLISH 216363 rev 1 0 805 5080...
Страница 2: ......
Страница 4: ......
Страница 8: ...iv rev...
Страница 18: ...1 Introduction 10...
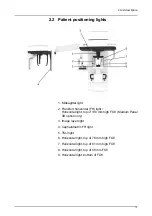
Страница 22: ...2 Unit description 14 Panoramic lights 1 Midsagittal light 2 FH light 1 Image layer 2 TMJ light...
Страница 27: ...2 Unit description 19 2 6 Unit movements Panoramic unit movements R C J D...
Страница 29: ...2 Unit description 21...
Страница 30: ...2 Unit description 22...
Страница 38: ...4 PC requirements 30...
Страница 54: ...5 Installing the unit 46 4 Fasten the covers...
Страница 67: ...5 Installing the unit 59 C C D D Top cover of the column E E...
Страница 104: ...7 Cephalometric calibration and alignment 96...
Страница 111: ...7 Cephalometric calibration and alignment 103 3 Tighten the locking nut...
Страница 117: ...7 Cephalometric calibration and alignment 109...
Страница 128: ...8 Special procedures 120 6 Remove the arm from the column 4 nuts 7 Disassemble the arm...
Страница 132: ...8 Special procedures 124 right handed assembly Prism assembly for the left handed cephalostat...
Страница 158: ...8 Special procedures 150...
Страница 165: ...9 OP 3D Pro Pre sales check list 157 9 11 Notes comments...
Страница 166: ...9 OP 3D Pro Pre sales check list 158 9 12 Dimensions 463...
Страница 167: ...9 OP 3D Pro Pre sales check list 159 9 13 Dimensions with cephalostat...
Страница 168: ...9 OP 3D Pro Pre sales check list 160...


