23
3
Pre-installation requirements
3.1 The unit
■
See chapter 9 OP 3D Pro Pre-sales check list.
■
The unit is supplied:
■
Unit weights:
■
Make sure that the floor where the unit is to be in-
stalled can support this weight. To avoid the unit
from tipping over, fix the unit with floor bolts appro-
priate to the surface the unit is mounted on. The
bolts and the floor material must endure force of
5000 N on the base plate.
■
The unit must be permanently attached to the wall
and the floor. If floor attachment is not possible, ei-
ther use additional wall support (ordered separate-
ly) or use the exhibition stand and one wall
mounting bracket. Wall mount screws should be
tightened.
OP 3D Pro
Packages
COLUMN
(card board)
MAIN SUPPORT
AND ROTATION
UNIT
(card board)
CEPHALOSTAT
(card board)
Size (LxWxH) cm:
Size (LxWxH) in:
171 x 65 x 97 cm
67.3 x 25.5 x 38.1 in
118 x 65 x 97 cm
46.4 x 25.5 x 38.1 in
140 x 78 x 88 cm
55.1 x 30.7 x 34.6 in
Gross weight
approx.:
170 kg/ 372.5 lbs
114 kg/ 251.3 lbs
66 kg/ 145.5 lbs
Net weight approx.:
87 kg/192 lbs
83 kg/183 lbs
25 kg/55 lbs
PAN
CEPH
3D
210 kg
(463 lb.)
245 kg
(540 lb.)
212 kg
(467 lb.)
Additional wall support
Содержание ORTHOPANTOMOGRAPH OP 3D Pro
Страница 1: ...ORTHOPANTOMOGRAPH OP 3D Pro 3D Dental X Ray System Installation Manual ENGLISH 216363 rev 1 0 805 5080...
Страница 2: ......
Страница 4: ......
Страница 8: ...iv rev...
Страница 18: ...1 Introduction 10...
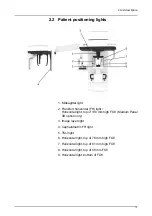
Страница 22: ...2 Unit description 14 Panoramic lights 1 Midsagittal light 2 FH light 1 Image layer 2 TMJ light...
Страница 27: ...2 Unit description 19 2 6 Unit movements Panoramic unit movements R C J D...
Страница 29: ...2 Unit description 21...
Страница 30: ...2 Unit description 22...
Страница 38: ...4 PC requirements 30...
Страница 54: ...5 Installing the unit 46 4 Fasten the covers...
Страница 67: ...5 Installing the unit 59 C C D D Top cover of the column E E...
Страница 104: ...7 Cephalometric calibration and alignment 96...
Страница 111: ...7 Cephalometric calibration and alignment 103 3 Tighten the locking nut...
Страница 117: ...7 Cephalometric calibration and alignment 109...
Страница 128: ...8 Special procedures 120 6 Remove the arm from the column 4 nuts 7 Disassemble the arm...
Страница 132: ...8 Special procedures 124 right handed assembly Prism assembly for the left handed cephalostat...
Страница 158: ...8 Special procedures 150...
Страница 165: ...9 OP 3D Pro Pre sales check list 157 9 11 Notes comments...
Страница 166: ...9 OP 3D Pro Pre sales check list 158 9 12 Dimensions 463...
Страница 167: ...9 OP 3D Pro Pre sales check list 159 9 13 Dimensions with cephalostat...
Страница 168: ...9 OP 3D Pro Pre sales check list 160...


