5 Installing the unit
48
5.8 External warning light (optional)
NOTICE! External max. 230V warning light can be
connected only by doing internal modifications. Only
authorized technician is allowed to do this.
NOTICE!
These instructions are intended only for the
remote exposure button assembly (207502).
NOTICE! 12V voltage is supplied from the unit for the
external warning light. Do not connect any external
voltages to this connection.
1.
Attach the device end of the remote controller cable
(207264) to its place and tighten the strain relief.
2.
Connect the remote controllers cable connector J1004
to its place.
3.
Make sure that correct F3 fuse
(T2A, 250V,
Interrupting rating 100A@250Vac 10KA@125Vac,
6,3 x 3,2 mm, UR, CSA)
is in the units F3 fuse holder.
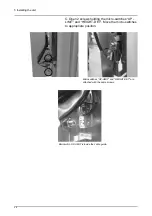
1. External warning light cable
2. Strain relief
3. Cable connection J1004
4. Fuse holder F3
Содержание ORTHOPANTOMOGRAPH OP 3D Pro
Страница 1: ...ORTHOPANTOMOGRAPH OP 3D Pro 3D Dental X Ray System Installation Manual ENGLISH 216363 rev 1 0 805 5080...
Страница 2: ......
Страница 4: ......
Страница 8: ...iv rev...
Страница 18: ...1 Introduction 10...
Страница 22: ...2 Unit description 14 Panoramic lights 1 Midsagittal light 2 FH light 1 Image layer 2 TMJ light...
Страница 27: ...2 Unit description 19 2 6 Unit movements Panoramic unit movements R C J D...
Страница 29: ...2 Unit description 21...
Страница 30: ...2 Unit description 22...
Страница 38: ...4 PC requirements 30...
Страница 54: ...5 Installing the unit 46 4 Fasten the covers...
Страница 67: ...5 Installing the unit 59 C C D D Top cover of the column E E...
Страница 104: ...7 Cephalometric calibration and alignment 96...
Страница 111: ...7 Cephalometric calibration and alignment 103 3 Tighten the locking nut...
Страница 117: ...7 Cephalometric calibration and alignment 109...
Страница 128: ...8 Special procedures 120 6 Remove the arm from the column 4 nuts 7 Disassemble the arm...
Страница 132: ...8 Special procedures 124 right handed assembly Prism assembly for the left handed cephalostat...
Страница 158: ...8 Special procedures 150...
Страница 165: ...9 OP 3D Pro Pre sales check list 157 9 11 Notes comments...
Страница 166: ...9 OP 3D Pro Pre sales check list 158 9 12 Dimensions 463...
Страница 167: ...9 OP 3D Pro Pre sales check list 159 9 13 Dimensions with cephalostat...
Страница 168: ...9 OP 3D Pro Pre sales check list 160...


