background image

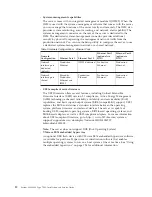
work. However, after the server is powered-on locally, the active power
management event signal will be enabled by the system-board logic.

v

The integrated management module II (IMM2) can turn off the server as an
automatic response to a critical system failure.

v

The server turns off when the left-side cover is opened.

Chapter 1. The IBM System x3300 M4 Type 7382 server

25

Содержание System x3300 M4

Страница 1: ...System x3300 M4 Type 7382 Installation and Service Guide...

Страница 2: ......

Страница 3: ...System x3300 M4 Type 7382 Installation and Service Guide...

Страница 4: ...Information and IBM Environmental Notices and User s Guide on the IBM Documentation CD and the IBM Warranty Information document that comes with the server First Edition August 2012 Copyright IBM Corp...

Страница 5: ...ves 67 Installing a 2 5 inch hot swap hard disk drive 70 Installing a 3 5 inch hot swap hard disk drive 72 Installing a 3 5 inch simple swap hard disk drive 73 Installing an optical CD DVD drive 74 In...

Страница 6: ...ems 297 Solving undetermined problems 298 Problem determination tips 299 Recovering the server firmware 300 Automated boot recovery ABR 302 Three boot failure 302 Chapter 5 Parts listing IBM System x3...

Страница 7: ...oard 425 Removing the system board 428 Replacing the system board 430 Appendix Getting help and technical assistance 433 Before you call 433 Using the documentation 434 Getting help and information fr...

Страница 8: ...vi System x3300 M4 Type 7382 Installation and Service Guide...

Страница 9: ...t eerst de veiligheidsvoorschriften Ennen kuin asennat t m n tuotteen lue turvaohjeet kohdasta Safety Information Avant d installer ce produit lisez les consignes de s curit Vor der Installation diese...

Страница 10: ...the caution or danger statement in the Safety Information document For example if a caution statement is labeled Statement 1 translations for that caution statement are in the Safety Information docu...

Страница 11: ...t and disconnect cables as described in the following table when installing moving or opening covers on this product or attached devices To Connect To Disconnect 1 Turn everything OFF 2 First attach a...

Страница 12: ...device v Use of controls or adjustments or performance of procedures other than those specified herein might result in hazardous radiation exposure DANGER Some laser products contain an embedded Clas...

Страница 13: ...disconnected from the power source Statement 6 CAUTION Do not place any objects on top of a rack mounted device unless that rack mounted device is intended for use as a shelf Statement 8 CAUTION Never...

Страница 14: ...conditions To avoid these hazards ensure that your system electrical requirements do not exceed branch circuit protection requirements Refer to the information that is provided with your device for el...

Страница 15: ...dous energy present Voltages with hazardous energy might cause heating when shorted with metal which might result in splattered metal burns or both Attention This server is suitable for use on an IT p...

Страница 16: ...ame can cause serious or fatal electrical shock v Explosive hazards such as a damaged CRT face or a bulging capacitor v Mechanical hazards such as loose or missing hardware To inspect the product for...

Страница 17: ...anical inspection work near power supplies or remove or install main units v Before you work on the equipment disconnect the power cord If you cannot disconnect the power cord have the customer power...

Страница 18: ...xvi System x3300 M4 Type 7382 Installation and Service Guide...

Страница 19: ...processors mode The planar also implements other system devices such as on board SATA host controller on board Intel I350 10 100 1000 Mb s Ethernet controller on board Graphics controller other syste...

Страница 20: ...documentation that comes with the server and the documentation might be updated occasionally to include information about those features or technical updates might be available to provide additional i...

Страница 21: ...cally detects the regional settings in use in your server and displays the documents in the language for that region if available If a document is not available in the language for that region the Eng...

Страница 22: ...h the server It contains information about the safety environmental and electronic emission notices for your IBM product v Environmental Notices and User Guide This document is in PDF format on the IB...

Страница 23: ...rmation document The following notices and statements are used in this document v Note These notices provide important tips guidance or advice v Important These notices provide information or advice t...

Страница 24: ...ng one redundant fan Memory v Slots 6 DIMM connectors 12 DIMM connectors when the microprocessor 2 expansion board is installed v Minimum 2 GB v Maximum up to 384 GB when the microprocessor 2 expansio...

Страница 25: ...on operating Temperature 1 C to 60 C 33 8 F 140 F Altitude 3050 m 10 000 ft Relative humidity 5 80 Maximum dew point 29 C 84 2 F v Shipment non operating Temperature 40 C to 60 C 40 F 140 F Altitude 1...

Страница 26: ...phic Card VGA Card in SPP list can only be installed for PCI Slot 4 with Full Height bracket It might be performance limited if VGA Card installed due to the elec link is x8 v Power consumption and he...

Страница 27: ...a rich set of diagnostic tests of the major components of the server DSA Preboot collects the following information about the server Drive health information Event logs for ServeRAID controllers and s...

Страница 28: ...for remote server management capabilities The IMM2 provides remote server management through the following industry standard interfaces Intelligent Platform Management Interface IPMI version 2 0 Simpl...

Страница 29: ...key IBM part number 90Y4349 is required to enable ports 3 and 4 on the Gigatbit Ethernet controller See https www 304 ibm com systems x fod index wss for detailed information on product feature activ...

Страница 30: ...Ethernet Production Ethernet Production Ethernet v UEFI compliant server firmware The UEFI firmware offers several features including Unified Extensible Firmware Interface UEFI version 2 1 compliance...

Страница 31: ...el are mutually exclusive of each other v Memory error correcting code and parity test v Memory down sizing non mirrored memory After a restart of the server after the memory controller detected a non...

Страница 32: ...ing systems and virtualization technologies in IBM and non IBM x86 platforms Through a single user interface IBM Systems Director provides consistent views for viewing managed systems determining how...

Страница 33: ...em Pack Installer The UpdateXpress System Pack Installer detects supported and installed device drivers and firmware in the server and installs available updates For additional information and to down...

Страница 34: ...swap hard disk drive has an activity LED and when this LED is flashing it indicates that the drive is in use v Hard disk drive status LEDs This LED is used on hot swap SAS or SATA hard disk drives Wh...

Страница 35: ...activity LEDs When any of these LEDs is flashing or flickering it indicates that the server is transmitting to or receiving signals from the Ethernet LAN that is connected to the Ethernet port that c...

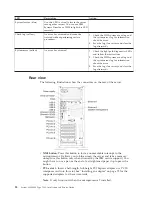
Страница 36: ...for information about the error 3 Save the log if necessary and clear the log afterwards Rear view The following illustrations show the connectors on the rear of the server v NMI button Press this but...

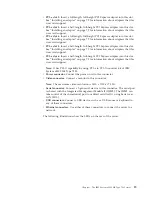
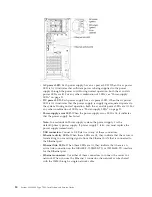
Страница 37: ...height PCI Express adapter into this slot See Installing an adapter on page 79 for information about adapters that this riser card support Note It has PCI X capability by using PCI e to PCI X converte...

Страница 38: ...that the power supply has failed Note In a redundant Power supply system the power supply 1 is the default primary power supply If power supply 1 fails you must replace the power supply immediately v...

Страница 39: ...ired for the server to start v One microprocessor in microprocessor socket 1 v One 2 GB DIMM per microprocessor on the system board v One power supply v Power cord v 2 cooling fans fan 2 and rear fan...

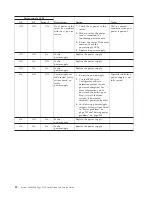
Страница 40: ...Faulty power supply Replace the power supply On Off Off Power supply not fully seated faulty system board or faulty power supply 1 Reseat the power supply 2 Use the IBM Power Configurator utility to...

Страница 41: ...ce processor the Integrated Management Module II is shut down however the server can respond to requests to the service processor such as a remote request to turn on the server The power on LED flashe...

Страница 42: ...the device The device also might have more than one power cord To remove all electrical current from the device ensure that all power cords are disconnected from the power source The server can be tur...

Страница 43: ...t signal will be enabled by the system board logic v The integrated management module II IMM2 can turn off the server as an automatic response to a critical system failure v The server turns off when...

Страница 44: ...26 System x3300 M4 Type 7382 Installation and Service Guide...

Страница 45: ...ore you install optional hardware devices make sure that the server is working correctly Start the server and make sure that the operating system starts if an operating system is installed or that a 1...

Страница 46: ...server is correctly configured and functions correctly with the newly installed devices 4 Save the DSA log as a file and send it to IBM For information about transferring data and logs see http publib...

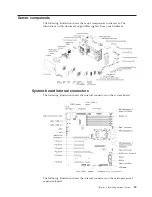
Страница 47: ...n this document might differ slightly from your hardware System board internal connectors The following illustration shows the internal connectors on the system board The following illustration shows...

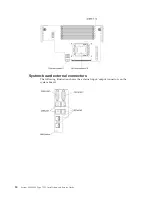
Страница 48: ...System board external connectors The following illustration shows the external input output connectors on the system board 30 System x3300 M4 Type 7382 Installation and Service Guide...

Страница 49: ...s Jumper number Jumper name Jumper setting ME_UPDATE PCH ME firmware update v Pins 1 and 2 Normal mode default v Pins 2 and 3 Force update mode Clear CMOS CMOS clear jumper v Pins 1 and 2 Normal mode...

Страница 50: ...resence is not asserted by default The physical presence needs to be asserted to activate deactivate clear or change ownership of the TPM SW1 1 Host TPM physical presence v Physical presence off defau...

Страница 51: ...then disconnect all power cords and external cables Review the information in Safety Installation guidelines on page 36 Handling static sensitive devices on page 39 and Turning off the server on page...

Страница 52: ...The following illustration shows the light emitting diodes LEDs on the microprocessor 2 expansion board 34 System x3300 M4 Type 7382 Installation and Service Guide...

Страница 53: ...planes and the backplane assembly 1 Connectors on the hot swap 3 5 inch hard disk drive backplane 2 Connectors on the simple swap 3 5 inch hard disk drive backplane 3 Connectors on the 2 5 inch hard d...

Страница 54: ...maximum levels of performance To download firmware updates for your server go to http www ibm com support fixcentral Important Some cluster solutions require specific code levels or coordinated code...

Страница 55: ...replace hot swap power supplies hot swap fans or hot plug Universal Serial Bus USB devices However you must turn off the server before you perform any steps that involve removing or installing adapter...

Страница 56: ...t cover or a microprocessor and heat sink v You have installed the air baffle and fan 2 when you installed the microprocessor 2 expansion board option Working inside the server with the power on Atten...

Страница 57: ...tic protective package Do not place the device on the server cover or on a metal surface v Take additional care when handling devices during cold weather Heating reduces indoor humidity and increases...

Страница 58: ...ect all power cords then disconnect all external cables as necessary to replace the device 3 Unlock the left side cover using the key that comes with the server Note You must unlock the left side cove...

Страница 59: ...external cables from the server 3 Carefully turn the server on its side so that it is lying flat with the cover facing up Attention Do not allow the server to fall over 4 Unlock and remove the left s...

Страница 60: ...s lying flat with the cover facing up Attention Do not allow the server to fall over 4 Unlock and remove the left side cover see Removing the left side cover on page 39 5 Remove the air baffle see Rem...

Страница 61: ...n the server on its side so that it is lying flat with the cover facing up Attention Do not allow the server to fall over 4 Unlock and remove the left side cover see Removing the left side cover on pa...

Страница 62: ...n fan 2 in the fan assembly The following instructions can be used to install any simple swap fan in the server Note 1 When you install the second microprocessor you must also install fan 3 The fan fi...

Страница 63: ...dundant fan P N 00D2593 Attention When fan 3 is installed and 16 GB 1 5V 32 GB 1 35V DIMMs are installed fan 1 must also be populated To install a simple swap fan complete the following steps 1 Read t...

Страница 64: ...erver see step 1 in the following illustration 8 Align the release latches of the fan and make sure the fan is firmly seated on the right position see step 2 and 3 in the following illustration 9 Conn...

Страница 65: ...ves that are preinstalled in the server come with power and signal cables attached If you replace any drives remember which cable is attached to which drive v When you route a cable make sure that it...

Страница 66: ...ion Panel Cable Connection The following illustration shows the internal cable routing and connectors from the operator information panel to the system board 48 System x3300 M4 Type 7382 Installation...

Страница 67: ...r the USB tape drives It also shows the internal power cable for the optical drives Hard Disk Drive Cable Connection Review the following information before connecting power and signal cables to inter...

Страница 68: ...nfigure your disk arrays after you install drives See the ServeRAID adapter documentation for additional information about RAID operation and complete instructions for using the ServeRAID adapter Revi...

Страница 69: ...5 inch hot swap hard disk drives with the redundant power supply and the serveRAID adapter 3 For server models with sixteen 2 5 inch hot swap hard disk drives with the redundant power supply Chapter...

Страница 70: ...4 For server models with sixteen 2 5 inch hot swap hard disk drives with the redundant power supply and the serveRAID adapter 52 System x3300 M4 Type 7382 Installation and Service Guide...

Страница 71: ...5 For server models with four 3 5 inch hot swap hard disk drives with the fixed power supply Chapter 2 Installing optional devices 53...

Страница 72: ...the serveRAID adapter 7 For server models with eight 3 5 inch hot swap hard disk drives with the fixed power supply Note It is necessary to use one 2 8 pins to 2 7 pins power cable for these server m...

Страница 73: ...2 8 pins to 2 7 pins power cable for these server models come with a fixed power supply 9 For server models with four 3 5 inch hot swap hard disk drives with the redundant power supply Note It is nec...

Страница 74: ...o 2 7 pins power cable for these server models come with a redundant power supply 11 For server models with eight 3 5 inch hot swap hard disk drives with the redundant power supply Note It is necessar...

Страница 75: ...o 2 8 pins to 2 7 pins power cables for these server models come with a redundant power supply 13 For server models with four 3 5 inch simple swap hard disk drives with the fixed power supply Note It...

Страница 76: ...s to 2 8 pins power cables for these server models come with the fixed power supply 15 For server models with eight 3 5 inch simple swap hard disk drives with the fixed power supply Note It is necessa...

Страница 77: ...ply and the ServeRAID adaptery Note It is necessary to use one 2 7 pins to 2 8 pins power cable for these server models come with a fixed power supply 17 For server models with four 3 5 inch simple sw...

Страница 78: ...e swap hard disk drives with the redundant power supply with the serveRAID adapter 19 For server models with eight 3 5 inch simple swap hard disk drives with the redundant power supply 60 System x3300...

Страница 79: ...disk drives with the redundant power supply with the serveRAID adapter Fan Power Cable Connection The following illustration shows the internal cable routing and connectors from the fan assembly to t...

Страница 80: ...rank in specified models registered or unbuffered synchronous dynamic random access memory SDRAM dual inline memory modules DIMMs with error correcting code ECC The specifications of a DDR3 DIMM are o...

Страница 81: ...r supports a maximum of 12 DIMMs single rank dual rank or quad rank on the system board If you mix single rank dual rank or quad rank DIMMs in the server quad rank DIMMs must be installed first When o...

Страница 82: ...nstall a minimum of two DIMMs if the server has two microprocessors installed That is one for microprocessor 1 and one for microprocessor 2 v The server comes with a minimum of one DIMM installed in s...

Страница 83: ...0 are not used in memory mirroring mode To enable memory mirroring through the Setup utility select System Settings Memory For more information see Using the Setup utility on page 115 DIMMs must be in...

Страница 84: ...all power cords then disconnect all external cables as necessary to replace the device 3 Carefully turn the server on its side so that it is lying flat with the cover facing up Attention Do not allow...

Страница 85: ...nd the retaining clips the DIMM has not been correctly inserted open the retaining clips remove the DIMM and then reinsert it If you have other devices to install or remove do so now Otherwise go to C...

Страница 86: ...v The server with sixteen 2 5 inch hard disk drives v The server with four 3 5 inch hard disk drives 68 System x3300 M4 Type 7382 Installation and Service Guide...

Страница 87: ...you are installing see http www ibm com systems info x86servers serverproven compat us v Locate the documentation that comes with the drive and follow those instructions in addition to the instructio...

Страница 88: ...ted optional devices for the server see http www ibm com servers eserver serverproven compat us v Inspect the drive and drive bay for signs of damage v Make sure that the drive is correctly installed...

Страница 89: ...that the hard disk drive is operating correctly If the yellow hard disk drive status LED is lit continuously that drive is faulty and must be replaced If the green hard disk drive activity LED is fla...

Страница 90: ...to halt which might result in the loss of data To avoid this potential problem always use an electrostatic discharge wrist strap or other grounding system when you work inside the server with the powe...

Страница 91: ...ut either a drive or a filler panel installed in each drive bay v You have to turn off the server to install simple swap drives in the simple swap drive bays To install a 3 5 inch simple swap hard dis...

Страница 92: ...ables and other equipment that are specified in the documentation that comes with the new drive v You have checked the instructions that come with the new drive to determine whether you must set any s...

Страница 93: ...tical instruments and avoid direct exposure to the beam 2 Read the safety information that begins in Safety and Installation guidelines on page 36 3 Turn off the server see Turning off the server on p...

Страница 94: ...lock and remove the left side cover see Removing the left side cover on page 39 4 Open the bezel see Removing the bezel on page 331 5 Remove the EMC shields from the drive bay if installed 6 Touch the...

Страница 95: ...sconnect all external cables from the server 3 Carefully turn the server on its side so that it is lying flat with the cover facing up Attention Do not allow the server to fall over 4 Unlock and remov...

Страница 96: ...ention Incomplete insertion might cause damage to the system board or the adapter 10 Make sure the latch on the rear side of the PCI X riser card assembly is secured to the rear of the server chassis...

Страница 97: ...ion v Do not set the maximum digital video adapter resolution above 1280 x 1024 at 75 Hz for an LCD monitor This is the highest resolution that is supported for any add on video adapter that you insta...

Страница 98: ...iser card assembly 1 Note While installing 16 GB 1 5 Volt 32 GB 1 35 Volt please refers to the table of fan configuration instruction Table 13 Fan Configuration Instruction Fans Conditions 2 and Rear...

Страница 99: ...BA 59Y1993 59Y1998 Broadcom NetXtreme I quad port GbE adapter 90Y9352 90Y9355 Broadcom NetXtreme I dual port GbE adapter 90Y9370 90Y9373 Emulex 10 GbE virtual fabric adapter III 95Y3762 9573766 Emulex...

Страница 100: ...at comes with the adapter for any cabling instructions and information about jumper or switch settings It might be easier for you to route cables before you install the adapter 6 Touch the static prot...

Страница 101: ...use damage to the system board or the adapter v If you are installing or removing an adaptor into or from PCI slot 4 you have to press the release latch firstly as step 1 of the following illustration...

Страница 102: ...w the server to fall over 4 Unlock and remove the left side cover see Removing the left side cover on page 39 5 See the documentation that comes with the adapter for any cabling instructions and infor...

Страница 103: ...to the expansion slot Attention Incomplete insertion might cause damage to the system board or the adapter 11 Perform any configuration tasks that are required for the adapter If you have other device...

Страница 104: ...veRAID adapter which you will install the memory module Remove the ServeRAID adapter if necessary 7 Touch the static protective package that contains the adapter to any unpainted metal surface on the...

Страница 105: ...sconnect all external cables from the server 3 Carefully turn the server on its side so that it is lying flat with the cover facing up Attention Do not allow the server to fall over 4 Unlock and remov...

Страница 106: ...ny components on the system board 9 Install the battery a Align the battery cable connector with the slot on the battery holder Place the battery into the battery holder and make sure that the battery...

Страница 107: ...sor 2 expansion board complete the following steps Note While installing 16 GB 1 5 Volt 32 GB 1 35 Volt please refers to the table of fan configuration instruction Table 15 Fan Configuration Instructi...

Страница 108: ...ffle see Removing the air baffle on page 41 6 Remove the fan assembly see Removing the fan assembly on page 42 7 Touch the static protective package that contains the microprocessor 2 expansion board...

Страница 109: ...ard release levers are in the open position 11 Align the holes on the microprocessor 2 expansion board to the guide pins on the system board Install the microprocessor 2 expansion board on the system...

Страница 110: ...r 2 power cable P4 to its connector on the system board see Power Cable Connection on page 47 If you have other devices to install or remove do so now Otherwise go to Completing the installation on pa...

Страница 111: ...delines on page 36 2 Remove the socket cover from the microprocessor socket if it is installed 3 If the microprocessor is preinstalled in the installation tool release the sides of the cover and remov...

Страница 112: ...arefully close the microprocessor release lever to the closed position to secure the microprocessor in the socket 5 Install the heat sink that comes with the microprocessor Attention v Do not set down...

Страница 113: ...the screws to 8 5 Newton meters Nm to 13 Nm 6 3 foot pounds to 9 6 foot pounds 6 If you installed the second microprocessor install the two fans on Fan connector 3 of the system board respectively se...

Страница 114: ...the following steps 1 Place the heat sink on a clean work surface 2 Remove the cleaning pad from its package and unfold it completely 3 Use the cleaning pad to wipe the thermal grease from the bottom...

Страница 115: ...these parts contact a service technician To install a fixed power supply complete the following steps Note You must install the fan assembly before removing or installing the power supply 1 Read the...

Страница 116: ...wait approximately 3 minutes after you connect the server power cord to an electrical outlet before the power control button becomes active 9 Make sure that the ac power LED and the dc power LED on t...

Страница 117: ...assembly on page 42 7 Remove the existing power paddle card if there is one installed See Removing the power paddle card on page 414 8 Align the power paddle card to the guide pins of the redundant p...

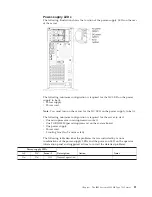
Страница 118: ...ibm com systems bladecenter resources powerconfig html v The server comes with one hot swap 12 volt output power supply that connects to power supply bay 1 The input voltage is 100 127 V ac or 200 24...

Страница 119: ...ns in Safety and Installation guidelines on page 36 Attention Static electricity that is released to internal server components when the server is powered on might cause the server to halt which might...

Страница 120: ...you connect the server power cord to an electrical outlet before the power control button becomes active 7 Make sure that the ac power LED and the dc power LED on the ac power supply are lit indicati...

Страница 121: ...rnal cables from the server 3 Carefully turn the server on its side so that it is lying flat with the cover facing up Attention Do not allow the server to fall over 4 Unlock and remove the left side c...

Страница 122: ...it see Installing the left side cover on page 108 4 Reconnect the cables and power cords see Connecting the cables on page 108 5 Update the server configuration see Updating the server configuration o...

Страница 123: ...erver to fall over 4 Unlock and remove the left side cover see Removing the left side cover on page 39 5 Remove the air baffle see Removing the air baffle on page 41 if necessary 6 Touch the static pr...

Страница 124: ...ock and remove the left side cover see Removing the left side cover on page 39 5 Remove the air baffle see Removing the air baffle on page 41 6 Touch the static protective package that contains the fa...

Страница 125: ...elines on page 36 2 Turn off the server see Turning off the server on page 24 and all attached peripheral devices Disconnect all power cords then disconnect all external cables as necessary to replace...

Страница 126: ...cover edges slip into position over the chassis Important Before you slide the left side cover forward make sure that all the tabs on the cover engage the chassis correctly If all the tabs do not eng...

Страница 127: ...about installing device drivers see the documentation that comes with each device If the server has an optional RAID adapter and you have installed or removed a hard disk drive see the documentation t...

Страница 128: ...110 System x3300 M4 Type 7382 Installation and Service Guide...

Страница 129: ...oblem however even if your problem is not listed installing the update might solve the problem Be sure to separately install any listed critical updates that have release dates that are later than the...

Страница 130: ...ic input output system firmware To change the startup device sequence set the date and time and set passwords For information about using this program see Using the Setup utility on page 115 v Boot Ma...

Страница 131: ...and diskette image files as virtual drives that are available for use by the server Uploading a diskette image to the IMM memory and mapping it to the server as a virtual drive The blue screen captur...

Страница 132: ...Insert the CD and restart the server If the CD does not start see ServerGuide problems on page 294 2 Follow the instructions on the screen to complete the following steps a Select your language b Sele...

Страница 133: ...lers and network adapters Then the program checks the CD for newer device drivers This information is stored and then passed to the operating system installation program 3 The ServerGuide program pres...

Страница 134: ...choice to view configuration information including the ID speed and cache size of the microprocessors machine type and model of the server the serial number the system UUID and the amount of installed...

Страница 135: ...wer Power Performance Bias Platform Controlled is enabled Workload Configuration Select this choice to determine how to balance between I O bandwidth and balanced workload Choosing I O sensitive will...

Страница 136: ...ort period of time when it is in turbo mode CPU C States Select this choice to enable or disable ACPI C2 Processor Power states It will be effective after the next system reboot Package ACPI CState Li...

Страница 137: ...the IMM MAC address the current IMM IP address and the host name define the static IMM IP address subnet mask and gateway address specify whether to use the static IP address or have DHCP assign the...

Страница 138: ...and all events that are generated by the baseboard management controller that is embedded in the integrated management module IMM Important If the system error LED on the front of the server is lit b...

Страница 139: ...authority to set change and delete the power on password A user who types the power on password has access to only the limited Setup utility menu the user can set change and delete the power on passwo...

Страница 140: ...F12 If a bootable USB mass storage device is installed a submenu item USB Key Disk is displayed 4 Use the Up arrow and Down arrow keys to select an item from the Boot Selection Menu and press Enter T...

Страница 141: ...ystem hangs and the operating system watchdog timer times out The IMM might be configured to watch for the operating system watchdog timer and reboot the system after a timeout if the ASR feature is e...

Страница 142: ...v Serial over LAN Establish a Serial over LAN SOL connection to manage servers from a remote location You can remotely view and change the UEFI settings restart the server identify the server and perf...

Страница 143: ...ct USB Storage Press Enter and then select Esc 5 Select Change Boot Order and then select Commit Changes then press Enter 6 Select Save Settings and then select Exit Setup If the embedded hypervisor f...

Страница 144: ...on Demand FoD including instructions for automating the activation and installation of the activation key by using IBM ToolsCenter or IBM Director see the IBM System x Features on Demand User s Guide...

Страница 145: ...re the network as a startable device and you can customize where the network startup option appears in the startup sequence Enable and disable the Intel Gigabit Ethernet Utility program from the Setup...

Страница 146: ...tility press Ctrl H to start pre boot CLI press Ctrl P to start ServerGuide HII MegaRAID Storage Manager MSM MegaCLI Command Line Interface and IBM Director ServeRAID M5110 ServeRAID M5120 adapters Me...

Страница 147: ...trol button becomes active after the power on LED flashes slowly 2 When prompted F1 Setup is displayed press F1 If you have set an administrator password you are prompted to type the password 3 Under...

Страница 148: ...For further details on creating a software RAID array of hard disk drives please see the ServeRAID C105 documentation at http www 947 ibm com support entry portal docdisplay lndocid MIGR 5089068 2 Som...

Страница 149: ...ualization technologies in IBM and non IBM x86 platforms Through a single user interface IBM Systems Director provides consistent views for viewing managed systems determining how these systems relate...

Страница 150: ...ibm com supportportal b Click on the Downloads tab at the top of the panel c Under ToolsCenter select View ToolsCenter downloads d Select Advanced Settings Utility ASU e Scroll down and click on the l...

Страница 151: ...enticated KCS access method The following commands are examples of using the userid and password default values and not using the default values Example that does not use the userid and password defau...

Страница 152: ...count 1 of 12 accounts The default value is USERID imm_password The IMM account password 1 of 12 accounts The default value is PASSW0RD with a zero 0 not an O The following commands are examples of us...

Страница 153: ...LAN based v Bootable media containing ASU LAN or KCS depending upon the bootable media Note IBM provides a method for building a bootable media You can create a bootable media using the Bootable Media...

Страница 154: ...he default values Examples that do not use the userid and password default values asu set SYSTEM_PROD_DATA SYsInfoProdName m t_model user imm_user_id password imm_password asu set SYSTEM_PROD_DATA SYs...

Страница 155: ...ccount 1 of 12 accounts The default value is USERID imm_password The IMM account password 1 of 12 accounts The default value is PASSW0RD with a zero 0 not an O The following commands are examples of u...

Страница 156: ...138 System x3300 M4 Type 7382 Installation and Service Guide...

Страница 157: ...re the problem occurred If any hardware software or firmware was changed before the problem occurred if possible reverse those changes This might include any of the following items v Hardware componen...

Страница 158: ...In DSA click Firmware VPD to view system firmware levels or click Software to view operating system levels 2 Download and install updates of code that is not at the latest level To display a list of a...

Страница 159: ...roblem might cause multiple symptoms Follow the troubleshooting procedure for the most obvious symptom If that procedure does not diagnose the problem use the procedure for another symptom if possible...

Страница 160: ...n the microprocessor socket See Microprocessor problems on page 285 for information about diagnosing microprocessor problems v Before you run diagnostic programs you must determine whether the failing...

Страница 161: ...path diagnostics LEDs see Light path diagnostics Note When you slide the light path diagnostics panel out of the server to check the LEDs or checkpoint codes do not run the server continuously with l...

Страница 162: ...ork Management Protocol SNMP version 3 Common Information Model CIM Web browser For more information about the Integrated Management Module IMM see Using the integrated management module II on page 12...

Страница 163: ...or components of the server DSA Preboot collects the following information about the server Drive health information Event logs for ServeRAID controllers and service processors Installed hardware incl...

Страница 164: ...d for the server to start v One microprocessor in microprocessor socket 1 v One 2 GB DIMM per microprocessor on the system board v One power supply v Power cord v 2 cooling fans fan 2 and rear fan The...

Страница 165: ...upply Off On On Faulty power supply Replace the power supply On Off Off Power supply not fully seated faulty system board or faulty power supply 1 Reseat the power supply 2 Use the IBM Power Configura...

Страница 166: ...m one entry to the next use the Up Arrow and Down Arrow keys Some IMM sensors cause assertion events to be logged when their setpoints are reached When a setpoint condition no longer exists a correspo...

Страница 167: ...o to http www 947 ibm com systems support supportsite wss docdisplay lndocid SERV DSA brandind 5000008 If IPMItool is installed in the server you can use it to view the system event log Most recent ve...

Страница 168: ...the server state might be hung not hung or powered off Use any of the following methods v Use IPMItool over the network to the IMM external IP address to view the system event log v Use the Web browse...

Страница 169: ...e information If POST detects a problem an error message is sent to the POST event log see Event logs on page 148 for more information IBM Dynamic System Analysis IBM Dynamic System Analysis DSA colle...

Страница 170: ...ash memory on the server or you can create a bootable media such as a CD DVD ISO USB or PXE using the IBM ToolsCenter Bootable Media Creator BoMC For more details see the BoMC User Guide at http www i...

Страница 171: ...e memory diagnostic environment you must restart the server to access the stand alone memory diagnostic environment again 5 Select gui to display the graphical user interface or select cmd to display...

Страница 172: ...out the system when the system detects a fault and sends that data to IBM Service for problem determination It also includes the call home feature that automatically calls IBM Service when a problem o...

Страница 173: ...v Go to the IBM support website at http www ibm com supportportal to check for technical information hints tips and new device drivers or to submit a request for information Diagnostic code Message D...

Страница 174: ...microprocessor and heat sink on page 416 and Replacing a microprocessor and heat sink on page 418 3 Trained technician only Replace the system board S 1100C S 1100C An uncorrectable error has been det...

Страница 175: ...Replacing a microprocessor and heat sink on page 418 I 18007 I 18007 A power segment mismatch has been detected for one or more processor packages Processors have mismatched Power Segments 1 Make sure...

Страница 176: ...I 1800A A mismatch has been detected between the speed at which a QPI link has trained between two or more processor packages Processors have mismatched Bus Speed 1 Make sure that the microprocessor i...

Страница 177: ...r and heat sink on page 418 I 1800D I 1800D A cache associativity mismatch has been detected for one or more processor packages Processors have one or more cache levels with mismatched associativity 1...

Страница 178: ...t us 2 Check the IBM support website for an applicable retain tip or firmware update that applies to this problem 3 Trained technician only Remove and replace the affected microprocessor error LED is...

Страница 179: ...ctor error LED is lit you can re enable the DIMM through the Setup utility or the Advanced Settings Utility ASU S 51003 S 51003 An uncorrectable memory error was detected in DIMM slot on rank S 51003...

Страница 180: ...cted Note Each time you install or remove a DIMM you must disconnect the server from the power source then wait 10 seconds before restarting the server Make sure that the DIMMs match and are installed...

Страница 181: ...r the event logs to a different memory channel see Installing a memory module on page 62 for memory population sequence 3 If the error still occurs on the same DIMM replace the affected DIMM 4 If the...

Страница 182: ...request for information Diagnostic code Message Description Action W 58007 W 58007 Invalid memory configuration Unsupported DIMM Population detected Please verify memory configuration is valid Unsupp...

Страница 183: ...the same DIMM 3 If the problem is related to a DIMM replace the failing DIMM indicated by the error LEDs 4 If the problem occurs on the same DIMM connector swap the affected DIMMs as indicated by the...

Страница 184: ...I 580A5 I 580A5 Mirror Fail over complete DIMM number has failed over to to the mirrored copy DIMM Mirror Fail over Detected Information only Memory redundancy has been lost Check the event log for u...

Страница 185: ...ck the IBM support website for an applicable retain tip or firmware update that applies to this error 2 Inspect the microprocessor socket for foreign material if the microprocessor socket contains any...

Страница 186: ...ed for the device found at Bus Device Function The Vendor ID for the device is and the Device ID is ROM CHECKSUM ERROR 1 Check the riser card LEDs 2 Reseat all affected adapters and riser cards 3 Move...

Страница 187: ...Backup UEFI Image Information only Set the JP2 jumper in the backup position pins 2 and 3 to allow the server to boot from the backup UEFI W 3048006 W 3048006 UEFI has booted from the backup flash ba...

Страница 188: ...tion and then restart the server 7 Trained technician only If the problem remains replace the system board W 3058009 W 3058009 DRIVER HEALTH PROTOCOL Missing Configuraiton Requires Change Settings Fro...

Страница 189: ...3 Trained technician only Replace the system board W 305800E W 305800E DRIVER HEALTH PROTOCOL Reports Invalid Health Status Driver DRIVER HEALTH PROTOCOL Reports Invalid Health Status Driver 1 Restart...

Страница 190: ...111 W 3808003 W 3808003 Unable to retrieve the system configuration from the IMM Error Retrieving System Configuration from IMM 1 Run the Setup utility select Save Settings and restart the server see...

Страница 191: ...Load Default Settings and save the settings 2 Recover the server firmware W 3938002 W 3938002 A boot configuration error has been detected Boot Configuration Error 1 Run the Setup utility select Load...

Страница 192: ...as asserted Error An upper non recoverable sensor going high has asserted Check the server airflow Make sure that nothing is blocking the air from coming into or preventing the air from exiting the se...

Страница 193: ...b01 2d01xxxx Numeric sensor PCH Temp going high upper non recoverable has asserted Error An upper non recoverable sensor going high has asserted Check the server airflow Make sure that nothing is bloc...

Страница 194: ...he connectors on fan n are not damaged 2 Make sure that the fan n connectors on the system board are not damaged 3 Make sure that the fans are correctly installed 4 Reseat the fans 5 Replace the faili...

Страница 195: ...going high has asserted Trained technician only 1 For the hot swap power supply systems replace Power Paddle Card 2 For the fixed power supply systems replace the power supply 3 Replace System board...

Страница 196: ...place the system board n power supply number 80010002 0701xxxx Numeric sensor Planar VBAT going low lower non critical has asserted Warning A lower critical sensor going low has asserted Replace the s...

Страница 197: ...bm com systems bladecenter resources powerconfig html v For hot swap power supply systems follow actions listed in Power problems on page 289 and Solving power problems on page 296 n power supply numb...

Страница 198: ...s on page 296 80070603 0701xxxx Sensor Pwr Rail 2 Fault has transitioned to non recoverable Error A sensor has changed to Nonrecoverable state See more information in Power problems on page 289 and So...

Страница 199: ...ere state 1 Check power supply n LED 2 Remove the failing power supply 3 Trained technician only Replace the system board n power supply number 80070608 0a01xxxx 80070608 0a02xxxx Sensor PS n 12V UV F...

Страница 200: ...er solution verify that the latest level of code is supported for the cluster solution before you update the code 2 Update the firmware UEFI and IMM to the latest level Updating the firmware on page 1...

Страница 201: ...he DSA program 4 Re seat the adapter see Removing an adapter on page 358 and Installing an adapter on page 79 5 Replace the adapter 6 Trained technician only Replace microprocessor n see Removing a mi...

Страница 202: ...icroprocessor number Error A processor configuration mismatch has occurred 1 Check the CPU LED See more information about the CPU LED in Light path diagnostics LEDs 2 Check for a server firmware updat...

Страница 203: ...and heat sink on page 418 806f0807 0301xxxx 806f0807 0302xxxx The Processor CPU n has been disabled n microprocessor number Info A processor has been disabled 1 Update the firmware UEFI and IMM to the...

Страница 204: ...ocessor nis installed correctly 4 Trained technician only Replace microprocessor n n microprocessor number 80070201 0301xxxx 80070201 0302xxxx Sensor CPU n OverTemp has transitioned to critical from a...

Страница 205: ...installed and completely closed 2 Check the ambient temperature You must be operating within the specifications see Server features and specifications on page 6 for more information 3 Make sure that...

Страница 206: ...5 Trained technician only Replace the system board see Removing the system board on page 428 and Replacing the system board on page 430 Memory errors 806f000f 220101xx The System 1 has detected no mem...

Страница 207: ...e DIMM error LEDs 3 Remove the failing DIMM from the system board see Removing a memory module on page 403 4 Check for a server firmware update Important Some cluster solutions require specific code l...

Страница 208: ...gs to a different memory channel or microprocessor see Installing a memory module on page 62 for memory population 3 If the problem follows the DIMM replace the failing DIMM see Removing a memory modu...

Страница 209: ...for memory population 3 If the problem follows the DIMM replace the failing DIMM see Removing a memory module on page 403 and Installing a memory module on page 62 4 Trained technician only If the pr...

Страница 210: ...ion 3 If the problem follows the DIMM replace the failing DIMM see Removing a memory module on page 403 and Installing a memory module on page 62 4 Trained technician only If the problem occurs on the...

Страница 211: ...e for an applicable retain tip or firmware update that applies to this memory error 2 Make sure that the DIMMs are firmly seated and no foreign material is found in the DIMM connector Then retry with...

Страница 212: ...Installing a memory module on page 62 3 Trained technician only Replace the system board see Removing the system board on page 428 and Replacing the system board on page 430 806f040c 2001xxxx 806f040...

Страница 213: ...or firmware update that applies to this memory event If no memory fault is recorded in the logs and no DIMM connector error LED is lit you can re enable the DIMM through the Setup utility or the Advan...

Страница 214: ...system board or the event logs to a different memory channel or microprocessor see Installing a memory module on page 62 for memory population 3 If the error still occurs on the same DIMM replace the...

Страница 215: ...lling a memory module on page 62 for memory population 3 If the error still occurs on the same DIMM replace the affected DIMM 4 Trained technician only If the problem occurs on the same DIMM connector...

Страница 216: ...or contains any foreign material or is damaged replace the system board see Removing the system board on page 428 and Replacing the system board on page 430 5 Trained technician only Remove the affect...

Страница 217: ...06f0a0c 2009xxxx 806f0a0c 200axxxx 806f0a0c 200bxxxx 806f0a0c 200cxxxx An Over Temperature condition has been detected on the DIMM n Status n DIMM number Error An over temperature condition has occurr...

Страница 218: ...components a Hard disk drive wait 1 minute or more before reinstalling the drive b Cable from the system board to the backplane 3 Replace the following components one at a time in the order shown res...

Страница 219: ...xxx 806f070d 0402xxxx 806f070d 0403xxxx 806f070d 0404xxxx 806f070d 0405xxxx 806f070d 0406xxxx 806f070d 0407xxxx The Drive n Status rebuilt has been in progress n hard disk drive number Info The Drive...

Страница 220: ...only Replace the system board see Removing the system board on page 428 and Replacing the system board on page 430 806f0021 2582xxxx PCI fault has been detected for All PCI Error Error A PCI fault has...

Страница 221: ...gnostics LEDs 2 Reseat the affected adapters and riser cards 3 Update the server firmware UEFI and IMM and adapter firmware Important Some cluster solutions require specific code levels or coordinated...

Страница 222: ...on page 430 806f0125 0B01xxxx 806f0125 0B02xxxx The entity of PCI riser has been detected absent for PCI n n PCI slot number Info The entity of PCI riser n has been detected absent n PCI slot number N...

Страница 223: ...this event can be found in the logged IMM message text Please refer to the UEFI diagnostic code in the UEFI diagnostic code section of the Info Center for the appropriate user response 8007020f 2582xx...

Страница 224: ...the firmware on page 111 806f0313 1701xxxx A software NMI has occurred on system 1 1 CIM_ComputerSystem ElementName Error A software NMI has occurred 1 Check the device driver 2 Reinstall the device...

Страница 225: ...ce jumper has been detected No action information only 81030006 2101xxxx Sig verify fail has deasserted Info The sig verify fail has deasserted No action information only 806f0028 2101xxxx TPM command...

Страница 226: ...d has occurred 1 This is a UEFI detected event The UEFI diagnostic code for this event can be found in the logged IMM message text Please refer to the UEFI diagnostic code in the UEFI diagnostic code...

Страница 227: ...fic code levels or coordinated code updates If the device is part of a cluster solution verify that the latest level of code is supported for the cluster solution before you update the code 4 Remove c...

Страница 228: ...ystem board 806f052b 2201xxxx IMM2 FW Failover has been detected Error Invalid or unsupported firmware or software was detected 1 Make sure the server meets the minimum configuration to start see Powe...

Страница 229: ...re importing is correct and correctly generated 2 Try importing the certificate again 40000003 00000000 Ethernet Data Rate modified from arg1 to arg2 by user arg3 Info The specified user has changed t...

Страница 230: ...e set to arg1 by user arg2 Info A specified user has modified the host name of the IMM No action information only 40000009 00000000 IP address of network interface modified from arg1 to arg2 by user a...

Страница 231: ...Power Down Power Cycle or Reset 2 IBM_ComputerSystem ElementName 3 user ID Info A user has used the IMM to perform a power function on the server No action information only 40000010 00000000 Security...

Страница 232: ...ess xxx xxx xxx xxx Error A user has attempted to log in from a Telnet session by using an invalid login ID or password 1 Make sure that the correct login ID and password are being used 2 Have the sys...

Страница 233: ...rnet 0 interface is no longer active Info The IMM Ethernet interface has been disabled No action information only 40000019 00000000 LAN Ethernet 0 interface is now active Info The IMM Ethernet interfa...

Страница 234: ...dog or Loader Watchdog Error An operating system error has occurred and the screen capture failed Complete the following steps until the problem is solved 1 Reconfigure the watchdog timer to a higher...

Страница 235: ...ase where a specific type of firmware mismatch has been detected No action information only 4000002b 00000000 Domain name set to arg1 Info Domain name set by user No action information only 4000002c 0...

Страница 236: ...st link 1 Make sure that the certificate that you are importing is correct 2 Try to import the certificate again 40000023 00000000 Flash of 1 from 2 succeeded for user 3 1 CIM_ManagedElement ElementNa...

Страница 237: ...the RNDIS or cdc_ether device driver for the operating system 4 Disable the watchdog 5 Check the integrity of the installed operating system 40000028 00000000 IMM Test Alert Generated by 1 1 user ID...

Страница 238: ...g2 IP arg3 Pref arg4 GW arg5 Info IPv6 Static address is active No action information only 40000039 00000000 ENET arg1 DHCPv6 HSTN arg2 DN arg3 IP arg4 Pref arg5 Info IPv6 DHCP assigned address is act...

Страница 239: ...00000000 SNMP Agent port number changed from arg1 to arg2 by user arg3 Info A user has modified the SNMP Agent port number No action information only 40000044 00000000 SNMP Traps port number changed f...

Страница 240: ...ootDN arg2 UIDSearchAttribute arg3 BindingMethod arg4 EnhancedRBS arg5 TargetName arg6 GroupFilter arg7 GroupAttribute arg8 LoginAttribute arg9 Info A user configured an LDAP Miscellaneous setting No...

Страница 241: ...2 arg3 Info A user configured the SMTP server No action information only 40000057 00000000 Telnet arg1 by user arg2 Info A user enables or disables Telnet services No action information only 40000058...

Страница 242: ...od arg3 SessionTimeout arg4 Info A user changes the Global Login General Settings No action information only 40000063 00000000 Global Login Account Security set by user arg1 PasswordRequired arg2 Pass...

Страница 243: ...figuration saved to a file by user arg2 Info A user saves a Management Controller configuration to a file No action information only 4000006e 00000000 Alert Configuration Global Event Notification set...

Страница 244: ...1 Info Power capping deactivated by user No action information only 40000079 00000000 Static Power Savings mode has been turned on by user arg1 Info Static Power Savings mode turned on by user No acti...

Страница 245: ...n nodes No action information only 40000085 00000000 FPGA firmware mismatch between nodes arg1 and arg2 Please attempt to flash the FPGA firmware to the same level on all nodes Error A mismatch of FPG...

Страница 246: ...nly 4000008b 00000000 One or more of the Storage Management IP addresses has changed Info This message is for the use case where an IP address for the Storage Management has changed No action informat...

Страница 247: ...rn off and restart the system 2 Make sure that the DSA code is at the latest level For the latest level of DSA code go to http www ibm com support docview wss uid psg1SERV DSA 3 Run the test again 4 M...

Страница 248: ...hown in the DSA event log in the Firmware VPD section for this component For the latest level of firmware go to http www ibm com support docview wss uid psg1 MIGR 4JTS2T and select your system to disp...

Страница 249: ...e system if necessary to recover from a hung state 2 Make sure that the DSA code is at the latest level For the latest level of DSA code go to http www ibm com support docview wss uid psg1SERV DSA 3 R...

Страница 250: ...onnect it from the power source You must disconnect the system from ac power to reset the IMM2 2 After 45 seconds reconnect the system to the power source and turn on the system 3 Run the test again 4...

Страница 251: ...he system and disconnect it from the power source You must disconnect the system from ac power to reset the IMM2 2 After 45 seconds reconnect the system to the power source and turn on the system 3 Ru...

Страница 252: ...from the power source You must disconnect the system from ac power to reset the IMM2 2 After 45 seconds reconnect the system to the power source and turn on the system 3 Run the test again 4 Make sure...

Страница 253: ...onnect it from the power source You must disconnect the system from ac power to reset the IMM2 2 After 45 seconds reconnect the system to the power source and turn on the system 3 Run the test again 4...

Страница 254: ...it from the power source You must disconnect the system from ac power to reset the IMM2 2 After 45 seconds reconnect the system to the power source and turn on the system 3 Run the test again 4 Make...

Страница 255: ...em and disconnect it from the power source You must disconnect the system from ac power to reset the IMM2 2 After 45 seconds reconnect the system to the power source and turn on the system 3 Run the t...

Страница 256: ...e power source You must disconnect the system from ac power to reset the IMM2 2 After 45 seconds reconnect the system to the power source and turn on the system 3 Run the test again 4 Make sure that t...

Страница 257: ...system and disconnect it from the power source You must disconnect the system from ac power to reset the IMM2 2 After 45 seconds reconnect the system to the power source and turn on the system 3 Run...

Страница 258: ...from the power source You must disconnect the system from ac power to reset the IMM2 2 After 45 seconds reconnect the system to the power source and turn on the system 3 Run the test again 4 Make sure...

Страница 259: ...and disconnect it from the power source You must disconnect the system from ac power to reset the IMM2 2 After 45 seconds reconnect the system to the power source and turn on the system 3 Run the test...

Страница 260: ...nnect it from the power source You must disconnect the system from ac power to reset the IMM2 2 After 45 seconds reconnect the system to the power source and turn on the system 3 Run the test again 4...

Страница 261: ...d disconnect it from the power source You must disconnect the system from ac power to reset the IMM2 2 After 45 seconds reconnect the system to the power source and turn on the system 3 Run the test a...

Страница 262: ...connect it from the power source You must disconnect the system from ac power to reset the IMM2 2 After 45 seconds reconnect the system to the power source and turn on the system 3 Run the test again...

Страница 263: ...system and disconnect it from the power source You must disconnect the system from ac power to reset the IMM2 2 After 45 seconds reconnect the system to the power source and turn on the system 3 Run...

Страница 264: ...it from the power source You must disconnect the system from ac power to reset the IMM2 2 After 45 seconds reconnect the system to the power source and turn on the system 3 Run the test again 4 Make...

Страница 265: ...off the system and disconnect it from the power source You must disconnect the system from ac power to reset the IMM2 2 After 45 seconds reconnect the system to the power source and turn on the syste...

Страница 266: ...ect it from the power source You must disconnect the system from ac power to reset the IMM2 2 After 45 seconds reconnect the system to the power source and turn on the system 3 Run the test again 4 Ma...

Страница 267: ...m and disconnect it from the power source You must disconnect the system from ac power to reset the IMM2 2 After 45 seconds reconnect the system to the power source and turn on the system 3 Run the te...

Страница 268: ...system and disconnect it from the power source You must disconnect the system from ac power to reset the IMM2 2 After 45 seconds reconnect the system to the power source and turn on the system 3 Run...

Страница 269: ...the device is in firmware update mode 1 Turn off the system and disconnect it from the power source You must disconnect the system from ac power to reset the IMM2 2 After 45 seconds reconnect the sys...

Страница 270: ...ystem and disconnect it from the power source You must disconnect the system from ac power to reset the IMM2 2 After 45 seconds reconnect the system to the power source and turn on the system 3 Run th...

Страница 271: ...and disconnect it from the power source You must disconnect the system from ac power to reset the IMM2 2 After 45 seconds reconnect the system to the power source and turn on the system 3 Run the test...

Страница 272: ...disconnect it from the power source You must disconnect the system from ac power to reset the IMM2 2 After 45 seconds reconnect the system to the power source and turn on the system 3 Run the test ag...

Страница 273: ...d disconnect it from the power source You must disconnect the system from ac power to reset the IMM2 2 After 45 seconds reconnect the system to the power source and turn on the system 3 Run the test a...

Страница 274: ...level is shown in the DSA event log in the Firmware VPD section for this component For more information see Updating the firmware on page 111 5 Run the test again 6 If the failure remains go to the I...

Страница 275: ...st level The installed firmware level is shown in the DSA event log in the Firmware VPD section for this component For more information see Updating the firmware on page 111 5 Run the test again 6 If...

Страница 276: ...ibm com support docview wss uid psg1SERV DSA 4 Make sure that the IMM2 firmware is at the latest level The installed firmware level is shown in the DSA event log in the Firmware VPD section for this c...

Страница 277: ...vel The installed firmware level is shown in the DSA event log in the Firmware VPD section for this component For more information see Updating the firmware on page 111 5 Run the test again 6 If the f...

Страница 278: ...e Firmware VPD section for this component For more information see Updating the firmware on page 111 4 Run the test again 5 If the failure remains go to the IBM Web site for more troubleshooting infor...

Страница 279: ...s shown in the DSA event log in the Firmware VPD section for this component For more information see Updating the firmware on page 111 4 Run the test again 5 If the failure remains go to the IBM Web s...

Страница 280: ...rmation see Updating the firmware on page 111 4 Run the test again 5 If the failure remains go to the IBM Web site for more troubleshooting information at http www ibm com systems support supportsite...

Страница 281: ...ed Test stopped unknown error code xxx received in COMMONEXIT procedure 1 Turn off and restart the system 2 Run the test again 3 Make sure that the DSA code is at the latest level For the latest level...

Страница 282: ...tem 4 Make sure that the DSA code is at the latest level For the latest level of DSA code go to http www ibm com support docview wss uid psg1SERV DSA 5 Make sure that the server firmware is at the lat...

Страница 283: ...ting the firmware on page 111 4 Run the test again 5 Turn off and restart the system if necessary to recover from a hung state 6 Run the memory diagnostics to identify the specific failing DIMM 7 If t...

Страница 284: ...901 xxx Memory Memory Stress Test Failed Test failure 1 Run the standard memory test to validate all memory 2 Make sure that the DSA code is at the latest level For the latest level of DSA code go to...

Страница 285: ...ode is at the latest level For the latest level of DSA code go to http www ibm com support docview wss uid psg1SERV DSA 2 Run the test again 3 Check the drive cabling at both ends for loose or broken...

Страница 286: ...le Replace the cable if it is damaged 6 Run the test again 7 Make sure that the DSA code is at the latest level For the latest level of DSA code go to http www ibm com support docview wss uid psg1SERV...

Страница 287: ...again 5 For additional troubleshooting information go to http www ibm com support docview wss uid psg1MIGR 41559 6 Run the test again 7 Replace the DVD drive 8 If the failure remains go to the IBM We...

Страница 288: ...ld not access the drive 1 Insert a CD DVD into the drive or try a new media and wait for 15 seconds 2 Run the test again 3 Check the drive cabling at both ends for loose or broken connections or damag...

Страница 289: ...For additional troubleshooting information go to http www ibm com support docview wss uid psg1MIGR 41559 6 Run the test again 7 Replace the DVD drive 8 If the failure remains go to the IBM Web site f...

Страница 290: ...eck the PCI Information and Network Settings information in the DSA event log to determine the physical location of the failing component 4 If the failure remains go to the IBM Web site for more troub...

Страница 291: ...in the DSA event log in the Firmware VPD section for this component For more information see Updating the firmware on page 111 2 Run the test again 3 Check the interrupt assignments in the PCI Hardwar...

Страница 292: ...og in the Firmware VPD section for this component For more information see Updating the firmware on page 111 2 Run the test again 3 Check the interrupt assignments in the PCI Hardware section of the D...

Страница 293: ...ings information in the DSA event log to determine the physical location of the failing component 4 If the failure remains go to the IBM Web site for more troubleshooting information at http www ibm c...

Страница 294: ...he IBM Web site for more troubleshooting information at http www ibm com systems support supportsite wss docdisplay brandind 5000008 lndocid SERV CALL Troubleshooting by symptom Use the troubleshootin...

Страница 295: ...rive diagnostic programs 3 Reseat the following components a CD or DVD drive b CD or DVD drive cable 4 Replace the components listed in step 3 one at a time in the order shown restarting the server ea...

Страница 296: ...evice 3 See the documentation that comes with the optional embedded hypervisor flash device for setup and configuration information 4 Make sure that other software works on the server General problems...

Страница 297: ...t swap drives or Removing a 3 5 inch simple swap SATA drive then run the hard disk drive diagnostic test again see DSA messages on page 228 If the remaining drives are recognized replace the drive tha...

Страница 298: ...If the activity of the LEDs changes return to step 1 4 Make sure that the hard disk drive backplane is correctly seated When it is correctly seated the drive assemblies correctly connect to the backpl...

Страница 299: ...place the drive A yellow hard disk drive status LED does not accurately represent the actual state of the associated drive 1 If the yellow hard disk drive LED and the RAID adapter software do not indi...

Страница 300: ...system might have a problem see Software problems on page 295 3 If neither condition applies check the event logs see Event logs on page 148 Keyboard mouse or pointing device problems v Follow the su...

Страница 301: ...y 2 Make sure that v The mouse or pointing device cable is securely connected to the server v If you are using a pointing device the keyboard and mouse or pointing device cables are not reversed v The...

Страница 302: ...les are seated correctly see Removing a memory module on page 403 and Installing a memory module on page 62 v You have installed the correct type of memory v If you changed the memory you updated the...

Страница 303: ...r If the problem is related to a DIMM replace the failing DIMM v Trained technician only Install the failing DIMM into a DIMM connector for microprocessor 2 if installed to verify that the problem is...

Страница 304: ...e rear of the server 2 Make sure that v The server is turned on If there is no power to the server see Power problems on page 289 v The monitor cables are connected correctly v The monitor is turned o...

Страница 305: ...e it is turned on might cause screen discoloration Move the device and the monitor at least 305 mm 12 in apart and turn on the monitor Notes a To prevent diskette drive read write errors make sure tha...

Страница 306: ...ther installed devices or cables v You updated the configuration information in the Setup utility Whenever memory or any other device is changed you must update the configuration 2 Reseat the device t...

Страница 307: ...e operator information panel 4 Make sure that the reset button is working correctly a Disconnect the server power cords b Reconnect the power cords c Reseat the operator information panel cable and th...

Страница 308: ...n ACPI operating system If you are using a non ACPI operating system complete the following steps a Press Ctrl Alt Delete b Turn off the server by pressing the power control button and hold it down fo...

Страница 309: ...optional PCI adapters if one is present v Hard disk drives v Optional DVD or Tape drive if one is present 3 Restart the server If the Pwr rail 1 error has been recorded in the IMM2 event log again tr...

Страница 310: ...essor 1 see Installing a microprocessor and heat sink on page 92 5 Reinstall the component then restarting the server If the Pwr rail 2 error has been recorded in the IMM2 event log again the componen...

Страница 311: ...efective Replace the defective component v Trained technician only replace microprocessor 2 see Installing a microprocessor and heat sink on page 92 v DIMMs 1 through 12 v Fan 4 5 Trained technician o...

Страница 312: ...blems v Follow the suggested actions in the order in which they are listed in the Action column until the problem is solved v See Chapter 5 Parts listing IBM System x3300 M4 Type 7382 on page 303 to c...

Страница 313: ...defined SCSI RAID servers or the ServerGuide System Partition is not present Run the ServerGuide program and make sure that setup is complete Software problems v Follow the suggested actions in the or...

Страница 314: ...following general procedure 1 Turn off the server and disconnect all ac power cords 2 Check for loose cables in the power subsystem Also check for short circuits for example if a loose screw is causi...

Страница 315: ...et controllers and see the Ethernet controller device driver readme file Try the following procedures v Make sure that the correct device drivers which come with the server are installed and that they...

Страница 316: ...wer supplies are working correctly complete the following steps 1 Turn off the server 2 Make sure that the server cover is closed and latched correctly 3 Make sure that the server top cover power cut...

Страница 317: ...sts What occurs When Where Does the failure occur on a single server or on multiple servers Is the failure repeatable Has this configuration ever worked What changes if any were made before the config...

Страница 318: ...e to update the firmware using the latest server firmware update package Note You can obtain a server update package from one of the following sources v Download the server firmware update from the Wo...

Страница 319: ...te package 11 Turn off the server and disconnect all power cords and external cables and then remove the server cover 12 Move the UEFI boot recovery jumper back to the primary position pins 1 and 2 13...

Страница 320: ...start the server 2 When the prompt press F3 to restore to primary is displayed press F3 to recover the primary bank Pressing F3 will restart the server Three boot failure Configuration changes such as...

Страница 321: ...assembly top cover and bezel is your responsibility If IBM acquires or installs a structural component at your request you will be charged for the service v Tier 1 customer replaceable unit CRU Replac...

Страница 322: ...TB 7 2 K 6 Gbps NL SATA SFF hard disk drive 81Y9731 Hard disk drive 2 5 inch 256 GB SSD 6 Gbps SATA SFF slim hard disk drive 90Y8644 Hard disk drive 2 5 inch 128 GB SSD 6 Gbps SATA SFF slim hard disk...

Страница 323: ...hard disk drive backplane 49Y4462 19 Backplane 3 5 inch simple swap hard disk drive backplane 00D2827 20 Fan redundant fan 00D2823 22 Fan rear fan 00D2824 23 Card PCI X interposer conversion riser ca...

Страница 324: ...CL11 ECC DDR3 1600MHz LP RDIMM 00D4968 DIMM 2GB 1Rx8 1 35V PC3L 10600 CL9 ECC DDR3 1333MHz LP UDIMM 49Y1421 DIMM 4GB 2Rx8 1 35V PC3L 10600 CL9 ECC DDR3 1333MHz LP UDIMM 49Y1422 DIMM 4GB 2Rx8 1 35V PC3...

Страница 325: ...III 95Y3766 Battery 3V Lithium system battery 33F8354 Battery M5100 SERIES battery 81Y4491 Controller ServeRAID M1115 SAS SATA Controller 46C8928 Consumable and Structural parts Consumable and struct...

Страница 326: ...r SJT three conductor cord a maximum of 15 feet in length and a parallel blade grounding type attachment plug rated 15 amperes 125 volts For units intended to be operated at 230 volts U S use Use a UL...

Страница 327: ...stan Tahiti Togo Tunisia Turkey Turkmenistan Ukraine Upper Volta Uzbekistan Vanuatu Vietnam Wallis and Futuna Yugoslavia Federal Republic of Zaire 39M5130 Denmark 39M5144 Bangladesh Lesotho Macao Mald...

Страница 328: ...ba Dominican Republic Ecuador El Salvador Guam Guatemala Haiti Honduras Jamaica Mexico Micronesia Federal States of Netherlands Antilles Nicaragua Panama Peru Philippines Saudi Arabia Thailand Taiwan...

Страница 329: ...is a consumable structural or FRU that must be replaced only by a trained service technician For information about the terms of the warranty see the Warranty Information document that comes with the s...

Страница 330: ...t To avoid straining the muscles in your back lift by standing or by pushing up with your leg muscles v Make sure that you have an adequate number of properly grounded electrical outlets for the serve...

Страница 331: ...d option v Microprocessor socket 2 always contains either a socket cover or a microprocessor and heat sink v You have installed the air baffle and fan 2 when you installed the microprocessor 2 expansi...

Страница 332: ...ackage and from your body v Remove the device from its package and install it directly into the server without setting down the device If it is necessary to set down the device put it back into its st...

Страница 333: ...Power Cable Connection The following illustration shows the fixed power cable routing The following illustration shows the hot swap power cable routing Chapter 6 Removing and replacing components 315...

Страница 334: ...nel to the system board Optical DVD and Tape Drive Cable Connection You can install either USB or SATA tape drives in the server The following illustration shows the internal cable routing and connect...

Страница 335: ...information before connecting power and signal cables to internal drives 1 Connectors on the hot swap 3 5 inch hard disk drive backplane 2 Connectors on the simple swap 3 5 inch hard disk drive backp...

Страница 336: ...figure your disk arrays after you install drives See the ServeRAID adapter documentation for additional information about RAID operation and complete instructions for using the ServeRAID adapter Revie...

Страница 337: ...nch hot swap hard disk drives with the redundant power supply and the serveRAID adapter 3 For server models with sixteen 2 5 inch hot swap hard disk drives with the redundant power supply Chapter 6 Re...

Страница 338: ...4 For server models with sixteen 2 5 inch hot swap hard disk drives with the redundant power supply and the serveRAID adapter 320 System x3300 M4 Type 7382 Installation and Service Guide...

Страница 339: ...5 For server models with four 3 5 inch hot swap hard disk drives with the fixed power supply Chapter 6 Removing and replacing components 321...

Страница 340: ...the serveRAID adapter 7 For server models with eight 3 5 inch hot swap hard disk drives with the fixed power supply Note It is necessary to use one 2 8 pins to 2 7 pins power cable for these server mo...

Страница 341: ...8 pins to 2 7 pins power cable for these server models come with a fixed power supply 9 For server models with four 3 5 inch hot swap hard disk drives with the redundant power supply Note It is necess...

Страница 342: ...o 2 7 pins power cable for these server models come with a redundant power supply 11 For server models with eight 3 5 inch hot swap hard disk drives with the redundant power supply Note It is necessar...

Страница 343: ...8 pins to 2 7 pins power cables for these server models come with a redundant power supply 13 For server models with four 3 5 inch simple swap hard disk drives with the fixed power supply Note It is n...

Страница 344: ...s to 2 8 pins power cables for these server models come with the fixed power supply 15 For server models with eight 3 5 inch simple swap hard disk drives with the fixed power supply Note It is necessa...

Страница 345: ...and the ServeRAID adaptery Note It is necessary to use one 2 7 pins to 2 8 pins power cable for these server models come with a fixed power supply 17 For server models with four 3 5 inch simple swap...

Страница 346: ...e swap hard disk drives with the redundant power supply with the serveRAID adapter 19 For server models with eight 3 5 inch simple swap hard disk drives with the redundant power supply 328 System x330...

Страница 347: ...sk drives with the redundant power supply with the serveRAID adapter Fan Power Cable Connection The following illustration shows the internal cable routing and connectors from the fan assembly to the...

Страница 348: ...ans unless they are classified as customer replaceable units CRUs Tier 1 customer replaceable unit CRU Replacement of Tier 1 CRUs is your responsibility If IBM installs a Tier 1 CRU at your request yo...

Страница 349: ...afety information that begins in Safety and Installation guidelines on page 36 2 Turn off the server see Turning off the server on page 24 and all attached peripheral devices Disconnect all power cord...

Страница 350: ...on of the chassis correctly 7 Turn on the peripheral devices and the server Removing the left side cover Important Before you install optional hardware make sure that the server is working correctly S...

Страница 351: ...owing steps 1 Read the safety information that begins in Safety and Installation guidelines on page 36 2 Turn off the server see Turning off the server on page 24 and all attached peripheral devices D...

Страница 352: ...it is lying flat with the cover facing up Attention Do not allow the server to fall over 4 Carefully position the server on a flat surface with the feet hanging over the edge of the flat surface to e...

Страница 353: ...ernal cables from the server 3 Carefully turn the server on its side so that it is lying flat with the cover facing up Attention Do not allow the server to fall over 4 Unlock and remove the left side...

Страница 354: ...Disconnect all power cords then disconnect all external cables as necessary to replace the device 3 Remove the left side cover see Removing the left side cover on page 39 4 Remove the existing air baf...

Страница 355: ...en disconnect all external cables from the server 3 Carefully turn the server on its side so that it is lying flat with the cover facing up Attention Do not allow the server to fall over 4 Unlock and...

Страница 356: ...es Disconnect all power cords then disconnect all external cables from the server 3 Carefully turn the server on its side so that it is lying flat with the cover facing up Attention Do not allow the s...

Страница 357: ...owings are illustrations of the server and the location of the drive bays Your hardware might differ depending on the model Note If the server is configured for RAID operation using a ServeRAID adapte...

Страница 358: ...v The server with sixteen 2 5 inch hard disk drives v The server with four 3 5 inch hard disk drives 340 System x3300 M4 Type 7382 Installation and Service Guide...

Страница 359: ...u are installing see http www ibm com systems info x86servers serverproven compat us v Locate the documentation that comes with the drive and follow those instructions in addition to the instructions...

Страница 360: ...ed optional devices for the server see http www ibm com servers eserver serverproven compat us v Inspect the drive and drive bay for signs of damage v Make sure that the drive is correctly installed i...

Страница 361: ...swap bays Note When using ServeRAID adapter M1015 to support more than sixteen 2 5 inch hard disk drives the maximum number of RAID supported drives is 16 All the other drives will remain JBOD the dri...

Страница 362: ...er on 2 Unlock the left side cover Note You must unlock the left side cover to open or remove the bezel When you lock the left side cover it locks both the cover and the bezel 3 Open the bezel see Rem...

Страница 363: ...minutes without either a drive or a filler panel installed in each drive bay v You do not have to turn off the server to install hot swap drives in the hot swap drive bays To remove a 3 5 inch hot sw...

Страница 364: ...ebsite at http www ibm com systems support for information about RAID adapters If you have other devices to install or remove do so now Otherwise go to Completing the installation on page 104 Replacin...

Страница 365: ...Make sure that the tray handle is open then install the hard disk drive into the hot swap bay 7 Align the drive assembly with the guide rails in the bay then carefully slide the drive assembly into t...

Страница 366: ...ty on page vii and Installation guidelines on page 36 Attention Static electricity that is released to internal server components when the server is powered on might cause the server to halt which mig...

Страница 367: ...ete the following steps 1 Read the safety information that begins Safety on page vii and Installation guidelines on page 36 Attention Static electricity that is released to internal server components...

Страница 368: ...104 Removing an optical CD DVD drive To remove an optional CD DVD drive complete the following steps 1 If you are replace a drive make sure that v You have all the cables and other equipment that are...

Страница 369: ...ure to the beam 2 Read the safety information that begins in Safety and Installation guidelines on page 36 3 Turn off the server see Turning off the server on page 24 and all attached peripheral devic...

Страница 370: ...You have all the cables and other equipment that are specified in the documentation that comes with the new drive v You have checked the instructions that come with the new drive to determine whether...

Страница 371: ...d Installation guidelines on page 36 3 Turn off the server see Turning off the server on page 24 and all attached peripheral devices Disconnect all power cords then disconnect all external cables from...

Страница 372: ...24 and all attached peripheral devices Disconnect all power cords then disconnect all external cables from the server 3 Unlock and remove the left side cover see Removing the left side cover on page 3...

Страница 373: ...l on page 331 5 Remove the air baffle see Removing the air baffle on page 41 6 Remove the fan assembly see Removing the fan assembly on page 42 7 Remove the existing tape drive see Removing an optiona...

Страница 374: ...ver see Removing the left side cover on page 39 5 Pull the hard disk drives and filler panels out of the server slightly to disengage them from the hard disk drive backplane 6 Remove the 2 5 inch hot...

Страница 375: ...ith the chassis and install it in the server b Fasten the four screws 7 Install the 2 5 inch hot swap hard disk drive backplane see Replacing the hot swap drive backplane 8 Install the EMC shields tha...

Страница 376: ...pheral devices Disconnect all power cords then disconnect all external cables as necessary to replace the device 3 Carefully turn the server on its side so that it is lying flat with the cover facing...

Страница 377: ...9 Pull the adapter out of the adapter connector then lift the adapter out of the server Chapter 6 Removing and replacing components 359...

Страница 378: ...ptor into or from PCI slot 4 you have to press the release latch firstly as step 1 of the following illustration 10 Install the PCI slot filler 11 Move the adapter retention brackets back to the close...

Страница 379: ...cards provide up to three PCI Express Gen2 adapter slots The following table lists the PCI e slots on the riser card and the system board the microprocessor to which each slot is connected and the su...

Страница 380: ...e 4Gb FC dual port HBA 59Y1993 59Y1998 Broadcom NetXtreme I quad port GbE adapter 90Y9352 90Y9355 Broadcom NetXtreme I dual port GbE adapter 90Y9370 90Y9373 Emulex 10 GbE virtual fabric adapter III 95...

Страница 381: ...ving the fan assembly on page 42 7 Remove the existing adaptor see Removing an adapter on page 358 8 See the documentation that comes with the adapter for any cabling instructions and information abou...

Страница 382: ...364 System x3300 M4 Type 7382 Installation and Service Guide...

Страница 383: ...g steps 1 Read the safety information that begins in Safety and Installation guidelines on page 36 2 Turn off the server see Turning off the server on page 24 and all attached peripheral devices Disco...

Страница 384: ...ntion brackets on the PCI X bracket to the open position Note Remove the expansion slot cover if it is installed on the PCI X bracket and save it for future use 12 Remove the PCI slot filler if instal...

Страница 385: ...n Do not allow the server to fall over 5 Unlock and remove the left side cover see Removing the left side cover on page 39 6 See the documentation that comes with the adapter for any cabling instructi...

Страница 386: ...t side cover see Removing the left side cover on page 39 5 Remove the air baffle see Removing the air baffle on page 41 6 Remove the fan assembly see Removing the fan assembly on page 42 7 Remove the...

Страница 387: ...ruct any components on the system board 13 Install the battery a Align the battery cable connector with the slot on the battery holder Place the battery into the battery holder and make sure that the...

Страница 388: ...nes on page 36 2 Turn off the server see Turning off the server on page 24 and all attached peripheral devices 3 Disconnect all power cords then disconnect all external cables from the server 4 Carefu...

Страница 389: ...d all attached peripheral devices 3 Disconnect all external cables and power cords 4 Carefully turn the server on its side so that it is lying flat with the cover facing up Attention Do not allow the...

Страница 390: ...guidelines on page 36 2 Turn off the server see Turning off the server on page 24 and all attached peripheral devices Disconnect all power cords then disconnect all external cables from the server 3 D...

Страница 391: ...off the server on page 24 and all attached peripheral devices Disconnect all power cords then disconnect all external cables from the server 3 Carefully turn the server on its side so that it is lying...

Страница 392: ...n the following illustration 10 Remove the expansion slot cover kit located in PCI slot 1 and save it for future use see step 2 in the following illustration 11 Press PCI X riser card assembly firmly...

Страница 393: ...nal lithium battery with a heavy metal battery or a battery with heavy metal components be aware of the following environmental consideration Batteries and accumulators that contain heavy metals must...

Страница 394: ...ir or disassemble Dispose of the battery as required by local ordinances or regulations To remove the system board battery complete the following steps 1 Read the safety information that begins in Saf...

Страница 395: ...7 Dispose of the battery as required by local ordinances or regulations See the IBM Environmental Notices and User s Guide on the IBM Documentation CD for more information Replacing the system battery...

Страница 396: ...lete the following steps 1 Read the safety information that begins in Safety and Installation guidelines on page 36 2 Turn off the server see Turning off the server on page 24 and all attached periphe...

Страница 397: ...it clicks into place Make sure that the battery clip holds the battery securely 10 Install the cover see Installing the left side cover on page 108 11 Reconnect the external cables and power cords the...

Страница 398: ...sconnect all external cables and power cords 4 Carefully turn the server on its side so that it is lying flat with the cover facing up Attention Do not allow the server to fall over 5 Remove the left...

Страница 399: ...rning off the server on page 24 and all attached peripheral devices Disconnect all power cords then disconnect all external cables as necessary to replace the device 3 Disconnect all external cables a...

Страница 400: ...d operator information panel assembly on page 380 10 Slide the USB connector and operator information assembly into the right position shown as the illustration 11 Connect the USB cable to the front U...

Страница 401: ...ety information that begins in Safety and Installation guidelines on page 36 2 Turn off the server see Turning off the server on page 24 and all attached peripheral devices Disconnect all power cords...

Страница 402: ...le on page 41 9 Remove the fan assembly see Removing the fan assembly on page 42 10 Note where the power signal and configuration cables are connected to the 2 5 inch hard disk drive backplane then di...

Страница 403: ...lane repeat step 10 and 11 13 If you are instructed to return the drive backplane follow all packaging instructions and use any packaging materials for shipping that are supplied to you Chapter 6 Remo...

Страница 404: ...llow the server to fall over 6 Remove the left side cover see Removing the left side cover on page 39 7 Remove the air baffle see Removing the air baffle on page 41 8 Remove the fan assembly see Remov...

Страница 405: ...Chapter 6 Removing and replacing components 387...

Страница 406: ...nstalling the fan assembly on page 105 18 Install the air baffle see Replacing the air baffle on page 336 19 Install and lock the left side cover see Installing the left side cover on page 108 20 Reco...

Страница 407: ...cover facing up Attention Do not allow the server to fall over 6 Remove the left side cover see Removing the left side cover on page 39 7 Remove the 3 5 inch hot swap hard disk drives see Installing a...

Страница 408: ...epeat step 10 and 11 13 If you are instructed to return the drive backplane follow all packaging instructions and use any packaging materials for shipping that are supplied to you 390 System x3300 M4...

Страница 409: ...off the server see Turning off the server on page 24 and all attached peripheral devices Disconnect all power cords then disconnect all external cables as necessary to replace the device 3 Disconnect...

Страница 410: ...41 9 Remove the fan assembly see Removing the fan assembly on page 42 10 Touch the static protective package that contains the hard disk drive backplane to any unpainted metal surface on the server th...

Страница 411: ...see Installing the fan assembly on page 105 18 Install the air baffle see Replacing the air baffle on page 336 19 Install and lock the left side cover see Installing the left side cover on page 108 2...

Страница 412: ...the power supply v You must install the fan assembly before removing or installing the power supply 1 Read the safety information that begins in Safety and Installation guidelines on page 36 Attention...

Страница 413: ...firm that the server supports the power supply that you are installing see http www ibm com systems info x86servers serverproven compat us v Before replacing a power supply with one of a different wat...

Страница 414: ...an electrostatic discharge wrist strap or other grounding system when you work inside the server with the power on 2 Turn off the server see Turning off the server on page 24 and all attached peripher...

Страница 415: ...at the ac power LED and the dc power LED on the ac power supply are lit indicating that the power supply is operating correctly The two green LEDs are to the right of the power cord connector 12 If yo...

Страница 416: ...ny part that has the following label attached Hazardous voltage current and energy levels are present inside any component that has this label attached There are no serviceable parts inside these comp...

Страница 417: ...talling see http www ibm com systems info x86servers serverproven compat us v Before installing an additional power supply or replace a power supply with one of a different wattage the user may use th...

Страница 418: ...a service technician To replace a hot swap power supply complete the following steps Note You must install the fan assembly before removing or installing the power supply 1 Read the safety information...

Страница 419: ...r cord through the handle and cable tie if any so that it does not accidentally become unplugged 10 Connect one end of the power cord for the new power supply into the connector on the back of the pow...

Страница 420: ...e power supplies 14 If you are instructed to return the drive backplane follow all packaging instructions and use any packaging materials for shipping that are supplied to you If you have other device...

Страница 421: ...ny cabling instructions and information about jumper or switch settings It might be easier for you to route cables before you install the adapter 7 Remove the air baffle if installed see Removing the...

Страница 422: ...lines per SDRAM 8 x8 organization 16 x16 organization wwwww is the DIMM bandwidth in MBps 8500 8 53 GBps DDR3 1066 SDRAMs 8 byte primary data bus 10600 10 66 GBps DDR3 1333 SDRAMs 8 byte primary data...

Страница 423: ...tem board supports a minimum of 2 GB and a maximum of 96 GB of system memory Note The amount of usable memory is reduced depending on the system configuration A certain amount of memory must be reserv...

Страница 424: ...hen you use the memory mirroring feature consider the following information In spare channel mode one rank is a spare of the other ranks on the same channel The spare rank is held in reserve and is no...

Страница 425: ...addressable memory is available when you use memory mirroring The following table lists the DIMM installation sequence for memory mirroring mode when one or two microprocessors is installed in the se...

Страница 426: ...cables as necessary to replace the device 3 Carefully turn the server on its side so that it is lying flat with the cover facing up Attention Do not allow the server to fall over 4 Unlock and remove t...

Страница 427: ...d open the retaining clips remove the DIMM and then reinsert it If you have other devices to install or remove do so now Otherwise go to Completing the installation on page 104 Removing a USB embedded...

Страница 428: ...on page 24 and all attached peripheral devices Disconnect all power cords then disconnect all external cables from the server 3 Carefully turn the server on its side so that it is lying flat with the...

Страница 429: ...he safety information that begins in Safety on page vii and Installation guidelines on page 36 2 Turn off the server see Turning off the server on page 24 and all attached peripheral devices Disconnec...

Страница 430: ...ry to replace the device 3 Carefully turn the server on its side so that it is lying flat with the cover facing up Attention Do not allow the server to fall over 4 Unlock and remove the left side cove...

Страница 431: ...packaging instructions and use any packaging materials for shipping that are supplied to you If you have other devices to install or remove do so now Otherwise go to Completing the installation on pa...

Страница 432: ...n assembly on page 42 7 Remove the redundant power supply slightly out of the server to disconnect it from the power paddle card 8 Disconnect all power cables from the connectors on the system board D...

Страница 433: ...oving the left side cover on page 39 5 Remove the air baffle see Removing the air baffle on page 41 6 Remove the fan assembly see Removing the fan assembly on page 42 7 Remove the existing power paddl...

Страница 434: ...ocessor to remove and install the microprocessor Failure to use the microprocessor tool may cause damage to the pins on the socket Any damage to the pins may require replacing the system board To remo...

Страница 435: ...ion tool down over the microprocessor 1 Twist the handle clockwise 2 to attach the tool to the microprocessor Note You can pick up or release the microprocessor by twisting the microprocessor installa...

Страница 436: ...careful the pins on the socket are fragile Any damage to the pins may require replacing the system board v Use the microprocessor installation tool that came with the new microprocessor to remove the...

Страница 437: ...ol then continue to step 5 10 Install the microprocessor a Align the holes on the microprocessor installation tool with the screws on the microprocessor bracket then place the microprocessor installat...

Страница 438: ...k after you remove the plastic cover v Do not touch the thermal material on the bottom of the heat sink Touching the thermal material will contaminate it If the thermal material on the microprocessor...

Страница 439: ...n on page 104 Thermal grease The thermal grease must be replaced whenever the heat sink has been removed from the top of the microprocessor and is going to be reused or when debris is found in the gre...

Страница 440: ...icroprocessor and heat sink on page 92 Removing the microprocessor 2 expansion board To remove the microprocessor 2 expansion board complete the following steps 1 Read the safety information that begi...

Страница 441: ...lled on the microprocessor 2 expansion board and put them in a safe static protective place a Adapters see Removing an adapter on page 358 b DIMMs see Removing a memory module on page 403 c Microproce...

Страница 442: ...w all packaging instructions and use any packaging materials for shipping that are supplied to you Attention Make sure to place the socket cover for the microprocessor socket on the microprocessor 2 e...

Страница 443: ...ve the air baffle see Removing the air baffle on page 41 6 Remove the fan assembly see Removing the fan assembly on page 42 7 Remove the existing additional microprocessor see Removing the microproces...

Страница 444: ...e levers are in the open position 12 Align the holes on the microprocessor 2 expansion board to the guide pins on the system board Install the microprocessor 2 expansion board on the system board 426...

Страница 445: ...r on v Make sure that none of the server cables are caught under the microprocessor 2 expansion board 14 Rotate the release lever to the close position to secure the microprocessor 2 expansion board i...

Страница 446: ...te the following steps 1 Read the safety information that begins in Safety and Installation guidelines on page 36 2 Turn off the server see Turning off the server on page 24 and all attached periphera...

Страница 447: ...d as the illustration and keep they in a safe place for future use 13 Grasp the handle of the system board Then carefully move the system board backward and lift it up to be removed from the chassis C...

Страница 448: ...FoD keys after installing the new system board For more information on Features on Demand FoD including instructions for automating the activation and installation of the activation key by using IBM...

Страница 449: ...Updating the firmware on page 111 12 Update the UUID see Updating the Universal Unique Identifier UUID on page 132 13 Update the DMI SMBIOS see Updating the DMI SMBIOS data on page 135 14 If you are...

Страница 450: ...432 System x3300 M4 Type 7382 Installation and Service Guide...

Страница 451: ...are upgrade You can obtain the latest downloads for your IBM product from http www ibm com support fixcentral systemx groupView query productGroup ibm 2FSystemx v If you have installed new hardware or...

Страница 452: ...ages on the World Wide Web where you can get the latest technical information and download device drivers and updates To access these pages go to http www ibm com supportportal You can find the most u...

Страница 453: ...ibm com planetwide In the U S and Canada call 1 800 IBM SERV 1 800 426 7378 In the U S and Canada hardware service and support is available 24 hours a day 7 days a week In the U K these services are...

Страница 454: ...436 System x3300 M4 Type 7382 Installation and Service Guide...

Страница 455: ...504 1785 U S A INTERNATIONAL BUSINESS MACHINES CORPORATION PROVIDES THIS PUBLICATION AS IS WITHOUT WARRANTY OF ANY KIND EITHER EXPRESS OR IMPLIED INCLUDING BUT NOT LIMITED TO THE IMPLIED WARRANTIES OF...

Страница 456: ...Microsystems Inc in the United States other countries or both Linux is a registered trademark of Linus Torvalds in the United States other countries or both Microsoft Windows and Windows NT are tradem...

Страница 457: ...is specification sets forth limits for particulates and gases that are intended to avoid such damage The limits must not be viewed or used as definitive limits because numerous other factors such as t...

Страница 458: ...to use or distribute the information in any way it believes appropriate without incurring any obligation to you Electronic emission notices Federal Communications Commission FCC statement Note This e...

Страница 459: ...ct is in conformity with the protection requirements of EU Council Directive 2004 108 EC on the approximation of the laws of the Member States relating to electromagnetic compatibility IBM cannot acce...

Страница 460: ...diesem Fall kann vom Betreiber verlangt werden angemessene Ma nahmen zu ergreifen und daf r aufzukommen Deutschland Einhaltung des Gesetzes ber die elektromagnetische Vertr glichkeit von Ger ten Dies...

Страница 461: ...ics and Information Technology Industries Association JEITA statement Japan Electronics and Information Technology Industries Association JEITA Confirmed Harmonics Guidelines products less than or equ...

Страница 462: ...People s Republic of China Class A electronic emission statement Taiwan Class A compliance statement 444 System x3300 M4 Type 7382 Installation and Service Guide...

Страница 463: ...onic emission notice 440 collecting data 139 completing the options installation 104 components on the server 29 303 configuration cable routing 49 317 ServerGuide Setup and Installation CD 111 Setup...

Страница 464: ...6 external system board connectors 30 F fan installing 44 fan assembly replacing 412 fan cage assembly removing 42 43 105 411 fan power cable routing 61 329 fans 11 FCC Class A notice 440 features 6...

Страница 465: ...system log 17 system error 17 LED errors power supply 21 146 LED system pulse 23 LEDs on the system board 33 operator information panel 18 system board 33 left side cover removing 39 332 local area ne...

Страница 466: ...nt USB connector 380 removing and replacing consumable and structural parts 331 Tier 1 CRUs 339 removing replacing the system board 428 replacement parts for the server 303 replacing 2 5 inch backplan...

Страница 467: ...355 temperature 7 test log viewing 154 thermal grease 96 421 three boot failure 302 Tier 1 CRUs removing and replacing 339 TOE 6 tools call home 154 tools diagnostic 144 trademarks 438 troubleshootin...

Страница 468: ...450 System x3300 M4 Type 7382 Installation and Service Guide...

Страница 469: ......

Страница 470: ...Part Number 00V9709 Printed in USA 1P P N 00V9709...

Отзывы: