


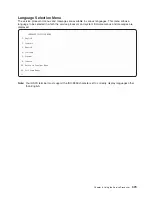

v
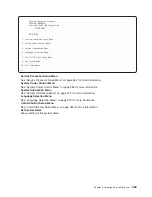
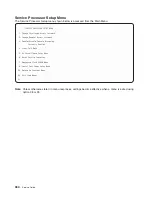
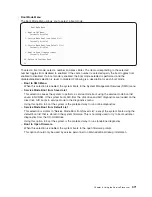
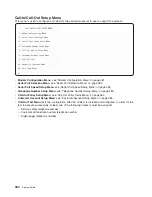
Reprogram
Flash
EPROM
Menu
This
option
updates
the
system
EPROMs.
After
entering
Y
to
indicate
that
you
want
to
continue,
you
are
prompted
to
enter
the
update
diskettes.
Follow
the
instructions
on
the
screen.
When
the
update
is
complete,
the
service
processor
reboots.
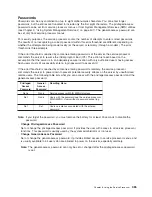
All
system
EPROMs
that
can
be
reprogrammed
are
updated
at
the
same
time.
They
are
as
follows:
–
System
power
control
network
programming
–
Service
processor
programming
–
System
firmware
–
Run-time
abstraction
services
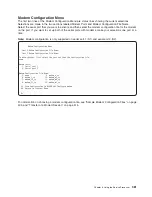
v
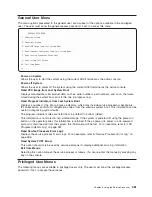
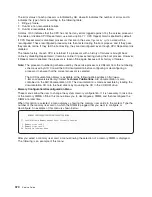
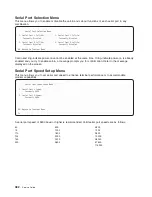
Serial
Port
Snoop
Setup
Menu
This
menu
can
be
used
to
set
up
serial
port
snooping,
in
which
the
user
can
configure
serial
port
1
as
a
″
catch-all
″
reset
device.
From
the
service
processor
main
menu,
select
option
1,
Service
Processor
Setup
Menu,
then
select
option
8
(Serial
Port
Snoop
Setup
Menu).
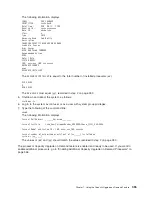
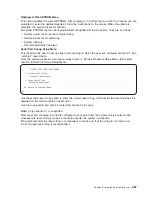
SERIAL
PORT
SNOOP
SETUP
MENU
1.
System
reset
string:
Currently
Unassigned
2.
Snoop
Serial
Port:
Currently
Unassigned
98.
Return
to
Previous
Menu
1>
Use
the
system
reset
string
option
to
enter
the
system
reset
string,
which
resets
the
machine
when
it
is
detected
on
the
main
console
on
serial
port
1.
Use
the
snoop
serial
port
option
to
select
the
serial
port
to
snoop.
Note:
Only
serial
port
1
is
supported.
After
serial
port
snooping
is
correctly
configured,
at
any
point
after
the
system
unit
is
booted
to
AIX,
whenever
the
reset
string
is
typed
on
the
main
console,
the
system
unit
reboots.
Pressing
Enter
after
the
reset
string
is
not
required,
so
make
sure
that
the
string
is
not
common
or
trivial.
A
mixed-case
string
is
recommended.
Chapter
8.
Using
the
Service
Processor
367
Содержание RS/6000 Enterprise Server M80
Страница 1: ...RS 6000 Enterprise Server Model M80 Eserver pSeries 660 Model 6M1 Service Guide SA38 0571 01...
Страница 10: ...x Service Guide...
Страница 14: ...xiv Service Guide...
Страница 16: ...xvi Service Guide...
Страница 22: ...Data Flow 4 Service Guide...
Страница 28: ...CEC Drawer Front View With Bezel Removed 3 2 1 1 Power On Off LED 2 Fan 2 3 Fan 1 10 Service Guide...
Страница 30: ...CEC Card Cage Rear of CEC drawer viewed from top cover removed 12 Service Guide...
Страница 84: ...66 Service Guide...
Страница 176: ...158 Service Guide...
Страница 376: ...358 Service Guide...
Страница 430: ...412 Service Guide...
Страница 445: ...3 Insert the memory module firmly into the connector Chapter 10 Removal and Replacement Procedures 427...
Страница 476: ...7 Remove the screws that connect the carrier to the CD ROM Replacement Replace in reverse order 458 Service Guide...
Страница 485: ...Chapter 11 Parts Information This chapter contains parts information for the system 467...
Страница 486: ...CEC Drawer Card Assembly 9 468 Service Guide...
Страница 488: ...CEC Drawer Backplane 5 2a 1 2 3 4 470 Service Guide...
Страница 490: ...CEC Drawer Power Supplies 1 2 3 4 5 6 7 8 9 472 Service Guide...
Страница 492: ...CEC Drawer Fan Assemblies 2 1 3 4 5 6 8 9 10 11 12 13 7 14 474 Service Guide...
Страница 494: ...I O Drawer 1 2 3 4 5 6 7 8 9 10 11 16 17 18 19 20 12 14 13 13 15 21 22 23 24 26 25 27 476 Service Guide...
Страница 496: ...7 8 9 10 6 1 2 3 4 4 5 478 Service Guide...
Страница 508: ...490 Service Guide...
Страница 520: ...502 Service Guide...
Страница 522: ...504 Service Guide...
Страница 526: ...508 Service Guide...
Страница 542: ...error Handle unexpected modem responses expect 8 r or 7 r or 6 r or 4 r or 3 r delay 2 done 524 Service Guide...
Страница 558: ...540 Service Guide...
Страница 565: ......
Страница 566: ...Printed in USA September 2001 SA38 0571 01...
Страница 567: ...Spine information RS 6000 Enterprise Server Model M80 Eserver pSeries 660 Model 6M1 Service Guide SA38 0571 01...