background image

EasyMatch QC User’s Manual Version 2.1 

The Sensor Menu 

8-17 

As instructed, make sure that the standard port plate for your instrument is currently installed.  This will 
generally be the port insert with the largest opening that is not covered by glass.  Click 

OK

 when this 

port plate is installed. 

Follow the on-screen prompts to perform a normal standardization in reflectance/RSIN mode.  When 
standardization is complete, the following prompt will be shown. 

Center the white calibrated tile over the sample port/reflectance port with the white side facing the 
instrument.  Click 

OK

.  The Repeatability Test screen appears. 

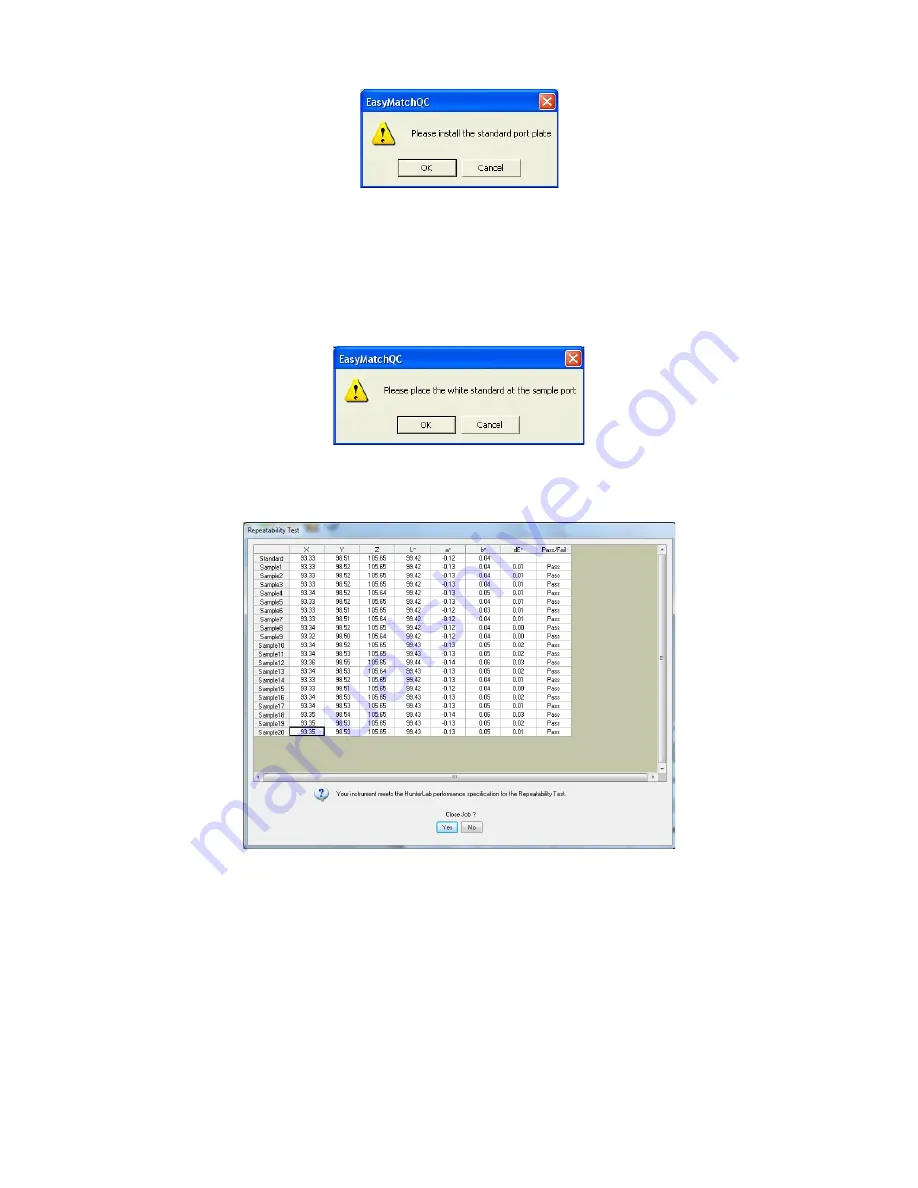
The white tile is read as a standard and then twenty times as a sample.  The color values for each reading 
are displayed on the Repeatability Test screen as they are made.  The pass/fail result for each reading is 
also shown.  Once all of the readings have been made, you are provided with instructions concerning 
what you should do if your instrument fails the repeatability test.  Click 

Yes

 if you wish to save the test 

data to the job or 

No

 if you wish the data to be discarded.  The pass/fail tolerances for each instrument 

are listed below. 

ColorFlex: Pass if dE* for the average reading is less than or equal to 0.04 else fail. 

ColorFlex EZ:  Pass if dE* is less than or equal to 0.05 else fail. 

ColorQuest XE:  Pass if dE* is less than or equal to 0.03 else fail. 

Содержание EasyMatch QC

Страница 1: ...4 50 and above User s Manual for UltraScan VIS An ISO 9001 2008 Certified Company Hunter Associates Laboratory 11491 Sunset Hills Road Reston Virginia 20190 USA www hunterlab com A60 1012 402 Manual...

Страница 2: ...val Test plan development including requirements verification general quality and performance verification color calculation and data management and presentation and sensor interface and performance v...

Страница 3: ...duction in whole or in part without express written consent of Hunter Associates Laboratory Inc is prohibited Windows is a registered trademark of Microsoft Corporation in the United States and other...

Страница 4: ...General safety instruction that should be observed at all times while operating the instrument CAUTION Specific safety instruction critical to the type of instrument operation being explained in the a...

Страница 5: ...Feature 2 22 Lesson 7 Sharing Data and Setups with a ColorFlex MiniScan XE Plus or MiniScan EZ 2 26 Lesson 8 Using Custom Data and Formula Fields 2 32 Lesson 9 Setting Up a Print Job 2 36 Lesson 10 Ob...

Страница 6: ...3 37 THE EDIT MENU 4 1 Edit Cut 4 1 Edit Copy 4 2 Edit Paste 4 3 Edit Delete 4 4 THE VIEW MENU 5 1 View Toolbar 5 1 View Status Bar 5 3 View Job Tree 5 4 View Audit Log ER Version Only 5 5 THE MEASUR...

Страница 7: ...r 7 27 Options EasyGroup 7 28 Options Import EasyGroup Sequence 7 29 THE SENSOR MENU 8 1 Sensor Install Configure 8 1 Sensor Standardize 8 4 Sensor Set Modes 8 6 Sensor Set Interval 8 7 Sensor UV Filt...

Страница 8: ...11G 18 Transmission Cell Holder 11G 20 Transmission Cells 11G 20 Transmission Cells with Two Screw Tops 11G 21 Transmission Spill Tray 11G 22 Tall Transmission Cells 11G 22 Flow through Transmission C...

Страница 9: ...Warranty 12 1 Shipping Claims 12 2 Breakage or Damage 12 2 Shortage 12 2 Incorrect Shipment 12 3 Returns 12 4 Packing and Shipping Instruments for Repair 12 4 When You Need Assistance 12 6 PART IV RE...

Страница 10: ...19 Dominant Wavelength and Excitation Purity A 20 EBC 10 mm A 21 EP 10 mm and EP 20 mm A 22 Gardner 20 mm and D6166 A 22 Saybolt 50 100 mm A 24 Tint Indices A 25 USP 10 mm and USP 20 mm A 27 Whiteness...

Страница 11: ...Part I Software Overview...

Страница 12: ...including installation use maintenance and troubleshooting as well as instructions for use of the EasyMatch QC software Thus every component of your color measurement system is covered Software instr...

Страница 13: ...d higher The software allows you to control your spectrophotometer instrument make color measurements and display print and store results both in spreadsheet format and graphically The basic features...

Страница 14: ...n job with his own preferences or you can create separate jobs for different operations such as measuring plastic pellets before extrusion and then the final extruded product You can be creative in ma...

Страница 15: ...job there are some attributes that all jobs will share Each individual job may contain all the information necessary to complete that job if the operator has included that data All information recalle...

Страница 16: ...and properties of each view on the screen 3 Configure the desired options you wish to use for this template using the Options menu 4 Save the job as a template using the Save Job Template As command i...

Страница 17: ...ading or other major changes to your system computer Data Views Each of the smaller panes shown on a job tab is a data view Each data view displays unique information about the standard and or samples...

Страница 18: ...mand removes the highlighted items from the Job Tree and from the job and places them on the Windows clipboard If desired the cut items may then be pasted into another job using the Paste command Copy...

Страница 19: ...y illuminant observer combinations as you wish and or indicate hitch factors to apply to the standard and its samples See the Default Tolerances section in the Options Menu chapter for instructions on...

Страница 20: ...samples only and causes the highlighted sample measurement to be added to the job as a standard as well while retaining the sample s ID Copy Standard To Sample This command appears for standards only...

Страница 21: ...EasyMatch QC User s Manual Version 2 1 1 10 Introduction to EasyMatch QC Print this View This command prints the Job Tree view in a fashion similar to that shown below...

Страница 22: ...Tree Show All Items This command opens all the branches of the Job Tree so that every standard and sample is visible Enter Standard Data This command allows you to hand enter colorimetric or spectral...

Страница 23: ...maximized Color Data Table The Color Data Table view shows color scale color difference and index data for the standards and samples in the job The items in the Color Data Table may be sorted by click...

Страница 24: ...combination you wish to display Choose your statistics the same way You may indicate the order in which you would like the illuminant observer tabs and statistical parameters displayed by deselecting...

Страница 25: ...s to your display as a text field then click OK from the Color Data Table Configuration screen The Oven Temperature field is added to the Color Data Table 4 Enter the oven temperature for each item de...

Страница 26: ...ustom Formula Field 1 Click Insert Custom Field The Configure Custom Field box appears 2 Click the radio button next to Formula Field Type a label for the formula field into the Label box In this exam...

Страница 27: ...t of the spreadsheet The rows are numbered from 1 to n from the top of the spreadsheet down For instance the top left cell of the spreadsheet is A1 You may use the pound sign instead of a column lette...

Страница 28: ...signed b else assigned c LOG10 Coord Returns the logarithm base 10 of the value in the cell LN Coord Returns the natural logarithm of the value in the cell MAX a b Returns the largest of the cell valu...

Страница 29: ...value in the cell i e your formula uses cell C1 regardless whether L a or b values are in it If you reconfigure your display you may need to adjust your formula 6 Click Set Formula then OK Add Formula...

Страница 30: ...two and adds a new view so that the old view and the new view are displayed with one above the other Maximize this View This command causes the currently selected view to be enlarged to the full size...

Страница 31: ...ile this view is active the following options are available by clicking the right mouse button Show Background This item when checked causes the colored background to be shown on the 2D Color Plot Whe...

Страница 32: ...n 2 1 Introduction to EasyMatch QC 1 21 Print Preview This command shows on screen what the 2D Color Plot will look like when printed Print this View This command prints the 2D Color Plot view in a fa...

Страница 33: ...two and adds a new view so that the old view and the new view are displayed with one above the other Maximize this View This command causes the currently selected view to be enlarged to the full size...

Страница 34: ...pertaining to the 3D Color Plot view Make your selections for each parameter including the illuminant observer and color scale for display and whether you wish to display a flat representation of two...

Страница 35: ...n 2 1 1 24 Introduction to EasyMatch QC Print Preview This command shows on screen what the 3D Color Plot will look like when printed Print this View This command prints the 3D Color Plot view in a fa...

Страница 36: ...ly and Add This command splits the current view into two and adds a new view so that the old view and the new view are displayed with one above the other Maximize this View This command causes the cur...

Страница 37: ...use button within the boundaries of the view Configure Selection of Configure brings up the following dialog box which allows you to set various preferences pertaining to the Color Render view Choose...

Страница 38: ...EasyMatch QC User s Manual Version 2 1 Introduction to EasyMatch QC 1 27 Print this View This command prints the Color Render view in a fashion similar to that shown below...

Страница 39: ...w view so that the old view and the new view are displayed with one above the other Maximize this View This command causes the currently selected view to be enlarged to the full size of the job Restor...

Страница 40: ...olor scale and one difference or index or a total of four differences and indices The red number next to each parameter indicates how many more selections you have available Print Preview This command...

Страница 41: ...w view are displayed side by side Split View Horizontally and Add This command splits the current view into two and adds a new view so that the old view and the new view are displayed with one above t...

Страница 42: ...opy to the Windows clipboard Then select Copy to copy it If you wish you may paste the text elsewhere such as in a word processing program Paste Before you may use the Paste command you must have copi...

Страница 43: ...Version 2 1 1 32 Introduction to EasyMatch QC Print Preview This command shows you on screen what the view will look like when printed Print this View This command prints the Memo View in a similar f...

Страница 44: ...and Add This command splits the current view into two and adds a new view so that the old view and the new view are displayed with one above the other Maximize this View This command causes the curre...

Страница 45: ...ht one or more of the samples and standards shown in the spreadsheet When Copy to Clipboard is then selected the highlighted data is then copied to the Windows Clipboard If desired the copied data may...

Страница 46: ...ttance When Auto Size Cells is checked the spreadsheet cells will be automatically sized based on the data contained in them Print Preview This command shows you on screen what the view will look like...

Страница 47: ...plit View Horizontally and Add This command splits the current view into two and adds a new view so that the old view and the new view are displayed with one above the other Maximize this View This co...

Страница 48: ...ral Plot When unchecked the background is white Show Legend This item when checked causes the legend the list of which samples are currently displayed to be shown to the left of the Spectral Plot When...

Страница 49: ...EasyMatch QC User s Manual Version 2 1 1 38 Introduction to EasyMatch QC Print this View This command prints the Spectral Plot view in a similar fashion to that shown below...

Страница 50: ...so that the old view and the new view are displayed side by side Split View Horizontally and Add This command splits the current view into two and adds a new view so that the old view and the new vie...

Страница 51: ...are shown below the line in black The L value can be estimated based on the scale given to the left of the graph Similarly the second graph shows the change in redness greenness or a Samples in red a...

Страница 52: ...alues of all the samples shown The standard values are not included Limits This command allows you to set parameters regarding the scale and limits of the trend plot Make your selections for each para...

Страница 53: ...EasyMatch QC User s Manual Version 2 1 1 42 Introduction to EasyMatch QC Print this View This command prints the Trend Plot view in a fashion similar to that shown below...

Страница 54: ...creen to its previous configuration after one view has been maximized Database The database is a permanent repository of all spectral data and ID information for standards and samples that have been s...

Страница 55: ...om left to right on the toolbar along with a brief explanation of each button s function The functions of the buttons may be altered if desired using the Customize Toolbar command in the Options menu...

Страница 56: ...t standardization was successfully completed Lesson 3 describes measuring in a transmission mode Lesson 4 describes setting up and using a hitch standard Lesson 5 describes querying the database in or...

Страница 57: ...ards read into jobs based on this template 1 Choose New Job from the File menu A new job based on the current default template is opened 2 Open the View menu and confirm that Job Tree is checked If it...

Страница 58: ...into the Selected Items box 8 Locate Y Brightness in the Indices drop down list and select it Click the left arrow button next to the Indices list Y Brightness will move into the Selected Items box 9...

Страница 59: ...rs box to select them 12 Click Average in the Statistics box to select it 13 At the right bottom of the screen make the following selections Display Latest Data First Checked Data Orientation Row Majo...

Страница 60: ...the 2D Color Plot view and choose Configure from the menu that appears The Color Plot Configuration screen is shown 17 Make the following selections on the Color Plot Configuration screen Illuminant O...

Страница 61: ...ns on the Trend Plot Configuration screen Quick set with Scale Unchecked Trace 1 Difference dL Trace 2 Difference da Trace 3 Difference db Trace 4 Difference dE Illuminant Observer D65 10 Display Colu...

Страница 62: ...Scales tab choose CIELAB from the drop down box beneath Selected Scale Also choose D65 10 from the drop down box beneath Illuminant Observer 26 On the right side of the screen enter 0 5 into all six...

Страница 63: ...OK to accept the limits 31 If any extra displays are shown on your screen right click on each one and choose Delete View from the menu that appears 32 Back on the template screen select Save Job Temp...

Страница 64: ...will be saved again 37 Close the open job 38 Choose Application Preferences from the Options menu The Application Preferences screen appears 39 On the Startup Defaults tab Select Lesson 1 for the Defa...

Страница 65: ...This lesson does not apply to the ColorQuest XT 1 Open a new job 2 Choose Set Modes from the Sensor menu The following screen will appear Note If your instrument is a ColorFlex or MiniScan only one mo...

Страница 66: ...ce port with the light trap Click Next to continue 6 The instrument will read the glass or trap and set the zero When it is finished the following prompt will appear 7 Center the white tile at the mea...

Страница 67: ...e ID and click OK 13 The white tile will be read and the measurement values placed in the Color Data Table 14 Remove the white tile from the instrument port and compare the values read to the values p...

Страница 68: ...n measurements are made using the TTRAN total transmittance mode The steps required for performing this type of measurement are described below 1 Choose Set Modes from the Sensor menu The following sc...

Страница 69: ...plete Click Finish and then OK to exit the Modes screen Leave the white tile at the reflectance port while you make your measurements 7 Center your sample over the transmission port the hole in the sp...

Страница 70: ...e it by choosing Read Standard from the Measurements menu For this example read your instrument white tile 3 Select check Job Tree in the View menu if it is not already displayed 4 Right click on the...

Страница 71: ...xt to the word Target and click OK twice In this case type in 94 00 for L 1 00 for a and 1 00 for b Note When using a tristimulus hitch you should enter hitch values using the same illuminant observer...

Страница 72: ...eometric differences between instruments cause differences in measured values as can differences in sample preparation Hitch standardization is recommended for use only among instruments with the same...

Страница 73: ...t select the dates you want to delete or the standardization mode you wish from this screen so click More for more options The screen will expand to show the following 3 First click the radio button n...

Страница 74: ...olorFlex LabScan XE ColorQuest 45 0 LAV MiniScan XE Plus or MiniScan EZ choose Reflectance instead 9 We will name and save these query parameters so that you can use them again later Click on the box...

Страница 75: ...your mind about deleting the samples with the screen shown below Click Yes to continue with the deletion 14 In order to delete samples periodically after the RSIN OLD query is set up choose Delete Mea...

Страница 76: ...l Version 2 1 Lessons 2 21 Data to be displayed in your job not deleted can be recalled in a very similar fashion Simply choose Recall Measurement From Database from the File menu rather than Delete M...

Страница 77: ...nces will be calculated and used for that standard 1 Open a new job and configure it to include a Color Data Table with the following specifications See Lesson 1 if you need help Scale CIELAB Differen...

Страница 78: ...ta Table and 2D Color Plot 8 Enter 2 1 for the l c ratio This is the default value used for CMC calculations in the textile industry Your industry may suggest a different value 9 Enter 1 for the Comme...

Страница 79: ...e Calculate button The L a b D65 10 tolerances for this standard are automatically calculated and shown in the Tolerances boxes 12 Click OK twice to accept the tolerances You will now see the toleranc...

Страница 80: ...User s Manual Version 2 1 Lessons 2 25 13 Save the job and save the standard to the database The automatically generated tolerances will also be saved 14 You may now read samples to be compared to th...

Страница 81: ...E Plus or MiniScan EZ to your computer and install it in EasyMatch QC See the Sensor Menu chapter and Chapter 11 for more information 2 Open an EasyMatch QC job and configure it as desired You may mod...

Страница 82: ...retrieved from the data log when it is in tristimulus mode will be received and the sample will not be copied into the job This is because the software does not know what standard values were used to...

Страница 83: ...ensor menu The following screen appears 2 Since you wish to edit one setup click Edit The Product Setup Configuration screen appears ColorFlex and MiniScan EZ MiniScan XE Plus 3 The setup you wish to...

Страница 84: ...lick the Retrieve button The parameters that are currently stored in your instrument for Setup Number 10 are brought into the Product Setup Configuration screen ColorFlex and MiniScan EZ MiniScan XE P...

Страница 85: ...Scan EZ from the drop down box next to Index Scale ColorFlex and MiniScan EZ MiniScan XE Plus 7 Select Physical from the drop down box next to Standard Type Center your product standard at the sample...

Страница 86: ...Your setup has now been modified as desired on your computer screen Click the Update Sensor button The altered setup is sent to your instrument Observe the change on your instrument s display 9 Click...

Страница 87: ...alue for each sample using the C 2 illuminant observer In the second half of this lesson we will add a custom formula field to calculate and display pH Lightness 1 Open the desired job and place a Col...

Страница 88: ...added to the Color Data Table 7 Read or recall some samples and standards into the job if there aren t already some present 8 Select one item in the Job Tree and right click on it From the menu that...

Страница 89: ...e Configure Custom Field box appears 14 Click the radio button next to Formula Field Type pH Lightness into the Label box 15 Click OK The Configure Formula Field box is shown 16 Your custom formula wi...

Страница 90: ...User s Manual Version 2 1 Lessons 2 35 17 Click Set Formula then OK 18 Add the pH Lightness Text Field to the display then click OK The formula fills the pH Lightness column for each displayed sample...

Страница 91: ...ng Printers and Faxes Right click on your default printer and choose Properties Consult Windows Help for more information 2 For the paper size and orientation for your printer choose Letter 8 x 11 and...

Страница 92: ...ete the current text and type in n to use the page number as the footer Increase the font size to 12 8 Click OK to accept the new header and footer 9 Choose Page Setup from the File menu The Page Setu...

Страница 93: ...company logo header and footer If the Color Data Table 2D Color Plot Spectral Plot and Spectral Data Table are not included in the current job you will not see them in the list and you will not be ab...

Страница 94: ...he screen Click where you would like to locate one of the top corners of the logo box drag the mouse across the page to where you would like to locate the opposite bottom corner of the logo box and th...

Страница 95: ...intout 15 Highlight Header in the Selected Items box and click and drag on the piece of paper to place the header on the page 16 Highlight Footer in the Available Items box and click Add to add a foot...

Страница 96: ...h QC User s Manual Version 2 1 Lessons 2 41 18 Add the Color Data Table to the display across the bottom half of the page 19 Add the 2D Color Plot to the printout in the left half of the remaining bla...

Страница 97: ...ed print layout for the first page of your printout appears as follows 21 Click Add Page to add the second page to your report You will receive a blank page on the Print Job Setup screen Also the Page...

Страница 98: ...the second page of your printout appears as follows 23 Click the Configure button 24 The screen that appears allows you to select the spectral range that will be printed on this page in the area you j...

Страница 99: ...1 27 Read or recall the sample and standards you wish to view and print and select highlight them in the Job Tree 28 Choose Print Job from the File menu Your two report pages will print to your Windo...

Страница 100: ...locks will be based Autotolerancing may be used to calculate these tolerances if desired but manually entered tolerances work just as well In this lesson we will demonstrate both methods 1 Open the jo...

Страница 101: ...Calculate button 9 Enter the average number for L into the First Trace tolerance box 10 Enter the average number for a into the Second Trace tolerance box 11 Enter the average number for b into the T...

Страница 102: ...d on their shade numbers 15 Read a new standard 16 Apply L a and b tolerances D65 10 of 1 to this standard for each parameter of the color scale 17 Also enter shade tolerances of this value 1 for L a...

Страница 103: ...es to input these product specifications and then compare samples to it as if it were a standard 1 Open a new job and configure the Color Data Table to display XYZ for C 2 and to show tolerances You m...

Страница 104: ...OK twice to exit the Tolerances screen and the Series Properties screen The minimum and maximum values entered now show in the tolerance rows of the Color Data Table 7 Read a sample and link it to th...

Страница 105: ...EasyMatch QC User s Manual Version 2 1 2 50 Lessons...

Страница 106: ...you will report Configure the averaging and read the sample as described below 1 Open a new job and configure its Color Data Table to display CIELAB for D65 10 You may configure the other parameters h...

Страница 107: ...he screen check the boxes next to both Use Sample presentation prompts and Show prompts when measuring standards The white box for Sample presentation prompt Before reading 1 will be activated Type Pl...

Страница 108: ...Method screen 10 Initiate the reading of a standard The Average Reading screen appears as follows Note the prompt to place the sample at the port shown at the bottom of the screen 11 Place the sample...

Страница 109: ...t at the port Click Read The standard is read again and its values placed in the Average Reading spreadsheet 13 Per the prompt rotate the sample 90 degrees again and replace it at the port Click Read...

Страница 110: ...egrees again and replace it at the port Click Read The standard is read for the fourth time and its values placed in the Average Reading spreadsheet 15 Click the Average button The Average Reading scr...

Страница 111: ...eraged standard in the Job Tree and select Properties The Standard Properties screen appears 17 Note that the standard deviation and range for the 4 readings made and averaged are still available When...

Страница 112: ...Part II Software Menu Commands...

Страница 113: ...the database control the printer e mail jobs and exit EasyMatch QC The functions available through the File menu are described in the remainder of this chapter File New Job The New Job command in the...

Страница 114: ...to open a pre existing job that has been saved to your computer The keyboard shortcut for this command is Ctrl O When the Select Job File dialog box appears locate the job you wish to open from any dr...

Страница 115: ...n the File menu allows you to select a template to open and modify or use as the basis of a new job When the Open dialog box appears locate the template you wish to open from any drive or folder acces...

Страница 116: ...en On the left you can enter the ID Product ID and or Extra ID for the measurement s to be recalled You can also use and wildcards to recall measurements For example to recall all measurements that st...

Страница 117: ...d sample or standard you wish to see In the example shown above all standards within 2 00 dE units using D65 10 from Sample 1 will be recalled Click OK You can save a set of search parameters as a que...

Страница 118: ...the items you wish to recall into the current job and click OK They will be recalled and placed in the job The keyboard shortcut for the Recall Measurement From Database command is Ctrl R More instruc...

Страница 119: ...en On the left you can enter the ID Product ID and or Extra ID for the measurement s to be deleted You can also use and wildcards to recall measurements For example to delete all measurements that sta...

Страница 120: ...ed sample or standard you wish to see In the example shown above all standards within 2 00 dE units using D65 10 from Sample 1 will be deleted Click OK You can save a set of search parameters as a que...

Страница 121: ...l Version 2 1 The File Menu 3 9 Select check the items you wish to delete from the database and click OK They will be deleted from the database More instructions on deleting measurements are provided...

Страница 122: ...e Menu File Close Job The Close Job command in the File menu saves the current job using its pre established name and then closes the job If the job is untitled it prompts for a job name and then save...

Страница 123: ...command in the File menu saves the current job including its measurements and screen configuration If the job has been saved previously it will automatically be saved under the same name Otherwise yo...

Страница 124: ...ob The complete job including its measurements and screen configuration is saved The keyboard shortcut for this command is Ctrl A When the Save Job File As dialog box appears locate the drive and fold...

Страница 125: ...Job Template command in the File menu saves the screen configuration of the current job as a template If the template has been saved previously it will automatically be saved under the same name Other...

Страница 126: ...e the job template currently in use under a new name When the Save As dialog box appears locate the drive and folder where you wish to save the template any that are accessible by your computer Type t...

Страница 127: ...e Menu 3 15 File Apply Template to Job The Apply Template to Job command in the File menu allows you to apply a template to an existing job and have the configuration of that job change accordingly Th...

Страница 128: ...to Database The Save Measurement to Database command in the File menu saves any standards and samples currently selected highlighted in the Job Tree to the database Once the measurement s are saved t...

Страница 129: ...ord and type in the meaning of the signature or choose the meaning of the signature creation review approval etc from the drop down box in the Comments box These choices were configured by your System...

Страница 130: ...mpany logo or other graphic to printouts created using the Print Job Setup command also in the File menu The following screen appears Click the Browse button to find the file name and location for the...

Страница 131: ...ill be applied to all of your printouts in this job You may type any information into the Header Information and Footer Information boxes that you wish to have displayed on every page of your printout...

Страница 132: ...footer configured in Header Footer Setup and company logo configured in Configure Company Logo discussed earlier in this chapter may also be placed in the report To add an item to your report highligh...

Страница 133: ...ted a Configure button appears next to the Remove button When the Configure button is clicked the Configure Spectral Data screen appears on which you can alter the wavelength range and interval that w...

Страница 134: ...Preview The Print Job Preview command in the File menu allows you to view your configured print job on screen as it will appear when printed If you select this command without having configured the p...

Страница 135: ...iates printing of the print job that was configured using the Print Out Setup command The job is printed to the Windows default printer The keyboard shortcut for this command is Ctrl P If you select t...

Страница 136: ...p command in the File menu causes the Windows Print Setup dialog box to be displayed so you can configure your printer parameters without printing anything Click OK when your configuration is complete...

Страница 137: ...age Setup command in the File menu opens the Page Setup window in which you can set the margins you wish to leave on each page when printing the print job configured using the Print Job Setup command...

Страница 138: ...ose an existing QTX file for import into the current EasyMatch QC job Once you click Open the data records in the QTX file will be added to the current job Note A sensor of the same type i e ColorQues...

Страница 139: ...appears from which you can make this selection QTX Format Select QTX Format to export the data in the job to a QTX color communication file that when opened in Windows Notepad resembles the following...

Страница 140: ...EasyMatch QC User s Manual Version 2 1 3 28 The File Menu...

Страница 141: ...ent job or template to that message This command appears in the File menu only if an e mail program is installed and available on your computer The picture below uses Microsoft Outlook 98 Compose and...

Страница 142: ...chronization ER Version Only The Time Synchronization command in the File menu causes your client computer s clock to be synchronized with the server computer Your system administrator should check th...

Страница 143: ...ion Universal Database Import Select Universal Database Import to import measurements from a Universal Software database Universal Software must be installed on this computer in order to complete the...

Страница 144: ...ish to import into EasyMatch QC using the Ctrl key plus clicking on each individual record by holding the Shift key and clicking on the first and then the last record desired or by clicking the Select...

Страница 145: ...Database must be checked with a Textiles Database Path set in Options System Configuration Data Storage before the Import Textiles Database command will be available in the File menu Indicate whether...

Страница 146: ...t the EasyMatch Textiles measurements into the current EasyMatch QC job or the EasyMatch QC database Then click OK The measurements will be imported as you instructed If you imported sample s to a job...

Страница 147: ...tch QC and returns to the EasyMatch QC splash screen so that the next user may log on If the current job has not yet been saved you will be prompted to save it before log off occurs Note This command...

Страница 148: ...ersion 2 1 3 36 The File Menu File Most Recently Opened Jobs The most recently opened jobs area of the File menu lists the four most recently opened jobs You may select the name of any of these jobs t...

Страница 149: ...User s Manual Version 2 1 The File Menu 3 37 File Exit The Exit command in the File menu allows you exit EasyMatch QC If the current job has not yet been saved you will be prompted to save it before...

Страница 150: ...EasyMatch QC User s Manual Version 2 1 3 38 The File Menu...

Страница 151: ...to this one You may also delete measurements The functions available through this menu are described in the remainder of this chapter Edit Cut The Cut command in the Edit menu allows the measurement s...

Страница 152: ...enu allows the measurement s highlighted in the Job Tree to be copied to the Windows clipboard The measurement s can then be pasted into another job The keyboard shortcut for this command is Ctrl C It...

Страница 153: ...ch you would like the measurement to be placed and click in the Job Tree in a blank area if you cut or copied a standard or on the desired Samples branch header for a sample Then when you select Paste...

Страница 154: ...dit Menu Edit Delete The Delete command in the Edit menu deletes the measurement s that are highlighted in the Job Tree from the current job You are prompted to confirm that you actually wish to delet...

Страница 155: ...ribed in the remainder of this chapter View Toolbar The Toolbar command in the View menu allows you to choose whether or not to display the toolbar beneath the menu bar at the top of your EasyMatch QC...

Страница 156: ...EasyMatch QC User s Manual Version 2 1 5 2 The View Menu Toolbar is not displayed...

Страница 157: ...t to display the status bar at the bottom of your EasyMatch QC screen When a check appears next to Status Bar the bar is displayed When no check appears the status bar is not displayed The setting cho...

Страница 158: ...oose whether or not to display the Job Tree at the left of your EasyMatch QC screen for the current job When a check appears next to Job Tree the Job Tree is displayed When no check appears the Job Tr...

Страница 159: ...w the audit log for the current job Select the types of events you would like to view from the drop down box next to Filter By The available choices are Save the job Edit Print the job or a view Signa...

Страница 160: ...Read Standard command in the Measurements menu initiates reading of a standard Place the standard before initiating the Read Standard command If Prompt for standard name was checked in Naming Convent...

Страница 161: ...ons in the Options menu you will then be prompted to enter a name for the sample as well as a Product ID and Extra ID if you wish and to choose the standard with which the sample should be linked Stan...

Страница 162: ...ered in spec Once the standard is created select it and only it in the Job Tree Then right click on the standard and choose Properties Click the Tolerances button to obtain a Tolerances screen on whic...

Страница 163: ...lected in the Options menu After the first reading is taken the following screen appears Click Read to initiate each additional reading in the set of readings and Average to complete the average and a...

Страница 164: ...itiates on reading the timed read method selected using the Configure Timed Read command in the Options menu When Read Sample is chosen measurements are made at the interval chosen until the number of...

Страница 165: ...ndard Search command in the Options menu When Automatic Standard Search is chosen and measurement of a sample is initiated either the one standard contained in the database that is closest to that rea...

Страница 166: ...hlighted in the Job Tree You are prompted to choose the standard to which this new sample will be linked and allowed to name the sample If spectral reflectance or transmittance data is available for a...

Страница 167: ...and replaces the current standard on the branch with the averaged measurement while retaining the current standard name If spectral reflectance or transmittance data is available for all the measureme...

Страница 168: ...he Job Tree and creates a new standard for the averaged measurement which you are prompted to name If spectral reflectance or transmittance data is available for all the measurements being averaged th...

Страница 169: ...naming convention for your samples You may type any desired text into the Sample ID String Layout box You may also insert a number to be automatically incremented with each sample read and or insert t...

Страница 170: ...be automatically applied to the series You may override the default name by typing a new one into the box that appears when reading is initiated as long as the Prompt for series name box is checked If...

Страница 171: ...Extra IDs may be maintained and chosen on this tab Type text for a new Extra ID into the box and then click Add Selection to add it to the list Choose an ID to be deleted from the drop down box and c...

Страница 172: ...age Method area you may select Continuous or n of N If you select Continuous then you can monitor the running average of the measurements each time you choose to read and terminate the readings by cli...

Страница 173: ...he sample backed by black In the Opacity Selections area you may choose to display Y White and or Y Black in your Color Data Table view in addition to Opacity by checking the desired boxes Also choose...

Страница 174: ...sor menu Note Multiple Read Mode is available only with the ColorQuest XE LabScan XE UltraScan XE UltraScan PRO and UltraScan VIS sensors Note The averaging feature activated by clicking Average in th...

Страница 175: ...cified time interval Select the Read Count Method desired You may choose either continuous readings or a fixed number of readings between 1 and 1000 Also select the Read Interval time between the end...

Страница 176: ...t is closest in color to the sample is recalled into the current job and linked to the read sample Select the parameter for which the sample standard comparison will be performed Your choices are dE d...

Страница 177: ...values for each of the three components of the color scale for this illuminant observer combination Then enter tolerances for all other scales and illuminant observer combinations desired by choosing...

Страница 178: ...desired by choosing each one individually and typing the tolerance values It is not necessary to click OK after entering each set of tolerances Clicking OK once will cause all tolerances entered to b...

Страница 179: ...Manual Version 2 1 The Options Menu 7 11 On the Haze and Opacity tab enter the tolerances you wish to use for the haze and opacity read methods Click OK to accept the default tolerances and close the...

Страница 180: ...ices when using a ColorQuest XE ColorQuest XT UltraScan XE UltraScan PRO or UltraScan VIS The factors chosen here apply to all jobs used in this installation of EasyMatch QC When the Select Adjustable...

Страница 181: ...ndow and all of the available parameters are listed on the right side of the window Select each desired item from the drop down menus on the right side of the window and then click on the left arrow b...

Страница 182: ...n to the top of the file when the file is first created From that point on only data is appended to the file not headers Note Beware that if you later change the ASCII export configuration without ope...

Страница 183: ...click OK The Configure option allows you to choose the parameters you would like to send when Data Send is selected The screen below is obtained The information currently selected for sending is disp...

Страница 184: ...o Send Uses This Port Click Configure to define all COM port parameters Click OK when all selections have been made Each job may have its own data send configuration Multiple jobs may send to the same...

Страница 185: ...tware These preferences apply globally when EasyMatch QC is in use no matter which job or jobs are open On the Units tab shown above choose the date format and type of length units English or metric y...

Страница 186: ...turns the software to English On the Startup Defaults tab you may indicate the name of the job template you would like to use by default when new jobs are opened Clicking the button with three dots on...

Страница 187: ...IDs in Sample Measurement Window is checked the last sample ID used is displayed on the Read Sample screen when another sample reading is initiated This allows you to use the ID again or modify it wit...

Страница 188: ...locked to a single sensor type and standardization mode When either or both of these boxes is checked a second level of status bar is shown at the bottom of the EasyMatch QC screen showing the job s s...

Страница 189: ...e accounts When the User Manager screen appears you may click on Users to view the users already in the system Note The User Manager command is available only if Login Required is checked on the Start...

Страница 190: ...ice to change this user s password Edit Choose this command to edit the full name for this user Delete Choose this command to delete this user Add to Group Choose this command to obtain a list of avai...

Страница 191: ...s to the group and Remove to remove any highlighted users from the group Click Create to actually create the group Click Set Privileges to configure the privileges for the group Each menu command may...

Страница 192: ...elete View Audit Log Sensor Set Interval Options User Manager Options Data Storage You may wish to further limit the privileges of lower level operators On the right side of the User manager screen ri...

Страница 193: ...any location accessible by your computer If required for database access enter the user name and password for the database If you wish to have all measurements saved to the database automatically as...

Страница 194: ...rement s will be saved to the configured database Note Microsoft Access need not be installed on the system in order to use the Access database feature Note Create and configure a SQL database as desc...

Страница 195: ...ar This configuration applies to this installation of the software no matter what job or jobs are in use In the Button to change box select the button you wish to change and then click the icon for th...

Страница 196: ...nu Options EasyGroup The EasyGroup command in the Options menu allows you to launch HunterLab s tapering and grouping program EasyGroup if you purchased and installed that package Refer to the User s...

Страница 197: ...e a collection of samples has been grouped or tapered in EasyGroup to bring the grouping or tapering information back into EasyMatch QC and display it as a new column in the Color Data Table view The...

Страница 198: ...he Sensor menu are described in the remainder of this chapter Sensor Install Configure The Install Configure command in the Sensor menu allows you to install a new sensor or change the configuration o...

Страница 199: ...ensor configuration Click Next or Finish to complete the installation For instruments with more than one available standardization mode you will receive a check box asking if you would like to set up...

Страница 200: ...change To set the standardization modes for a sensor highlight it in the Sensor Name box and click Set Modes To connect to a different sensor than the one that is currently in use first check your sen...

Страница 201: ...ently selected using the Set Modes command The prompts will appear slightly differently depending on the instrument in use and the standardization mode The keyboard shortcut for this command is F4 Fir...

Страница 202: ...figure standardization modes for the currently active sensor To add a new mode click the Add Mode button To remove an already configured mode highlight it in the Mode Names box and click Remove To sta...

Страница 203: ...you to standardize before more readings can be made The interval indicated here applies to EasyMatch QC as a whole regardless of the job currently in use Note A standardization interval of no longer...

Страница 204: ...V Filter Calibration is chosen from the Sensor menu the following screen appears Enter the standard s assigned value into the appropriate box on the UV Calibration screen This value has been assigned...

Страница 205: ...of the fluorescent standard every six months Compare the results If spot 3 has faded beyond tolerable limits for your application use spot 4 for UV filter calibration from this point on and order a ne...

Страница 206: ...all of the standardization modes you have configured for your instrument using Sensor Set Modes are listed in the Available Modes box Click on the first mode you wish to use and then click the Includ...

Страница 207: ...own the remainder of the buttons at the bottom of the screen become active and serve the following functions Sort By Log Causes the measurements shown in the Data log window to be sorted by their inst...

Страница 208: ...are prompted to indicate the standard under which samples should be saved Copy to Database Places the measurements that are currently selected into the database Standards are saved as standards and sa...

Страница 209: ...the setups stored in the instrument are brought into EasyMatch QC These setups can then be edited if desired The setups can also be saved as a setup group by typing a name into the white box or selec...

Страница 210: ...are the same as those configured through your instrument firmware If you are using a physical standard you may click the Read Standard button to read the standard to be saved with the setup using you...

Страница 211: ...enter the values read at factory for your green tile in XYZ These values can be found on the back of the green diagnostics tile Once all three numbers have been entered click OK A standard called Gre...

Страница 212: ...to close the Green Tile Job The following pdf report will appear documenting the results of the test As an option this report can be printed as a hardcopy for your records In addition this Green Tile...

Страница 213: ...eatability Test screen appears The white tile is read as a standard and then twenty times as a sample The color values for each reading are displayed on the Repeatability Test screen as they are made...

Страница 214: ...than or equal to 0 03 else fail UltraScan VIS Pass if dE is less than or equal to 0 03 else fail Click Yes to close the Repeatability Job The following pdf report will appear documenting the results...

Страница 215: ...is complete the following prompt will be shown Screw the didymium filter in its threaded tune into the matching threads at the lens Shut the transmission compartment door Click OK when you have done s...

Страница 216: ...UltraScan VIS Pass if the 430 nm average reading differs from the entered 430 nm value by no more than 1 00 T and the 570 nm average reading differs from the entered 570 nm value by no more than 3 10...

Страница 217: ...eports with a unique data time stamp for future reference File Exit to close the report and finish the test Hardware Checks available for all instruments When Hardware Checks is selected from the Diag...

Страница 218: ...Refresh to read again Click Motor Test to test the instrument motors Click the button to the left of each test name to toggle between Run perform the test and Skip do not perform the test then click...

Страница 219: ...o display raw signal level counts for the sample that is currently at the sample port Check any of the available boxes to show the data a different way such as in a graph Click Flash to alter the numb...

Страница 220: ...r go to a specific job The functions available through the Window menu are described in the remainder of this chapter Window New Window The New Window command in the Window menu allows you to open a s...

Страница 221: ...u moves all of the current jobs so that they are cascaded one on top of the other and only the title bar of each job is visible You may click on any of the title bars to show that job as the top job P...

Страница 222: ...command in the Window menu moves all of the current jobs so that they are displayed on the screen with one on top of the other The sizes of the jobs are adjusted so that they all fit on the screen The...

Страница 223: ...List of Open Jobs You can make any job active by selecting it from the Window menu A check will appear next to that job in the Window menu the title bar of the active job will be highlighted and the...

Страница 224: ...cate information on how to operate your instrument and software by searching for keywords using the index or using the table of contents In order to use the help file you must have a web browser such...

Страница 225: ...nual Version 2 1 10 2 The Help Menu Help About The About command in the Help menu brings up the About EasyMatch QC Software box specifying the version of EasyMatch QC being run and giving copyright an...

Страница 226: ...lp Menu 10 3 Help HunterLab on the Web The HunterLab on the web command in the Help menu opens your web browser and takes you to the HunterLab web site in case you need to get information on color mea...

Страница 227: ...Part III Instruments...

Страница 228: ...t can measure both reflected and transmitted color of a product The sensor uses a plastic integrating sphere that is six inches 152 4 mm in diameter and coated with Spectraflect which diffuses the lig...

Страница 229: ...rea port plate must be installed at the reflectance port Small Area View The small area view feature includes a small area view lens and port plate To use the small area of view 1 Remove the original...

Страница 230: ...has two modes of operation 1 The lamp stays on between readings 2 The lamp turns off after each reading Select the desired mode of operation using the retroviewer button as follows Lamp Stay On Mode...

Страница 231: ...on compartment door should be closed while standardizing and taking measurements1 Specular Included Excluded Port The UltraScan VIS sphere contains a specular exclusion port door which is closed durin...

Страница 232: ...d with an assigned Ganz whiteness normally assigned in reflectance specular excluded mode is used to set the correct illumination conditions The assigned value is traceable to a four step cotton white...

Страница 233: ...Manual Version 2 1 11G 6 UltraScan VIS Macro Button The macro button also known as the Sensor button activates a sample measurement Power on Specular excluded Small area view UV excluded UV cut off fi...

Страница 234: ...t during standardization in transmittance modes Green tile placed at the reflectance port with pegs in the guidance holes to check instrument performance Didymium filter screwed into the lens as a che...

Страница 235: ...Scan VIS Light trap White calibrated tile Standards care card and certificate of traceability Lens brush Black card device Optional port plates Envelope containing spare fuses and Allen wrench Didydiu...

Страница 236: ...313 Reflectance preform holder HL D02 1011 841 Transmission clamp HL C02 1005 444 Transmission cell holder HL C02 1005 481 Transmission cells HL 13 8573 20 for 50 mm B04 1003 801 for 33 mm 04 4592 00...

Страница 237: ...fied port insert and glass sample cup may also be used to hold carpet fabric and other soft samples at the reflectance port with constant pressure The option consists of the following components Modif...

Страница 238: ...inal port insert 2 Standardize the instrument and then return the modified port insert to the port 3 Weigh the specified amount of sample material into the sample cup The fibers should completely fill...

Страница 239: ...sition up The clamp will compress the sample into the sample cup 8 Initiate a reading 9 Turn off the air pressure remove the sample from the port and continue with measurement of additional samples No...

Страница 240: ...area view option is available and in use To install the port plate remove the standard port plate and snap the modified port plate into place at the reflectance port Standardize the instrument in a re...

Страница 241: ...er s Manual Version 2 1 11G 14 UltraScan VIS 3 Tighten the sample shelf into place by turning both knobs clockwise 4 Place your sample on the shelf and cover it with the light cover if included 5 Meas...

Страница 242: ...nd use the powder holder complete the steps below 1 Install the small area view port plate and standardize the UltraScan VIS in a reflectance mode for the 0 375 inch 9 575 mm area view 2 Replace the s...

Страница 243: ...ple Note The powder holder should be used ONLY for color difference measurements 7 Between measurements remove the powder holder unscrew the top and clean the glass The glass insert may be removed fro...

Страница 244: ...g steps to install the holder onto the instrument 1 Lower the sample clamp as far as it will go 2 Insert the two finger clamps of the preform holder into the guidance holes located below the reflectan...

Страница 245: ...measurements in Regular Transmission 1 Position the transmission clamp so that the curved opening is aligned at the lens port located at the rear of the transmission compartment The inner curvature of...

Страница 246: ...u may finger tighten the screws or you may use the Allen wrench that is included with the transmission clamp 3 Follow the software prompts to standardize in total transmission TTRAN 4 Place the film s...

Страница 247: ...so that the screws align properly in the holes on the floor of the transmission compartment You may use the holder for measurements in either total or regular transmission by following the software p...

Страница 248: ...s transmission cells are as follows Path Length mm Minimum Sample Volume for Measurement mL Dimensions of Measurement Face Width x Height in mm 10 20 55 x 57 20 40 55 x 57 33 70 55 x 57 50 100 55 x 57...

Страница 249: ...ssion cell holder portion is aligned with the rear wall of the transmission compartment The slanted end will be at the sphere wall at the front of the compartment Ensure that the holder is flush again...

Страница 250: ...anual or automated pumps such as peristaltic pumps to inject the liquid into or extract the liquid from the cell To install the flow through cell and holder 1 Place the instrument on a level surface 2...

Страница 251: ...ugh cell assembly in place This may damage the cell and or instrument The flow through transmission cell may need to be cleaned periodically Use a glass cleaner on the exterior of the cell and distill...

Страница 252: ...erate fill the cylindrical cell with the clear solvent that is to be used as a blank for standardization Then slide the lever of the cell holder out to open the space for the cell Insert the cell into...

Страница 253: ...centered over the hole in the sphere 2 Locate the appropriate two mounting holes in the transmission compartment floor and fasten the tube holder to the instrument using the two thumb screws provided...

Страница 254: ...ssion compartment for measurement of small and semi micro volumes of clear liquids The analytical cells to be used with this holder are not sold by HunterLab though several disposable semi micro 10 mm...

Страница 255: ...Ensure that the holder is in a straight line between the instrument lens and the hole in the sphere Depress and turn the captive thumbscrews clockwise into holes in the transmission compartment floor...

Страница 256: ...for the black card 4 When prompted for the cell blank fill the desired analytical cell with distilled water or another clear liquid you would like to use as your top of scale Some cells will have a fi...

Страница 257: ...as the top of scale 7 Remove the cell from the cell holder and rinse it with the sample to be measured Fill the cell with the sample and measure it the same way you did the blank Note It is important...

Страница 258: ...hen properly aligned the holes in the base of the holder will align with holes in the floor of the transmission compartment Place a thumbscrew in each of the holes and tighten until snug Use the prefo...

Страница 259: ...ion compartment door rotate the preform and measure it again 6 Repeat step 5 until the preform has been measured the desired number of times Blue Denim Tile Assembly This option provides a blue denim...

Страница 260: ...ly the power cord included with this instrument or a replacement obtained from HunterLab HL 10 0000 55 for 110V A13 1002 656 for 220V Be certain that the power cord is in good condition before connect...

Страница 261: ...en click Next 11 Click the radio button for Install the software automatically Recommended then click Next 12 The required driver should be located on the CD and installed producing the following two...

Страница 262: ...appear again proceed with Step 14 14 At the end of the process observe the Windows balloons that appear until the message Found New Hardware Your new hardware is installed and ready to use is shown A...

Страница 263: ...ce EasyMatch QC is installed and you configure your sensor you will need to indicate this COM port address as the location for the instrument 18 If the computer did not automatically locate the needed...

Страница 264: ...Place the desired port plate at the reflectance port and snap it into place 23 Turn on the UltraScan VIS by switching the on off switch on the back of the sensor to the on position Allow the instrumen...

Страница 265: ...e is set with the light trap for reflectance modes The black card device is used to set the bottom of the scale for transmittance measurements The top of the scale is then set by scaling the light whi...

Страница 266: ...hen you standardize the UltraScan VIS RSIN Reflectance Specular Included RSEX Reflectance Specular Excluded TTRAN Total Transmittance RTRAN Regular Transmittance Taking into account varying hardware c...

Страница 267: ...s close to the sphere as possible for measuring total transmittance Place it as close to the lens as possible when measuring regular transmittance Note Closing the transmission compartment door while...

Страница 268: ...ructions given in the Sensor Menu chapter Diagnostics section to run the repeatability test that is built into EasyMatch QC Running the Green Tile Test The green tile is not used during the standardiz...

Страница 269: ...the lamp no longer flashes or instrument repeatability has become unacceptable it must be replaced CAUTION Replace only with a specified xenon flash lamp module HL D02 1010 930 Before you attempt to...

Страница 270: ...screwdriver Note These screws are captive within the instrument cover housing and cannot be removed 5 Loosen the thumb screw on the inner panel bezel 6 Remove the front cover from the instrument by s...

Страница 271: ...8 Unplug the white connector of the lamp assembly by squeezing the latches on the sides of the connector 9 Remove the lamp assembly and replace with a new assembly Be sure not to touch the bulb of the...

Страница 272: ...he inner bezel thumb screw 15 Turn the power on 16 Standardize the instrument Replacing the Fuses The fuses are located on the back panel of the instrument Follow the instructions below to replace the...

Страница 273: ...uses and replace with new ones Notice Use only the fuse specified above for your instrument or one which is identical in type voltage rating and current rating Otherwise there may be a risk of fire 5...

Страница 274: ...lamp HL A13 1004 022 To change the view lamp 1 Disconnect the UltraScan VIS from its power source 2 Wait two minutes for complete discharge of the capacitors 3 Disengage and remove the sample clamp 4...

Страница 275: ...arness which connects the indicator lights on the front cover to the instrument 7 Remove the view lamp assembly and replace it with a new one Be sure not to touch the bulb of the lamp as fingerprints...

Страница 276: ...prints before standardizing the UltraScan VIS The white and green tiles can be cleaned using a soft nylon bristle brush warm water and a laboratory grade detergent such as SPARKLEEN Wipe the tiles dry...

Страница 277: ...ment should be closed and the sample clamp placed against the reflectance port when the instrument is not in use The sphere is coated with Spectraflect which can be damaged by putting any objects into...

Страница 278: ...ble instrument grade power line If other equipment is connected to the same power line a transient power surge may be produced when the other equipment is turned on If this happens restandardize the i...

Страница 279: ...es in excess of 5VAC at 110V input power or in excess of 10VAC at 220V input power may indicate a difference in ground wiring and can damage the instrument and or the computer Check the wiring and tak...

Страница 280: ...Wavelength Resolution 2 nm Wavelength Bandpass 10 nm equivalent triangular Wavelength Interval 10 nm Wavelength Accuracy 0 75 nm Photometric Range 0 150 reflectance or transmittance Photometric Resol...

Страница 281: ...UltraScan VIS Models USVIS USVIS 2 Conforms to the following Product Specifications Safety EN61010 EMC EN500081 1 1992 EN55011 CISPR11 EN55024 1998 EN61000 4 2 EN61000 4 3 EN61000 4 4 EN61000 4 5 EN61...

Страница 282: ...tation If you establish a method so that the same procedure is used each time specific samples or types of samples are measured then you will have a valid basis for comparison of measured results This...

Страница 283: ...pe reflectance specular included RSIN measures the diffuse plus specular reflectance of the sample at the port These measurements are made with the specular exclusion port door closed The specular inc...

Страница 284: ...is one year from date of shipment of new instruments and two months from the date of shipment of repaired instruments The printer and computer are covered under the original manufacturer s warranty Hu...

Страница 285: ...examining agent Do not return any goods to HunterLab prior to inspection and authorization of the carrier 3 File a claim against the carrier Substantiate this claim with the examining agent s report...

Страница 286: ...king material particularly to locate smaller items 3 Ascertain that the item was not removed by unauthorized personnel prior to complete unpacking and checking 4 Notify HunterLab immediately of the sh...

Страница 287: ...all repairs including warranty repairs Packing and Shipping Instruments for Repair Please regard the following instructions when packing your instrument to return it to HunterLab for repair Proper pa...

Страница 288: ...l cardboard cartons should not be used A proper packing carton with packing material may be purchased from HunterLab if desired Insure the shipment Provide an itemized packing list of all contents of...

Страница 289: ...the number of units the sensor reads off from the standard tiles 5 The steps performed prior to the start of the problem 6 Steps already performed to reconcile the problem and or results of any diagn...

Страница 290: ...Part IV Reference...

Страница 291: ...view Color Scales and Related Color Difference Scales CIE Tristimulus XYZ Scale EasyMatch QC performs integration of reflectance transmittance values over the visible spectrum to arrive at tristimulus...

Страница 292: ...s n Y Y 100 L n n n a Y Y Y Y X X K a n n n b Y Y Z Z Y Y K b where X Y and Z are the CIE tristimulus values obtained for the sample Xn Yn and Zn are tristimulus values of the standard illuminant as l...

Страница 293: ...ge maximum difference acceptable in a series of dye house commercial matches in 1939 The CIE 1976 L a b Scale is recommended by the Commission Internationale de l Eclairage CIE It is a simplified cube...

Страница 294: ...Color Differences CIE LCh is a modification to the CIELAB scale which plots in polar coordinates rather than rectangular ones dC is the difference between the chroma of the sample and the chroma of th...

Страница 295: ...td dE ab CIE 1976 L a b color difference formula 2 2 2 db da dL d Difference between Sample and Standard Reference Commission International de l Eclairage CIE Recommendations on Uniform Color Spaces C...

Страница 296: ...xRyRz Reflection Factors The Reflection Density Color Scale Rx Ry Rz is a variation of the CIE XYZ scale where Rx is corrected to represent only the amber peak of the tristimulus X bi modal response T...

Страница 297: ...uation fixes the ratio of the three components SL SC SH to correlate with visible assessment of typical textile samples Other values of l may be required in cases where the surface characteristics cha...

Страница 298: ...of CMC refer to Calculation of Small Color Differences for Acceptability AATCC Test Method 173 1992 published in the AATCC Technical Manual CIE TC 1 29 CIE TC 1 29 also called the CIE 1994 dL CIE94 dC...

Страница 299: ...calculated as follows Redness e cos 16 a sin 16 b Yellowness f 0 7 sin 16 a cos 16 b Chroma G e2 f2 0 5 Hue angle hef arctan f e Chroma C DIN99 E CH k 0 045k 0 045G 1 log e Hue angle h DIN99 180 hef...

Страница 300: ...The FMC 2 unit of color difference is based on just noticeable or threshold color difference data published in 1942 Friele used the data in his suggested color difference formula which was modified l...

Страница 301: ...to visual assessment as described in AATCC Evaluation Procedure 1 Gray Scale for Color Change It may be used in assessing any samples except those which have been treated with fluorescent whitening a...

Страница 302: ...of Original dL L T L O dC ab C abT C abO sign of dH ab sign of habT habO 2 ab 2 2 ab ab dC dL dE dH 2 2 2 ab db da dL dE dEf is used to calculate ISO Grey Scale using the equations below 1 7 dEf 5 Sc...

Страница 303: ...tings 1 to 4 If SSR calculated by the above equation is greater than 4 recalculate using the following equation ISO Grey Stain 5 0 23dEGS for Ratings 4 to 5 Metamerism Index The Metamerism Index is de...

Страница 304: ...reflectance Strength SWL Strength SWL single wavelength is the Strength measured at the wavelength of maximum absorbance This is the same Strength described in the Spectral Data Types section of this...

Страница 305: ...value of zero in ADMI units as it does in APHA units An ADMI value of 500 is assigned to a solution having a total color difference from distilled water equal to the total color difference from disti...

Страница 306: ...on a clear liquid distilled water is suggested for water based samples toluene or benzene for resins and mineral oil for oils in a cell of the desired size Place the cell in the transmission compartm...

Страница 307: ...0 039 100 T log 1 27 else turbid 1 0 where T700 nm measured transmittance value at 700 nm ASBC Difference is also available and is defined as follows dASBC 10 mm ASBC 10 mm sample ASBC 10 mm standard...

Страница 308: ...Two columns will be added to the color data table one for the index and another for the dilution factor 4 To edit the scale constants choose Adjust Scale Factors from the Options menu and then ASTM D1...

Страница 309: ...pectral data It is most often used to calculate the difference in strength Strength between a standard and a sample Color Value may be calculated by any one of three acceptable methods The color value...

Страница 310: ...ce WSUM Value Color points 1 for transmittance where E Energy distribution of light source S Observer function K S and Absorbance are described in the Spectral Data Types section of this appendix Colo...

Страница 311: ...and observer For complementary wavelengths the displayed values are less than zero For further information see A Digital Computer Technique for Calculation of Dominant Wavelength by Charles G Leete a...

Страница 312: ...mentally determine the closest EP standard to any sample solution read Samples should be measured using a 10 mm or 20 mm path length transmission cell choosing the matching version of the EP index for...

Страница 313: ...6290 0 3701 18 4 0 6477 0 3521 Gardner D6166 is calculated as follows F I TM G G G where GTM the Gardner color of the test material GI the integer portion of the test material s Gardner color value G...

Страница 314: ...e from 0 1 to 18 0 for both Gardner scales A value of zero or 18 1 indicates the value is out of range Gardner D6166 Difference is also available and is defined as follows dGardner D6166 Gardner D6166...

Страница 315: ...splay in the Color Data Table 3 Two columns will be added to the color data table The first column gives the calculated value for the index and the second column indicates Dil if the specimen read was...

Страница 316: ...ns ASTM E313 Tint is available for illuminants C D50 and D65 and the 2 and 10 standard observers A blank cell is received when any other illuminant observer combination is in use Value C 2 D50 2 D65 2...

Страница 317: ...having tint values between 3 and 3 USP 10 mm and USP 20 mm ColorQuest II Sphere ColorQuest XE ColorQuest XT UltraScan PRO UltraScan XE and UltraScan VIS only USP United States Pharmacopeia Color is a...

Страница 318: ...the same as the current ASTM E313 whiteness described above but may only be calculated and displayed for D65 2 D65 10 and C 2 The CIE method on which this index is based is equivalent to AATCC Test Me...

Страница 319: ...orQuest XE LabScan XE UltraScan PRO and UltraScan VIS Y x and y are the CIE Chromaticity Coordinates the hue preference in reference to the perpendicular to the reference dominant wavelength RWL 15 th...

Страница 320: ...e Y value from the CIE XYZ color scale Y Brightness Difference is also available and is defined as follows dY Brightness Y Brightness sample Y Brightness standard Yellowness Indices Visually yellownes...

Страница 321: ...illuminant C and the 1931 CIE 2 standard observer are X 98 041 Y 100 000 Z 118 103 Using these values the ASTM formula yields YI 0 303 for clear air because the factors are truncated to three signific...

Страница 322: ...re instrument ColorQuest XE ColorQuest II Sphere UltraScan XE UltraScan PRO or UltraScan VIS In order to measure and display haze values follow the steps outlined below 1 Select Read Method from the O...

Страница 323: ...measurement as usual After you do so Haze and the other parameters you chose to display will be shown in your Color Data Table Opacity Note Opacity may not be measured using a ColorQuest XT Opacity m...

Страница 324: ...and UltraScan VIS 5 Read the standard or sample by choosing Read Standard or Read Sample from the Measurements menu clicking the Read Standard or Read Sample button on the toolbar or pressing F2 or F...

Страница 325: ...EasyMatch QC User s Manual Version 2 1 Measurement Values A 35...

Страница 326: ...calculated for each wavelength Absorbance log10T where T transmittance In the Color Data Table configuration a wavelength range appropriate for your instrument should be chosen Do not choose wavelengt...

Страница 327: ...ts of these calculations may be in error Reflectance Selecting reflectance spectral data allows the raw reflectance value for each wavelength interval selected in the configuration to be displayed Tra...

Страница 328: ...Template to Job Ctrl T Save Measurement to Database Ctrl M Print Job Ctrl P Cut Ctrl X Copy Ctrl C Paste Ctrl V Return to English Ctrl E Delete Del Read Standard F2 Read Sample F3 Standardize F4 Read...

Страница 329: ...nu New Job N Open Job O Open Job Template T Recall Measurement From Database R Delete Measurement From Database D Close Job C Save Job S Save Job As A Save Job Template J Save Job Template As B Save M...

Страница 330: ...og L Commands from an Open Measurements Menu Read Standard S Read Sample R Average A Timed Read T Average Selected to Measurement U Average Selected to Standard N Average selected to new standard W Co...

Страница 331: ...Open Sensor Menu Install Configure C Standardize S Set Modes M Import Logged Reads L Configure Setups P Configure Multi Mode C Commands from an Open Window Menu New Window N Cascade C Tile T Bring th...

Страница 332: ...allation process This generally occurs when you are attempting to install while logged into Windows using an account that does not have administrator privileges Cancel the installation and log into Wi...

Страница 333: ...are attempting to link a sample read in one mode i e TTRAN 1 00 in with UV filter nominal to a standard read in another mode i e RSIN 1 00 in with UV filter nominal If the mode of the sample is corre...

Страница 334: ...and choose to open the C Program Files HunterLab EasyMatchQC SQL Database Script EZMQC sql script file This is the location of the file if you installed EasyMatch QC to the default folder If you insta...

Страница 335: ...L Database 7 Close SQL Server 8 On the computer where EasyMatch QC will be run open EasyMatch QC 9 Select the Options menu System Configuration and then Data Storage The Data Storage Screen appears 10...

Страница 336: ...EasyMatch QC User s Manual Version 2 1 Creating and Configuring a SQL Database D 3 11 Restart EasyMatch QC and the SQL database is ready for use...

Страница 337: ...nch glass sample cup ColorFlex 11A 9 LabScan XE 11D 11 3D color plot 1 22 4 mm port plate ColorQuest XE 11B 13 UltraScan PRO 11F 10 UltraScan VIS 11G 12 420 nm UV filter assembly MiniScan EZ 11E 7 45...

Страница 338: ...control ColorQuest XE 11B 8 LabScan XE 11D 5 UltraScan PRO 11F 3 UltraScan VIS 11G 5 Automated variable sample illumination LabScan XE 11D 4 Automatic standard search 6 6 Autotolerancing 2 22 Average...

Страница 339: ...CIELAB2000 A 9 CIELCh A 2 CIE luminosity function 13 1 CIE standard observer 13 2 CIE TC 1 29 A 8 CIE tint A 25 CIE tristimulus values 13 2 CIE tristimulus XYZ A 1 Claims 12 2 Clarity 13 2 Cleaning C...

Страница 340: ...A 17 Non opaque samples 11A 25 OJ4 orange juice standard 11A 11 Operating conditions 11A 18 Options 11A 4 Orange juice standards 11A 11 Orange juice tube holder 11A 10 Physical characteristics 11A 20...

Страница 341: ...22 Fluorescing samples 11B 52 Foot switch assembly 11B 10 Fuses 11B 41 Glass port plate 11B 12 Green tile test 11B 37 Holder for small volume transmission cells 11B 24 Illumination 11B 48 Indicator l...

Страница 342: ...ission clamp 11B 18 Transmission compartment 11B 3 Transmission preform holder 11B 30 Transmission spill tray 11B 21 Transmittance measurements 11B 52 Transparent samples 11B 52 TTRAN 11B 35 UV contro...

Страница 343: ...nsmission cell holder 11C 7 Transmission cells 11C 8 Transmission cells with two screw tops 11C 8 Transmission clamp 11C 5 Transmission compartment 11C 2 Transmission preform holder 11C 17 Transmissio...

Страница 344: ...n VIS 11G 25 Damaged instruments 12 2 Database 1 41 3 31 Data send 7 15 Data series 2 48 Data storage 7 25 Data views 1 6 dC A 2 dC A 4 dE A 2 dE A 4 dE CIE94 A 8 dE 2000 A 9 Declaration of conformity...

Страница 345: ...G 51 Dominant wavelength A 20 Dust cover MiniScan EZ 11E 3 EasyGroup 7 28 EBC 10 mm A 21 Edit menu 4 1 Copy 4 2 Cut 4 1 Delete 4 4 Paste 4 3 Elliptical tolerancing scales A 7 E mail 3 29 Environmental...

Страница 346: ...Log off 3 35 Most recently opened jobs 3 36 New job 3 1 Open job 3 2 Open job template 3 3 Page setup 3 25 Print job 3 23 Print job preview 3 22 Print job setup 3 20 Printer setup 3 24 Recall measurem...

Страница 347: ...nose cone MiniScan EZ 11E 6 Glass port insert ColorFlex 11A 7 ColorQuest XE 11B 12 UltraScan PRO 11F 10 UltraScan VIS 11G 12 Glass sample cup ColorFlex 11A 9 LabScan XE 11D 11 Glossary 13 1 Green til...

Страница 348: ...11E 13 UltraScan PRO 11F 45 UltraScan VIS 11G 48 Import EasyGroup sequence 7 29 Import logged reads 8 11 Import QTX format 3 26 Import Textiles database 3 33 Incorrect shipment 12 3 Index tolerances 7...

Страница 349: ...s 11D 3 Automated UV control 11D 5 Cleaning 11D 17 Color measurement notes 11D 22 Compression cell set 11D 8 Directional samples 11D 22 Environmental requirements 11D 18 Features 11D 1 Fluorescing sam...

Страница 350: ...ple illumination 11D 4 Viewing 11D 19 Lamp ColorFlex 11A 18 ColorQuest XE 11B 38 ColorQuest XT 11C 25 MiniScan EZ 11E 11 UltraScan PRO 11F 34 UltraScan VIS 11G 38 Lens brush ColorFlex 11A 3 ColorQuest...

Страница 351: ...rage 6 4 Average selected to measurement 6 7 Average selected to new standard 6 9 Average selected to standard 6 8 Read sample 6 2 Read series 6 3 Read standard 6 1 Timed read 6 5 Measuring in a trans...

Страница 352: ...jobs 3 36 Multiple read mode 7 6 Munsell color system 13 3 Naming conventions 7 1 Nanometer 13 3 New job 3 1 New window 9 1 Non opaque samples ColorFlex 11A 25 ColorQuest XE 11B 51 LabScan XE 11D 22...

Страница 353: ...s 7 1 Read method 7 5 System configuration 7 21 Orange juice standards ColorFlex 11A 11 Orange juice tube holder ColorFlex 11A 10 Order processing department 12 6 Organization of manual 1 1 Packing in...

Страница 354: ...uest XT 11C 35 LabScan XE 11D 22 UltraScan PRO 11F 48 UltraScan VIS 11G 51 Presenting samples ColorFlex 11A 24 ColorQuest XE 11B 51 ColorQuest XT 11C 35 LabScan XE 11D 22 UltraScan PRO 11F 48 UltraSca...

Страница 355: ...11 UltraScan VIS 11G 12 Reflectance 13 4 Reflection 13 4 Refraction 13 4 Regular transmittance 13 4 Regulatory notice ColorFlex 11A 22 ColorQuest XE 11B 49 ColorQuest XT 11C 33 LabScan XE 11D 20 Mini...

Страница 356: ...raScan VIS 11G 35 RxRyRz A 6 Safety notes Front of manual Sample clamp ColorFlex 11A 6 ColorQuest XE 11B 2 LabScan XE 11D 6 UltraScan PRO 11F 2 UltraScan VIS 11G 3 Sample cup opaque cover ColorFlex 11...

Страница 357: ...G 26 Semi micro powder holder ColorQuest XE 11B 14 UltraScan PRO 11F 11 UltraScan VIS 11G 14 Sensor menu 8 1 Configure multi mode 8 10 Configure setups 8 13 Diagnostics 8 15 Import logged reads 8 11 I...

Страница 358: ...re features 1 3 Software messages C 1 Software validation statement Front of manual Source lamp ColorQuest XE 11B 38 ColorQuest XT 11C 25 UltraScan PRO 11F 34 UltraScan VIS 11G 38 Specifications Color...

Страница 359: ...XE 11B 35 ColorQuest XT 11C 24 UltraScan PRO 11F 31 UltraScan VIS 11G 35 Standardize 8 4 Standardizing 2 10 Standards ColorQuest XE 11B 45 MiniScan EZ 11E 11 UltraScan VIS 11G 45 Standards care card...

Страница 360: ...smission cell holder ColorQuest XE 11B 20 ColorQuest XT 11C 7 UltraScan PRO 11F 15 UltraScan VIS 11G 19 Transmission cells ColorQuest XE 11B 20 ColorQuest XT 11C 8 UltraScan PRO 11F 16 UltraScan VIS 1...

Страница 361: ...G 35 UltraScan PRO 11F 1 10 mm small volume transmission cells 11F 19 4 mm port plate 11F 10 Accessories 11F 6 Automated UV control 11F 3 Color measurement notes 11F 48 Compression clamp kit 11F 8 Cyl...

Страница 362: ...s 11F 48 Semi micro cell holder and optical assembly 11F 22 Semi micro powder holder 11F 11 Skein holder 11F 9 Small area view 11F 4 Source lamp 11F 34 Specifications 11F 44 Specular included excluded...

Страница 363: ...11G 23 Illumination 11G 48 Indicator lights 11G 5 Installation 11G 32 Instrument performance 11G 49 Instrument standards 11G 45 Lamp 11G 38 Lens surface 11G 46 Macro button 11G 5 Maintenance 11G 37 No...

Страница 364: ...measurements 11G 52 Transparent samples 11G 52 TTRAN 11G 35 UV control 11G 5 View lamp 11G 43 Viewing 11G 48 Uniform color scale 13 5 United states pharmacopeia color A 27 Universal database import 3...

Страница 365: ...13 5 What is EasyMatch QC 1 2 When you need assistance 12 6 White backup tile 11D 3 White calibrated tile 11A 3 11B 5 11D 3 11F 6 11G 6 WI CIE A 27 WI E313 A 27 Window menu 9 1 Cascade 9 2 New window...

Страница 366: ...Match QC User s Manual version 2 1 A60 1012 402 EasyMatch QC User s Manual version 2 1 A60 1012 402 EasyMatch QC User s Manual version 2 1 A60 1012 402 EasyMatch QC User s Manual version 2 1 A60 1012...

Отзывы: