background image

NO TE

The mobile phone number is used only for configuring the SMS function and is not used for

other purposes. The phone number is encrypted during transmission in the ECC800-Pro to

ensure that the personal data of users is fully protected.

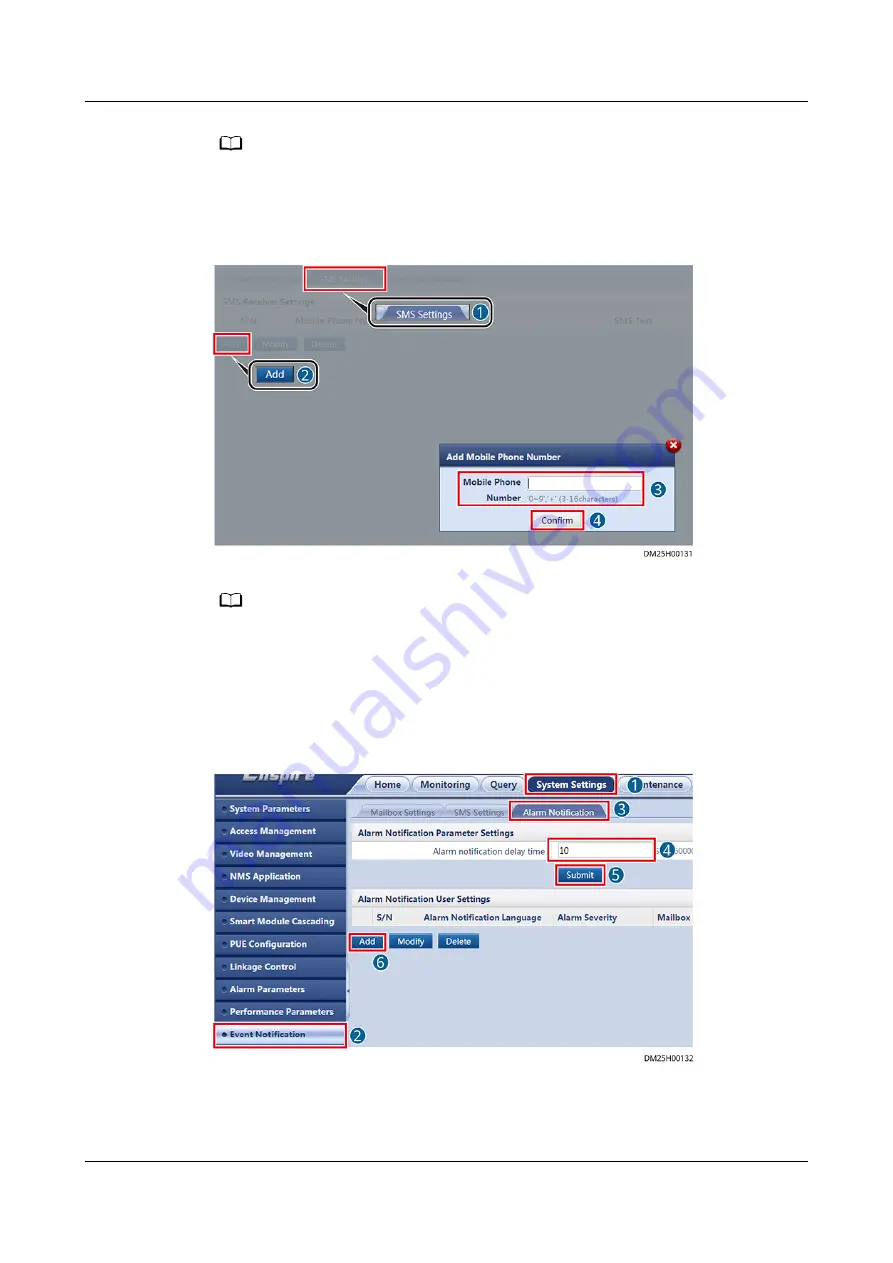
Figure 5-16 Adding a mobile number

NO TE

Click Test to check whether the added mobile phone number is available. If it is available,

Successfully to send the test short message. is displayed. If it is unavailable, Failed to send

the test short message. is displayed. Check whether the mobile phone number is correctly set.

Step 5 Set the alarm notification delay parameter and the new alarm notification

parameter.

Figure 5-17 Setting the alarm notification parameters

FusionModule2000-S Smart Modular Data Center

User Manual

5 Power-On Commissioning

Issue 03 (2021-07-15)

Copyright © Huawei Technologies Co., Ltd.

155

Содержание V100R021C10

Страница 1: ...FusionModule2000 S Smart Modular Data Center V100R021C10 User Manual Issue 03 Date 2021 07 15 HUAWEI TECHNOLOGIES CO LTD ...

Страница 2: ...cribed in this document may not be within the purchase scope or the usage scope Unless otherwise specified in the contract all statements information and recommendations in this document are provided AS IS without warranties guarantees or representations of any kind either express or implied The information in this document is subject to change without notice Every effort has been made in the prep...

Страница 3: ...ales engineers Technical support engineers System engineers Hardware installation engineers Commissioning engineers Data configuration engineers Maintenance engineers Symbol Conventions The symbols that may be found in this document are defined as follows Symbol Description Indicates a hazard with a high level of risk which if not avoided will result in death or serious injury Indicates a hazard w...

Страница 4: ... text NOTE is used to address information not related to personal injury equipment damage and environment deterioration Change History Changes between document issues are cumulative The latest document issue contains all updates made in previous issues Issue 03 2021 07 15 Updated the content about the aisle mounting kit Issue 02 2021 05 27 Updated the content about the temperature and humidity sen...

Страница 5: ...cking 21 3 1 1 Moving and Unpacking a Smart Cooling Product 21 3 1 2 Moving and Unpacking Smart Module Components 22 3 1 3 Moving the PDF 23 3 1 4 Moving an IT Cabinet 25 3 2 Optional Installing Bases 27 3 2 1 Precautions for Installing Bases 27 3 2 2 Installing Bases with Adjustable Dimension 28 3 3 Installing Cabinets 33 3 4 Combining Cabinets 35 3 5 Installing Cabinet Components 37 3 5 1 Instal...

Страница 6: ...ic Clasp Lock 67 3 10 3 Installing a PAD 70 3 10 4 Securing the PAD Mounting Kit 71 3 10 5 Installing an ECC800 Pro 72 3 10 6 Installing a LAN Switch 75 3 10 7 Installing an IVS1800 76 3 10 8 Optional Installing a TaiShan 200 Server 80 3 10 9 Installing a 2288X V5 Server 82 3 10 10 Installing a Camera 84 3 10 11 Rules for Deploying T H Sensors 88 3 10 12 Installing T H Sensors 02312PBL 89 3 10 13 ...

Страница 7: ...9 5 3 4 1 Recording Facial Data 149 5 3 4 2 Maintaining the Facial Data 150 5 3 5 Commissioning Configuration Wizard 151 5 3 6 Configuring Event Notification 152 5 3 7 Setting the Date and Time 158 5 3 8 Creating a Smart Module Plan View 159 5 3 9 Commissioning the New Main Way 160 5 3 10 Commissioning Sensors 162 5 3 10 1 Commissioning a Smoke Detector 162 5 3 10 2 Commissioning a WLD900 Water Se...

Страница 8: ...Maintenance 222 6 1 Routine Maintenance 222 6 1 1 Daily Maintenance 222 6 1 2 Monthly Maintenance 223 6 1 3 Quarterly Maintenance 226 6 1 4 Semiannual Maintenance 230 6 1 5 Annual Maintenance 235 6 2 Alarm Handling 236 6 2 1 Alarm Handling Flowchart 237 6 2 2 Viewing and Collecting Alarm Information 237 6 2 3 Determining the Faulty Area and Alarm Severity 238 6 2 4 Locating and Rectifying Faults 2...

Страница 9: ...r the IVS1800 257 6 3 16 Replacing an Aisle T H Sensor 260 6 3 17 Replacing a Temperature Sensor 262 6 3 18 Replacing a Remote T H Sensor 33010516 264 6 3 19 Replacing a Smoke Detector 264 6 3 20 Replacing a Water Sensor 265 7 Appendix 267 7 1 Installing an Expansion Bolt 267 7 2 Preparing Monitoring Cables 269 7 3 Preparing Load Cables 270 7 4 Common Screw Torques 272 7 5 Installation Verificatio...

Страница 10: ...lation of general safety requirements or design production and usage safety standards Ensure that the equipment is used in environments that meet its design specifications Otherwise the equipment may become faulty and the resulting equipment malfunction component damage personal injuries or property damage are not covered under the warranty Follow local laws and regulations when installing operati...

Страница 11: ...ain snow and level 6 or stronger wind Before installing operating or maintaining the equipment remove any conductive objects such as watches or metal jewelry like bracelets bangles and rings to avoid electric shock When installing operating or maintaining the equipment wear personal protective equipment such as insulation gloves goggles and safety clothing helmet and shoes as shown in the followin...

Страница 12: ...crawl damage or block any warning label on the equipment When installing devices use a torque wrench with a proper measurement range to tighten bolts Ensure that the wrench is not skewed and the torque error does not exceed 10 Do not work with power on during installation Repaint any paint scratches caused during equipment transportation or installation in a timely manner Equipment with scratches ...

Страница 13: ...rate the equipment including operators trained personnel and professionals should possess the local national required qualifications in special operations such as high voltage operations working at heights and operations of special equipment Professionals personnel who are trained or experienced in equipment operations and are clear of the sources and degree of various potential hazards in equipme...

Страница 14: ...orrect If the equipment has multiple inputs disconnect all the inputs before operating the equipment A circuit breaker equipped with a residual current device RCD is not recommended A damaged power cable must be replaced by the manufacturer service agent or professionals to avoid risks High voltage operations and installation of AC powered facilities must be performed by qualified personnel Cablin...

Страница 15: ...rated by human bodies may damage the electrostatic sensitive components on boards for example the large scale integrated LSI circuits Wear ESD gloves or a well grounded ESD wrist strap when touching the device or handling boards or application specific integrated circuits ASICs When holding a board hold its edge without touching any components Do not touch the components with your bare hands Packa...

Страница 16: ...ing consent When working at heights comply with local relevant laws and regulations Only trained and qualified personnel are allowed to work at heights Before working at heights check the climbing tools and safety gears such as safety helmets safety belts ladders springboards scaffolding and lifting equipment If they do not meet the requirements take corrective measures or disallow working at heig...

Страница 17: ...ood condition Before hoisting objects ensure that hoisting tools are firmly secured onto a load bearing object or wall Ensure that the angle formed by two hoisting cables is no more than 90 degrees as shown in the following figure Do not drag steel ropes and hoisting tools or bump hoisted objects against hard objects during hoisting Using Ladders Use wooden or fiberglass ladders when you need to p...

Страница 18: ...s into a wall or floor observe the following safety precautions NOTICE Do not drill holes into the equipment Doing so may affect the electromagnetic shielding of the equipment and damage components or cables inside Metal shavings from drilling may short circuit boards inside the equipment Obtain the consent from the customer and subcontractor before drilling Wear goggles and protective gloves when...

Страница 19: ...damage the equipment 1 6 Cooling System Safety Welding At least two persons are required on a welding site A welder must have a work permit A welding site must be free from inflammables Ensure that a fire extinguisher wet wiper and water container are available A burning welding torch must not be placed on a component or on the floor and must not be placed in a metal container with acetylene and o...

Страница 20: ... the device information in the recycling collection system or contact your dealer for help The dealer can help you recycle devices in a safe and environment friendly way 1 7 Others Exercise caution when shutting down the smart cooling product Doing so may cause equipment and room overheating which will damage the equipment Exercise caution when powering off the rPDU or PDU2000 Doing so may affect ...

Страница 21: ... Specifications and Appearance Protective gloves Marker Measuring tape 5 m Level Step ladder 2 m Phillips screwdriver M4 M6 M8 Flat head screwdriver 2 5 mm Torque wrench Adjustable wrench 6 Socket wrench M6 M8 M12 Hex key 5 mm Laser locator FusionModule2000 S Smart Modular Data Center User Manual 2 Installation Preparations Issue 03 2021 07 15 Copyright Huawei Technologies Co Ltd 12 ...

Страница 22: ...mping tool Multimeter Electroprobe Heat shrink tubing Cable tie Hammer drill Electric screwdriver Rubber mallet Table 2 2 Tools and instruments for smart cooling products Tool Name Specifications and Appearance Flashlight Hacksaw Manual pallet truck Electronic balance FusionModule2000 S Smart Modular Data Center User Manual 2 Installation Preparations Issue 03 2021 07 15 Copyright Huawei Technolog...

Страница 23: ...ene Hot melt device Clamp meter Pipe bender Insulation gloves Pressure gauge 1 PCS a Rubber hose 3 PCS a Nitrogenb Reducing valvec Vacuum pumpd Water pipe thread sealante FusionModule2000 S Smart Modular Data Center User Manual 2 Installation Preparations Issue 03 2021 07 15 Copyright Huawei Technologies Co Ltd 14 ...

Страница 24: ... sealant with PTEF as the padding Maximum gap 0 5 mm Pressure resistance 1 6 MPa Compliant with the industry standard JB T 7311 2008 Technical Specification for the Application of Anaerobic Glue in Engineering Machinery 2 2 Installation Environment Check Ensure that the installation environment meets the requirements before installation Table 2 3 Installation environment checklist Check Item Requi...

Страница 25: ...ht 2 2 m width 0 9 m Passed Failed Power supply 380 415 V AC 10 3 Ph 50 60 Hz Passed Failed Lighting Main equipment room 500 lx Monitoring center 500 lx Test area 500 lx Passed Failed Floor drain DN50 or larger made of cast iron or stainless steel Passed Failed Water port Condensate drain outlet Drains condensate from smart cooling products Passed Failed NOTE If any of the requirements is not met ...

Страница 26: ...inets If the site conditions do not meet the field requirements contact Huawei technical support Figure 2 1 Space requirements for a simplified single row DMC Figure 2 2 Space requirements in the high density HPC scenario 2 4 Reference Documentation Before installation prepare the following documents in addition to this document FusionModule2000 S Smart Modular Data Center User Manual 2 Installati...

Страница 27: ...uct NetCol5000 A050 In Row Air Cooled Smart Cooling Product User Manual 1350 mm Depth NetCol5000 A050 In row Air Cooled Smart Cooling Product Quick Guide 1350 mm Depth Facility manageme nt system ECC800 Pro ECC800 Data Center Controller V100R021C10 User Manual for ECC800 Pro NetEco iManager NetEco Product Documentation NetEco Version Others Smart Modular Data Center Quick Reference Guide includes ...

Страница 28: ...ario Figures in this section are for reference only The actual installation may vary Figure 2 3 Floor plan of the simplified single row containment Figure 2 4 Floor plan of the high density HPC scenario FusionModule2000 S Smart Modular Data Center User Manual 2 Installation Preparations Issue 03 2021 07 15 Copyright Huawei Technologies Co Ltd 19 ...

Страница 29: ...ilure to follow instructions in this document The requirements are as follows Customers technical personnel must be trained by Huawei and be familiar with the proper installation and operation methods The number of installation personnel varies depending on the project progress and installation environment Typically two to three persons are required FusionModule2000 S Smart Modular Data Center Use...

Страница 30: ...position unpack the equipment with caution to avoid scratching or bumping Do not remove the equipment from the pallet before installation For details about how to install the smart cooling product and outdoor unit see the NetCol5000 A050 In Row Air Cooled Smart Cooling Product User Manual 1350 mm Depth Unpacking an Indoor Unit Step 1 Check that the package is intact If any damage is found notify t...

Страница 31: ...devices cables and copper pipes 1 Check that the package is intact If any damage is found notify the carrier immediately 2 Remove the package Check that the cabinet exterior is intact and free of collision marks or scratches If any damage is found notify the carrier immediately 3 Check the type and quantity of fittings against the packing list If some fittings are missing or do not match the model...

Страница 32: ...kill requirement forklift driver common technician Procedure Step 1 Check whether the PDF packing is intact Step 2 Cut off and remove the binding straps and remove the packing Step 3 Remove the plastic bag and take out the fitting box and sliding plates Step 4 Check whether the PDF is intact 1 Check the exterior of the PDF and check whether the PDF is damaged during transportation If any damage is...

Страница 33: ...racket Step 6 Raise the four leveling feet to the highest position using an adjustable wrench FusionModule2000 S Smart Modular Data Center User Manual 3 Hardware Installation Issue 03 2021 07 15 Copyright Huawei Technologies Co Ltd 24 ...

Страница 34: ...ons Tool adjustable wrench Procedure Step 1 Move the cabinet to the planned installation position Step 2 Remove the bolts that secure the cabinet to the pallet NOTE If the cabinet needs to be secured save the bolts removed from the pallet for future use FusionModule2000 S Smart Modular Data Center User Manual 3 Hardware Installation Issue 03 2021 07 15 Copyright Huawei Technologies Co Ltd 25 ...

Страница 35: ...he pallet and place the cabinet in the installation position NOTE If there is a base place the cabinet on the base End FusionModule2000 S Smart Modular Data Center User Manual 3 Hardware Installation Issue 03 2021 07 15 Copyright Huawei Technologies Co Ltd 26 ...

Страница 36: ...check that the total length of each row of bases is the sum of nominal widths of all bases tolerance 3 mm to 0 mm If N is greater than or equal to 5 you are advised to install five bases at a time After installation check that the total length of the bases is the sum of nominal widths of all bases tolerance 3 mm to 0 mm After installing five bases check whether the total length of the five bases a...

Страница 37: ... 270 410 mm depth adjustable 1000 mm 1100 mm 1200 mm or 1350 mm Height adjustable 410 700 mm depth adjustable 1000 mm 1100 mm 1200 mm or 1350 mm Preparations Tools ruler marker torque wrench Phillips screwdriver right angle hammer drill φ16 drill bit level Materials base and accessories expansion bolt base connecting plate washer floor holder Document base installation position diagram FusionModul...

Страница 38: ...f the ESD floor using a ruler and record the value of H Figure 3 6 Measuring the ESD floor height 2 Adjust the base height to H and tighten the height locking bolts on the feet FusionModule2000 S Smart Modular Data Center User Manual 3 Hardware Installation Issue 03 2021 07 15 Copyright Huawei Technologies Co Ltd 29 ...

Страница 39: ...mble the base 1 Adjust the base depth based on the cabinet depth 2 Tighten the bolt assembly on the telescopic rod FusionModule2000 S Smart Modular Data Center User Manual 3 Hardware Installation Issue 03 2021 07 15 Copyright Huawei Technologies Co Ltd 30 ...

Страница 40: ...d ensure that the outline of the upper surface of the base aligns with the cabinet bottom outline on the floor Figure 3 9 Positioning the first base Step 4 Use the end cabinet base as the reference and place other cabinet bases FusionModule2000 S Smart Modular Data Center User Manual 3 Hardware Installation Issue 03 2021 07 15 Copyright Huawei Technologies Co Ltd 31 ...

Страница 41: ...nsion sleeves Step 8 Move the base back install expansion bolts and partially tighten them Step 9 Measure the levelness of the base using a level as shown by 1 in below figure NOTE If a base is not level put washers under it as shown by 2 in below figure Figure 3 11 Leveling a base Step 10 Tighten expansion bolts as shown by 3 in above figure FusionModule2000 S Smart Modular Data Center User Manua...

Страница 42: ... Installing Cabinets Prerequisites The floor levelness meets engineering requirements Context To position a cabinet perform the following steps 1 Determine the positions for installing the equipment cabinet and smart cooling product cabinets based on the layout diagram 2 Place the equipment cabinet at the correct installation position 3 Place other smart cooling product cabinets at the specified p...

Страница 43: ...ts are different they may fail to be combined and the entire smart module may not be sealed properly NOTE Anchor bolts cannot be removed Anchor bolt adjustment method Wrench an anchor bolt clockwise to elevate a cabinet or wrench an anchor bolt anticlockwise to lower a cabinet Leveling criteria Level a cabinet using a level to ensure that the cabinet is not tilted A smart cooling product is shown ...

Страница 44: ...he top of the 2000 mm high cabinet and the floor is 2000 mm 3 mm Then use a level to check that the cabinet is level If the leveled height of a cabinet does not meet the requirement the door of the cabinet behind it may not be opened or closed properly Adjust the base height or use washers to level the IT equipment FusionModule2000 S Smart Modular Data Center User Manual 3 Hardware Installation Is...

Страница 45: ... depth directions and check that the air bubble is in the middle between the two lines marked on the glass tube A smart cooling product is shown in the figure to demonstrate how to level a cabinet Figure 3 15 Leveling a cabinet 1 Level Step 2 Combine adjacent cabinets 1 Remove the M5x10 tapping screws that secure the connecting kits and then remove the connecting kits 2 Remove M4x10 screw assembli...

Страница 46: ...onal Installing Side Panels for IT Cabinets Context If IT cabinets are located at both the end and head of a row install side panels on the outer sides of both end and head cabinets FusionModule2000 S Smart Modular Data Center User Manual 3 Hardware Installation Issue 03 2021 07 15 Copyright Huawei Technologies Co Ltd 37 ...

Страница 47: ...nstall side panels only on the outer side of the head cabinet Figure 3 18 Installing side panel 2 1 Side panel Preparations Tools Phillips screwdriver flat head screwdriver Material side panel Procedure Step 1 Install the floating nuts FusionModule2000 S Smart Modular Data Center User Manual 3 Hardware Installation Issue 03 2021 07 15 Copyright Huawei Technologies Co Ltd 38 ...

Страница 48: ...at the end of the row NOTE Install two side panels for each end cabinet one in the upper part and the other in the lower part Figure 3 20 Installing a cabinet side panel Step 4 Optional After adjusting side panels remove the labels on the panels End FusionModule2000 S Smart Modular Data Center User Manual 3 Hardware Installation Issue 03 2021 07 15 Copyright Huawei Technologies Co Ltd 39 ...

Страница 49: ...rough the opening End Follow up Procedure Before connecting the power plug of a device to the rPDU loosen the locking device on the rPDU After connecting the power plug tighten the locking device 3 5 1 3 Optional Installing a Horizontal Ground Bar Context Install the horizontal ground bar in the IT cabinet at the end of a row closest to the PDF Preparations Tools adjustable wrench torque wrench Ma...

Страница 50: ... End 3 5 1 4 Optional Installing a Vertical Ground Bar Context Install the vertical ground bar in the IT cabinet closest to the PDF Preparations Tool Phillips screwdriver Material vertical ground bar Procedure Step 1 Open the cabinet rear door and use four M4 screws to secure the vertical ground bar to the right mounting bar FusionModule2000 S Smart Modular Data Center User Manual 3 Hardware Insta...

Страница 51: ...e PDF The depth of the PDF and integrated UPS is 1100 mm An enclosure frame needs to be added on the rear to expand the depth to 1350 mm Procedure Step 1 Remove the rear door and original beam from the cabinet Step 2 Align the enclosure frame with the holes in the cabinet FusionModule2000 S Smart Modular Data Center User Manual 3 Hardware Installation Issue 03 2021 07 15 Copyright Huawei Technolog...

Страница 52: ...ns Figure 3 24 Securing the top beam Step 4 Use three M5x10 tapping screws to secure the enclosure frame to the bottom of the cabinet Figure 3 25 Securing the enclosure frame to the bottom of the cabinet End FusionModule2000 S Smart Modular Data Center User Manual 3 Hardware Installation Issue 03 2021 07 15 Copyright Huawei Technologies Co Ltd 43 ...

Страница 53: ... Glass aisle doors need to be installed only in the 1600 mm cold and hot aisle containment scenario The front doors of the smart cooling product PDF and integrated PDF are glass doors with an LCD An IT cabinet is not equipped with an LCD The following procedure describes how to install an aisle door for the smart cooling product cabinet which is the same as that of other power supply and distribut...

Страница 54: ... Step 3 Remove the beam from the cabinet Step 4 Install the glass aisle door 1 Align the glass aisle door with the holes in the cabinet Use four M5x10 tapping screws to secure it at the front holes on the top of the cabinet The following figure shows the installation positions Figure 3 27 Securing holes on the cabinet top 2 Use three M5x10 tapping screws to secure the glass aisle door to the botto...

Страница 55: ...s NOTE Side sealing plates need to be installed only for the front doors of the cabinets at the end and head of a row 1 Secure the side sealing plate to the aisle door frame FusionModule2000 S Smart Modular Data Center User Manual 3 Hardware Installation Issue 03 2021 07 15 Copyright Huawei Technologies Co Ltd 46 ...

Страница 56: ... plate from the outside Use four M6x16 screw assemblies to secure the side sealing plate to the aisle door frame from the outside FusionModule2000 S Smart Modular Data Center User Manual 3 Hardware Installation Issue 03 2021 07 15 Copyright Huawei Technologies Co Ltd 47 ...

Страница 57: ...ing screws to secure a side sealing plate to the aisle door mechanical part on the inner side of the glass door near the cabinet as shown in the following figure FusionModule2000 S Smart Modular Data Center User Manual 3 Hardware Installation Issue 03 2021 07 15 Copyright Huawei Technologies Co Ltd 48 ...

Страница 58: ...or LCD mounting kit from the front of the aisle door 2 Secure the LCD to the mounting kit at the rear of the aisle door using four M4x10 screw assemblies 3 Reconnect the LCD to the LCD cables reserved on the smart cooling product FusionModule2000 S Smart Modular Data Center User Manual 3 Hardware Installation Issue 03 2021 07 15 Copyright Huawei Technologies Co Ltd 49 ...

Страница 59: ...ughs Context Installation principle Install one electric cable trough and one ELV cable trough on the top of each cabinet Install two cable troughs on the top of the cabinet at the end of a row PDF first and then install cable troughs on the top of other cabinets along the aisle in sequence FusionModule2000 S Smart Modular Data Center User Manual 3 Hardware Installation Issue 03 2021 07 15 Copyrig...

Страница 60: ... the cable trough above the rear door After PDU2000 cables are placed bind the cables to the cable trough using cable ties Figure 3 34 rPDU cable routing on the top of a cabinet 1 Weak current cable trough 2 Strong current cable trough Preparations Tool Phillips screwdriver Materials cable troughs and accessories FusionModule2000 S Smart Modular Data Center User Manual 3 Hardware Installation Issu...

Страница 61: ...mping a vertical plate Step 2 Rotate the vertical plate by 90 degrees to stand it on the top plate of the cabinet Figure 3 36 Rotating the vertical plate by 90 degrees Step 3 Install the other vertical plate into the mounting holes in the second row counting from the front door to the rear door in the same way Install one M5x10 tapping FusionModule2000 S Smart Modular Data Center User Manual 3 Har...

Страница 62: ... is fully into the clasps NOTE When installing the supporting plate do not remove the grommet strip on the U shaped trough Figure 3 38 Installing a supporting plate Step 5 Install a partition plate Press both sides of the V shaped partition plate with both hands to decrease the angle to a proper degree and clamp the clasps at the bottom into the nearby holes FusionModule2000 S Smart Modular Data C...

Страница 63: ...able troughs in the same way Step 7 Rotate the interconnecting lever and clamp it into the clasps until the lever is horizontal This operation interconnects the cable troughs Figure 3 40 Installing an interconnecting lever 1 Interconnecting lever FusionModule2000 S Smart Modular Data Center User Manual 3 Hardware Installation Issue 03 2021 07 15 Copyright Huawei Technologies Co Ltd 54 ...

Страница 64: ... cabinet front door and the signal cable trough is away from the cabinet front door Preparations Material cable trough end panel Procedure Step 1 Hold the top of the end panel with both hands to keep it vertical Press it from top to bottom into the hooks at the end of the cable trough until the top of the end panel aligns with the top of the cable trough NOTE During installation the interconnectin...

Страница 65: ...0 End 3 9 2 Optional Installing a Power Distribution Box for Smart Cooling Products For detailed operations see the documentation delivered with the equipment or obtain the documentation by referring to the section Reference Documentation FusionModule2000 S Smart Modular Data Center User Manual 3 Hardware Installation Issue 03 2021 07 15 Copyright Huawei Technologies Co Ltd 56 ...

Страница 66: ...s The smart cooling product PDB weighs about 44 kg It is recommended that the PDB be installed on a concrete wall with a thickness of at least 70 mm Figure 3 43 Dimensions of a smart cooling product PDB FusionModule2000 S Smart Modular Data Center User Manual 3 Hardware Installation Issue 03 2021 07 15 Copyright Huawei Technologies Co Ltd 57 ...

Страница 67: ...10 kW single phase power distribution units are used and each power distribution unit supports a maximum of six IT cabinets One power distribution unit provides six power outputs to route A and the other power distribution unit provides six power outputs to route B for the corresponding cabinets If the power density per cabinet is greater than 10 kW three phase power distribution units are used an...

Страница 68: ...ion unit provides six power outputs to route A and the other power distribution unit provides six power outputs to route B for the corresponding cabinets If the power density per cabinet is greater than 10 kW three phase power distribution units are used and each power distribution unit supports a maximum of two IT cabinets One power distribution unit provides two power outputs to route A and the ...

Страница 69: ... are arranged neatly Step 2 Secure the supports NOTICE The following procedure describes how to install a low support that applies to the cabinet front door scenario If there are bolts in the holes for securing the supports remove the bolts and then secure the supports If the cabinet edges are uneven secure the supports to the higher cabinet edge and use a level to ensure that the adjacent support...

Страница 70: ...ep 3 Remove the covers from the general input unit Figure 3 50 Removing the covers Step 4 Secure the general input unit to the support Figure 3 51 Securing general input unit 1 FusionModule2000 S Smart Modular Data Center User Manual 3 Hardware Installation Issue 03 2021 07 15 Copyright Huawei Technologies Co Ltd 61 ...

Страница 71: ...maintaining the general input unit Step 6 Install the busbar trunking unit Figure 3 53 Securing the busbar trunking units Step 7 Level the supports and secure them 1 Adjust the screw on the top of the support clockwise to raise the support and adjust the screw counterclockwise to lower the support 2 Use a level to check that the supports are on the same horizontal line FusionModule2000 S Smart Mod...

Страница 72: ...ning M12 bolts on the connective kit is 45 N m For the actual torque see the label on the connective kit Figure 3 55 Installing the connective kit 1 Protective cover 2 Busbar trunking unit 3 Connective kit 4 19 socket Step 9 Install other supports and busbar trunking units NOTICE If the installation cannot be completed at a time protect the port for connecting to the busbar trunking unit from sund...

Страница 73: ...on unit 1 Position for removing the protective cover Figure 3 57 Installing two power distribution units 1 Positions for removing the protective covers Figure 3 58 Installing three power distribution units 1 Positions for removing the protective covers Figure 3 59 Removing the protective cover from the busbar trunking unit FusionModule2000 S Smart Modular Data Center User Manual 3 Hardware Install...

Страница 74: ...ment cards Skip this step if integrated management cards are not configured or have been preinstalled Figure 3 62 Installing an integrated management card NOTE The following figure uses the general input unit as an example to illustrate how to install an integrated management card FusionModule2000 S Smart Modular Data Center User Manual 3 Hardware Installation Issue 03 2021 07 15 Copyright Huawei ...

Страница 75: ... be installed on the power distribution unit adjacent to the general input unit and they need to be routed continuously End 3 10 Installing Monitoring Devices 3 10 1 Installing a Smart ETH Gateway Preparations Tool Phillips screwdriver Materials smart ETH gateway and accessories Procedure Step 1 Use two M4x10 screw assemblies to secure the guide rail for the smart ETH gateway to the cable trough a...

Страница 76: ... 2 Press the lower part of the smart ETH gateway to clamp the smart ETH gateway onto the guide rail 3 Shake the smart ETH gateway in different directions to ensure that it is reliably installed End 3 10 2 Installing an Electronic Clasp Lock Context NOTICE The electronic clasp lock is not required in the 1350 mm deep scenario In the 1600 mm deep scenario an electronic clasp lock needs to be install...

Страница 77: ...tongue on the door and the lock latch on the door frame post and then replace the round lock tongue Ensure that the notch on the round lock tongue faces upwards Step 2 Remove the intelligent lock positioning plate from the cabinet post Figure 3 66 Removing the intelligent lock positioning plate 1 Intelligent lock positioning plate 2 Intelligent lock mounting plate Step 3 Install the electronic cla...

Страница 78: ...talled electronic clasp lock NOTICE The positioning plate is only used to assist in determining the installation position of the electronic lock In the actual installation ensure that the lock latch is located in the middle of the C shaped lock slot and the door can be opened and closed smoothly End FusionModule2000 S Smart Modular Data Center User Manual 3 Hardware Installation Issue 03 2021 07 1...

Страница 79: ... 69 Figure 3 69 Adjusting the foot Step 2 Remove the cable hole baffle plate from the PAD mounting kit as shown by 1 in Figure 3 70 Step 3 Remove the nut from the PAD mounting bracket and secure the bracket to the PAD mounting kit using the nut as shown by 2 in Figure 3 70 Step 4 Route the PAD power cable through the cable hole in the PAD mounting kit and connect it to the PAD as shown by 3 in Fig...

Страница 80: ... mounting kit Procedure Step 1 Use three M5x10 tapping screws to secure the PAD mounting kit on the upper part of the end cabinet of the smart module as shown in the following figure FusionModule2000 S Smart Modular Data Center User Manual 3 Hardware Installation Issue 03 2021 07 15 Copyright Huawei Technologies Co Ltd 71 ...

Страница 81: ...End 3 10 5 Installing an ECC800 Pro Context Tool Phillips screwdriver Materials ECC800 Pro floating nut FusionModule2000 S Smart Modular Data Center User Manual 3 Hardware Installation Issue 03 2021 07 15 Copyright Huawei Technologies Co Ltd 72 ...

Страница 82: ...s and install floating nuts Figure 3 73 Installing a floating nut Step 2 Place the ECC800 Pro in the IT cabinet with caution Step 3 Secure the ECC800 Pro in the IT cabinet by tightening the M6 screws on the mounting ears FusionModule2000 S Smart Modular Data Center User Manual 3 Hardware Installation Issue 03 2021 07 15 Copyright Huawei Technologies Co Ltd 73 ...

Страница 83: ...l module and take out the module Figure 3 75 Removing an ECC800 Pro main control module 2 Insert the MicroSD and SIM cards into the correct slots on the left side of the ECC800 Pro main control module Figure 3 76 Installing the MicroSD card and SIM card 3 Reinstall the ECC800 Pro main control module in the ECC800 Pro subrack and tighten the captive screws on both sides of the module FusionModule20...

Страница 84: ...inet NOTE This section describes only the installation method The actual product appearance may vary Figure 3 77 Installing a LAN switch Step 3 Connect the LAN switch power cable to the PDU2000 Step 4 Connect any port among the 1 24 ports of the LAN switch to the WAN1 port on the ECC800 Pro using a network cable Step 5 Insert a power module into the power slot of the 24 port LAN switch and tighten...

Страница 85: ... Remove two black screws on each side of the chassis and the silvery white one on top of the hard disk tray raise the hard disk tray by 45 degrees and take out the upper and then lower layers of hard disk tray Figure 3 80 Removing the hard disk tray 3 Place the hard disks with ports facing upwards and align the screw holes on the hard disk tray with the hard disks and fasten the screws Before the ...

Страница 86: ... on the panel and the screws on the hard disk tray 5 Connect data and power cables to hard disks Connect hard disk cable ports P0 P3 to hard disks on the lower layer hard disk tray and ports P4 P7 to hard disks on the upper layer as shown in the lower left figure Figure 3 83 Connecting data and power cables to hard disks 6 Close the chassis cover and use a PH2 screwdriver to fasten the rear screws...

Страница 87: ...t figure shows how to install cage nuts 1 Insert a cage nut into the square hole from the inside of the cabinet and clamp it to the lower frame of the square hole 2 Use a mounting bar to pull the cage nut until it clamps the upper frame of the square hole Figure 3 85 Installing a cage nut 2 Install guide rails Horizontally place a guide rail to the installation location through the positioning blo...

Страница 88: ... rails as shown in the following figure Figure 3 88 Installing cage nuts 5 Install mounting ears Use a PH2 screwdriver to secure the mounting ears to both sides of the front panel of the device with four screws on each side When the device is near the front door of the cabinet fasten screws in hole groups 1 and 2 when the device is near the rear door fasten screws in hole groups 2 and 3 FusionModu...

Страница 89: ... mounting ear Fasten the M6 screws using a Phillips screwdriver to fix the mounting ears on the front mounting bars of the cabinet as shown in the lower right figure Figure 3 90 Securing the device Step 3 Power on the device 1 Turn on the power switch 2 Check the indicators on the front panel of the device for its running status End 3 10 8 Optional Installing a TaiShan 200 Server Context 123 This ...

Страница 90: ...When the two mounting ears on the server contact the mounting bars on the rack tighten the captive screws on the mounting ears to secure the server Figure 3 92 Installing a TaiShan 200 server Step 5 Connect the power cable to the TaiShan 200 server 1 Wear an ESD wrist strap or ESD gloves 2 Connect one end of the power cable to the cable port on the AC power module of the server FusionModule2000 S ...

Страница 91: ... Route the power cable along the cable tray neatly use cable ties to bind the power cable and use diagonal pliers to trim off the excess of the cable ties End 3 10 9 Installing a 2288X V5 Server FusionModule2000 S Smart Modular Data Center User Manual 3 Hardware Installation Issue 03 2021 07 15 Copyright Huawei Technologies Co Ltd 82 ...

Страница 92: ...ting holes at the middle insert rubber plugs tightly into the upper holes b Behind the guide rails Insert rubber plugs tightly into the upper mounting holes 3 Optional To enhance the rigidness and seismic proof performance of a server you can install bolts at the rear of flexible guide rails Step 2 Place the server on the guide rails and slide it along the guide rails into the cabinet Step 3 Align...

Страница 93: ...t PDU2000s Figure 3 97 Connecting server power cables End 3 10 10 Installing a Camera Prerequisites A C3220 camera and tools for installing it have been prepared The network cable used for camera communication has been prepared FusionModule2000 S Smart Modular Data Center User Manual 3 Hardware Installation Issue 03 2021 07 15 Copyright Huawei Technologies Co Ltd 84 ...

Страница 94: ...ounting plate and screw the camera to the mounting plate as shown in Figure 3 98 Figure 3 98 Installing a camera NOTE This camera model has triple axis adjustment design Connect the auxiliary video cable delivered with the camera to a display device such as the monitor Rotate the camera 0 355 degrees horizontally 0 75 degrees vertically or 0 355 degrees in the revolving direction to achieve an app...

Страница 95: ... in the document do not need to be connected onsite and should be insulated only Step 4 Adjust the monitoring image as shown in Figure 3 101 1 Determine an appropriate installation angle and set the aperture mode to manual in image configuration 2 Power on the ECC800 Pro to energize the camera 3 Assign one person to log in to the camera control software to observe the image on the monitor and anot...

Страница 96: ...bolts NOTE Use a flat head screwdriver to adjust the focal length for the first time Step 5 Before installing the inner cover adjust the infrared light panel of the camera and keep the photoresistor perpendicular to the camera base to avoid blocking the infrared light and photoresistor See Figure 3 102 Figure 3 102 Installing the inner cover Step 6 Install the front cover of the camera in the dire...

Страница 97: ...ont and rear doors of every six IT cabinets Smart cooling products use the T H sensors delivered with them NOTE Components shown in the same background color belong to the same area Figure 3 104 Cold and hot aisle containment Step 2 In the hot aisle containment scenario attach the T H sensors delivered with a smart cooling product to the front door post of the adjacent IT cabinet FusionModule2000 ...

Страница 98: ...the same number of cabinets Figure 3 106 Scenario with different numbers of cabinets End 3 10 12 Installing T H Sensors 02312PBL Context In the cold and hot aisle containment scenario T H sensors are required for the front and rear doors of every six IT cabinets Procedure Step 1 Secure the T H sensor base to the 33 U position on the IT cabinet door frame using M5x10 tapping screws FusionModule2000...

Страница 99: ...ors inside the cabinet at the return air side of the smart cooling product and connect their IN ports to the main control board When connecting the T H sensors outside the cabinet connect the OUT port of one T H sensor inside the cabinet to the IN port of the next T H sensor outside the cabinet Connect all T H sensors in series in this way Step 3 Set device addresses for the T H sensors FusionModu...

Страница 100: ... numbers 1 4 indicate the DIP switch settings of the T H sensors An even address indicates a cold aisle and an odd address indicates a hot aisle Table 3 2 T H sensor DIP switch T H Sensor Address DIP Switc h 1 DIP Switc h 2 DIP Switc h 3 DIP Switc h 4 DIP Switc h 5 DIP Switc h 6 DIP Switc h 7 DIP Switc h 8 1 ON OFF OFF OFF OFF OFF OFF OFF 2 OFF ON OFF OFF OFF OFF OFF OFF 3 ON ON OFF OFF OFF OFF OF...

Страница 101: ...stalling T H Sensors 33010516 Context In the hot aisle containment scenario you do not need to install a new T H sensor Attach the T H sensors delivered with a smart cooling product to the front door post of the adjacent IT cabinet Procedure Step 1 Attach the bottom of the T H sensor to the 33 U position on the IT cabinet door frame FusionModule2000 S Smart Modular Data Center User Manual 3 Hardwa...

Страница 102: ...etween the 33 U and 40 U positions based on site requirements Figure 3 111 Installing T H sensor 1 FusionModule2000 S Smart Modular Data Center User Manual 3 Hardware Installation Issue 03 2021 07 15 Copyright Huawei Technologies Co Ltd 93 ...

Страница 103: ...Figure 3 112 Installing T H sensor 2 FusionModule2000 S Smart Modular Data Center User Manual 3 Hardware Installation Issue 03 2021 07 15 Copyright Huawei Technologies Co Ltd 94 ...

Страница 104: ... 1 2 3 4 5 6 Cold aisle Cold aisle 1 temp humid 11 ON ON OFF ON OFF OFF Cold aisle 2 temp humid 12 OFF OFF ON ON OFF OFF Cold aisle 3 temp humid 13 ON OFF ON ON OFF OFF Cold aisle 4 temp humid 14 OFF ON ON ON OFF OFF Cold aisle 5 temp humid 15 ON ON ON ON OFF OFF FusionModule2000 S Smart Modular Data Center User Manual 3 Hardware Installation Issue 03 2021 07 15 Copyright Huawei Technologies Co Lt...

Страница 105: ...ne end of the cable to the smoke detector and the other end to the AI DI_1 port on the ECC800 Pro End 3 10 15 Routing a Cable to a WLDS900 Water Sensor If the water sensor is required perform the following steps to install it Context The water sensor is composed of the water detection cable BOM number 33010445 water detector BOM number 33010352 and conversion cable packed with the water detector T...

Страница 106: ...Figure 3 114 Detector position 1 Water detector FusionModule2000 S Smart Modular Data Center User Manual 3 Hardware Installation Issue 03 2021 07 15 Copyright Huawei Technologies Co Ltd 97 ...

Страница 107: ...ater detection cable Figure 3 116 Laying out the water detection cable NOTE The following figure shows how to lay out the water detection cable in the five cabinet scenario where the pipe is routed from the bottom In the scenario where pipe is routed from the top the water detection cable is bound to the pipe FusionModule2000 S Smart Modular Data Center User Manual 3 Hardware Installation Issue 03...

Страница 108: ...m Take protective measures when routing a water detection cable Procedure Step 1 Install the water detector 1 Remove the cover from the water detector as shown in Figure 3 117 FusionModule2000 S Smart Modular Data Center User Manual 3 Hardware Installation Issue 03 2021 07 15 Copyright Huawei Technologies Co Ltd 99 ...

Страница 109: ...n in Figure 3 118 Figure 3 118 Installing the water detector bottom plate 3 Reinstall the water detector cover by referring to Step 1 Step 2 Connect the water detection cable to the conversion cable as shown in Figure 3 119 FusionModule2000 S Smart Modular Data Center User Manual 3 Hardware Installation Issue 03 2021 07 15 Copyright Huawei Technologies Co Ltd 100 ...

Страница 110: ...ction cable Ensure that the water detection cable placed on the fasteners is in good contact with the floor Step 5 Tear off the protection paper on the rear of the fasteners and then securely attach the fasteners to the floor If the fasteners cannot be securely attached to the floor go to Step 6 If the fasteners are securely attached to the floor go to Step 7 Step 6 Drill holes in the floor with t...

Страница 111: ... floor as shown in Figure 3 122 Figure 3 122 Securing a water detection cable NOTE If multiple water detection cables need to be connected in series connect the male connector of one cable to the female connector of another cable End FusionModule2000 S Smart Modular Data Center User Manual 3 Hardware Installation Issue 03 2021 07 15 Copyright Huawei Technologies Co Ltd 102 ...

Страница 112: ...e a label shall not be attached to the bending part of a cable or attached in some positions that may affect cable installation If a label conflicts with a cable tie attach the label to the outer side of the cable tie Attach labels to both ends of a cable Requirements for Neatly Routing and Binding Cables To route and bind cables in an appealing way follow these rules 1 Neatly organize exterior ca...

Страница 113: ... maintenance 4 Route several flat cables along the same path and then overlap them as one 5 Arrange cables on distinct layers and prevent cable tangles that are avoidable when cables in different colors are bound together as shown in Figure 4 3 Also comply with these rules when cables of different thickness are bound together Arrange cables by thickness when arrangement by thickness conflicts with...

Страница 114: ... Cables 1 Unless otherwise specified in a design file ensure that the bend radius R of a cable meets the following requirements Common cable R 3d Optical cable R 40 mm NOTE R indicates the bend radius and d indicates the cable diameter 2 Reserve slack at cable connection positions to facilitate connection and disconnection and to prevent stress Do not leave the cables tight and prevent connector m...

Страница 115: ...and do not bind cables to an airflow path of fans 8 Prevent rotating components such as doors from squeezing or pulling cables Cable Binding Requirements Bind cables reliably along the route and ensure that the binding interval meets the requirements in Table 4 1 Table 4 1 Cable binding interval Cable Diameter mm Binding Interval mm 10 150 10 30 200 30 300 1 Bind cables with a moderate force and e...

Страница 116: ...stress as shown in Figure 4 7 Figure 4 7 Binding cables in a bending area 4 Ensure that the cable ties are wrapped and secured in the same direction and do not generate interference with subsequent operations as shown in Figure 4 8 FusionModule2000 S Smart Modular Data Center User Manual 4 System Cabling Issue 03 2021 07 15 Copyright Huawei Technologies Co Ltd 107 ...

Страница 117: ...s Procedure Step 1 Install an equipotential ground cable Figure 4 9 Installing an equipotential ground cable Step 2 Install AC input power cables FusionModule2000 S Smart Modular Data Center User Manual 4 System Cabling Issue 03 2021 07 15 Copyright Huawei Technologies Co Ltd 108 ...

Страница 118: ...lation seal it from the inside using sealing putty Step 4 Reinstall the cover of the general input unit Figure 4 11 Installing the cover of the general input unit Step 5 Install load cables 1 Remove the protective cover from the load wiring port 2 Remove the ring buckle 3 Press the front part of the round connector backwards and insert the connector into the load wiring port 4 Check the insertion ...

Страница 119: ...le terminal If not prefabricated the cables from the power distribution unit to the cabinet rPDU need to be prepared onsite For details see the appendix 7 3 Preparing Load Cables Table 4 2 Load cable silk screen Output Connector Single Phase Power Distribution Unit Three Phase Power Distribution Unit XT1 QF1 QF1 QF2 XT2 QF3 QF2 QF4 XT3 QF5 QF6 FusionModule2000 S Smart Modular Data Center User Manu...

Страница 120: ...g cable needs to be prepared onsite ensure that the wire with a red tube is inserted into the terminal pin marked in red and the wire with a black tube is inserted into the terminal pin marked in blue FusionModule2000 S Smart Modular Data Center User Manual 4 System Cabling Issue 03 2021 07 15 Copyright Huawei Technologies Co Ltd 111 ...

Страница 121: ... 13 General input unit cabling Figure 4 14 Power distribution unit cabling FusionModule2000 S Smart Modular Data Center User Manual 4 System Cabling Issue 03 2021 07 15 Copyright Huawei Technologies Co Ltd 112 ...

Страница 122: ...le to the Smart ETH Gateway Prerequisites The smart ETH gateway has been installed Context Figure 4 17 shows the external ports on a smart ETH gateway FusionModule2000 S Smart Modular Data Center User Manual 4 System Cabling Issue 03 2021 07 15 Copyright Huawei Technologies Co Ltd 113 ...

Страница 123: ...r 53 5VDC_OUT2 port on the ECC800 Pro using a power cable Step 3 Connect the FE_2 port on the smart ETH gateway to the LAN_2 POE port on the ECC800 Pro using a network cable End 4 4 Connecting Cabinet Electronic Clasp Lock Cables Prerequisites The cabinet electronic clasp locks have been installed NOTICE Only the electronic clasp locks of IT cabinets and smart cooling products need to be connected...

Страница 124: ...inet among even numbered cabinets and the other end to the COM3 port on the ECC800 Pro Figure 4 18 Installing cabinet electronic clasp lock cables End 4 5 Routing Power Cables for the PAD and WiFi Module Prerequisites The PAD and PAD power cable have been installed Context NOTE The PAD is installed at the end of a row When the PDF is deployed inside the row the PAD power cable needs to be connecte...

Страница 125: ...ctors connect the rPDU cables and lay out the cables on the cabinet top Preparations Tools Phillips screwdriver flat head screwdriver diagonal pliers protective gloves Material cable tie Procedure Step 1 Connect the rPDU cables NOTICE rPDU cable connections depend on the rPDU type and wiring port silk screen FusionModule2000 S Smart Modular Data Center User Manual 4 System Cabling Issue 03 2021 07...

Страница 126: ...ice to the rPDU loosen the locking device on the rPDU After connecting the power plug tighten the locking device 4 8 Optional Cabling Routes for a Smart Cooling Product PDB NOTE In the precision PDF or NMW scenario use a smart cooling product PDB to supply power to the smart cooling product Cables are routed in from the top and routed out from the top or bottom of the smart cooling product PDB Fus...

Страница 127: ...r a smart cooling product PDB NOTE The figure is for reference only The actual scenario may vary FusionModule2000 S Smart Modular Data Center User Manual 4 System Cabling Issue 03 2021 07 15 Copyright Huawei Technologies Co Ltd 118 ...

Страница 128: ...AUTION Perform system commissioning and power on strictly according to the system manual and ATS instructions For any changes in operations and parameters consult Huawei engineers Otherwise system commissioning or power on may fail or even the cabinet is damaged Procedure Step 1 Switch on all SPD circuit breakers in the integrated UPS Step 2 Switch on the upstream power input circuit breaker for t...

Страница 129: ...menu screen is displayed On the main menu screen select system configuration and press The following table lists the system configuration attributes and values Table 5 1 System configuration attributes and values Item Value Description Rated operating voltage 110 V 57 V 115 V 66 V 120 V 70 V 208 V 120 V 220 V 127 V 230 V 132 V 240 V 138 V 227 V 160 V 347 V 200 V 380 V 220 V 400 V 230 V 415 V 240 V...

Страница 130: ...ription Voltage Thresholds Volt Threshold Min LN1 30 to 5 The step increase is 1 The default settings are 10 for LN1 and LN2 Volt Threshold Min LN2 30 to 5 Volt Threshold Max LN1 5 to 30 The step increase is 1 The default settings are 10 for LN1 and LN2 Volt Threshold Max LN2 5 to 30 Frequency Thresholds Freq Threshold Min LN1 10 to 1 The step increase is 1 The default settings are 5 for LN1 and L...

Страница 131: ...case of ATS input Turn on the MCCB Step 2 Turn on the UPS input circuit breaker QF1 The UPS is powered by the mains and initialization begins The LCD displays the Huawei logo and an initialization progress bar End 5 2 1 3 Initial Startup NOTICE If the UPS is powered on for the first time you need to obtain the startup password from the Service Expert app Skip this step if the UPS is not powered on...

Страница 132: ... on the Offline Activation screen Tap Generate PWD to generate a startup password c Enter the generated password in the password text box on the LCD to start the inverter End 5 2 1 3 2 Settings Wizard Procedure Step 1 Set the language time network parameters system parameters and battery parameters on the Settings Wizard screen NOTICE Set system parameters with caution because the settings determi...

Страница 133: ...ery alarms which do not need to be handled If there is any other alarm you need to rectify the fault NOTE After you set parameters on the Settings Wizard screen choose System Info Settings System Setting Check that System Capacity Power module capacity Requisite modules and Redundant modules match the actual values If dry contact signals are connected to the system choose System Info Settings Dry ...

Страница 134: ...reen select a user name and enter the password Step 3 In the displayed dialog box tap Yes to start the inverter End 5 2 1 5 Powering On Loads Context After the inverter starts the UPS transfers to inverter mode and the Bypass mode alarm on the LCD disappears Procedure Step 1 After confirming that the battery strings are properly connected turn on the battery string input switch If there are multip...

Страница 135: ...e corresponding Branch Disconnected alarm on the MDU screen disappears You can mask the Branch Disconnected alarm generated by a reserved circuit breaker on the UPS by choosing System Info Settings PDU Parameters Branch Abnormal Alarm Enable Step 6 If a dual bus system is used set BSC mode End 5 2 1 6 Optional Setting BSC Mode NOTE The default value of BSC mode is Non BSC Set it to Standard BSC mo...

Страница 136: ...stem Step 3 Set the slave BSC system On the LCD of the other UPS choose System Info Settings System Settings and set BSC master slave system to BSC slave system Figure 5 4 BSC slave system Step 4 If no alarm is generated after settings the UPS runs properly End FusionModule2000 S Smart Modular Data Center User Manual 5 Power On Commissioning Issue 03 2021 07 15 Copyright Huawei Technologies Co Ltd...

Страница 137: ...vals and the red indicator is steady on The SmartLi circuit breaker can be switched on but the UPS cannot be cold started The green indicator blinks at 1 Hz or is steady on blinking at long intervals The UPS can be cold started Procedure Step 1 On the UPS LCD screen set System Info Settings Battery Settings Battery Type to Lithium battery NOTICE The UPS software needs to be upgraded to the version...

Страница 138: ... indicator is steady on If multiple SmartLi cabinets are combined press and hold the POWER ON OFF button on the BCU of the master cabinet for more than 2s to power on the master cabinet Then power on slave cabinets one by one in the same way Step 3 Set the language time date network parameters and system parameters on the Settings Wizard screen of the SmartLi Figure 5 5 Settings Wizard FusionModul...

Страница 139: ...high temperature Mode 1 Mode 1 Mode 2 Cell undervoltage protection threshold You can adjust the EOD threshold as required 2 5 2 5 2 9 Battery undervoltage protection time h Maximum battery discharge time 48 24 3000 Table 5 6 Alarm Settings Item Description Default Value Value Range Battery cabinet EPO Emergency power off EPO is performed only when this parameter is set to Enable and the EPO switch...

Страница 140: ...s parameter is set to Enable an alarm is reported when battery overtemperature occurs Disable Disable Enable Step 4 After the green indicator of the BCU blinks at super short intervals switch on the battery circuit breaker on the SmartLi Step 5 When multiple SmartLi cabinets are combined 1 If the green indicator of one BCU blinks at super short intervals switch on the battery circuit breaker on an...

Страница 141: ...rio the frequency should be in the range of 47 53 Hz In the 60 Hz scenario the frequency should be in the range of 57 63 Hz Step 4 Switch on the upstream input circuit breaker UPS output circuit breaker outside the smart module for the integrated PDF to power on the IT equipment route for the integrated PDF NOTE If the IT power indicator on the front panel of the integrated PDF lights up the IT eq...

Страница 142: ...m which is a normal phenomenon Step 9 Switch on the output circuit breakers for smart cooling products in the integrated PDF to power on the smart cooling products Step 10 Optional Switch on the lighting output circuit breaker in the integrated PDF and check whether the PWR indicator on the fusion module actuator lights up Press the lighting button to power on the lights Step 11 Switch on the IT i...

Страница 143: ...er Procedure Step 1 Power on the PDB 1 Switch on the SPD circuit breaker in the PDB 2 Turn on the upstream power input switch to power on the PDB 3 Check that the voltage and frequency are within the normal ranges NOTE Measure the line voltage at the customer input side using a multimeter The line voltage should be in the range of 342 456 V Measure the frequency at the customer input side using a ...

Страница 144: ... until the MDU screen starts Then log in to the system NOTICE Check that the MDU screen displays information properly and communicates properly After the first login change the password in time to improve account security and prevent unauthorized network attacks such as data tampering Huawei will not be liable for any security issues caused by your failure to change the preset password in time or ...

Страница 145: ...n output circuit breaker check whether the mapping between the circuit breaker and the downstream device is consistent with that in the design drawing Do not switch on the reserved circuit breakers When switching on the circuit breakers observe whether there is any abnormal phenomenon such as sparks or unsmooth switching Step 8 After switching on an IT output circuit breaker check whether the corr...

Страница 146: ...g a multimeter The line voltage should be in the range of 342 456 V Measure the frequency at the customer input side using a multimeter In the 50 Hz scenario the frequency should be in the range of 47 53 Hz In the 60 Hz scenario the frequency should be in the range of 57 63 Hz 2 Switch on the input circuit breaker of the NMW Step 5 Switch on the network cabinet output circuit breaker in the power ...

Страница 147: ...Characters in Device Barcodea PDU2000 32 1PH 20 4 M1 CLEVER Clever PDU2000 M C FT PDU2000 32 1PH 20 4 M1 HPX HPXIN PDU2000 M H 6B MD 1324 2004 Clever rPDU MPDU FT PN1 32I10 20E4G AV4 HPXIN rPDU PN 6B ZFIF 112 0800 Clever rPDU FT PN1 16X18 8E AH4W HPXIN 6B ZZIF 130 2004 Clever FT PN1 32I15 20E4G AV4W HPXIN 6B a The barcode starts with 21 and is attached to the device The PDU2000 M C and PDU2000 M H...

Страница 148: ...rameter settings take effect only if you press MENU and then the PDU2000 M C buzzes and restarts If you do not press MENU the PDU2000 M C buzzes and restarts automatically after 30s and the settings are not saved Set the PDU2000 M H monitoring parameters NOTE The display of a single phase module is used as an example After the PDU2000 M H is powered on press MENU The LCM displays Press MENU again ...

Страница 149: ... M H from the drop down list box based on the actual device Connect To Select ECC800 from the drop down list box Communicati ons Port Select COM1 from the drop down list box NOTE The setting example indicates that the PDU2000 is connected to the COM1 port on the ECC800 Pro If the PDU2000 is connected to another port enter the number of the connected port Device Address Enter the actual device addr...

Страница 150: ... Pro Port Default IP Address WAN1 192 168 8 10 WAN2 192 168 0 10 LAN1 and LAN2 192 168 248 10 NOTICE In ECC800 V100R002C10 and earlier versions the default IP address for the WAN1 port is 192 168 1 10 The WAN1 port IP address cannot be set to an IP address in any of the following network segments 192 168 0 x 192 168 245 x 192 168 246 x and 192 168 248 x IP addresses for the WAN1 and WAN2 ports sho...

Страница 151: ...CC800 Pro 1 Open Internet Explorer and choose Tools Internet Options 2 Click the Advanced tab and select Use TLS1 1 and Use TLS1 2 3 Optional Click the Connections tab and select LAN settings 4 Optional Under Proxy server deselect Use a proxy server for your LAN 5 Click OK Figure 5 9 Setting Internet options Step 4 Set Internet Explorer parameters 1 When you use Internet Explorer for access set In...

Страница 152: ... is as follows 1 Open Internet Explorer and choose Tools Internet Options General 2 Select Delete browsing history on exit and click Delete 3 In the Delete Browsing History dialog box select all options except Password and click Delete Step 5 Log in to the ECC800 Pro WebUI 1 Enter https monitoring IP address such as https 192 168 8 10 in the address box of the browser and then press Enter to acces...

Страница 153: ...assword retrieval mode is configured under user management the password can be retrieved You will be logged out after being inactive for 10 minutes A maximum of three users can log in to the ECC800 Pro WebUI at the same time End 5 3 2 Preparations and App Login Prerequisites App operating environment requirements The mobile device runs Android 4 0 or later and the operating system is not rooted Th...

Страница 154: ...Log in to Huawei AppGallery https appgallery huawei co m search for FusionModule and tap Install 2 In the displayed Tip dialog box tap Install AppGallery 3 The Huawei AppGallery installation file is displayed on the screen Download and install the Huawei AppGallery as prompted 4 On the Huawei AppGallery client search for FusionModule and tap Install Check that the app icon exists on the PAD deskto...

Страница 155: ... and click Submit 4 If this is the first time you enable the WiFi function set WiFi Password and click OK 5 Enter the password currently used for logging in to the WebUI and click Submit 6 Specify WiFi SSID and WiFi Password and click Submit to change the SSID and password NOTE If you have set a password when enabling WiFi for the first time you do not need to set the password again The WiFi funct...

Страница 156: ...up password on the WebUI 1 Log in to the ECC800 Pro WebUI as an administrator 2 Record the values of Barcode and Verify Code in the displayed Startup Password dialog box 3 Within 24 hours inform Huawei technical support of Barcode and Verify Code to obtain the password After obtaining the password enter the password in the Password text box and click Submit to complete the authentication of the st...

Страница 157: ...UI there is no preset password After WiFi is enabled by pressing the button the PAD prompts the customer to change the default password when logging in to the app After you disable the WiFi hotspot function on the WebUI and press the button again the WiFi function is still enabled In this case the WiFi password is the one you changed last time The WiFi function is disabled by default If you need t...

Страница 158: ... iDCService app supports only the Android system The iDCService app is available only in Chinese End 5 3 4 Facial Recognition 5 3 4 1 Recording Facial Data Prerequisites The FusionModule app has been installed on the PAD Procedure 1 Log in to the FusionModule app on the PAD as an administrator 2 On the main screen of the app tap On the displayed Edit screen select Face Account Management After rea...

Страница 159: ...ntaining the Facial Data Prerequisites The facial data has been recorded Procedure Step 1 Connect the PAD to the WiFi network of the ECC800 Pro in the room Step 2 Log in to the FusionModule app on the PAD as an administrator Step 3 On the app home screen tap On the displayed Settings screen select Face Account Management FusionModule2000 S Smart Modular Data Center User Manual 5 Power On Commissio...

Страница 160: ...or the first time or the system type is switched Step 2 Choose Maintenance Configuration Wizard to access the parameter configuring page for the deployment wizard Step 3 Configure related parameters on the page as instructed For details see the function description on the left of the page NOTE In the process click Previous Next and Skip as required To exit before the configuration is complete clic...

Страница 161: ... related outbox parameters 1 Set related parameters in the Outbox Settings area on the Mailbox Settings page If the address type of the outbox is Domain name choose System Settings System Parameters and set related parameters in the DNS Server Address area on the Monitor IP page NOTE The DNS server address is provided by the local network operator 2 Click Test to check the email sending If an emai...

Страница 162: ...the position of the blinking cursor and press Enter to obtain email server IP addresses Non encryption 25 The email server must comply with the standard SMTP protocol to ensure that the email sending and receiving functions are normal Enter the email client authorizatio n password at Password for 163 Mail 126 Mail and QQ Mail 163 Mail smtp 163 com Non encryption 25 SSL encryption 465 126 Mail smtp...

Страница 163: ...ddress is encrypted during transmission in the ECC800 Pro to ensure that the personal data of users is fully protected Figure 5 15 Adding an email address to receive emails NOTE Click Test to check whether the added mailbox is available If it is available Successfully to send the test email is displayed If it is unavailable Failed to send the test email is displayed Check whether the receiver s ma...

Страница 164: ...bile phone number is available If it is available Successfully to send the test short message is displayed If it is unavailable Failed to send the test short message is displayed Check whether the mobile phone number is correctly set Step 5 Set the alarm notification delay parameter and the new alarm notification parameter Figure 5 17 Setting the alarm notification parameters FusionModule2000 S Sm...

Страница 165: ...ted in the following table If an error code is not listed in the following table provide the ECC run log and contact Huawei technical support Table 5 19 Mailbox error codes Type Error Code Suggestion Failed to resolve the domain name 2 1 Check whether the IP address of the DNS server is correct 2 Check whether the domain name of the email server is correctly configured 3 Check whether the network ...

Страница 166: ... between the ECC and the email server to ensure that the ECC communicates with the email server properly 110 1 Verify that the communication link between the ECC and the email server is normal 2 Check whether the service port of the email server is enabled 111 Check whether the email server is running properly and whether the service port is started properly 112 Check whether the email server is r...

Страница 167: ...he spam setting rule 2 Provide ECC run logs and contact the service center 550 1 Log in to the email server or contact the third party email server personnel to add the IP address to the whitelist 2 Provide ECC run logs and contact the service center 421 Reduce the email sending speed or contact the third party email server personnel to increase the email server configuration limit 450 Contact the...

Страница 168: ... and click Submit End 5 3 8 Creating a Smart Module Plan View Procedure Step 1 Choose Home Plan View click Create smart module set Layout to Single row dual aisle and set Half size cabinet qty row and Room monitoring based on the actual smart module scenario Figure 5 19 Creating a smart module Step 2 Click Modify Device Drag the icons of registered devices and devices on the cabinet list to approp...

Страница 169: ...nd power distribution units otherwise a false alarm may be generated Procedure Step 1 Set parameters for general input units on the ECC800 Pro WebUI 1 Set parameters for general input unit 1 Table 5 20 Power distribution settings for a general input unit Path Parameter Name Default Value Setting Monitoring Power Distribution General Input Unit Running Parameters Power Distribution Settings Rated s...

Страница 170: ... an alarm is generated 2 Set the parameters for other general input units in the same way or by synchronizing parameters Path Maintenance Parameter Sync Step 2 Set parameters for power distribution units on the ECC800 Pro WebUI 1 Optional To modify the branch signal name of the power distribution unit choose System Settings Signal Name Modify and access the Batch Signal Configuration to modify the...

Страница 171: ...ed When the parameter is set to Enable for a branch all alarms of the branch will be reported Upper load current threshold 80 When the load current exceeds the preset value an alarm is generated Lower load current threshold 60 When the load current exceeds the preset value an alarm is generated 4 Set the parameters for other power distribution units in the same way or by synchronizing parameters P...

Страница 172: ...od Normal Connection Status Alarm Clearance Method Simulate a smoky environment under the smoke detector Smoke DI alarm is displayed on the active alarm page of the app or WebUI Disconnect the smoke detector cable and reconnect it to clear the alarm End 5 3 10 2 Commissioning a WLD900 Water Sensor If a water sensor is installed perform the following steps to configure it Prerequisites One end of t...

Страница 173: ...rs Ensure that I power supply enable AIDI_2 COM1 AIDI_4 COM3 is Enable Step 2 Check the function of the water sensor Table 5 23 Check Method Normal Connection Status Alarm Clearance Method Immerse the water detection cable in water Leak DI alarm is displayed on the active alarm page of the app or WebUI Wipe dry the water detection cable The alarm disappears automatically End 5 3 10 3 Commissioning...

Страница 174: ...Add a T H sensor 1 Log in to the ECC800 Pro WebUI as an administrator a Log in to the ECC800 Pro WebUI as an administrator b Choose System Settings Signal Name Modify The Batch Signal Configuration page is displayed c Set Device type to ECC800 set Device name to ECC800 and click OK d On the query result tab page set the new signal name of COM3 to T H Sensor and click Submit e Choose Monitoring Sys...

Страница 175: ...devices are displayed in the Number of connected devices list If the connection is abnormal check whether the device is properly connected to the ECC800 Pro whether the device and the ECC800 Pro are running properly and whether the parameter settings are consistent with the device parameters Step 3 Check the T H sensor functions Table 5 26 Function commissioning Check Method Normal Connection Stat...

Страница 176: ...and smart cooling products This does not apply to PDFs and battery cabinets The cabinet electronic clasp locks of odd and even numbered cabinets have been cascaded in hand in hand mode respectively One end of a network cable is connected to the RS485_IN port on the electronic clasp lock of the first cabinet among odd numbered cabinets and the other end of the cable is connected to the COM2 port on...

Страница 177: ...are connected in series The addresses start from 1 and a maximum of 12 cabinet electronic clasp locks can be connected in series The cabinet electronic clasp locks of even numbered cabinets are connected in series The addresses start from 1 and a maximum of 12 cabinet electronic clasp locks can be connected in series Set a device address for a cabinet electronic clasp lock by operating the DIP swi...

Страница 178: ...ng a cabinet electronic clasp lock Path Parameter Name Setting Choose System Settings Device Management and click Add Device The parameters for adding devices are displayed Device Attribute Cabinet electronic clasp lock Device Type Cabinet electronic clasp lock Connect To ECC800 Pro Communicat ions Port Odd numbered cabinets COM2 Even numbered cabinets COM3 Device Address Enter the actual device a...

Страница 179: ... lock 1 on the WebUI Change a cabinet electroni c clasp lock name Click the Running Parameters tab Change the cabinet electronic clasp lock name Remotely open a cabinet electroni c clasp lock Choose Monitoring Cabinet IT Cabinet101a Click the Controls tab Select Open front door or Open back door from the Cabinet door control drop down list box and click Submit to remotely open the door Open cabine...

Страница 180: ...osition 2 Check whether there is interference between the lock tongue and the cabinet post If they interfere with each other adjust the installation position of the lock tongue Figure 5 24 Adjusting the installation position 3 Check whether there is interference between the castors and the door sill at the bottom of the cabinet If they interfere with each other remove the fastener that secures the...

Страница 181: ...31 Commissioning documents Component Document C3220 Huawei C Series SDC 8 0 1 Product Documentation IVS1800 IVS1800 8 1 0 Product Documentation 5 3 12 2 Networking Scenarios Smart ETH Gateway Networking Scenario If there are multiple IVS1800s for multiple smart modules you are advised to evenly distribute the cameras to each IVS1800 The number of cameras and IVS1800s in a single smart module must ...

Страница 182: ...normal operating of the ECC800 Pro services you can view video from a maximum of two cameras concurrently LAN Switch Networking Scenario If there are multiple IVS1800s for multiple smart modules you are advised to evenly distribute the cameras to each IVS1800 Figure 5 27 Camera IVS1800 connecting to the LAN switch FusionModule2000 S Smart Modular Data Center User Manual 5 Power On Commissioning Is...

Страница 183: ...8 FireFox 35 51 Supports Windows 10 Internet Explorer 11 Chrome 38 FireFox 35 51 The Internet Explorer tab plugin needs to be installed for Google Chrome 45 and later versions Only 32 bit browsers are supported 2 Set the password as prompted upon the first login Then use the new password to log in NOTE To prevent security risks the system prompts you to set the password of the admin user when you ...

Страница 184: ... Internet Zone dialog box is displayed 5 Set Automatic prompting for ActiveX controls to Enable and set Download unsigned ActiveX controls and Initialize and script ActiveX controls not marked as safe for scripting to Prompt 6 Click OK Enable TLS 1 1 or TLS 1 2 NOTE You must enable TLS 1 1 or TLS 1 2 when the HTTPS protocol is used to access the camera Otherwise the camera WebUI cannot be opened 1...

Страница 185: ...ble 6 Click OK Step 2 Commission cameras and set parameters for them For details see the delivered documents 1 Preview the site situation in real time and check the camera coverage through videos Adjust the lens if necessary 2 On the View tab page click the Network Time tab to access the Network Time tab page Figure 5 28 Setting the IP address FusionModule2000 S Smart Modular Data Center User Manu...

Страница 186: ...n IP address starting with a value that ranges from 1 to 223 IPv4 gateway Gateway IP address of the network where the camera is located The default value is 192 168 0 1 IPv4 subnet mask Subnet mask of the network where the camera is located The default value is 255 255 255 0 Primary DNS Primary DNS IP address The default value is 0 0 0 0 Secondary DNS Secondary DNS IP address The default value is ...

Страница 187: ...Figure 5 29 Setting primary stream parameters FusionModule2000 S Smart Modular Data Center User Manual 5 Power On Commissioning Issue 03 2021 07 15 Copyright Huawei Technologies Co Ltd 178 ...

Страница 188: ...Figure 5 30 Setting secondary stream 1 parameters FusionModule2000 S Smart Modular Data Center User Manual 5 Power On Commissioning Issue 03 2021 07 15 Copyright Huawei Technologies Co Ltd 179 ...

Страница 189: ...ding process of each slice is independent of each other Therefore the camera can encode and decode multiple slices in parallel improving encoding and decoding performance This parameter is selected by default Encoding protocol Set the coding protocol based on the site requirements The options are as follows H 264 The H 264 protocol requires relatively small bandwidth to ensure video quality MJPEG ...

Страница 190: ...ate The bit rate range depends on the selected resolution Bit rate value Average bit rate when Bit rate type is set to Constant bit rate The bit rate range depends on the selected resolution Bit rate control mode This parameter is available only when you set Bit rate type to Constant bit rate The options are as follows Frame rate priority Ensure the smoothness of the video image Image quality prio...

Страница 191: ...Configured Context If the IVS1800 is not configured and an SD card is chosen perform the following procedure Procedure Step 1 Log in to the Huawei camera WebUI 1 Configure the PC IP address and the camera IP address in the same network segment Enter the camera IP address 192 168 0 120 by default in the address bar of the Internet Explorer and press Enter 2 Enter the preset user name admin and the ...

Страница 192: ...ard after the Storage Management page is displayed 4 Set the camera stream type and primary stream parameters Path Settings Video Audio Image Video Settings Figure 5 32 Setting audio and video parameters FusionModule2000 S Smart Modular Data Center User Manual 5 Power On Commissioning Issue 03 2021 07 15 Copyright Huawei Technologies Co Ltd 183 ...

Страница 193: ...Mbit s 66 H 265 720P 25 50 0 8 Mbit s 75 H 264 720P 25 50 1 Mbit s 66 H 265 720P 25 50 0 6 Mbit s 105 H 264 720P 25 50 0 8 Mbit s 75 5 Choose Settings Intelligent Analysis Common Intelligence Select Enable click Add add motion detection areas set motion detection parameters and click Save 6 Set the deployment policy Figure 5 33 Setting the deployment policy 7 Set the alarm linkage policy FusionMod...

Страница 194: ... Context Before commissioning the C3220 camera set the IP address for the C3220 camera based on customer requirements Configure the internal IP addresses of the camera and IVS1800 and the IP address of the LAN port on the ECC800 Pro in the same network segment Configure the external IP addresses of the camera and IVS1800 and the IP address of the WAN1 port on the ECC800 Pro in the same network Set...

Страница 195: ... 2 Use a network cable to connect the PC to the PoE port on the smart ETH gateway Then set the local IP address of the PC to 192 168 0 11 3 Remove the camera shell and press the reset button for 6s to 10s to restart the camera Figure 5 35 Reset button 1 Reset button 4 Open a web browser enter https 192 168 0 120 in the address box and press Enter Enter the default user name admin and preset passwo...

Страница 196: ... Internet Zone dialog box is displayed 5 Set Automatic prompting for ActiveX controls to Enable and set Download unsigned ActiveX controls and Initialize and script ActiveX controls not marked as safe for scripting to Prompt 6 Click OK Enable TLS 1 1 or TLS 1 2 NOTE You must enable TLS 1 1 or TLS 1 2 when the HTTPS protocol is used to access the camera Otherwise the camera WebUI cannot be opened 1...

Страница 197: ...k Time Second Protocol Parameters and select Enable ONVIF Figure 5 36 ONVIF parameters 6 Remove the network cable from the PC to the PoE port on the ETH gateway 7 Connect the PC to the LAN1 port on the ECC800 Pro using a network cable and reconnect the network cable between the smart ETH gateway and the LAN2 port on the ECC800 Pro Step 2 Set the IP address for the C3220 camera FusionModule2000 S S...

Страница 198: ...d click Log In Figure 5 37 Clicking the camera access link 5 Choose Settings Network TCP IP set Way to obtain IPv4 to Use the following IP address and set an IP address to the planned IP address for the camera The IP address should be in the range of 192 168 248 50 to 192 168 248 199 Step 3 On the ECC800 Pro WebUI click Add under Video Information In the displayed New Video Information dialog box ...

Страница 199: ... the IP camera ONVIF interface Step 4 After entering the video information click Confirm Step 5 In the Video Information list click the link under the Link column and go to the camera WebUI as prompted Step 6 For details about how to commission the camera and set parameters see the documents delivered with the device or the documents obtained by referring to the section Preparing Documentation 1 P...

Страница 200: ...d secondary stream 1 parameters as shown in the following figures NOTICE Set the encoding protocol to H 265 Figure 5 41 Setting primary stream parameters FusionModule2000 S Smart Modular Data Center User Manual 5 Power On Commissioning Issue 03 2021 07 15 Copyright Huawei Technologies Co Ltd 191 ...

Страница 201: ... to the Huawei camera WebUI Step 2 Format the SD card 1 Choose Settings System Configuration Storage Management 2 Format the SD card after the Storage Management page is displayed Step 3 Set the camera stream type and primary stream parameters Path Settings Video Audio Image Video Settings FusionModule2000 S Smart Modular Data Center User Manual 5 Power On Commissioning Issue 03 2021 07 15 Copyrig...

Страница 202: ... Storage Duration h H 265 1080P 25 50 1 Mbit s 66 H 264 1080P 25 50 1 Mbit s 66 H 265 720P 25 50 0 8 Mbit s 75 H 264 720P 25 50 1 Mbit s 66 H 265 720P 25 50 0 6 Mbit s 105 H 264 720P 25 50 0 8 Mbit s 75 Step 4 Choose Settings Intelligent Analysis Common Intelligence Select Enable click Add add motion detection areas set motion detection parameters and click Save FusionModule2000 S Smart Modular Da...

Страница 203: ...n Procedure Step 1 Check whether the network connection between the PC for logging in to the OMU portal and the IVS1800 is normal If the device is just delivered or has just been restored to factory settings ensure that the PC for logging in to the OMU portal is directly connected to the IVS1800 and is in the same network segment as the IVS1800 For the device that is just delivered or has just bee...

Страница 204: ...word for user admin of the operating system 3 Set the password for user root of the operating system 4 Use the configured service system password to log in to the OMU portal again Step 4 Configure disk initialization NOTE Recording data can be stored only after you install and initialize the disks 1 Choose Local Configuration Local Disk 2 In the upper right corner of the RAID Groups area click Ini...

Страница 205: ...han or equal to 7 the system automatically uses the three hard disks with the smallest slot numbers to form a RAID 1 group in which one hard disk functions as the hot spare disk Every four of the remaining hard disks form a RAID 10 group If the number of remaining hard disks is less than 4 the disks do not form a RAID 10 group Step 5 Modify the IP address for the IVS1800 1 Choose Local Configurati...

Страница 206: ...800 1 Configure the MU 1 Choose Maintenance Unified Configuration set Module Name to MU and click Search 2 Click Edit in the record where the value of Parameter Name is MUNNatIP set the external IP address of the IVS1800 and click Save Figure 5 48 Setting the external IP address of the MU 3 Click Edit in the row where the value of Parameter Name is NatRtspServerPort and set the NAT port number of ...

Страница 207: ...in the row where the value of Parameter Name is SDKNatPort and set Value to the NAT mapped port number configured on the firewall Click Save 4 Set other parameters based on the site requirements by referring to the preceding steps Table 5 40 Parameter description Module Name Parameter Name Setting IMGU IMGUNNatIP Northbound IP address of the IVS1800 which must be the same as the NAT mapped IP addr...

Страница 208: ... NTP clock source server Indicates whether the NTP clock source server is specified for time synchronization Select Yes if an NTP server is configured onsite Select No If no NTP server is configured onsite NTP server IP Indicates the IP address of the NTP clock source server After this parameter is specified the server synchronizes the time to this clock source If an NTP server is configured onsit...

Страница 209: ...need to log in as a non admin user 1 Log in to the OMU portal as user admin 2 Choose User Management Add User NOTE When creating a user you can select Enable account validity period and set Valid from and Valid to to set the account validity period for the created user 3 Set Multi point logins to a value greater than 2 4 On the User List page click Permission Settings next to the new user select t...

Страница 210: ...Tools iClient select the version and patch number that are the same as the current system version and download the software package based on the site requirements Figure 5 51 iClient software package search result 2 Decompress the software package double click the installation program and complete the installation as prompted 3 Right click the client program and choose Run as administrator from th...

Страница 211: ...f you log in for the first time you need to add an IVS1800 device by selecting Manual Access by IP Segment Figure 5 53 Micro edge access FusionModule2000 S Smart Modular Data Center User Manual 5 Power On Commissioning Issue 03 2021 07 15 Copyright Huawei Technologies Co Ltd 202 ...

Страница 212: ...devices can be online at the same time After logging in to the client you may need to add more IVS1800 devices You can choose System Management Devices to add edit or delete a device Step 3 Add cameras For details see the documentation delivered with the device or obtain the documentation by referring to the Reference Documentation section View the corresponding section 1 Choose System Management ...

Страница 213: ... the camera list Then verify accounts The default password of the HWSDK protocol is HuaWei123 Figure 5 56 Verifying accounts 6 Select the cameras to be added and click Next 7 Click Finish 8 Preview the live video Choose System Management Devices Device Management Micro Edge on the iClient home page Drag an added camera to the live video pane If the live video can be properly played the camera is s...

Страница 214: ...a storage policy Figure 5 58 Configuring a storage policy Step 5 Configure a server video recording plan 1 Choose System Management Devices Device Management Micro Edge on the iClient home page 2 Right click a device and choose Storage Management 3 Click Server Recording Plan and configure a server recording plan FusionModule2000 S Smart Modular Data Center User Manual 5 Power On Commissioning Iss...

Страница 215: ...tep 1 Choose Home Plan View click Create smart module and set Layout Half size cabinet qty row and Room monitoring based on the actual smart module scenario NOTE Cold and hot aisle containment scenario Set the Layout to Single row dual aisle and the Aisle containment type to Cold Hot aisle containment scenario Set the Layout to Single row narrow aisle 2 and the Aisle containment type to Hot The co...

Страница 216: ...ate positions in the layout to create a smart module plan view Step 3 Go to the ECC running parameter page click Unhide All Advanced Signals and select Other Parameters Set High density island solution to Yes and click Submit FusionModule2000 S Smart Modular Data Center User Manual 5 Power On Commissioning Issue 03 2021 07 15 Copyright Huawei Technologies Co Ltd 207 ...

Страница 217: ...etting linkage control in the high density island scenario End 5 3 14 Optional NetEco Management 5 3 14 1 Connecting a Communications Cable Networking Through the WAN1 Port Step 1 Connect the communications cable to the WAN1 port on the ECC800 Pro Figure 5 64 Connecting a communications cable End FusionModule2000 S Smart Modular Data Center User Manual 5 Power On Commissioning Issue 03 2021 07 15 ...

Страница 218: ...E The monthly traffic of the SIM card is not less than the total traffic of all networked devices It is recommended that the monthly traffic of the SIM card be greater than or equal to the total number of networked devices multiplied by 20 MB Figure 5 66 Installing a SIM card Step 4 Insert the ECC800 Pro main control module into the slot Step 5 Tighten the screws on both sides of the panel of the ...

Страница 219: ...g System Settings System Paramete rs Monitor IP WAN_1 IP 192 168 8 10 Set this parameter based on the IP address assigned by the network administrator Subnet mask 255 255 25 5 0 Set this parameter based on the subnet mask assigned by the network administrator Default gateway 192 168 8 1 Set this parameter based on the default gateway address assigned by the network administrator 4G networking Set ...

Страница 220: ...must be configured in the same network to ensure normal connection between the NetEco and the ECC800 Pro Port number 31220 31220 Network port for link setup WAN_1 WAN_1 Table 5 45 Setting an authentication password Path Parameter Default Value Setting System Settings NMS Application NetEco Set Authenticati on Password Authenticatio n password Modifyme _123 Set this parameter based on customer requ...

Страница 221: ...tware by referring to the guide 5 3 14 4 Powering On a Server This topic describes how to power on a server Procedure Step 1 Check that the power cables and ground cables of the upstream components of the server are securely connected with correct polarity and in good contact Step 2 Ensure that the upstream input power supply is not connected Use a multimeter to measure the resistance between the ...

Страница 222: ...UI viewing effect you are advised to use Internet Explorer 11 and set the resolution of the PC to 1366 768 or higher The IP address of the NetEco server has been obtained The PC communicates with the NetEco server properly Context The idle timeout period of the PowerEcho system is 30 minutes by default Set the idle timeout period of the PowerEcho system as required If users do not perform any oper...

Страница 223: ...ord for three consecutive times you must enter the verification code upon the fourth login After you enter the incorrect password for five consecutive times the IP address will be locked for 10 minutes End 5 3 14 6 NetEco Menu Settings Prerequisites You have logged in to the PowerEcho client using a browser Procedure Step 1 Choose NetEco Maintenance from the main menu Then choose NetEco Menu Setti...

Страница 224: ...ed by your failure to change the preset password in time or password loss after changing If the number of online users reaches the maximum number supported by the system a message is displayed indicating that you cannot log in In this case contact the system administrator After you enter the incorrect password for three consecutive times you must enter the verification code upon the fourth login A...

Страница 225: ...section describes how to create a management domain Prerequisites The management domain adapter has been preconfigured or installed Context The management domains include Park Building Room ContainerDC Subnet NetecoSite FusionModule500 Modular Room ShapeNode and Building ShapeNode You are advised to plan the subordinate relationship between management domains and devices before performing operatio...

Страница 226: ...nt domain Step 6 Click on the toolbar to save the settings Step 7 Repeat steps Step 3 to Step 6 until the configuration is complete End 5 3 14 10 2 Example Adding a Smart Module This section describes how to create a module in the root node subnet equipment room container or site management domain Prerequisites You have created management domains in Planning Configuration Procedure Step 1 Log in t...

Страница 227: ...etain the default values Step 7 Click on the toolbar to save the settings End Follow up Procedure Perform the following operations on the Planning Configuration page as required FusionModule2000 S Smart Modular Data Center User Manual 5 Power On Commissioning Issue 03 2021 07 15 Copyright Huawei Technologies Co Ltd 218 ...

Страница 228: ...odules 3 Select the smart module to be deleted and click Delete 4 In the displayed Confirm dialog box click Yes Add tools 1 Select the module for which you want to add a pillar 2 In the lower left corner of the current page click Tool 3 Select the Pillar component to be added and drag it to the planning configuration area NOTE After the component is added you can set attributes for the component i...

Страница 229: ...e Management Configuration Planning Configuration 3 Choose the smart module where you want to create a device from the navigation tree on the left 4 Click in the upper left corner of the toolbar 5 Click Access in the Operation column The Device Integration dialog box is displayed 6 In the Device Integration dialog box add the ECC800 to the specified smart module Figure 5 72 Adding an ECC800 Pro de...

Страница 230: ... Type Device Name Management Domain Progress Status Start Time End Time and Detailed Information in the displayed window FusionModule2000 S Smart Modular Data Center User Manual 5 Power On Commissioning Issue 03 2021 07 15 Copyright Huawei Technologies Co Ltd 221 ...

Страница 231: ...ical Alarms No abnormal record is found for current and historical alarms See the ECC800 Pro documents Check the smart cooling product status On the ECC800 Pro WebUI choose Monitoring Cooling The smart cooling product is powered on The current temperature ranges from 18 C to 27 C and the humidity ranges from 20 to 80 See the smart cooling product documents FusionModule2000 S Smart Modular Data Cen...

Страница 232: ...ance Table 6 2 Monthly maintenance for the power supply and distribution system Maintenance Item Method Expected Result Troubleshooting UPS power grid environment Check the running status on the UPS LCD Input voltage 380 V AC 400 V AC 415 V AC line voltage Output voltage 380 V AC 400 V AC 415 V AC tolerance 1 line voltage If the input voltage is abnormal check the power grid and input cable connec...

Страница 233: ...l Check whether cables are damaged or loose Connection of input and output cables of the PDF or NMW Visual inspection The cables are not damaged The terminals are intact and secure and free from spark signs and rust Replace damaged cables Secure all output terminals Signs of rodent movements in the PDF or NMW Visual inspection There is no sign of rodent movements in the PDF or NMW If there is a si...

Страница 234: ... Clean up the oil stains Listen to the compressor operating sound The compressor does not generate abnormal sound during operation Replace the compressor Pipe connection Visual inspection The refrigerant pipe does not leak or corrode and is properly wrapped with thermal insulation foam Repair the leakage points and rewrap thermal insulation foam Visual inspection The refrigerant pipe support is se...

Страница 235: ...is off rectify any input power grid fault Ambient temperature detection The ambient temperature of the smart module should be lower than 45 C Find the cause of an abnormal temperature 6 1 3 Quarterly Maintenance Table 6 5 Quarterly maintenance for the power supply and distribution system Maintenance Item Method Expected Result Troubleshooting Operating temperature and humidity of the PDF On the EC...

Страница 236: ...common five ones If no monitoring system is available skip this item There are no abnormal records in alarms Rectify the fault or contact Huawei technical support Electric heater Start the equipment choose Maint Diagnostic Mode Enter on the main screen and start the electric heater NOTE To avoid burns do not touch the electric heater surface with bare skin The electric heater generates heat Replac...

Страница 237: ...m Maintenance Item Method Expected Result Troubleshooting Battery management parameter settings On the UPS LCD choose System Info Settings Battery Param and check whether battery management parameters are set as required The parameters are set based on requirements Set parameters correctly Fire control linkage function Simulate a smoky environment under the smoke detector If real smoke is not allo...

Страница 238: ...intervals check whether the communications cable is loose or disconnected If so reconnect the cable If the ALM indicator is steady on check and rectify alarms Indicator on the smoke detector Check whether the indicator on the detector is normal The indicator blinks once every 6 seconds The interval varies with detectors See the product instructions If the indicator blinks twice every 6 seconds or ...

Страница 239: ...ere oxidation remove the rust or replace the component in a timely manner If the component was painted before repaint it after removing the rust Table 6 9 Semiannual maintenance for the cooling system Maintenance Item Method Expected Result Troubleshooting T H sensor Use a precision T H sensor to calibrate the T H sensors inside and outside the cabinet The temperature deviation is less than 1 C an...

Страница 240: ...nd weld the leaking points again Contact Huawei technical support Cleanliness of the smart cooling product Visual inspection The white paper that you use to wipe the cabinet panel is clean If the white paper becomes dirty clean up the dust from the smart cooling product cabinet Outdoor fan Visual inspection The fan runs properly without abnormal noise or vibration and the blades rotate properly Ca...

Страница 241: ...ed If so reconnect the cable If not replace the smart ETH gateway Availability of the cabinet electronic lock Observe the cabinet electronic lock indicator and check the lock function by swiping a card After the card is swiped the green indicator is on and the door lock is open If the door is abnormal replace the access card If the door can be opened after the access card is replaced record the ac...

Страница 242: ...he possible causes are as follows The two PSUs for the LAN switch are installed but not powered on The power supply is disconnected Both the board power supply and PoE power supply are faulty Steady orange When the LAN switch is configured with one PSU the PoE power supply is abnormal If the LAN switch is configured with two PSUs the board power supply or PoE power supply is abnormal Take correcti...

Страница 243: ...eck whether the cable to the cabinet temperature sensor is properly connected Otherwise replace the cabinet temperature sensor Availability of the water sensor Drip water to the water detection cable using a cup and check active alarms on the WebUI A water alarm is generated on the WebUI If the water sensor is abnormal check whether the cable to the water sensor is properly connected If not replac...

Страница 244: ...reliability of each connection point from positive terminals to negative terminals All points should be connected reliably 2 Use a torque wrench to check the tightening torque for each battery screw The torque meets the requirements of the battery manufacturer After checking that the battery screws meet the requirements mark the screws for later check The battery string connection point is not loo...

Страница 245: ...te Dust on the batteries in the PDF and on the NMW Visual inspection There is no dust or foreign matter Clean the dust with soft cotton cloth Appearance of structures such as aisle end doors Visual inspection Structures such as aisle end doors are free from deformation corrosion and paint flake off Replace a component if its function is affected 6 2 Alarm Handling If an incident occurs and may jeo...

Страница 246: ... and Collecting Alarm Information Prerequisites An alarm is generated NOTE Alarm information helps to rapidly locate and rectify faults FusionModule2000 S Smart Modular Data Center User Manual 6 Operation and Maintenance Issue 03 2021 07 15 Copyright Huawei Technologies Co Ltd 237 ...

Страница 247: ...m Na me Alar m Gene ratio n Time Alarm Locatio n Descrip tion Alarm Type Curren t Operat ion Impact Measur es Taken and Effect 6 2 3 Determining the Faulty Area and Alarm Severity After receiving a fault alarm determine the alarm severity immediately If the alarm is critical perform emergency operations If not handle it as a common alarm NOTE Critical alarms include the following Alarms that cause...

Страница 248: ...NOTE Configuration information and fault logs may be required for handling some alarms For details see Fault Information Collection Guide Alarm Handling After locating the component or module for which the alarm is generated rectify the fault Figure 6 2 Troubleshooting flowchart FusionModule2000 S Smart Modular Data Center User Manual 6 Operation and Maintenance Issue 03 2021 07 15 Copyright Huawe...

Страница 249: ...lutions 6 3 Parts Replacement 6 3 1 ECC800 Pro Common Operations 6 3 1 1 Preparations and Login Prerequisites Supported operating system Windows 7 and later versions Recommended screen resolution 1366 x 768 or higher Browser Chrome Firefox Internet Explorer 11 or later Procedure Step 1 Connect the PC network port and the WAN1 port protected by a security mechanism on the ECC800 Pro using a network...

Страница 250: ...eway to 192 168 8 1 Step 3 Set LAN parameters NOTE If the ECC800 Pro connects to a LAN and a proxy server has been selected perform Step 3 3 and Step 3 4 If the ECC800 Pro connects to the Internet and the PC in a LAN accesses the Internet over a proxy server do not perform Step 3 3 and Step 3 4 Otherwise you will fail to access the ECC800 Pro 1 Open the Internet Explorer and choose Tools Internet ...

Страница 251: ...le download and set the security level of the trusted site to low Figure 6 4 Setting parameters FusionModule2000 S Smart Modular Data Center User Manual 6 Operation and Maintenance Issue 03 2021 07 15 Copyright Huawei Technologies Co Ltd 242 ...

Страница 252: ... preset password Changeme set the language and click Log In NOTE After the first login change the password in time to ensure account security and prevent unauthorized network attacks such as data tampering Huawei will not be liable for any security issues caused by your failure to change the preset password in time or password loss after changing You are advised to change the password periodically...

Страница 253: ...ndeformed ECC800 Pro main control module of the same model is available Procedure Step 1 Use the Back Up Current Settings function to record the ECC800 Pro configuration information or manually record the information Path Maintenance Configuration File Back Up Current Settings NOTE If the main control module is damaged login may fail and backup cannot be performed The following information cannot ...

Страница 254: ...rd Step 7 Install the spare ECC800 Pro main control module in the ECC800 Pro subrack and tighten the screws on both sides of the ECC800 Pro main control module Step 8 Connect the communications cables and antennas to the ECC800 Pro main control module Step 9 Choose Maintenance Configuration File and import the backup configuration file or set parameters for the devices that connect to the ECC800 P...

Страница 255: ...along guide rails and push the locking latch rightwards to secure the handle Figure 6 8 Replacing a PSU End 6 3 2 3 Replacing ECC800 Pro Antennas Prerequisites Tools ESD wrist strap ESD gloves Materials Spare ECC800 Pro antennas of the same model are available and functional Procedure Step 1 Remove the 4G antenna cables and RF_Z antenna cables connected to the ports on the ECC800 Pro as shown in F...

Страница 256: ... positions of the signal cables connected to the ECC800 Pro main control module panel and then disconnect the signal cables Step 2 Loosen the screws on both sides of the ECC800 Pro main control module Step 3 Pull the handles on both sides of the panel of the ECC800 Pro main control module and remove the module Figure 6 10 Removing an ECC800 Pro main control module Step 4 Remove the SIM card and Mi...

Страница 257: ...C800 Pro main control module panel based on the recorded information End 6 3 3 Replacing Parts for the Integrated UPS For details about replacing parts for the integrated UPS see the section Parts Replacement in the UPS user manual Table 6 14 Replaceable parts of the integrated UPS No Replaceable Part 1 Fuse 2 Indicator 3 Circuit breaker NOTE If you need to replace any other parts contact Huawei t...

Страница 258: ...lacement for the Precision PDF For details about parts replacement for the precision PDF see the Parts Replacement section in the corresponding Precision PDC user manual Table 6 16 Replaceable parts of the precision PDF No Replaceable Part 1 MCB Miniature circuit breaker 2 MDU Monitor display unit 3 SPD Surge protective device 4 Fuse 5 Indicator 6 Power distribution detection module NOTE If you ne...

Страница 259: ...e could be service interruptions during the replacement of the new main way If power disconnection is required seek the customer s permission first 6 3 7 Replacing an rPDU Impact on the System One power input of the equipment cannot work Preparations Tools Phillips screwdriver step ladder Material rPDU of the same model that is available and functional Skill requirement power distribution engineer...

Страница 260: ...ork Preparations Tools Phillips screwdriver step ladder label marker Material smart rPDU of the same specifications Context The smart rPDU is installed near the rear door of the cabinet Procedure Step 1 Open the rear door of the cabinet Step 2 Connect the IT load of the faulty smart rPDU to a normal rPDU Step 3 Turn off the industrial connector for the faulty smart rPDU Ensure that the smart rPDU ...

Страница 261: ...n 3 Outdoor fan 4 Differential pressure switch 5 High pressure switch 6 Compressor 7 Dryer filter 8 Liquid level detector 9 Condensate pump 10 Wet film humidifier 11 Control panel 12 Module 13 Electric heater NOTE If you need to replace any other parts contact Huawei technical support 6 3 10 Replacing a Smart ETH Gateway Prerequisites Tools ESD wrist strap ESD gloves Phillips screwdriver step ladd...

Страница 262: ...acing a Pad Impact on the System The pad cannot be used Preparations Tools ESD wrist strap ESD gloves labels and marker Material pad Procedure Step 1 Install the app on the reserved pad see the commissioning guide and connect the pad to the network over the WiFi hotspot of the data center Step 2 Specify the user name and password for the app on the reserved pad and log in to check that the app wor...

Страница 263: ... Then perform the Synchronize to Device operation Step 5 On the ECC800 Pro WebUI choose Monitoring System ECC800 Controls Delete device with communication failure and click Submit Step 6 Check that the electronic lock functions properly End 6 3 13 Replacing a Camera Prerequisites Recommended tools and materials inner hexagon screwdriver delivered with the product package step ladder 2 m A camera n...

Страница 264: ... In the scenario with an SD card remove the SD card and install it to a new camera Step 3 Remove the screws securing the camera base from the camera mounting plate FusionModule2000 S Smart Modular Data Center User Manual 6 Operation and Maintenance Issue 03 2021 07 15 Copyright Huawei Technologies Co Ltd 255 ...

Страница 265: ...eo images are properly displayed on the video screen of the management system client the new camera works properly End 6 3 14 Replacing an IVS1800 Prerequisites Recommended tool Phillips screwdriver An IVS1800 needs to be replaced A spare IVS1800 of the same model is available and functional Context NOTICE Videos cannot be recorded during the replacement of the IVS1800 DANGER Do not operate with p...

Страница 266: ...tted holes on the mounting ears Use a Phillips screwdriver to tighten the M6 screws on the mounting ears Each mounting ear uses two M6 screws Figure 6 17 Installing a device Step 4 Reconnect the cables to the new IVS1800 Step 5 Turn on the power switch of the IVS1800 Step 6 Commissioning the IVS1800 If the video recording function works properly after commissioning the IVS1800 is functional End 6 ...

Страница 267: ...ite one on top of the hard disk tray raise the hard disk tray by 45 degrees and take out the upper and then lower layers of hard disk tray Figure 6 19 Removing the hard disk tray Step 3 Install a new hard disk 1 Place the hard disk with ports facing upwards and align the screw holes on the hard disk tray with the hard disk and fasten the screws Before the installation ensure that the fastener of t...

Страница 268: ...disk cable ports P0 P3 to hard disks on the lower layer hard disk tray and ports P4 P7 to hard disks on the upper layer Figure 6 22 Connecting data and power cables to hard disks 4 Close the chassis cover and use a PH2 screwdriver to fasten the rear screws Figure 6 23 Closing the chassis cover Step 4 Observe the hard disk indicator to check whether the hard disk works properly End Follow up Proced...

Страница 269: ...n the controller home screen Step 2 Remove the cable terminal from the RS485_IN and RS485_OUT ports on the T H sensor as shown by 1 in the following figure NOTICE After removing cables wrap exposed terminals with insulation tape and do not block cable labels If cable labels are blocked cables may be connected incorrectly later Step 3 Pull out the T H sensor in the direction shown by 2 in the follo...

Страница 270: ...istent with the DIP switch settings of the old T H sensor Step 4 Connect cable terminals to RS485_IN and RS485_OUT ports and install the new T H sensor in the correct position FusionModule2000 S Smart Modular Data Center User Manual 6 Operation and Maintenance Issue 03 2021 07 15 Copyright Huawei Technologies Co Ltd 261 ...

Страница 271: ...n End 6 3 17 Replacing a Temperature Sensor Prerequisites Recommended tools and materials diagonal pliers insulation tape cable tie step ladder 2 m A temperature sensor needs to be replaced Spare temperature sensors of the same model are available and functional Procedure Step 1 Cut the cable ties on the temperature sensor using diagonal pliers and remove the network cable from the temperature sen...

Страница 272: ...ture sensors must not be in touch with metal parts or cabinets Keep the temperature sensors facing the inside of the cabinets to ensure accurate measurement of cabinet interior temperatures End Follow up Procedure Check whether the new temperature sensor works properly If its status is displayed on the WebUI of the ECC800 Pro the new temperature sensor works properly FusionModule2000 S Smart Modul...

Страница 273: ...ble labels If cable labels are blocked cables may be connected incorrectly later Step 3 Remove the faulty T H sensor Step 4 Attach the new T H sensor to an appropriate position on the IT cabinet door frame based on site requirements Step 5 Reinstall the cable removed from the T H sensor NOTE Before removing a T H sensor remember the DIP switch setting on it When you install a new T H sensor you ne...

Страница 274: ...ensor or water detection cable of the same model A water sensor consists of a water detection cable water detector and conversion cable The water detection cable is laid out on the floor connecting to the water detector placed near the collector by the conversion cable Impact on the System Water leakage of the data center cannot be detected Prerequisites Material water sensor Skill requirement har...

Страница 275: ...he water detection cable and conversion cable are interconnected through male and female connectors Step 3 Check whether the new water detector works properly Connect the network cable between the water detector and ECC immerse the water detection cable in water and check whether an alarm is generated If an alarm is generated the replacement is complete Step 4 Wipe dry the water detection cable Th...

Страница 276: ...sition for installing the expansion bolt Step 2 Partially tighten the expansion bolt and vertically insert it into the hole Knock the expansion bolt using a rubber mallet until the expansion sleeve is fully inserted into the hole Step 3 Rotate the expansion bolt clockwise using a wrench until the expansion sleeve fully expands Step 4 Rotate the expansion bolt counterclockwise to remove it together...

Страница 277: ...lt 2 Spring washer 3 Flat washer 4 Expansion sleeve Figure 7 2 Drilling a hole and installing an expansion bolt unit mm End FusionModule2000 S Smart Modular Data Center User Manual 7 Appendix Issue 03 2021 07 15 Copyright Huawei Technologies Co Ltd 268 ...

Страница 278: ...he insulation layer of cable B to expose cable core C 2 Put cable core C through cord end terminal A 3 Crimp the metal part of cord end terminal A using the crimping tool Figure 7 3 Preparing a cord end terminal A Cord end terminal connector B Insulation layer C Copper core wire Preparing RS485 Monitoring Cables Figure 7 4 shows how to prepare an RS485 monitoring cable for the ECC collector Fusion...

Страница 279: ...s 7 3 Preparing Load Cables Context The cables from the power distribution unit to the cabinet rPDU are not prefabricated and need to be prepared onsite Procedure Step 1 Prepare cables 1 Strip a cable NOTE The figure uses the single phase scenario as an example The required stripping length in the three phase scenario is the same as that in the single phase scenario Figure 7 5 Stripping a cable un...

Страница 280: ... Step 2 Install cables at a round connector 1 Remove the rear cover from the round connector 2 Loosen the screw on the cable clip 3 Route the cables through the rear cover 4 Insert cables into the round connector 5 Tighten the screws to secure each cable 6 Reinstall the rear cover 7 Optional Seal the holes where no cables are installed 8 Tighten the screw on the cable clip to the required torque G...

Страница 281: ...3 captive screw 3 8 4 2 Captive screw M2 5 3 M3 6 Guide rail installation Cross recessed pan head thread forming screw M5 GB T 6560 1986 30 Subrack or box type module installation M3 screw assembly mounting ear 6 M4 countersunk screw mounting ear 12 M6 panel screw 20 Grounding M4 14 FusionModule2000 S Smart Modular Data Center User Manual 7 Appendix Issue 03 2021 07 15 Copyright Huawei Technologie...

Страница 282: ...on 130 M10 M10 expansion bolt tension implosion 250 M12 M12 expansion bolt tension implosion 450 DB style connector 2 56 M2 5 2 5 4 40 M3 metal head or plastic head 4 OT terminal for power cables M2 screw assembly 2 5 M3 screw assembly 6 M4 screw assembly 16 M5 screw assembly 40 M6 screw assembly 50 M8 screw assembly 80 M10 screw assembly 150 M12 screw assembly 260 M16 screw assembly 350 Cord end ...

Страница 283: ...ements Passed Failed 5 The paint on the cabinet exterior is intact If paint flakes off repaint that area immediately to avoid corrosion Passed Failed 6 The cabinet doors and locks work properly Passed Failed 7 All labels are correct clear and complete Passed Failed 8 There is no foreign matter such as adhesive tape cable ties paper or packing materials left around the cabinets Passed Failed 9 The ...

Страница 284: ...ction Passed Failed 5 Cables are routed in a way convenient for maintenance and future capacity expansion Passed Failed 6 All labels at the cable ends are clear Passed Failed 7 Excess sections of cable ties are neatly cut Passed Failed 8 There is no unnecessary adhesive tape or cable tie on cables Passed Failed Electric Installation Checklist No Check Item Check Result 1 All ground cables are copp...

Страница 285: ...led 11 DIP switches on devices are correctly set Passed Failed Customer signature Check date 7 6 Acronyms and Abbreviations A AC alternating current ATS automatic transfer switch B BCB battery circuit breaker BIB battery control I O board BIM battery interface module BSPP British Standard Pipe Parallel Thread BSPT British Standard Taper Pipe Thread D DC direct current FusionModule2000 S Smart Modu...

Страница 286: ...it IT internet technology N NTC negative temperature coefficient P PDF power distribution frame PDU power distribution unit PE protective earthing PoE power over Ethernet PP R polypropylene random PVC polyvinyl chloride FusionModule2000 S Smart Modular Data Center User Manual 7 Appendix Issue 03 2021 07 15 Copyright Huawei Technologies Co Ltd 277 ...

Страница 287: ... SIM subscriber identity module U UPS uninterruptible power system W WiFi wireless fidelity FusionModule2000 S Smart Modular Data Center User Manual 7 Appendix Issue 03 2021 07 15 Copyright Huawei Technologies Co Ltd 278 ...

Отзывы: