


Removal and Replacement Procedures
•
Do not replace multiple degraded drives at the same time, since the fault tolerance can be
compromised. When a drive is replaced, the controller uses data from the other drives in
the array to reconstruct data on the replacement drive. If more than one drive is removed,
a complete data set is not available to reconstruct data on the replacement drive or drives,
and permanent data loss can occur.
CAUTION:
Do not turn off any external unit when the server containing the Smart Array
Controller is powered up. Also, do not power up the server before powering up the drive
enclosure. If these ordering rules are not followed, the Smart Array Controller may mark
the drives in this enclosure as “failed,” resulting in permanent data loss.
To remove a hard drive:
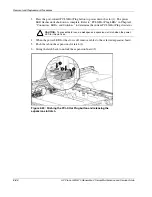
1. Open the front bezel door (tower model only). Refer to “Removing the Front Bezel Door
(Tower Model Only)” in this chapter.
CAUTION:
Remove or replace a hard drive only when the drive failure LED is amber.
Data loss can occur if a drive is removed when the drive online LED is green. Refer to
“Hot-Plug Drive LEDs” in Chapter 4 for more information.
CAUTION:
Remove or replace only one hard drive at a time. The controller relies on
other drives to reconstruct data on the replaced drive. Drive reconstruction is active when
the drive online LED is flashing green.
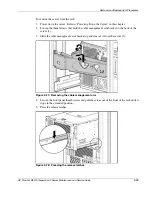
2. Push the sliding release button (1).
3. Swing out the ejector lever (2).
4. Pull the drive out from the drive cage (3).
CAUTION:
Always populate drive bays with either a hard drive or blank. Proper airflow
can only be maintained when the bays are populated. Unpopulated drive bays can lead to
improper cooling and thermal damage.
Figure 2-21: Removing a hard drive
HP ProLiant ML570 Generation 2 Server Maintenance and Service Guide
2-31
Содержание ProLiant ML570 Generation 2
Страница 6: ......