Cropping an Item
Crop an item to display only a portion of it. The portion inside the crop
marks remains, and the portion outside the crop marks is deleted.
To crop an item
1
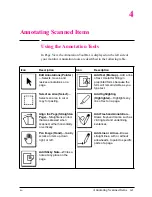
In Page View on the Annotation Tool Bar, click Select an Area. The
cursor changes to a cross hair.
2
Drag the cross hair to enclose the area you want to crop. A dashed box
appears around the area as you select it. If you need to increase or
decrease the size of the area that you selected, drag one of the handles
on the dashed selection box.
3
From the Edit menu, choose Crop. The portion of the item outside of
the selection box is removed from the page. The thumbnail in Desktop
View indicates that an area has been cropped from the page.
Working with Sticky Notes
Sticky Notes can contain several lines of text and can be placed
anywhere on an item. When you place a Sticky Note on a page, the note
covers the information beneath it. However, you can make Sticky Notes
as large or small as you like or collapse them to minimize the amount of
information that is hidden. You can change the color of the text or its
background, as described in the “Fine-Tuning Annotations” section later
in this chapter.
N o t e
Use Find Annotation to search for text on both Sticky Notes and on
Markup text.
To add a Sticky Note
1
In Page View on the Annotation Tool Bar, click Add Sticky Note. The
cursor changes to a small sticky-note symbol with cross hairs.
2
Click anywhere on the item, and the default note size appears. The
insertion point is ready for you to begin typing.
3
Type the note text. The note box expands to accommodate the amount of
text you type.
4
Click Edit Annotations, then select the note. Drag the handles on the
note box to resize it.
4
An
not
at
ing
Ite
m
s
EN
Annotating Scanned Items
4-3
Содержание C3989A
Страница 1: ...HP LaserJet PrinterAccessory User sManual Q u i c kstart 6 See back steps steps ...
Страница 4: ...HP LaserJet Companion Printer Accessory User s Manual ...
Страница 9: ...Contents 4 EN ...
Страница 107: ...Index Index 10 EN ...

